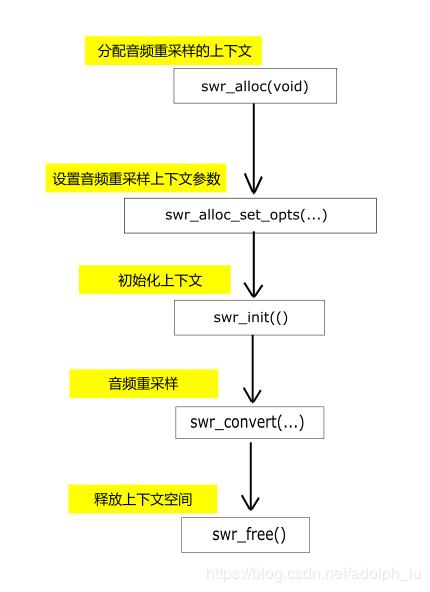
音频重采样流程图
函数介绍
swr_alloc()
分配音频重采样的上下文
swr_alloc_set_opts(...)
设置音频重采样参数,可以通过音频的样本率来改变播放速度,但声音一般会失真
-
struct SwrContext *swr_alloc_set_opts(struct SwrContext *s, -
int64_t out_ch_layout, -
enum AVSampleFormat out_sample_fmt, -
int out_sample_rate, -
int64_t in_ch_layout, -
enum AVSampleFormat in_sample_fmt, -
int in_sample_rate, -
int log_offset, void *log_ctx);
参数说明:
- 参数1:音频重采样上下文
- 参数2:输出的layout, 如:5.1声道…
- 参数3:输出的样本格式。Float, S16, S24,一般选用是s16 绝大部分声卡支持
- 参数4:输出的样本率。可以不变。
- 参数5:输入的layout。
- 参数6:输入的样本格式。
- 参数7:输入的样本率。
- 参数8,参数9,日志,不用管,可直接传0
swr_init(struct SwrContext *s)
初始化音频重采样上下文
swr_convert(...)
对音频帧进行重采样
-
int swr_convert(struct SwrContext *s, uint8_t **out, int out_count, -
const uint8_t **in , int in_count);
参数说明:
- 参数1:音频重采样的上下文
- 参数2:输出的指针。传递的输出的数组
- 参数3:输出的样本数量,不是字节数。单通道的样本数量。
- 参数4:输入的数组,AVFrame解码出来的DATA
- 参数5:输入的单通道的样本数量。
swr_free(struct SwrContext **s)
释放音频重采样上下文空间
关键代码参考
-
//音频重采样上下文初始化 -
SwrContext *swrContext = swr_alloc(); -
char *pcm = new char[480000*4*2]; -
swrContext = swr_alloc_set_opts(swrContext, -
av_get_default_channel_layout(2), -
AV_SAMPLE_FMT_S16, -
ac->sample_rate, -
av_get_default_channel_layout(ac->channels), -
ac->sample_fmt, -
ac->sample_rate, -
0, 0); -
re = swr_init(swrContext); -
if (re != 0) -
{ -
LOGI("swr_init failed"); -
} else -
{ -
LOGI("swr_init success"); -
}
-
uint8_t *out[2] = {0}; -
out[0] = (uint8_t *)pcm; -
//转换音频帧 -
int len = swr_convert(swrContext, out, frame->nb_samples, -
(const uint8_t **)frame->data, frame->nb_samples);
注意:
音频重采样的相关函数包含在 libswresample.so 库中
同时在代码中包含头文件 #include <libswresample/swresample.h>
版权声明:本文为adolph_lu原创文章,遵循 CC 4.0 BY-SA 版权协议,转载请附上原文出处链接和本声明。
本文链接:https://blog.csdn.net/adolph_lu/article/details/92795081
最后
以上就是土豪万宝路最近收集整理的关于音频重采样的全部内容,更多相关音频重采样内容请搜索靠谱客的其他文章。


发表评论 取消回复