本节代码NumReco.py 利用minist_trian中训练好的模型识别本地图片
首先是图像预处理操作,对输入的图片进行灰度化,并处理得到二值化图片矩阵,即构成后来神经网络的输入向量。
def imageprepare(file_name):

    im = cv2.imread(file_name,0)
    print(file_name)
    pixels = []
    h, w = im.shape
    #normalize pixels to 0 and 1. 0 is pure white, 1 is pure black.
    for i in range(h):
        for j in range(w):
            pixels.append((255-im[i, j])*1.0/255.0)
    print(pixels)
    return pixels
定义识别函数。在函数中调用训练好的模型并输出识别结果。因为重新构造模型,所以需要重新调用部分变量的定义方法,与minist_rain中的train函数中类似。
def recognize(file_name):
    with tf.Graph().as_default() as g:
        x = tf.placeholder(tf.float32,[None,mnist_inference.INPUT_NODE],name="x-input")
        y_ = tf.placeholder(tf.float32,[None,mnist_inference.OUTPUT_NODE],name="y-output")

        y = mnist_inference.inference(x,None)

        #将预测值与正确值相比较得到Bool型 然后将Bool型转为实数型并求平均值得准确度
        #correct_prediction = tf.equal(tf.argmax(y,1),tf.argmax(y_,1))
        #accuracy = tf.reduce_mean(tf.cast(correct_prediction, tf.float32))

        # 初始化滑动平均类
        mavg = tf.train.ExponentialMovingAverage(mnist_train.Moving_Average_Decay)

        variable_to_restore = mavg.variables_to_restore()
        saver = tf.train.Saver(variable_to_restore)

        # validate_feed = {x: mnist.validation.images,
        #                  y_: mnist.validation.labels}
        with tf.Session() as sess:
            result = imageprepare(file_name)
            #checkpoint函数会自动找到最新模型的文件名
            ckpt = tf.train.get_checkpoint_state("model/")
            if ckpt and ckpt.model_checkpoint_path:
                saver.restore(sess, ckpt.model_checkpoint_path)
                prediction = tf.argmax(y, 1)
                predint = prediction.eval(feed_dict={x: [result]}, session=sess)
                print("result :",predint[0])
                return (predint[0])
            else:
                print("no model found")
                return
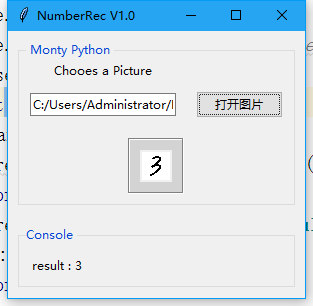
通过该代码可以实现识别本地图片(图片大小必须为28*28),然后出去可视化的想法,自己用tkinter写了一个简单的界面,运行效果如下:

项目代码地址:https://github.com/Zhu-haow/NumberDec_Mnist.git
最后
以上就是调皮手套最近收集整理的关于tensorflow入门:利用全连接神经网络实现手写数字识别(四)的全部内容,更多相关tensorflow入门内容请搜索靠谱客的其他文章。
本图文内容来源于网友提供,作为学习参考使用,或来自网络收集整理,版权属于原作者所有。


发表评论 取消回复