目录
- 前言
- 一般开发步骤
- 相关API介绍
- 一、通用API
- 1.BluetoothAdapter
- 2.BluetoothDevice
- 二、经典蓝牙(BT)API
- 1.BluetoothSocket
- 2.BluetoothServerSocket
- 3.BluetoothClass
- 4.BluetoothProfile
- 三、低功耗蓝牙(BLE)API
- 1.BluetoothGatt
- 2.BluetoothGattCallback
- 3.BluetoothGattService
- 4.BluetoothGattCharacteristic
- 5.BluetoothGattDescriptor
- 1.加入蓝牙权限
- (1)android.permission.BLUETOOTH
- (2)android.permission.BLUETOOTH_ADMIN
- 2.是否支持蓝牙
- 3.是否打开蓝牙
- (1)判断蓝牙是否打开
- (2)友好提示用户打开蓝牙
- (3)监听用户是否打开蓝牙的操作回调
- 4.扫描蓝牙
- (1)经典蓝牙搜索
- ① 新建蓝牙广播接收器
- ② 动态注册蓝牙广播接收器
- ② 开启扫描蓝牙
- (2)低功耗蓝牙搜索
- 5.蓝牙连接与断开
- (1)经典蓝牙(BT)
- ① createRfcommSocketToServiceRecord获取BluetoothSocket
- ② 反射获取BluetoothSocket
- ③ 连接蓝牙
- ④ 静默设置配对码
- ⑤ 断开连接
- (2)低功耗蓝牙(BLE)
- 连接之前
- GATT层次结构
- 各成员作用
- ① 设置自定义回调
- ② 启动蓝牙连接
- ③ 发现GATT服务
- ④ 配置通信
- ⑤ 断开连接
- 6.通信
- (1)经典蓝牙通信
- ① 获取输入输出流
- ② 发送数据
- ③ 读取数据
- (2)低功耗蓝牙通信
- ① 发送数据
- ② 读取数据
- 7.补充
- 参考
前言
在做蓝牙技术开发前,首先可以了解一下蓝牙模块分类:
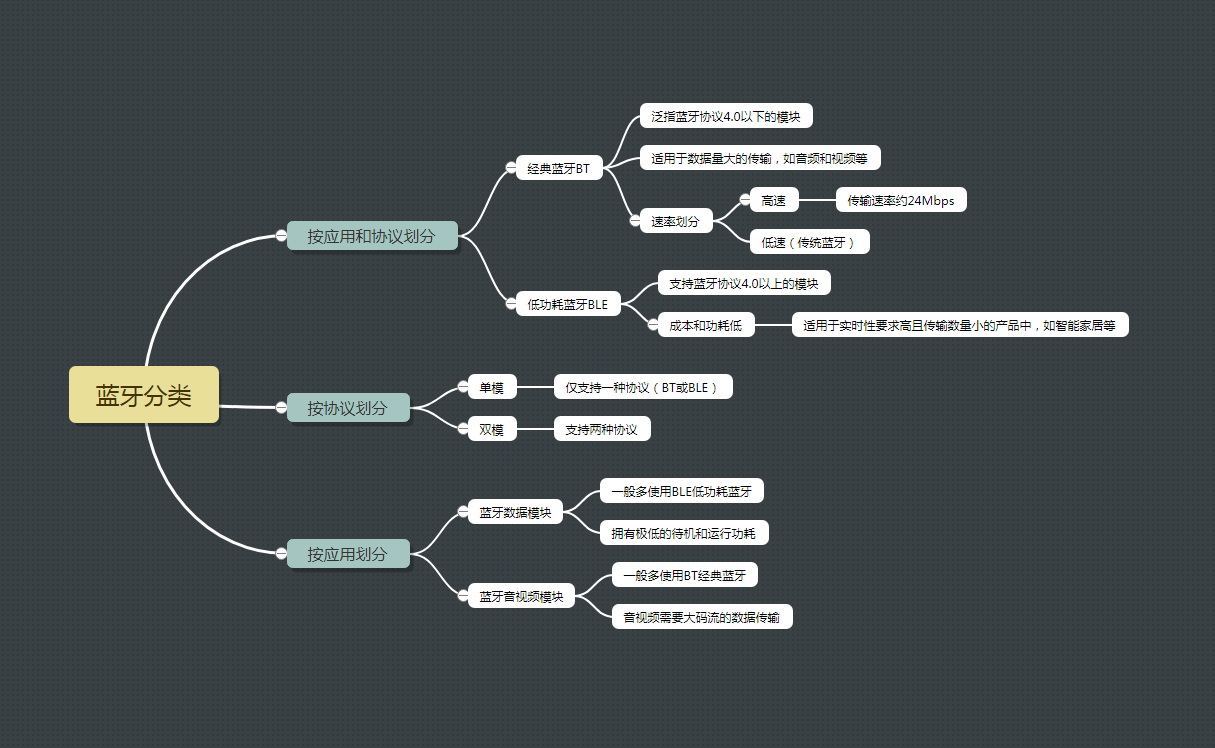
现今蓝牙模块开发分为经典蓝牙和低功耗蓝牙开发,目前市面上最火的物联网技术大多选择低功耗蓝牙模块,效率高且功耗低,缺点是只支持小数据量的数据传输,在Android 4.3 (API 18)后开始引入;而对于数据量较大的传输,如音视频等开发,则需要使用经典蓝牙模块。在开发前一定要先区分蓝牙模块类型,因为两种蓝牙模块的开发是不同的,在本篇文章两种蓝牙模块的开发步骤都会介绍到。
一般开发步骤
蓝牙模块开发步骤如下:
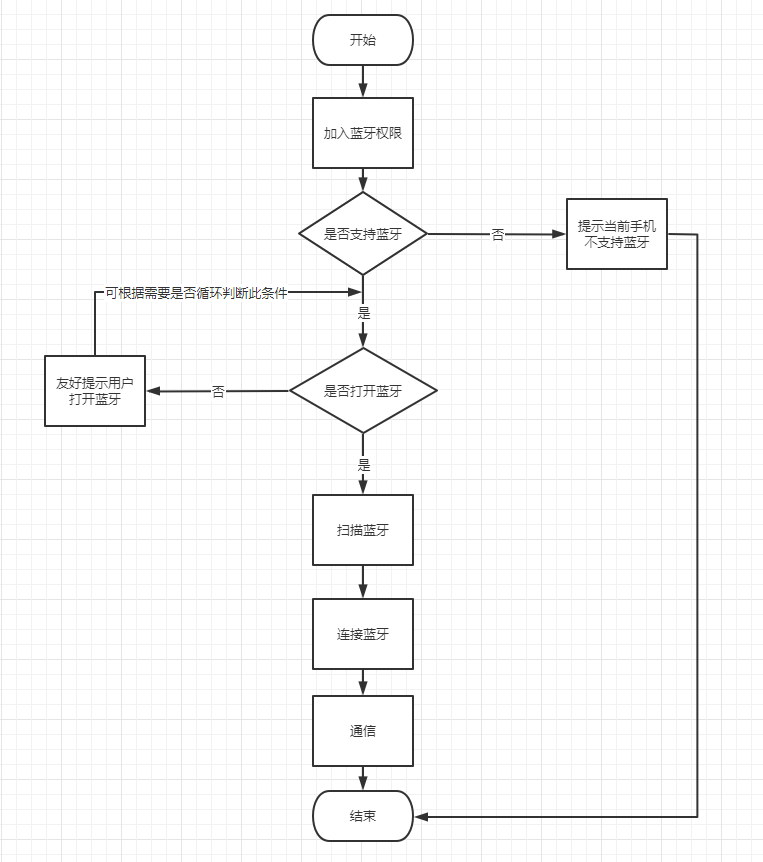
两种蓝牙模块的开发步骤大致一样,仅蓝牙连接和蓝牙通信时有所区分。
相关API介绍
一、通用API
1.BluetoothAdapter
本地蓝牙适配器,用于一些蓝牙的基本操作,比如判断蓝牙是否开启、搜索蓝牙设备等。
2.BluetoothDevice
蓝牙设备对象,包含一些蓝牙设备的属性,比如设备名称、mac地址等。
二、经典蓝牙(BT)API
1.BluetoothSocket
表示蓝牙socket的接口(与TCP Socket类似, 关于socket的概念请自行查阅计算机网络的相关内容)。该类的对象作为应用中数据传输的连接点。
2.BluetoothServerSocket
表示服务器socket,用来监听未来的请求(和TCP ServerSocket类似)。为了能使两个蓝牙设备进行连接,一个设备必须使用该类开启服务器socket,当远程的蓝牙设备请求该服务端设备时,如果连接被接受,BluetoothServerSocket将会返回一个已连接的BluetoothSocket类对象。
3.BluetoothClass
描述蓝牙设备的主要特征。BluetoothClass的类对象是一个只读的蓝牙设备的属性集。尽管该类对象并不能可靠地描述BluetoothProfile的所有内容以及该设备支持的所有服务信息,但是该类对象仍然有助于对该设备的类型进行提示。
4.BluetoothProfile
表示蓝牙规范,蓝牙规范是两个基于蓝牙设备通信的标准。
三、低功耗蓝牙(BLE)API
1.BluetoothGatt
蓝牙通用属性协议,定义了BLE通讯的基本规则,是BluetoothProfile的实现类,Gatt是Generic Attribute Profile的缩写,用于连接设备、搜索服务等操作。
2.BluetoothGattCallback
蓝牙设备连接成功后,用于回调一些操作的结果,必须连接成功后才会回调。
3.BluetoothGattService
蓝牙设备提供的服务,是蓝牙设备特征的集合。
4.BluetoothGattCharacteristic
蓝牙设备特征,是构建GATT服务的基本数据单元。
5.BluetoothGattDescriptor
蓝牙设备特征描述符,是对特征的额外描述。
1.加入蓝牙权限
(1)android.permission.BLUETOOTH
为了能够在你开发的应用设备中使用蓝牙功能,必须声明蓝牙的权限"BLUETOOTH"。在进行蓝牙的通信,例如请求连接,接受连接以及交换数据中,需要用到该权限
(2)android.permission.BLUETOOTH_ADMIN
如果你的应用程序需要实例化蓝牙设备的搜索或者对蓝牙的设置进行操作,那么必须声明BLUETOOTH_ADMIN权限。大多数应用需要该权限对本地的蓝牙设备进行搜索。该权限的其他能力并不应当被使用,除非你的应用是一个电源管理的应用,需要对蓝牙的设置进行修改
    <uses-permission android:name="android.permission.BLUETOOTH" />
    <uses-permission android:name="android.permission.BLUETOOTH_ADMIN" />
这里需要注意的是,Google在Android 6.0之后,为了更好的保护用户的数据安全,所有需要访问硬件唯一标识符的地方都需要申请位置权限,而且搜索周围的蓝牙设备,需要手机提供位置服务,否则调用蓝牙扫描将搜索不到任何结果。
    <uses-permission android:name="android.permission.ACCESS_COARSE_LOCATION" />
    <uses-permission android:name="android.permission.ACCESS_FINE_LOCATION" />
在AndroidManifest.xml中加入位置权限,位置权限属于Dangerous级别的权限,别忘了在代码里边还需要动态申请。
2.是否支持蓝牙
		//获取蓝牙适配器 若适配器为空则当前手机不支持蓝牙
		bluetoothAdapter = BluetoothAdapter.getDefaultAdapter()
        if (bluetoothAdapter == null) {
            Toast.makeText(this, "当前手机设备不支持蓝牙", Toast.LENGTH_SHORT).show()
        }
3.是否打开蓝牙
(1)判断蓝牙是否打开
			//手机设备支持蓝牙,判断蓝牙是否已开启
            if (bluetoothAdapter!!.isEnabled) {
                Toast.makeText(this, "手机蓝牙已开启", Toast.LENGTH_SHORT).show()
                //可以进行搜索蓝牙的操作
                searchBtDevice()
            } else {
                //蓝牙没有打开,去打开蓝牙。推荐使用第二种打开蓝牙方式
                //第一种方式:直接打开手机蓝牙,没有任何提示,一般不采用这种方法
                //                bluetoothAdapter.enable();  //BLUETOOTH_ADMIN权限
                //第二种方式:友好提示用户打开蓝牙
                val enableBtIntent = Intent(ACTION_REQUEST_ENABLE)
                startActivityForResult(enableBtIntent, REQUEST_ENABLE_BT)
            }
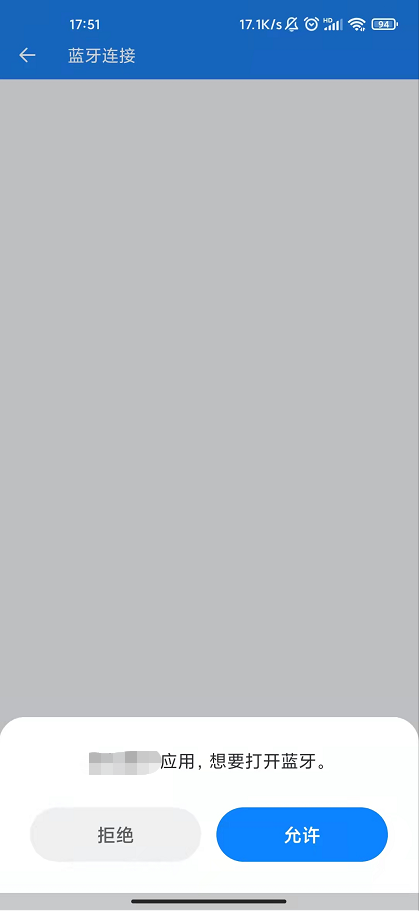
(2)友好提示用户打开蓝牙
                //友好提示用户打开蓝牙
                val enableBtIntent = Intent(ACTION_REQUEST_ENABLE)
                startActivityForResult(enableBtIntent, REQUEST_ENABLE_BT)
(3)监听用户是否打开蓝牙的操作回调
    override fun onActivityResult(requestCode: Int, resultCode: Int, data: Intent?) {
        super.onActivityResult(requestCode, resultCode, data)
        if (requestCode == REQUEST_ENABLE_BT) {
            if (resultCode == Activity.RESULT_OK) {
                // 蓝牙已打开
                //可以开始搜索蓝牙 获取蓝牙列表
                searchBtDevice()
            } else {
                // 蓝牙未打开 一般操作是弹出确认弹框提示用户继续打开蓝牙
                DialogUtil.getInstance().showConfirmDialog(this, "提示", "蓝牙没有开启,是否打开蓝牙?", "打开",
                    "取消", object : DialogUtil.DialogConfirmListener<Any> {
                        override fun cancel() {
                        	//如果用户选择取消的话  可以关闭当前页面或者提示蓝牙未打开
                            finish()
                        }

                        override fun confirm(data: Any?) {
                            //继续友好提示用户打开蓝牙
                            val enableBtIntent = Intent(ACTION_REQUEST_ENABLE)
                            startActivityForResult(enableBtIntent, REQUEST_ENABLE_BT)
                        }
                    })
            }
        }
    }
4.扫描蓝牙
蓝牙扫描共有两种方式,一种是适于经典蓝牙开发模式的调用蓝牙适配器 bluetoothAdapter.startDiscovery()搜索蓝牙,通过注册蓝牙广播接收器获取扫描到的蓝牙信息,这种搜索方法不管是经典蓝牙还是低功耗蓝牙都能全部扫描出来;另一种方法则是针对低功耗蓝牙进行搜索扫描,只有低功耗蓝牙模式的蓝牙信息才会被扫描出来。
(1)经典蓝牙搜索
① 新建蓝牙广播接收器
public class BroadcastReceiver extends BroadcastReceiver {
    private static final String TAG = "BluetoothReceiver";

    @Override
    public void onReceive(Context context, Intent intent) {
        String action = intent.getAction();
        LogUtil.logNormalMsg("----蓝牙广播接收器----------action----------" + action);
        //开启搜索
        if (TextUtils.equals(action, BluetoothAdapter.ACTION_DISCOVERY_STARTED)) {
            if (onDeviceSearchListener != null) {
                onDeviceSearchListener.onDiscoveryStart();  //开启搜索回调
            }
            findConnectedBluetooth();
        } else if (TextUtils.equals(action, BluetoothAdapter.ACTION_DISCOVERY_FINISHED)) {
            //完成搜素
            if (onDeviceSearchListener != null) {
                //完成搜素回调
                onDeviceSearchListener.onDiscoveryStop();
            }

        } else if (TextUtils.equals(action, BluetoothDevice.ACTION_FOUND)) {
            //3.0搜索到设备
            //蓝牙设备
            BluetoothDevice bluetoothDevice = intent.getParcelableExtra(BluetoothDevice.EXTRA_DEVICE);
            //信号强度
            int rssi = intent.getShortExtra(BluetoothDevice.EXTRA_RSSI, Short.MIN_VALUE);

            LogUtil.logNormalMsg("TAG", "扫描到设备:" + bluetoothDevice.getName() + "-->" + bluetoothDevice.getAddress());
            if (onDeviceSearchListener != null) {
                //3.0搜素到设备回调
                onDeviceSearchListener.onDeviceFound(bluetoothDevice, rssi);
            }
        } else if (TextUtils.equals(action, BluetoothDevice.ACTION_ACL_DISCONNECTED)) {
            //蓝牙已断开
            //蓝牙设备
            BluetoothDevice bluetoothDevice = intent.getParcelableExtra(BluetoothDevice.EXTRA_DEVICE);
            LogUtil.logNormalMsg("--------------蓝牙已断开---------------");
            if (onDeviceSearchListener != null) {
                //判断是否是当前蓝牙连接断开了
                if (bluetoothDevice.getAddress().equals(Content.bluetoothMac)){
                    onDeviceSearchListener.onDeviceDisconnect();
                }
            }
        } else if (TextUtils.equals(action, BluetoothDevice.ACTION_ACL_CONNECTED)) {
            //蓝牙已连接
            LogUtil.logNormalMsg("--------------蓝牙已连接---------------");
            if (onDeviceSearchListener != null) {
                onDeviceSearchListener.onDeviceConnect();
            }
        } else if (TextUtils.equals(action, BluetoothDevice.ACTION_PAIRING_REQUEST)) {
            //经典蓝牙的配对请求 可以用于拦截配对框,在代码里设置配对码
        }
    }
    /**
     * 蓝牙设备搜索监听者
     * 1、开启搜索
     * 2、完成搜索
     * 3、搜索到设备
     */
    public interface OnDeviceSearchListener {
        void onDiscoveryStart();   //开启搜索

        void onDiscoveryStop();    //完成搜索

        void onDeviceFound(BluetoothDevice bluetoothDevice, int rssi);  //搜索到设备

        //设备断开连接
        void onDeviceDisconnect();

        //设备连接成功
        void onDeviceConnect();
    }

    private OnDeviceSearchListener onDeviceSearchListener;

    public void setOnDeviceSearchListener(OnDeviceSearchListener onDeviceSearchListener) {
        this.onDeviceSearchListener = onDeviceSearchListener;
    }
}
② 动态注册蓝牙广播接收器
    /**
     * 注册蓝牙广播接收
     */
    private fun initBtBroadcast() {
        //注册广播接收
        btBroadcastReceiver = BtBroadcastReceiver()
        //这里需要当前的Activity实现(implements)一下蓝牙设备搜索监听者OnDeviceSearchListener
        btBroadcastReceiver!!.setOnDeviceSearchListener(this)
        val intentFilter = IntentFilter()
        //将优先级调高
        intentFilter.priority = 1001
        //添加Action
        intentFilter.addAction(BluetoothAdapter.ACTION_DISCOVERY_STARTED) //开始扫描
        intentFilter.addAction(BluetoothAdapter.ACTION_DISCOVERY_FINISHED)//扫描结束
        intentFilter.addAction(BluetoothDevice.ACTION_FOUND)//搜索到设备
        intentFilter.addAction(BluetoothDevice.ACTION_ACL_DISCONNECTED)//断开连接
        intentFilter.addAction(BluetoothDevice.ACTION_ACL_CONNECTED)//连接
        intentFilter.addAction(BluetoothDevice.ACTION_PAIRING_REQUEST)//蓝牙配对请求
        registerReceiver(btBroadcastReceiver, intentFilter)

    }
② 开启扫描蓝牙
 /**
     * 开始搜索蓝牙
     */
    private fun searchBtDevice() {
        if (bluetoothAdapter!!.isDiscovering) {
            //当前正在搜索设备...停止当前搜索
            bluetoothAdapter!!.cancelDiscovery()
        }
        //开始搜索
        bluetoothAdapter!!.startDiscovery()
    }
开启扫描后在蓝牙广播接收器中可以监听到手机扫描到的蓝牙,然后通过蓝牙设备搜索监听者OnDeviceSearchListener方法回调中拿到蓝牙设备信息。
    override fun onDeviceFound(device: BluetoothDevice?, rssi: Int) {
        //每扫描到蓝牙信息都会回调该方法 这里可以拿到蓝牙设备信息和信号强度
    }
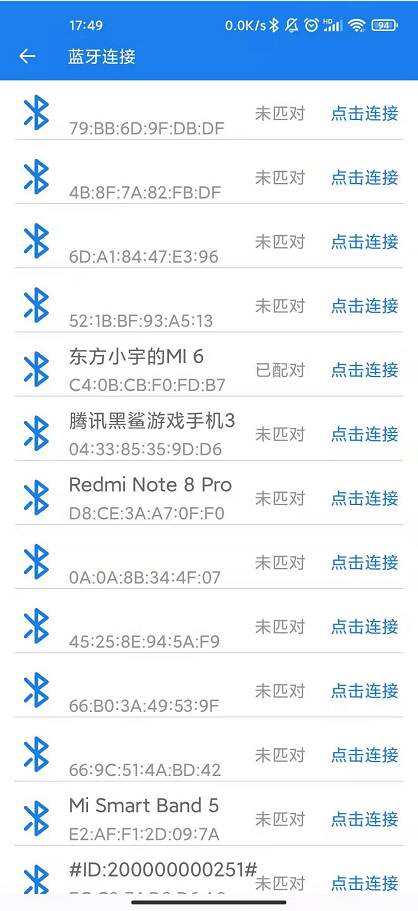
到这一步的话,开发者可以将扫描到的蓝牙设备信息列表展示,点击列表即可做蓝牙连接的操作。
(2)低功耗蓝牙搜索
通过startLeScan()方法开启扫描,扫描结果直接在BluetoothAdapter.LeScanCallback或者ScanCallback 中回调处理,不用经典蓝牙模式需要注册广播才能获取扫描到的蓝牙信息,这里注意不同版本调用startScan方法的逻辑不一样,目前大多数android版本都在5.0以上,基本上选用后者的扫描方法即可
//1. Android 4.3以上,Android 5.0以下
mBluetoothAdapter.startLeScan(BluetoothAdapter.LeScanCallback LeScanCallback);
//2. Android 5.0以上,扫描的结果在mScanCallback中进行处理
mBluetoothLeScanner = mBluetoothAdapter.getBluetoothLeScanner();
mBluetoothLeScanner.startScan(ScanCallback mScanCallback);
回调处理:
public abstract class ScanCallback {
    /**
     * Callback when a BLE advertisement has been found.
     *
     * @param callbackType Determines how this callback was triggered. Could be one of {@link
     * ScanSettings#CALLBACK_TYPE_ALL_MATCHES}, {@link ScanSettings#CALLBACK_TYPE_FIRST_MATCH} or
     * {@link ScanSettings#CALLBACK_TYPE_MATCH_LOST}
     * @param result A Bluetooth LE scan result.
     */
    public void onScanResult(int callbackType, ScanResult result) {
    	//这里可以处理蓝牙扫描结果
    	BluetoothDevice bluetoothDevice =  result.getDevice();
    }

    /**
     * Callback when batch results are delivered.
     *
     * @param results List of scan results that are previously scanned.
     */
    public void onBatchScanResults(List<ScanResult> results) {
    }

    /**
     * Callback when scan could not be started.
     *
     * @param errorCode Error code (one of SCAN_FAILED_*) for scan failure.
     */
    public void onScanFailed(int errorCode) {
    }
}
如果只是涉及到低功耗蓝牙的技术开发,选择第二种方法扫描蓝牙就可以了,比较简便,反之选择第一种方法。
5.蓝牙连接与断开
(1)经典蓝牙(BT)
APP与经典蓝牙设备连接一般通过BluetoothDevice对象的createRfcommSocketToServiceRecord方法获取BluetoothSocket,类似Socket编程,调用connect()方法开始连接,连接成功以后通过BluetoothSocket的getInputStream()和getOutputStream()方法获取输入流和输出流,进而与蓝牙进行通信。createRfcommSocketToServiceRecord方法需要传入UUID参数,一般通过需要连接的蓝牙设备参数得知,没法获取UUID也没关系,可以通过反射机制得到BluetoothSocket对象,再进行连接,这里需要注意蓝牙连接是一个耗时的过程,不能在主线程中执行。
① createRfcommSocketToServiceRecord获取BluetoothSocket
		//1、获取BluetoothSocket
        try {
            //建立安全的蓝牙连接,会弹出配对框
            mSocket = mDevice.createRfcommSocketToServiceRecord(UUID.fromString(uuid));
        } catch (IOException e) {
            e.printStackTrace();
            LogUtil.logNormalMsg(TAG, "获取BluetoothSocket异常!" + e.getMessage());
        }
② 反射获取BluetoothSocket
		//1、获取BluetoothSocket
        try {
            //通过反射获取Socket
            mSocket = (BluetoothSocket) mDevice.getClass().
                     getMethod("createRfcommSocket", new Class[]{int.class})
                     .invoke(mDevice, 1);
        } catch (IOException e) {
            e.printStackTrace();
            LogUtil.logNormalMsg(TAG, "获取BluetoothSocket异常!" + e.getMessage());
        }
③ 连接蓝牙
获取BluetoothSocket后就可以与蓝牙设备连接了,调用connect()连接方法后一般手机就会弹出蓝牙配对框,有一些蓝牙设备不会出现弹框因为蓝牙模块没有设置配对码,这里只针对有配对码的蓝牙模块,手动输入配对码后就成功连接了,一般蓝牙开发设备的配对码是0000或者1234,在考虑用户体验的时候,一般不让用户自己输入配对码,这一步操作显得繁琐多余,APP开发时一般都考虑在连接时静默设置蓝牙的配对码,在用户无感知的情况下进行连接和配对操作。做这一步操作就需要开发者拦截蓝牙配对的Action (BluetoothDevice.ACTION_PAIRING_REQUEST),在代码中进行配对处理。在BroadcastReceiver 蓝牙广播接收器中增加对蓝牙配对请求的拦截处理。
mSocket.connect();
④ 静默设置配对码
		if (TextUtils.equals(action, BluetoothDevice.ACTION_PAIRING_REQUEST)) {
            BluetoothDevice btDevice = intent.getParcelableExtra(BluetoothDevice.EXTRA_DEVICE);
            //蓝牙配对
            Log.i(TAG, "##### 是配对请求的请求 ######");
            Bundle extras = intent.getExtras();
            Log.i(TAG, "-->" + extras.toString());
            Object device = extras.get("android.bluetooth.device.extra.DEVICE");
            Object pairKey = BaseData.bluetoothPassword;
            Log.i(TAG, "device-->" + String.valueOf(device));
            Log.i(TAG, "pairkey-->" + String.valueOf(pairKey));
            try {
                //中断配对广播传递 如果没有将广播终止,则会出现一个一闪而过的配对框。
                abortBroadcast();
                //调用setPin方法进行配对...
                setPin(btDevice.getClass(), btDevice, String.valueOf(pairKey));
            } catch (Exception e) {
                e.printStackTrace();
            }
        }
记得在动态注册蓝牙广播接收器的时候添加一下蓝牙配对请求的Action
//蓝牙配对请求Action
intentFilter.addAction(BluetoothDevice.ACTION_PAIRING_REQUEST)
设置配对码
	/**
     * 设置蓝牙配对码
     * @param btClass btClass
     * @param btDevice BluetoothDevice
     * @param str str
     * @return boolean
     */
    public boolean setPin(Class btClass, BluetoothDevice btDevice, String str) {
        boolean flag = false;
        try {
            Class[] arrayOfClass = new Class[1];
            arrayOfClass[0] = byte[].class;
            Method removeBondMethod = btClass.getDeclaredMethod("setPin", arrayOfClass);
            Object[] arrayOfObject = new Object[1];
            arrayOfObject[0] = str.getBytes();
            flag = (Boolean) removeBondMethod.invoke(btDevice, arrayOfObject);
            LogUtil.logNormalMsg(TAG, "setPin result: " + flag);
        } catch (Exception e) {
            e.printStackTrace();
        }
        if (flag) {
            LogUtil.logNormalMsg("-------设置蓝牙配对码成功");
        } else {
            LogUtil.logNormalMsg("-------设置蓝牙配对码失败");
        }
        return flag;
    }
这里在贴一下我自己蓝牙连接的代码:
public class ConnectThread {
    private static final String TAG = "ConnectThread";
    private final BluetoothAdapter mBluetoothAdapter;
    private BluetoothSocket mmSocket;
    private final BluetoothDevice mDevice;

    public ConnectThread(BluetoothAdapter bluetoothAdapter, BluetoothDevice bluetoothDevice, String uuid) {
        this.mBluetoothAdapter = bluetoothAdapter;
        this.mDevice = bluetoothDevice;

        //使用一个临时变量,等会赋值给mmSocket
        //因为mmSocket是静态的
        BluetoothSocket tmp = null;

        if (mmSocket != null) {
            LogUtil.logNormalMsg(TAG, "ConnectThread-->mmSocket != null先去释放");
            try {
                mmSocket.close();
            } catch (IOException e) {
                e.printStackTrace();
            }
        }
        LogUtil.logNormalMsg(TAG, "ConnectThread-->mmSocket != null已释放");

        //1、获取BluetoothSocket
        try {
            //建立安全的蓝牙连接,会弹出配对框
            tmp = mDevice.createRfcommSocketToServiceRecord(UUID.fromString(uuid));
        } catch (IOException e) {
            e.printStackTrace();
            LogUtil.logNormalMsg(TAG, "ConnectThread-->获取BluetoothSocket异常!" + e.getMessage());
        }

        mmSocket = tmp;
        if (mmSocket != null) {
            LogUtil.logNormalMsg(TAG, "ConnectThread-->已获取BluetoothSocket");
        }

    }

    public void connectBluetooth() {
        connect();
    }

    private void connect() {
        //连接之前先取消发现设备,否则会大幅降低连接尝试的速度,并增加连接失败的可能性
        if (mBluetoothAdapter == null) {
            LogUtil.logNormalMsg(TAG, "ConnectThread:run-->mBluetoothAdapter == null");
            return;
        }
        //取消发现设备
        if (mBluetoothAdapter.isDiscovering()) {
            mBluetoothAdapter.cancelDiscovery();
        }

        if (mmSocket == null) {
            LogUtil.logNormalMsg(TAG, "ConnectThread:run-->mmSocket == null");
            return;
        }
        boolean firstFlag = false;
        //2、通过socket去连接设备
        try {
            LogUtil.logNormalMsg(TAG, "ConnectThread:run-->去连接...");
            if (onBluetoothConnectListener != null) {
                onBluetoothConnectListener.onStartConn();  //开始去连接回调
            }

            mmSocket.connect();
            firstFlag = true;
        } catch (Exception e) {
            LogUtil.logNormalMsg(TAG, "ConnectThread:run-->第一次连接异常!" + e.getMessage());
            boolean flag = false;
            try {
                LogUtil.logNormalMsg(TAG, "ConnectThread:run-->尝试第二次通过反射获取Socket连接");
                mmSocket = (BluetoothSocket) mDevice.getClass().
                        getMethod("createRfcommSocket", new Class[]{int.class})
                        .invoke(mDevice, 1);
                mmSocket.connect();
                flag = true;
                Log.e(TAG, "mmSocket.isConnected():" + mmSocket.isConnected());

            } catch (Exception e2) {
                LogUtil.logNormalMsg("mmSocket连接失败:" + e.getMessage());
                e2.printStackTrace();
                LogUtil.logNormalMsg(TAG, "ConnectThread:run-->连接异常2!" + e2.getMessage());

                if (onBluetoothConnectListener != null) {
                    onBluetoothConnectListener.onConnFailure("连接异常:" + e.getMessage());
                }
                //释放
                cancel();
            } finally {
                if (flag) {
                    if (onBluetoothConnectListener != null) {
                        //连接成功回调
                        onBluetoothConnectListener.onConnSuccess(mmSocket);
                        LogUtil.logNormalMsg(TAG, "ConnectThread:run-->连接成功");
                    }
                } else {
                    if (onBluetoothConnectListener != null) {
                        //连接失败回调
                        onBluetoothConnectListener.onConnFailure("");
                    }
                }
            }
        } finally {
            if (firstFlag) {
                if (onBluetoothConnectListener != null) {
                    //连接成功回调
                    onBluetoothConnectListener.onConnSuccess(mmSocket);
                    LogUtil.logNormalMsg(TAG, "ConnectThread:run-->连接成功");
                }
            }
        }
    }


    /**
     * 释放
     */
    public void cancel() {
        try {
            if (mmSocket != null && mmSocket.isConnected()) {
                LogUtil.logNormalMsg(TAG, "ConnectThread:cancel-->mmSocket.isConnected() = " + mmSocket.isConnected());
                mmSocket.close();
                mmSocket = null;
                return;
            }
            if (mmSocket != null) {
                mmSocket.close();
                mmSocket = null;
            }
            LogUtil.logNormalMsg(TAG, "ConnectThread:cancel-->关闭已连接的套接字释放资源");
        } catch (IOException e) {
            LogUtil.logNormalMsg(TAG, "ConnectThread:cancel-->关闭已连接的套接字释放资源异常!" + e.getMessage());
        }
    }

    private OnBluetoothConnectListener onBluetoothConnectListener;

    public void setOnBluetoothConnectListener(OnBluetoothConnectListener onBluetoothConnectListener) {
        this.onBluetoothConnectListener = onBluetoothConnectListener;
    }

    //连接状态监听者
    public interface OnBluetoothConnectListener {
        void onStartConn();  //开始连接

        void onConnSuccess(BluetoothSocket bluetoothSocket);  //连接成功

        void onConnFailure(String errorMsg);  //连接失败
    }

}
蓝牙连接成功后,就可通过BluetoothSocket 的输入输出流和蓝牙设备进行通信了。
需要注意的是,静默设置蓝牙配对码一般需要和蓝牙设备厂家协商一个固定的配对码,不然蓝牙配对码一直改变的话会导致APP连接不上蓝牙而且没有任何错误提示。
⑤ 断开连接
断开经典蓝牙连接其实就是关闭BluetoothSocket和输入输出流,这里注意需要先把输入输出流关闭再将BluetoothSocket关闭。
	try {
            if(mInStream != null){
                mInStream.close();  //关闭输入流
            }
            if(mOutStream != null){
                mOutStream.close();  //关闭输出流
            }
            if(mSocket != null){
                mSocket.close();   //关闭socket
            }
            mInStream = null;
            mOutStream = null;
            mmSocket = null;
            LogUtil.logNormalMsg(TAG,"成功断开连接");
        } catch (Exception e) {
            e.printStackTrace();
            // 任何一部分报错,都将强制关闭socket连接
            mInStream = null;
            mOutStream = null;
            mmSocket = null;
            LogUtil.logNormalMsg(TAG, "断开连接异常!" + e.getMessage());
        }
(2)低功耗蓝牙(BLE)
低功耗蓝牙的连接稍微复杂一点:
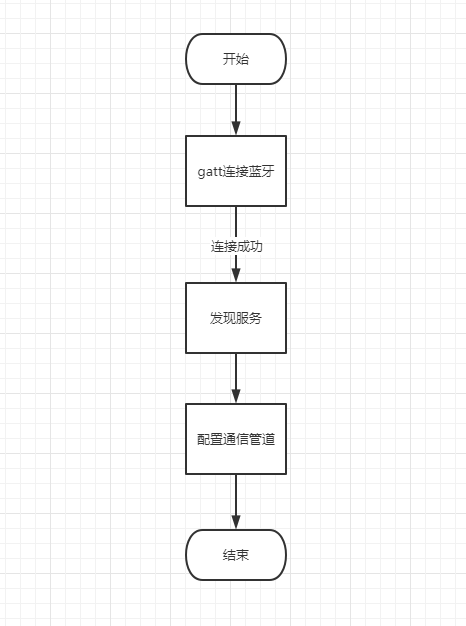
连接之前
在连接蓝牙这之前需要对GATT了解一下,方便加深我们对低功耗蓝牙开发技术的理解。
GATT层次结构
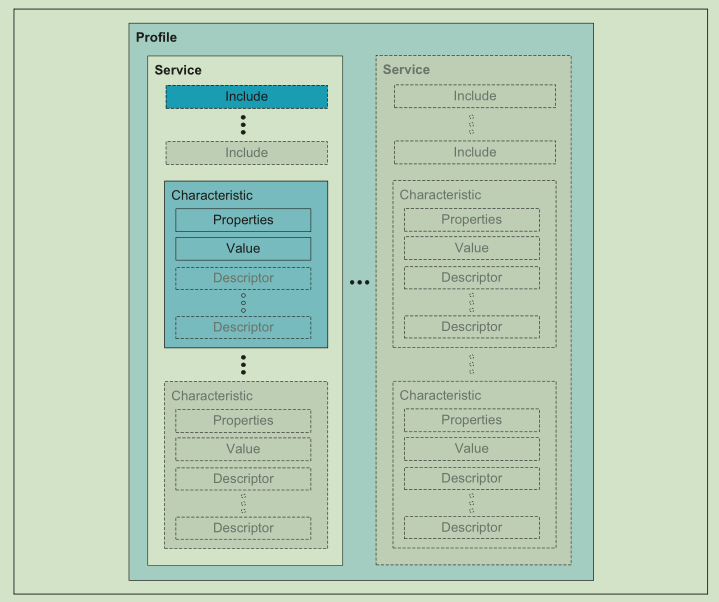
该层次结构的顶层是一个 profile(概要文件)。profile 由满足 use case(用例)所需的一个或多个 services(服务)组成。services(服务)由对其他服务的 characteristics(特征)或 references(引用)组成。每个 characteristics(特征)都包含一个值,并且可以包含关于该值的可选信息。service(服务)和 characteristic(特性)以及 characteristic(特性)的组成部分(即、值和 descriptors(描述符))包含 profile data,并且都存储在 server(服务器)上的 Attributes(属性)中。
各成员作用
1、Profile
Profile规格规定了交换配置文件数据的架构。此架构定义了配置文件所用的基本元素,例如服务和特征。该层级的最高层是配置文件(profile)。配置文件由实现用例所需的一个或多个服务组成。服务由特征或有关其它服务的引用组成。每一个特征包括一个值,还可能包括有关该值的可选信息。服务、特征以及特征的组件(即特征值和特征描述符)构成了配置文件数据,并全部存储在服务器的属性中。没错,上面这是摘抄的,说简单点就是协议规范,各个蓝牙兼容都靠这个规范,使用标准的Profile就不需要过多关注它了。
2、Service
服务分管不同的数据处理,例如有电池电量的,有心率的,它不参与具体的数据交互,承担的是功能分区的职责。每个服务都有一个UUID进行区分。
3、Characteristic
特征是直接参与数据交互的成员之一。特征也有一个UUID进行标识,通过UUID获取到特征,修改特征里面的Value达到通讯目的。这样的通讯模式和观察者模式相似,当Value有改变的时候会通知监听这个特征的观察者,告诉它数据有改变,观察者去获取数据就完成了一次通讯,具体的实现往后详述。
4、Descriptor
对特征值的描述,是用来定义特征值的已定义属性。例如:描述符可以指定可读的描述,特征值的可接受范围或者特征值特定的度量单位。这个东西用的不是很多,假如中心设备收不到数据,那么就看看是不是Descriptor没有设置可通知。
5、Advertising
广播,外围设备让自身可以被发现的手段,只有发出广播了,才能通过Ble扫描到,一旦设备连接上,广播就会停止。
低功耗蓝牙通过BluetoothGatt进行连接和管理,通过BluetoothDevice的connectGatt()方法可以得到BluetoothGatt对象,其中需要传入三个参数context上下文,autoConnect是否自动连接,callback连接回调,关键在于第三个参数BluetoothGattCallback,因为开发者需要在BluetoothGattCallback回调中发现服务和配置通信管道,同时可以在其中监听下位机(蓝牙模块)回复的消息。这里需要注意的是,获取到GATT中的服务Service、特征Characteristic和特征值描述Descriptor都需要指定UUID,这些UUID一般从蓝牙模块厂家获取,获取通过代码方式遍历所有的UUID实验出正确的UUID,后续会讲到。
connectGatt()方法源码:
	/**
     * Connect to GATT Server hosted by this device. Caller acts as GATT client.
     * The callback is used to deliver results to Caller, such as connection status as well
     * as any further GATT client operations.
     * The method returns a BluetoothGatt instance. You can use BluetoothGatt to conduct
     * GATT client operations.
     *
     * @param callback GATT callback handler that will receive asynchronous callbacks.
     * @param autoConnect Whether to directly connect to the remote device (false) or to
     * automatically connect as soon as the remote device becomes available (true).
     * @throws IllegalArgumentException if callback is null
     */
    public BluetoothGatt connectGatt(Context context, boolean autoConnect,
            BluetoothGattCallback callback) {
        return (connectGatt(context, autoConnect, callback, TRANSPORT_AUTO));
    }
① 设置自定义回调
/**
     * 低功耗蓝牙连接回调
     * 接收蓝牙数据
     */
    inner class MyBluetoothGattCallback : BluetoothGattCallback() {
        override fun onConnectionStateChange(
            gatt: BluetoothGatt,
            status: Int,
            newState: Int
        ) {
            super.onConnectionStateChange(gatt, status, newState)
            Content.isConnectBluetoothNow = false
            //连接成功  开始发现服务
            when {
                newState == BluetoothAdapter.STATE_CONNECTED -> {
                	//到这一步 gatt已经连接成功了  可以调用发现gatt的服务
                    mGatt?.discoverServices()
                }
                newState == BluetoothAdapter.STATE_DISCONNECTED -> {
                    //连接断开
                }
                status == 133 -> {
                    //连接失败
                }
            }
        }

        override fun onServicesDiscovered(gatt: BluetoothGatt, status: Int) {
            super.onServicesDiscovered(gatt, status)
            if (status == BluetoothGatt.GATT_SUCCESS) {
                //到这一步 已经发现了gatt的所有服务 可以通过gatt.services获取

				//如果我们知道gatt相关的所有UUID 则可以开始配置通信管道
				//获取写入的特征值
				writeCharact = this.bluetoothGattService?.getCharacteristic(writeUUID)
				//获取通知监听的特征值 相当于读取监听  开启监听后可实时监听下位机消息
				notifyCharact = this.bluetoothGattService?.getCharacteristic(notifyUUID)
				//设置开启监听 实时监听下位机消息
				//1.设置特征值通知
            	mGatt?.setCharacteristicNotification(notifyCharact , true)
            	//2.获取descriptor
            	val descriptor: BluetoothGattDescriptor = notifyCharact ?.getDescriptor(descriptorUUID)!!
            	descriptor.value = BluetoothGattDescriptor.ENABLE_NOTIFICATION_VALUE
            	//3.设置descriptor 这里设置结果会在onDescriptorWrite方法中回调
            	mGatt?.writeDescriptor(descriptor)
            	//至此低功耗蓝牙连接和配置完成
            }
        }

        override fun onCharacteristicRead(
            gatt: BluetoothGatt,
            characteristic: BluetoothGattCharacteristic,
            status: Int
        ) {
            super.onCharacteristicRead(gatt, characteristic, status)
        }

        override fun onCharacteristicWrite(
            gatt: BluetoothGatt,
            characteristic: BluetoothGattCharacteristic,
            status: Int
        ) {
            super.onCharacteristicWrite(gatt, characteristic, status)
            val value = characteristic.value
            val data = Util.bytesToAscii(value)
            //发送数据成功后会回调该方法
            LogUtil.logNormalMsg("onCharacteristicWrite", "发送成功:$data")
        }

        override fun onCharacteristicChanged(
            gatt: BluetoothGatt,
            characteristic: BluetoothGattCharacteristic
        ) {
            super.onCharacteristicChanged(gatt, characteristic)
            // value为设备发送的数据,根据数据协议进行解析
            //接收处理数据
            handBluetoothData(characteristic.value)
        }

        override fun onDescriptorRead(
            gatt: BluetoothGatt,
            descriptor: BluetoothGattDescriptor,
            status: Int
        ) {
            super.onDescriptorRead(gatt, descriptor, status)
        }

        override fun onDescriptorWrite(
            gatt: BluetoothGatt,
            descriptor: BluetoothGattDescriptor,
            status: Int
        ) {
            super.onDescriptorWrite(gatt, descriptor, status)
            if (status == BluetoothGatt.GATT_SUCCESS) {
                LogUtil.logNormalMsg("LockBluetoothService", "设置Descriptor成功,可以发送数据了")
                //一些蓝牙模块需要在连接成功后设置mtu 根据开发需要配置
                mGatt?.requestMtu(103)
            }
        }
    }
② 启动蓝牙连接
启动蓝牙蓝牙连接后,通过connectGatt方法得到BluetoothGatt对象,连接结果可在上一步自定义的BluetoothGattCallback中回调处理。
mGatt = bluetoothDevice1!!.connectGatt(appContext, false, bluetoothGattCallback)
③ 发现GATT服务
这一步操作需在连接成功后执行,发现服务后才可配置蓝牙通信
mGatt?.discoverServices()
④ 配置通信
获取BluetoothGattService服务和用于读写的BluetoothGattCharacteristic特征值,配置蓝牙通信。
				//获取写入的特征值
				writeCharact = this.bluetoothGattService?.getCharacteristic(writeUUID)
				//获取通知监听的特征值 相当于读取监听  开启监听后可实时监听下位机消息
				notifyCharact = this.bluetoothGattService?.getCharacteristic(notifyUUID)
				//设置开启监听 实时监听下位机消息
				//1.设置特征值通知
            	mGatt?.setCharacteristicNotification(notifyCharact , true)
            	//2.获取descriptor
            	val descriptor: BluetoothGattDescriptor = notifyCharact ?.getDescriptor(descriptorUUID)!!
            	descriptor.value = BluetoothGattDescriptor.ENABLE_NOTIFICATION_VALUE
            	//3.设置descriptor 这里设置结果会在onDescriptorWrite方法中回调
            	mGatt?.writeDescriptor(descriptor)
            	//至此低功耗蓝牙连接和配置完成 可以进行通信了
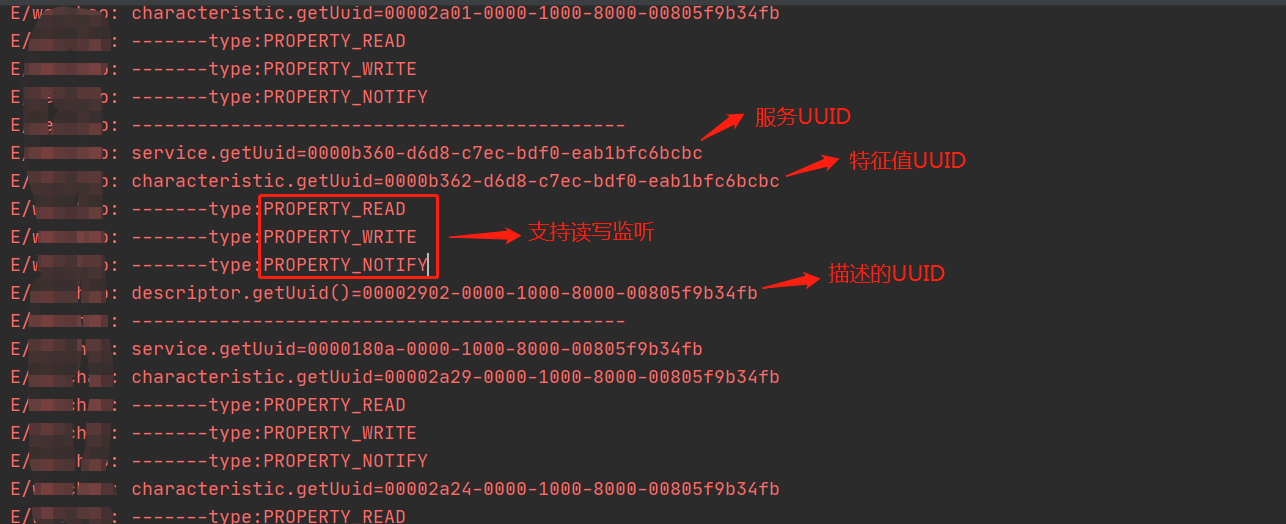
一般蓝牙开发厂商都会告知相关的UUID,如果不知道蓝牙模块的各UUID,可以通过遍历Gatt的所有服务查找,直至找到正确的UUID。
    /**
     * 查找低功耗蓝牙uuid
     */
    private fun findUUID(gatt: BluetoothGatt) {
        LogUtil.logNormalMsg("gatt.getServices().size():" + gatt.services.size)
        if (gatt.services != null && gatt.services.size > 0) {
        	//遍历所有服务
            for (i in gatt.services.indices) {
                val service = gatt.services[i]
                LogUtil.logNormalMsg("---------------------------------------------")
               	//输出当前服务的UUID
                LogUtil.logNormalMsg("service.getUuid=" + service.uuid)
                //判断当前服务是否有特征值
                if (service.characteristics != null && service.characteristics.size > 0) {					//遍历当前所有服务的特征值
                    for (j in service.characteristics.indices) {
                        val characteristic =
                            service.characteristics[j]
                        //输出当前特征值的UUID
                        LogUtil.logNormalMsg("characteristic.getUuid=" + characteristic.uuid)
                        //获取特征值属性
                        val charaProp = characteristic.properties
                        //是否支持读取
                        if (charaProp or BluetoothGattCharacteristic.PROPERTY_READ > 0) {
                            LogUtil.logNormalMsg("-------type:PROPERTY_READ")
                        }
                        //是否支持写入
                        if (charaProp or BluetoothGattCharacteristic.PROPERTY_WRITE > 0) {
                            LogUtil.logNormalMsg("-------type:PROPERTY_WRITE")
                        }
                        //是否支持开启监听
                        if (charaProp or BluetoothGattCharacteristic.PROPERTY_NOTIFY > 0) {
                            LogUtil.logNormalMsg("-------type:PROPERTY_NOTIFY")
                        }
                        if (characteristic.descriptors != null && characteristic.descriptors.size > 0) {
                            for (descriptor in characteristic.descriptors) {
                                LogUtil.logNormalMsg("descriptor.getUuid()=" + descriptor.uuid)
                            }
                        }
                    }
                }
            }
        }
    }
这里注意要找全面一点的服务,有些服务下没有特征,有些特征不支持读写,有些特征下没有描述,无法开启读取监听。
⑤ 断开连接
	mGatt?.let {
            //断开BluetoothGatt连接
            it.disconnect()
            //关闭BluetoothGatt
            it.close()
        }
6.通信
(1)经典蓝牙通信
根据5中提到的连接逻辑,可以得到BluetoothSocket,类似Socket编程,通过BluetoothSocket的到输入输出流与蓝牙模块进行数据通信。这里建议另起线程进行通信操作,需要实时监听InputStream输入流里边是否有数据可读取。
① 获取输入输出流
		//获取 InputStream 和 OutputStream
        try {
            mInStream = socket.getInputStream();
            mOutStream = socket.getOutputStream();

        } catch (IOException e) {
        	e.printStackTrace();
            LogUtil.logNormalMsg(TAG,"获取InputStream 和 OutputStream异常!");
        }
② 发送数据
	//发送数据
    public boolean write(byte[] bytes){
        try {
            if(mOutStream == null){
                LogUtil.logNormalMsg(TAG, "mmOutStream == null");
                return false;
            }
            //发送数据
            mOutStream.write(bytes);
            mOutStream.flush();
            Log.d(TAG, "写入成功:"+ bytes2HexString(bytes, bytes.length));
            return true;

        } catch (IOException e) {
            LogUtil.logNormalMsg("发送数据出错:"+e.getMessage());
            e.printStackTrace();
            return false;
        }
    }
③ 读取数据
	//线程的run方法
 	@Override
    public void run(){
        //最大缓存区 存放流
        byte[] buffer = new byte[1024 * 2];  //buffer store for the stream
        //从流的read()方法中读取的字节数
        int bytes = 0;  //bytes returned from read()
        //持续监听输入流直到发生异常
        while(!isStop){
            try {
                if(mInStream == null){
                    LogUtil.logNormalMsg(TAG,"ConnectedThread:run-->输入流mmInStream == null");
                    break;
                }
                //先判断是否有数据,有数据再读取
                if(mInStream.available() != 0){
                    //从(mmInStream)输入流中(读取内容)读取的一定数量字节数,并将它们存储到缓冲区buffer数组中,bytes为实际读取的字节数
                    bytes = mInStream.read(buffer);
                    LogUtil.logNormalMsg(TAG,"读取数据长度:"+bytes);
                    //存放实际读取的数据内容
                    byte[] b = Arrays.copyOf(buffer,bytes);
                    //处理蓝牙数据
                    handBluetoothData(b);
                }
                Thread.sleep(150);
            } catch (Exception e) {
                LogUtil.logNormalMsg(TAG,"接收消息异常!" + e.getMessage());
                //关闭流和socket
                boolean isClose = cancel();
                if(isClose){
                    LogUtil.logNormalMsg(TAG,"接收消息异常,成功断开连接!");
                }
                break;
            }
        }
        //关闭流和socket
        boolean isClose = cancel();
        if(isClose){
            Log.d(TAG,"接收消息结束,断开连接!");
        }
    }
(2)低功耗蓝牙通信
低功耗蓝牙通信较为简单一些,直接通过写入的特征值Characteristic就可发送数据,而读取数据在BluetoothGattCallback的
onCharacteristicChanged回调方法中监听读取蓝牙设备发送过来的数据。
① 发送数据
	fun sendMsgToBluetooth(msg: ByteArray): Boolean {
        if (writeCharact != null) {
        	//设置特征值的value
            writeCharact?.value = msg
            //设置特征值的写入类型 这里根据需要选择类型  详细可阅读源码
            writeCharact?.writeType = BluetoothGattCharacteristic.WRITE_TYPE_NO_RESPONSE
            //通过gatt写入数据
            return mGatt!!.writeCharacteristic(writeCharact)
        }
        return false
    }
② 读取数据
 		override fun onCharacteristicChanged(
            gatt: BluetoothGatt,
            characteristic: BluetoothGattCharacteristic
        ) {
            super.onCharacteristicChanged(gatt, characteristic)
            //接收处理数据
            handBluetoothData(characteristic.value)
        }
7.补充
(1)在多次调试中发现,在经典蓝牙模式开发中,有两种情况会扫描不到蓝牙设备:
- APP内断开蓝牙连接,再次扫描蓝牙或是重启APP再次扫描;
- 再启动APP时,蓝牙设备已与手机APP配对连接;
出现这种情况不要慌,只要把与手机蓝牙连接的蓝牙设备找到并加入到扫描的蓝牙列表中,重新点击蓝牙连接就可以解决。
搜索已与手机连接的蓝牙:
	/**
     * 搜索已连接的蓝牙
     */
    private void findConnectedBluetooth() {
        BluetoothAdapter adapter = BluetoothAdapter.getDefaultAdapter();
        Class<BluetoothAdapter> bluetoothAdapterClass = BluetoothAdapter.class;//得到BluetoothAdapter的Class对象
        try {//得到连接状态的方法
            Method method = bluetoothAdapterClass.getDeclaredMethod("getConnectionState", (Class[]) null);
            //打开权限
            method.setAccessible(true);
            int state = (int) method.invoke(adapter, (Object[]) null);
            if(state == BluetoothAdapter.STATE_CONNECTED){
                LogUtil.logNormalMsg("BLUETOOTH","BluetoothAdapter.STATE_CONNECTED");
                Set<BluetoothDevice> devices = adapter.getBondedDevices();
                LogUtil.logNormalMsg("BLUETOOTH","devices:"+devices.size());
                for(BluetoothDevice device : devices){
                    Method isConnectedMethod = BluetoothDevice.class.getDeclaredMethod("isConnected", (Class[]) null);
                    method.setAccessible(true);
                    boolean isConnected = (boolean) isConnectedMethod.invoke(device, (Object[]) null);
                    if(isConnected){
                        //找到已连接的蓝牙设备 进行下一步处理
                        if (device != null) {
                          onDeviceSearchListener.onDeviceFound(device, 50);
                        }
                    }
                }
            }

        } catch (Exception e) {
            e.printStackTrace();
        }

    }
(2)低功耗蓝牙GATT的默认MTU支持发送的数据量为23字节(byte), 除去GATT的opcode一个字节以及GATT的handle 2个字节之后,剩下的20个字节便是留给GATT的了。GATT默认支持最大512字节的数据通信,可以通过设置MTU的大小来改变,一般在蓝牙连接成功后设置,这里推荐在onDescriptorWrite回调方法中配置:
		override fun onDescriptorWrite(
            gatt: BluetoothGatt,
            descriptor: BluetoothGattDescriptor,
            status: Int
        ) {
            super.onDescriptorWrite(gatt, descriptor, status)
            if (status == BluetoothGatt.GATT_SUCCESS) {
                //蓝牙连接配置通信成功  可以设置mtu了
                mGatt?.requestMtu(103)
            }
        }
设置MTU是否的结果在onMtuChanged中可以得到
        override fun onMtuChanged(gatt: BluetoothGatt?, mtu: Int, status: Int) {
            super.onMtuChanged(gatt, mtu, status)
             if (status == BluetoothGatt.GATT_SUCCESS) {
             	//MTU设置成功 返回当前所支持的mtu大小
				this.supportedMTU = mtu
   			 }
        }
参考
安卓BLE蓝牙开发详解
Android 从开发角度来看经典蓝牙和低功耗(BLE)蓝牙的区别
Android连接经典蓝牙
Android 蓝牙BLE开发详解
最后
以上就是敏感缘分最近收集整理的关于Android笔记---蓝牙开发经典蓝牙和低功耗蓝牙前言1.加入蓝牙权限2.是否支持蓝牙3.是否打开蓝牙4.扫描蓝牙5.蓝牙连接与断开6.通信7.补充的全部内容,更多相关Android笔记---蓝牙开发经典蓝牙和低功耗蓝牙前言1内容请搜索靠谱客的其他文章。


发表评论 取消回复