上一篇主要讲述了机器人学中用到的几何基础知识,以及在KDL中的实现和使用。本篇将更加深入的涉及到机器人学中的内容,主要是如何表示一个串联型机械臂,以及KDL中的实现方式。
KDL中使用了两个使用广泛且技术成熟的机器人作为例子:puma560(六自由度)和kukaLWR(七自由度)。本篇主要使用六自由度的puma560作为例子。阅读本篇需要有一定的机器人学常识,至少要读过《机器人学导论》的前三章。
在KDL中创建puma560机器人很简单,只需要调用一个函数就可以了。
Chain p560=Puma560();
要想知道这个函数里面做了什么,首先有三个KDL里的概念要清楚:Joint,Segment,Chain。
1. KDL::Joint
A Joint allows translation or rotation in one degree of freedom between two Segments
Joint(关节)可以使两个Segments之间有一个自由度的旋转或平移。
1.1 创建一个Joint
首先,Joint类里面定义了一个Joint的类型(平移、旋转、None):
typedef enum { RotAxis,RotX,RotY,RotZ,TransAxis,TransX,TransY,TransZ,None} JointType;
创建Joint的函数有几个,先看第一个:
explicit Joint(const std::string& name, const JointType& type=None,const double& scale=1,const double& offset=0,
              const double& inertia=0,const double& damping=0,const double& stiffness=0);
各个参数的含义如下:
name: Joint的名字;
type: Joint的类型,旋转、平移还是None;
scale: the scale between joint input and actual geometric movement, default: 1;类似减速比的概念,在旋转关节中常用;
offset: offset between joint input and actual geometric input, default: 0;关节输入与输出之间的偏移,在平移关节中常用;
inertia: 沿关节轴向的惯性,默认:0;
damping: 沿关节轴向的阻尼,默认:0;
stiffness: 沿关节轴向的刚度,默认:0;
再看第二个创建Joint的函数:
explicit Joint(const JointType& type=None,const double& scale=1,const double& offset=0,
               const double& inertia=0,const double& damping=0,const double& stiffness=0);
与上个函数一样,省略了name参数,name默认是“NoName”。
再看第三个函数:
Joint(const std::string& name, const Vector& _origin, const Vector& _axis, const JointType& type, const double& _scale=1, const double& _offset=0,
       const double& _inertia=0, const double& _damping=0, const double& _stiffness=0);
与第一个函数一样,不同在于多了两个参数:
_origin和_axis,这两个参数的意思是,可以在任意原点沿任意轴线建立Joint。这种情况下type只能是RotAxis或者TransAxis。
joint_pose.p = origin;
joint_pose.M = Rotation::Rot2(axis, offset);
在函数的实现中多了这两个操作,第一步是记录原点位置到joint_pose.p,第二步是将joint_pose.M绕axis轴旋转offset角度后返回旋转矩阵。
在看另外一个函数:
Joint(const Vector& _origin, const Vector& _axis, const JointType& type, const double& _scale=1, const double& _offset=0,
       const double& _inertia=0, const double& _damping=0, const double& _stiffness=0);
与上一个函数一样,省略了name参数,name默认是“NoName”。
1.2 获取Joint特征
首先是获取Joint位姿的函数:
Frame pose(const double& q)const;
Request the 6D-pose between the beginning and the end of the joint at joint position q.
当关节位置为q时,获取关节位姿。
当type=RotAxis时:
joint_pose.M = Rotation::Rot2(axis, scale*q+offset);
return joint_pose;
当type=RotX时:
return Frame(Rotation::RotX(scale*q+offset));
当type=TransAxis时:
return Frame(origin + (axis * (scale*q+offset)));
当type=TransX时:
return Frame(Vector(scale*q+offset,0.0,0.0));
其次是获取Joint速度的函数:
Twist twist(const double& qdot)const;
Request the resulting 6D-velocity with a joint velocity qdot
当关节速度为qdot时,Joint的速度向量。
当type=RotAxis时:
return Twist(Vector(0,0,0), axis * ( scale * qdot));
当type=RotX时:
return Twist(Vector(0.0,0.0,0.0),Vector(scale*qdot,0.0,0.0));
当type=TransAxis时:
return Twist(axis * (scale * qdot), Vector(0,0,0));
当type=TransX时:
return Twist(Vector(scale*qdot,0.0,0.0),Vector(0.0,0.0,0.0));
然后是获取关节轴的向量函数:
Vector JointAxis() const;
Request the Vector corresponding to the axis of a revolute joint.
获取对应关节轴的向量。
例如,当type=RotX时:
return Vector(1.,0.,0.);
当type=TransY时:
return Vector(0.,1.,0.);
最后就是一些获取Joint参数的函数:
Vector Joint::JointOrigin() const
{
  return origin;
}
const std::string& getName()const
{
    return name;
}
const JointType& getType() const
{
    return type;
};
const std::string getTypeName() const;
2. KDL::Segment
this class encapsulates a simple segment, that is a “rigid body” (i.e., a frame and a rigid body inertia) with a joint and with “handles”, root and tip to connect to other segments. A simple segment is described by the following properties :
- Joint
- Rigid Body Inertia: of the rigid body part of the Segment
- Offset from the end of the joint to the tip of the segment: the joint is located at the root of the segment.
Segment类有几个私有变量:
std::string name;
Joint joint;
RigidBodyInertia I;
Frame f_tip;
name: Segment的名字;
joint: Segment的关节;
I: Segment刚体的惯量;
f_tip: Segment末端固连的一个坐标系;
2.1 一个例子
先看一个创建Segment的例子,从中可以看到Segment的组织结构。这个例子是创建Puma560基座关节的Segment。
Segment(Joint(Joint::RotZ),Frame::DH(0.4318,0.0,0.0,0.0),
RigidBodyInertia(17.4,Vector(-.3638,.006,.2275),RotationalInertia(0.13,0.524,0.539,0,0,0)));
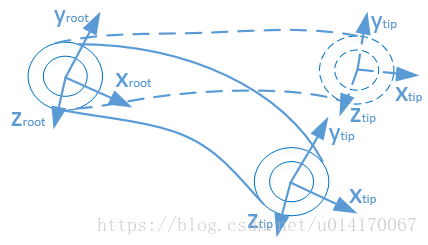
这段代码创建的Segment如下图所示:

其中root和tip的坐标系是由Segment的DH决定的。
2.1.1 Joint
可以看到这个Segment有一个绕Z轴的旋转关节。这个旋转关节上固连的坐标系就叫root坐标系,而Segment的末端固连的坐标系叫做tip坐标系。当Joint旋转一个角度的时候,root坐标系不变而tip坐标系因为固连在Segment上,所以要改变。当Joint角度为30°时的坐标系如上图虚线所示。
2.1.2 Frame
这里的Frame是用DH参数来构建的。我们知道机器人坐标系确定了之后,DH参数也唯一确定,所以用DH参数来表示Segment的坐标系没有问题。
2.1.3 Inertia
这里RigidBodyInertia函数里的三个参数分别表示质量、质心位置和转动惯量。
2.2 Segment的构造函数
常用的Segment构造函数有两种:
explicit Segment(const std::string& name, const Joint& joint=Joint(Joint::None), const Frame& f_tip=Frame::Identity(),const RigidBodyInertia& I = RigidBodyInertia::Zero());

explicit Segment(const Joint& joint=Joint(Joint::None), const Frame& f_tip=Frame::Identity(),const RigidBodyInertia& I = RigidBodyInertia::Zero());
两个构造函数基本一样。都是指定Segment的几个变量,即名字、关节、坐标系和惯量。
除此之外,Segment还设有复制和赋值构造函数:
Segment(const Segment& in);
Segment& operator=(const Segment& arg);
2.3 Segment的其他函数
Frame pose(const double& q)const;
当joint为q时,获得tip坐标系相对于root坐标系的位姿矩阵;例如在Segment图中虚线所示,joint=30°,tip相对于root的位置:p=[0.3739, 0.2159, 0],tip相对于root的旋转:
M
=
[
0.866
−
0.5
0
0.5
0.866
0
0
0
1
]
M=begin{bmatrix} 0.866 & -0.5 & 0\ 0.5 & 0.866 & 0\ 0 & 0 & 1 end{bmatrix}
M=⎣⎡0.8660.50−0.50.8660001⎦⎤
Twist twist(const double& q,const double& qdot)const;
当joint为q、joint的速度为qdot时,获取tip坐标系相对于root坐标系的平移和旋转速度向量,其中以tip坐标系的原点作为参考点。例如在Segment图中虚线,q=30°,qdot=0.1°/s,那么twist=[-0.02159, 0.03739, 0, 0, 0, 0.1]。
const std::string& getName()const
{
    return name;
}
const Joint& getJoint()const
{
    return joint;
}
const RigidBodyInertia& getInertia()const
{
    return I;
}
这三个函数分别是获取Segment的name、joint和惯量I。
void setInertia(const RigidBodyInertia& Iin)
{
    this->I=Iin;
}
设置Segment的惯量。
Frame getFrameToTip()const
{
    return joint.pose(0)*f_tip;
}
获取当joint=0时,tip坐标系相对于root坐标系的位姿;例如在Segment图中实线所示,joint=0°,tip相对于root的位置:p=[0.4318, 0, 0],tip相对于root的旋转:
M
=
[
1
0
0
0
1
0
0
0
1
]
M=begin{bmatrix} 1 & 0 & 0\ 0 & 1 & 0\ 0 & 0 & 1 end{bmatrix}
M=⎣⎡100010001⎦⎤
3. KDL::Chain
简单的说就是将几个Segment连接起来就形成了Chain。
Chain类里面主要有这几个变量:
private:
	unsigned int nrOfJoints;
        unsigned int nrOfSegments;
public:
        std::vector<Segment> segments;
nrOfJoints表示Joint的个数,nrOfSegments表示Segment的个数;segments中记录了所有的Segments。
3.1 Chain的构造函数
Chain();
Chain(const Chain& in);
Chain& operator = (const Chain& arg);
其中,Chain()表示构造一个空的Chain。后面两个都是复制构造函数。
3.2 其他函数
3.2.1 在Chain中增加Segment
void addSegment(const Segment& segment);
这个函数首先将新增的这个segment push到Chain::segments这个vector中,然后nrOfSegments++;如果这个segment包含一个Joint,即这个segment的Joint类型不为None,就让nrOfJoints++。
3.2.2 在Chain中增加另一个Chain
void addChain(const Chain& chain);
将新的chain直接添加到当前chain的后面。
3.2.3 get函数
unsigned int getNrOfJoints()const {return nrOfJoints;};
获取Chain的Joint个数;
unsigned int getNrOfSegments()const {return nrOfSegments;};
获取Chain的Segment个数;
这里需要注意的是Joint的个数不一定与Segment的个数相同,因为一个Segment不一定会有一个Joint。
const Segment& getSegment(unsigned int nr)const;
获取第nr个Segment,nr从0开始,注意这个函数没有边界检查,nr的值不要越界。
4. puma560
最后,在KDL中给出了建立一个完整puma560的Chain的例程:
namespace KDL{
    Chain Puma560(){
        Chain puma560;
        puma560.addSegment(Segment(Joint(Joint::RotZ),
                                   Frame::DH(0.0,M_PI_2,0.0,0.0),
                                   RigidBodyInertia(0,Vector::Zero(),RotationalInertia(0,0.35,0,0,0,0))));
        puma560.addSegment(Segment(Joint(Joint::RotZ),
                                   Frame::DH(0.4318,0.0,0.0,0.0),
                                   RigidBodyInertia(17.4,Vector(-.3638,.006,.2275),RotationalInertia(0.13,0.524,0.539,0,0,0))));
        puma560.addSegment(Segment(Joint(Joint::RotZ),
                                   Frame::DH(0.0203,-M_PI_2,0.15005,0.0),
                                   RigidBodyInertia(4.8,Vector(-.0203,-.0141,.070),RotationalInertia(0.066,0.086,0.0125,0,0,0))));
        puma560.addSegment(Segment(Joint(Joint::RotZ),
                                   Frame::DH(0.0,M_PI_2,0.4318,0.0),
                                   RigidBodyInertia(0.82,Vector(0,.019,0),RotationalInertia(1.8e-3,1.3e-3,1.8e-3,0,0,0))));
        puma560.addSegment(Segment(Joint(Joint::RotZ),
                                   Frame::DH(0.0,-M_PI_2,0.0,0.0),
                                   RigidBodyInertia(0.34,Vector::Zero(),RotationalInertia(.3e-3,.4e-3,.3e-3,0,0,0))));
        puma560.addSegment(Segment(Joint(Joint::RotZ),
                                   Frame::DH(0.0,0.0,0.0,0.0),
                                   RigidBodyInertia(0.09,Vector(0,0,.032),RotationalInertia(.15e-3,0.15e-3,.04e-3,0,0,0))));
        return puma560;
    }
}
其中,DH参数、质量、质心位置和转动惯量等参数与Matlab机器人工具箱中的一模一样。任何一种构型的串联机械臂,只要按照《机器人建模和控制》或《Robotics,Vision and Control - Fundamental Algorithms in MATLAB》(这两本书的DH建立方式与KDL中相同)建立各关节的坐标系,并确定DH参数、质量、质心位置和转动惯量等参数后,就能在KDL中建立该机械臂的运动链。
本篇主要讲述了KDL中运动链的建立方式,以及与其相关的段(Segment)和关节(Joint)的概念,这些是串联机械臂运动学的基础。下一篇讲述KDL中正运动学解的实现方式及其使用。
最后
以上就是无奈小丸子最近收集整理的关于开源机器人库orocos KDL 学习笔记(三):Kinematric Chain1. KDL::Joint2. KDL::Segment3. KDL::Chain4. puma560的全部内容,更多相关开源机器人库orocos内容请搜索靠谱客的其他文章。


发表评论 取消回复