一、需要注意的地方: 入站的消息会流经所有的添加的ChannelInboundHandler,出站的消息不一定会流经所有的ChannelOutboundHandler,通过在某个ChannelInboundHandler的ChannelHandlerContext的writeAndFlush方法写出的数据,并不会流经其后的ChannelOuntboundHandler,但如果是通过ctx.channel().writeAndFlush方法写出数据,则会流经所有的ChannelOutboundHandler.
例如,服务端这样添加Handler,
                protected void initChannel(Channel ch) throws Exception {
                    ch.pipeline().addLast(new MyChannelInboundHandler1());
                    ch.pipeline().addLast(new MyChannelInboundHandler2());
                    ch.pipeline().addLast(new MyChannelOutboundHandler1());

                }
则形成in1 -> in2 -> out1 的handler处理链,
在in1 和in 2中 进行如下操作,
ctx.writeAndFlush("Welcome to Netty......");
则该数据不会流经out1.要想让数据流经out1,则有两种修改方式:
1.
ctx.channel().writeAndFlush("Welcome to Netty......");
2.修改server中ChannelHandler的添加顺序,把ChannelOutboundHandler1放在整个处理链的最前端:
                protected void initChannel(Channel ch) throws Exception {
                    ch.pipeline().addLast(new MyChannelInboundHandler1());
                    ch.pipeline().addLast(new MyChannelInboundHandler2());
                    ch.pipeline().addFirst(new MyChannelOutboundHandler1());

                }
二、完整示例代码:
1.MyChannelInboundHandler1
package cn.edu.tju;

import io.netty.buffer.ByteBuf;
import io.netty.channel.ChannelHandlerContext;
import io.netty.channel.SimpleChannelInboundHandler;
import io.netty.util.CharsetUtil;

public class MyChannelInboundHandler1 extends SimpleChannelInboundHandler<Object> {
    @Override
    protected void channelRead0(ChannelHandlerContext ctx, Object msg) throws Exception {
        ByteBuf byteBuf=(ByteBuf)msg;
        String result=byteBuf.toString(CharsetUtil.UTF_8);
        System.out.println("MyChannelInboundHandler1 received: "+result);
        byteBuf.retain();
        ctx.fireChannelRead(msg);
    }
}
2.MyChannelInboundHandler2
package cn.edu.tju;

import io.netty.buffer.ByteBuf;
import io.netty.buffer.Unpooled;
import io.netty.channel.ChannelHandlerContext;
import io.netty.channel.SimpleChannelInboundHandler;
import io.netty.util.CharsetUtil;

public class MyChannelInboundHandler2 extends SimpleChannelInboundHandler<Object> {
    @Override
    protected void channelRead0(ChannelHandlerContext ctx, Object msg) throws Exception {
        ByteBuf byteBuf=(ByteBuf)msg;
        String result=byteBuf.toString(CharsetUtil.UTF_8);
        System.out.println("MyChannelInboundHandler2 received: "+result);
        ctx.channel().writeAndFlush("Welcome to Netty......");


    }
}
3.MyChannelOutboundHandler1
package cn.edu.tju;

import io.netty.buffer.ByteBuf;
import io.netty.buffer.Unpooled;
import io.netty.channel.ChannelHandlerContext;
import io.netty.channel.ChannelOutboundHandlerAdapter;
import io.netty.channel.ChannelPromise;
import io.netty.util.CharsetUtil;

public class MyChannelOutboundHandler1 extends ChannelOutboundHandlerAdapter {
   public void write(ChannelHandlerContext ctx, Object msg, ChannelPromise promise) throws Exception {
        String result=(String)msg;
        System.out.println("MyChannelOutboundHandler1 received: "+result);

        ByteBuf byteBuf= Unpooled.copiedBuffer(result.getBytes());
        ctx.write(byteBuf, promise);
    }

}
4.NettyServer
package cn.edu.tju;

import io.netty.bootstrap.ServerBootstrap;
import io.netty.channel.Channel;
import io.netty.channel.ChannelInitializer;
import io.netty.channel.EventLoopGroup;
import io.netty.channel.nio.NioEventLoopGroup;
import io.netty.channel.socket.nio.NioServerSocketChannel;

public class NettyServer {
    public static void main(String[] args) {
        EventLoopGroup bossGroup=new NioEventLoopGroup(1);
        EventLoopGroup workerGroup=new NioEventLoopGroup();
        try{
            ServerBootstrap serverBootstrap=new ServerBootstrap();
            serverBootstrap.group(bossGroup,workerGroup).channel(NioServerSocketChannel.class);
            serverBootstrap.childHandler(new ChannelInitializer<Channel>() {

                @Override
                protected void initChannel(Channel ch) throws Exception {
                    ch.pipeline().addLast(new MyChannelInboundHandler1());
                    ch.pipeline().addLast(new MyChannelInboundHandler2());
                    ch.pipeline().addLast(new MyChannelOutboundHandler1());

                }
            });
            serverBootstrap.bind(9095);
        }catch (Exception ex){
            bossGroup.shutdownGracefully();
            workerGroup.shutdownGracefully();
        }
    }
}
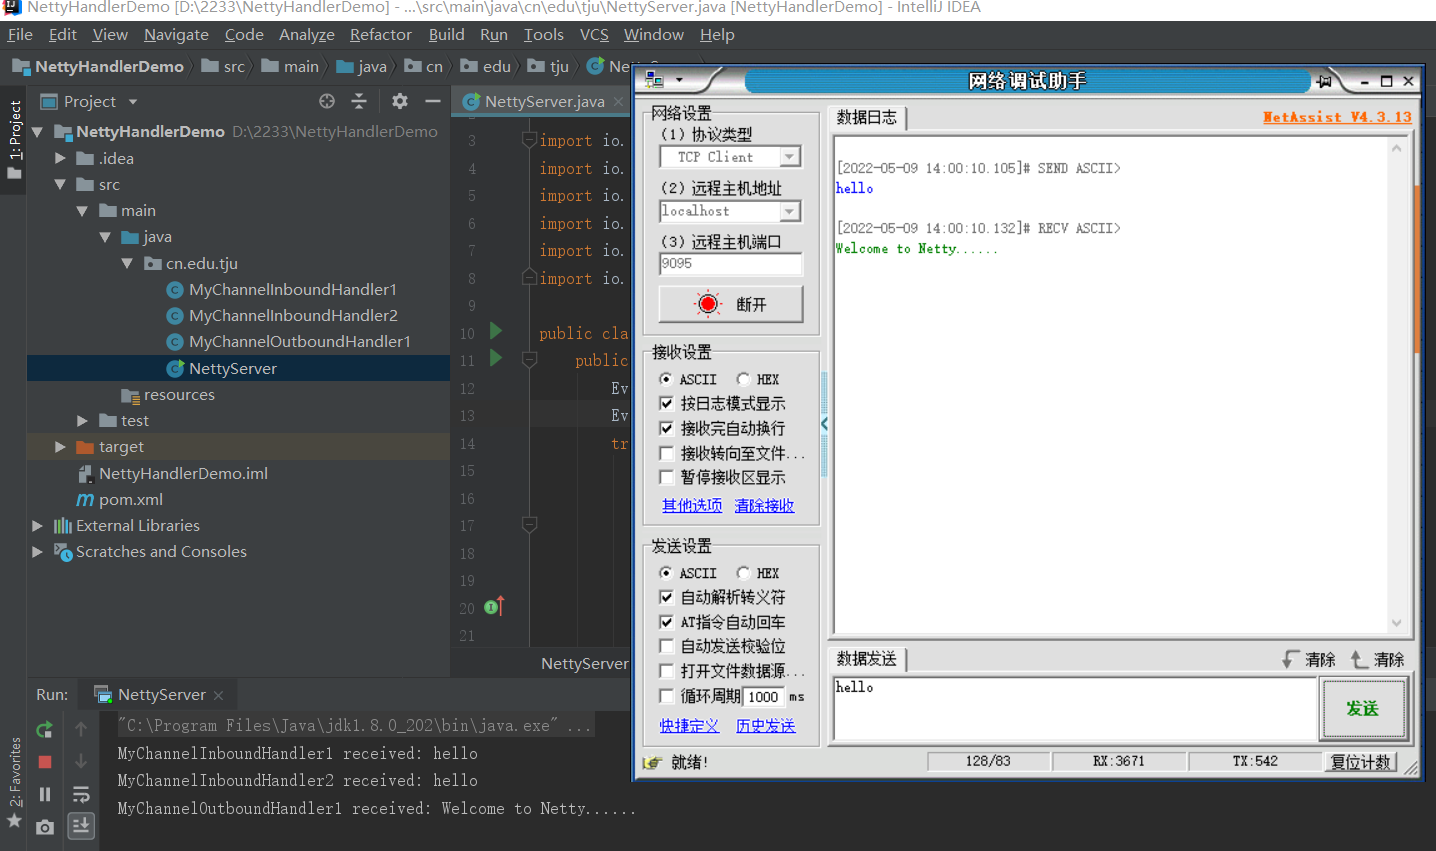
三、启动并测试:

最后
以上就是义气便当最近收集整理的关于Netty: ChannelInboundHandler和ChannelOutboundHandler的使用的全部内容,更多相关Netty:内容请搜索靠谱客的其他文章。
本图文内容来源于网友提供,作为学习参考使用,或来自网络收集整理,版权属于原作者所有。


发表评论 取消回复