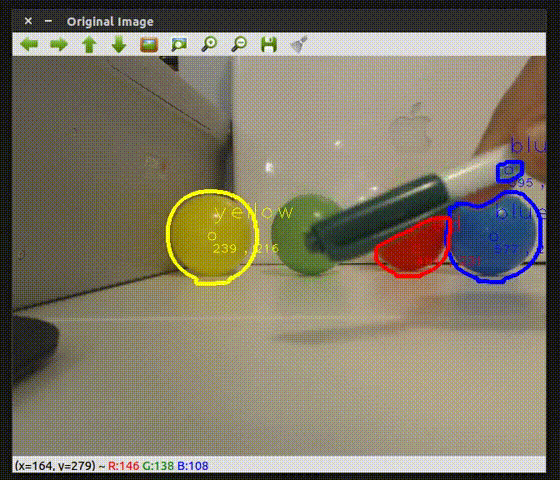
看效果 下面源代码
Object.h


#pragma once
#include <string>
#include <cv.h>
#include <highgui.h>
using namespace std;
using namespace cv;

class Object
{
public:
	Object();
	~Object(void);

	Object(string name);

	int getXPos();
	void setXPos(int x);

	int getYPos();
	void setYPos(int y);

	Scalar getHSVmin();
	Scalar getHSVmax();

	void setHSVmin(Scalar min);
	void setHSVmax(Scalar max);

	string getType(){return type;}
	void setType(string t){type = t;}

	Scalar getColor(){
		return Color;
	}
	void setColor(Scalar c){

		Color = c;
	}

private:

	int xPos, yPos;
	string type;
	Scalar HSVmin, HSVmax;
	Scalar Color;
};
Object.cpp


#include "Object.h"

Object::Object()
{
	//为默认构造函数设置值
	setType("Object");
	setColor(Scalar(0,0,0));

}

Object::Object(string name){

	setType(name);

	if(name=="blue"){

		//TODO:使用“校准模式”查找HSV最小值和最大值


		setHSVmin(Scalar(92,0,0));
		setHSVmax(Scalar(124,256,256));

		//BGR value for Blue:
		setColor(Scalar(255,0,0));

	}
	if(name=="green"){

		//TODO:使用“校准模式”查找HSV最小值和最大值

		setHSVmin(Scalar(34,50,50));
		setHSVmax(Scalar(80,220,200));

		//绿色的BGR值:
		setColor(Scalar(0,255,0));

	}
	if(name=="yellow"){

		//TODO:使用“校准模式”查找HSV最小值和HSV最大值

		setHSVmin(Scalar(20,124,123));
		setHSVmax(Scalar(30,256,256));

		//黄色的BGR值:
		setColor(Scalar(0,255,255));

	}
	if(name=="red"){

		//TODO:使用“校准模式”查找HSV最小值和HSV最大值
		setHSVmin(Scalar(0,200,0));
		setHSVmax(Scalar(19,255,255));

		//BGR value for Red:
		setColor(Scalar(0,0,255));

	}
}

Object::~Object(void)
{
}

int Object::getXPos(){

	return Object::xPos;

}

void Object::setXPos(int x){

	Object::xPos = x;

}

int Object::getYPos(){

	return Object::yPos;

}

void Object::setYPos(int y){

	Object::yPos = y;

}

Scalar Object::getHSVmin(){

	return Object::HSVmin;

}
Scalar Object::getHSVmax(){

	return Object::HSVmax;
}

void Object::setHSVmin(Scalar min){

	Object::HSVmin = min;
}


void Object::setHSVmax(Scalar max){

	Object::HSVmax = max;
}
multipleObjectTracking.cpp


#include <sstream>
#include <string>
#include <iostream>
#include <vector>

#include "Object.h"


//初始最小和最大HSV过滤器值。
//更改轨迹栏
int H_MIN = 0;
int H_MAX = 256;
int S_MIN = 0;
int S_MAX = 256;
int V_MIN = 0;
int V_MAX = 256;

//默认capture 宽度和高度
const int FRAME_WIDTH = 640;
const int FRAME_HEIGHT = 480;
//帧中要检测的最大对象数
const int MAX_NUM_OBJECTS=50;
//最小和最大物体面积
const int MIN_OBJECT_AREA = 20*20;
const int MAX_OBJECT_AREA = FRAME_HEIGHT*FRAME_WIDTH/1.5;
//每个窗口顶部的名称
const string windowName = "Original Image";
const string windowName1 = "HSV Image";
const string windowName2 = "Thresholded Image";
const string windowName3 = "After Morphological Operations";
const string trackbarWindowName = "Trackbars";


//下面是canny边缘检测的示例:
Mat dst, detected_edges;
Mat src, src_gray;
int edgeThresh = 1;
int lowThreshold;
int const max_lowThreshold = 100;
int ratio = 3;
int kernel_size = 3;
const char* window_name = "Edge Map";

void on_trackbar( int, void* )
{//每当发生错误时,就调用此函数


}

string intToString(int number){

	std::stringstream ss;
	ss << number;
	return ss.str();
}

void createTrackbars(){
	//创建窗口轨迹栏
	//下面注释有些写英文了 方便理解  ( 输入法切换太麻烦)
	namedWindow(trackbarWindowName,0);
	//create memory to store trackbar name on window
	char TrackbarName[50];
	sprintf( TrackbarName, "H_MIN", H_MIN);
	sprintf( TrackbarName, "H_MAX", H_MAX);
	sprintf( TrackbarName, "S_MIN", S_MIN);
	sprintf( TrackbarName, "S_MAX", S_MAX);
	sprintf( TrackbarName, "V_MIN", V_MIN);
	sprintf( TrackbarName, "V_MAX", V_MAX);
//创建轨迹栏并将其插入窗口
//3个参数为:移动轨迹栏时发生变化的变量地址(如H_LOW),
//轨迹栏可以移动的最大值(例如H_高),
//以及每当移动轨迹栏时调用的函数(例如,在轨迹栏上)
//                                  ---->    ---->     ---->
	createTrackbar( "H_MIN", trackbarWindowName, &H_MIN, H_MAX, on_trackbar );
	createTrackbar( "H_MAX", trackbarWindowName, &H_MAX, H_MAX, on_trackbar );
	createTrackbar( "S_MIN", trackbarWindowName, &S_MIN, S_MAX, on_trackbar );
	createTrackbar( "S_MAX", trackbarWindowName, &S_MAX, S_MAX, on_trackbar );
	createTrackbar( "V_MIN", trackbarWindowName, &V_MIN, V_MAX, on_trackbar );
	createTrackbar( "V_MAX", trackbarWindowName, &V_MAX, V_MAX, on_trackbar );
}

void drawObject(vector<Object> theObjects,Mat &frame, Mat &temp, vector< vector<Point> > contours, vector<Vec4i> hierarchy){

	for(int i =0; i<theObjects.size(); i++){
	cv::drawContours(frame,contours,i,theObjects.at(i).getColor(),3,8,hierarchy);
	cv::circle(frame,cv::Point(theObjects.at(i).getXPos(),theObjects.at(i).getYPos()),5,theObjects.at(i).getColor());
	cv::putText(frame,intToString(theObjects.at(i).getXPos())+ " , " + intToString(theObjects.at(i).getYPos()),cv::Point(theObjects.at(i).getXPos(),theObjects.at(i).getYPos()+20),1,1,theObjects.at(i).getColor());
	cv::putText(frame,theObjects.at(i).getType(),cv::Point(theObjects.at(i).getXPos(),theObjects.at(i).getYPos()-20),1,2,theObjects.at(i).getColor());
	}
}

void drawObject(vector<Object> theObjects,Mat &frame){

	for(int i =0; i<theObjects.size(); i++){

	cv::circle(frame,cv::Point(theObjects.at(i).getXPos(),theObjects.at(i).getYPos()),10,cv::Scalar(0,0,255));
	cv::putText(frame,intToString(theObjects.at(i).getXPos())+ " , " + intToString(theObjects.at(i).getYPos()),cv::Point(theObjects.at(i).getXPos(),theObjects.at(i).getYPos()+20),1,1,Scalar(0,255,0));
	cv::putText(frame,theObjects.at(i).getType(),cv::Point(theObjects.at(i).getXPos(),theObjects.at(i).getYPos()-30),1,2,theObjects.at(i).getColor());
	}
}

void morphOps(Mat &thresh){

	//创建用于“扩张”和“侵蚀”形象的结构元素。
	//the element chosen here is a 3px by 3px rectangle
	Mat erodeElement = getStructuringElement( MORPH_RECT,Size(3,3));
	//dilate with larger element so make sure object is nicely visible
	Mat dilateElement = getStructuringElement( MORPH_RECT,Size(8,8));

	erode(thresh,thresh,erodeElement);
	erode(thresh,thresh,erodeElement);

	dilate(thresh,thresh,dilateElement);
	dilate(thresh,thresh,dilateElement);
}
void trackFilteredObject(Mat threshold,Mat HSV, Mat &cameraFeed)
{
	vector <Object> objects;
	Mat temp;
	threshold.copyTo(temp);
	//these two vectors needed for output of findContours
	vector< vector<Point> > contours;
	vector<Vec4i> hierarchy;
	//find contours of filtered image using openCV findContours function
	findContours(temp,contours,hierarchy,CV_RETR_CCOMP,CV_CHAIN_APPROX_SIMPLE );
	//use moments method to find our filtered object
	double refArea = 0;
	bool objectFound = false;
	if (hierarchy.size() > 0) {
		int numObjects = hierarchy.size();
		//if number of objects greater than MAX_NUM_OBJECTS we have a noisy filter
		if(numObjects<MAX_NUM_OBJECTS)
		{
			for (int index = 0; index >= 0; index = hierarchy[index][0])
			{
				Moments moment = moments((cv::Mat)contours[index]);
				double area = moment.m00;
	//如果面积小于20px乘以20px,则可能只是噪声
//如果面积与图像大小的3/2相同,可能只是一个坏的过滤器
//只需要具有最大面积的对象,因此每个对象都有一个安全的参考区域
//迭代并将其与下一次迭代中的区域进行比较。
				if(area>MIN_OBJECT_AREA)
				{
					Object object;

					object.setXPos(moment.m10/area);
					object.setYPos(moment.m01/area);

					objects.push_back(object);

					objectFound = true;

				}
				else objectFound = false;
			}
			//let user know you found an object
			if(objectFound ==true)
			{
				//draw object location on screen
				drawObject(objects,cameraFeed);
			}
		}
		else putText(cameraFeed,"TOO MUCH NOISE! ADJUST FILTER",Point(0,50),1,2,Scalar(0,0,255),2);
	}
}

void trackFilteredObject(Object theObject,Mat threshold,Mat HSV, Mat &cameraFeed){

	vector <Object> objects;
	Mat temp;
	threshold.copyTo(temp);
	//这两个向量是FindContentours输出所需的
	vector< vector<Point> > contours;
	vector<Vec4i> hierarchy;
	//使用openCV findContours函数查找过滤图像的轮廓
	findContours(temp,contours,hierarchy,CV_RETR_CCOMP,CV_CHAIN_APPROX_SIMPLE );
	//使用矩方法查找过滤对象
	double refArea = 0;
	bool objectFound = false;
	if (hierarchy.size() > 0) {
		int numObjects = hierarchy.size();
		//if number of objects greater than MAX_NUM_OBJECTS we have a noisy filter
		if(numObjects<MAX_NUM_OBJECTS){
			for (int index = 0; index >= 0; index = hierarchy[index][0]) {

				Moments moment = moments((cv::Mat)contours[index]);
				double area = moment.m00;

//如果面积小于20px乘以20px,则可能只是噪声
//如果面积与图像大小的3/2相同,可能只是一个坏的过滤器
//只需要具有最大面积的对象,因此每个对象都有一个安全的参考区域
//迭代并将其与下一次迭代中的区域进行比较。
				if(area>MIN_OBJECT_AREA){

					Object object;

					object.setXPos(moment.m10/area);
					object.setYPos(moment.m01/area);
					object.setType(theObject.getType());
					object.setColor(theObject.getColor());

					objects.push_back(object);

					objectFound = true;

				}else objectFound = false;
			}
			//找到了一个对象
			if(objectFound ==true){
				//draw object location on screen
				drawObject(objects,cameraFeed,temp,contours,hierarchy);}

		}else putText(cameraFeed,"TOO MUCH NOISE! ADJUST FILTER",Point(0,50),1,2,Scalar(0,0,255),2);
	}
}

int main(int argc, char* argv[])
{
	//如果要校准过滤器值,请设置为true。
	bool calibrationMode = true;

	//Matrix to store each frame of the webcam feed
	Mat cameraFeed;
	Mat threshold;
	Mat HSV;

	if(calibrationMode){
		//create slider bars for HSV filtering
		createTrackbars();
	}
	//用于获取网络摄像头提要的视频捕获对象
	VideoCapture capture;
	//open capture object at location zero (default location for webcam)
	capture.open(0);
	//set height and width of capture frame
	capture.set(CV_CAP_PROP_FRAME_WIDTH,FRAME_WIDTH);
	capture.set(CV_CAP_PROP_FRAME_HEIGHT,FRAME_HEIGHT);
	//启动一个无限循环,将网络摄像头提要复制到cameraFeed矩阵
	//all of our operations will be 在这个循环中执行
	waitKey(1000);
	while(1){
		//store image to matrix
		capture.read(cameraFeed);

		src = cameraFeed;

  		if( !src.data )
  		{ return -1; }

		//将帧从BGR转换为HSV颜色空间
		cvtColor(cameraFeed,HSV,COLOR_BGR2HSV);

		if(calibrationMode==true){

		//需要找到合适的颜色范围值
		// 校准模式必须为false

		//如果处于校准模式,根据HSV滑块值跟踪对象。
			cvtColor(cameraFeed,HSV,COLOR_BGR2HSV);
			inRange(HSV,Scalar(H_MIN,S_MIN,V_MIN),Scalar(H_MAX,S_MAX,V_MAX),threshold);
			morphOps(threshold);
			imshow(windowName2,threshold);

		//canny边缘检测的后续步骤
			/// 创建一个与src(用于dst)类型和大小相同的矩阵
	  		dst.create( src.size(), src.type() );
	  		/// 图像转换为灰度
	  		cvtColor( src, src_gray, CV_BGR2GRAY );
	  		/// Create a window
	  		namedWindow( window_name, CV_WINDOW_AUTOSIZE );

	     	//	创建一个追踪栏供用户输入阈值
	  		createTrackbar( "Min Threshold:", window_name, &lowThreshold, max_lowThreshold);
	  		/// Show the image
			trackFilteredObject(threshold,HSV,cameraFeed);
		}
		else{
			//创建一些临时姐果对象,以便可以使用他们的成员功能/信息
			Object blue("blue"), yellow("yellow"), red("red"), green("green");

			//首先找到蓝色的物体
			cvtColor(cameraFeed,HSV,COLOR_BGR2HSV);
			inRange(HSV,blue.getHSVmin(),blue.getHSVmax(),threshold);
			morphOps(threshold);
			trackFilteredObject(blue,threshold,HSV,cameraFeed);
			//then yellows
			cvtColor(cameraFeed,HSV,COLOR_BGR2HSV);
			inRange(HSV,yellow.getHSVmin(),yellow.getHSVmax(),threshold);
			morphOps(threshold);
			trackFilteredObject(yellow,threshold,HSV,cameraFeed);
			//then reds
			cvtColor(cameraFeed,HSV,COLOR_BGR2HSV);
			inRange(HSV,red.getHSVmin(),red.getHSVmax(),threshold);
			morphOps(threshold);
			trackFilteredObject(red,threshold,HSV,cameraFeed);
			//then greens
			cvtColor(cameraFeed,HSV,COLOR_BGR2HSV);
			inRange(HSV,green.getHSVmin(),green.getHSVmax(),threshold);
			morphOps(threshold);
			trackFilteredObject(green,threshold,HSV,cameraFeed);

		}
		//show frames
		//imshow(windowName2,threshold);

		imshow(windowName,cameraFeed);
		//imshow(windowName1,HSV);

		//延迟30毫秒,以便屏幕可以刷新。
		//没有此waitKey()命令,图像将不会显示
		waitKey(30);
	}
	return 0;
}
工程项目:
链接:https://pan.baidu.com/s/1BUnslDd-FK2WFeVeLYp5Yw
提取码:1rwn
工程文件虽然跑起来了但是可能有点问题 需要自行调试:目前我没有细调试
如果不清楚怎么配置 参考这个博客
https://blog.csdn.net/weixin_39276851/article/details/106720387
邮箱:okjokull@gmail.com
最后
以上就是仁爱龙猫最近收集整理的关于C++ opencv实现颜色识别的全部内容,更多相关C++内容请搜索靠谱客的其他文章。
本图文内容来源于网友提供,作为学习参考使用,或来自网络收集整理,版权属于原作者所有。


发表评论 取消回复