文章目录
- 一、前言
- 1.1 回顾
- 1.2 在Pycharm使用Arcpy的方法
- 二、功能简介
- 三、代码
- 3.1 文件搜索file_picker.py
- 3.2 批处理工具batch_tools.py
- 2.3 综合处理模块preprocessing.py
- 三、使用例
- 2.1 基于MOD13Q1加工某地NDVI栅格
- 2.2 基于MOD13Q1加工多地EVI栅格
- 2.3 基于MYD16A3加工ET、PET栅格
- 四、问题解答
- 4.1 .prj文件的获取
- 4.2 代码下载地址
- 4.3 其他
一、前言
建议无python基础的转至这一篇MODIS数据处理工具箱下载地址
1.1 回顾
在之前的系列文章中已经分享了利用Arcmap对MODIS数据进行预处理的流程,通常包括以下几个操作:
- 提取子数据集
- 镶嵌至新栅格
- 投影栅格
- 裁剪
- 乘以缩放因子
具体操作可以参考这篇[MODIS数据处理#7]例三:批量加工长时间序列中的中国部分省市NDVI影像
也可以通过在Arcmap中创建自定义脚本工具来实现分步骤的批量处理,可参考:
【ArcGIS自定义脚本工具】批量提取子数据集
【ArcGIS自定义脚本工具】按区块批量镶嵌MODIS影像
【ArcGIS自定义脚本工具】批量重投影栅格脚本
【ArcGIS自定义脚本工具】批量裁剪栅格脚本
【ArcGIS自定义脚本工具】批量乘脚本
【ArcGIS自定义脚本工具】批量设为空函数脚本
除了上述的这种方式,本文介绍一种在Pycharm中调用Arcpy的方式对MODIS数据进行批量处理的方式,这种方式更加灵活,同时还可以通过并行处理的方式进一步提高处理速度。
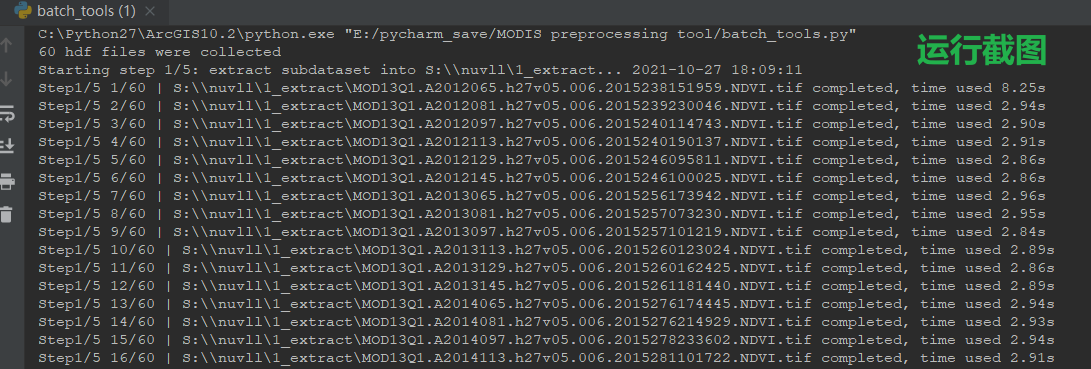
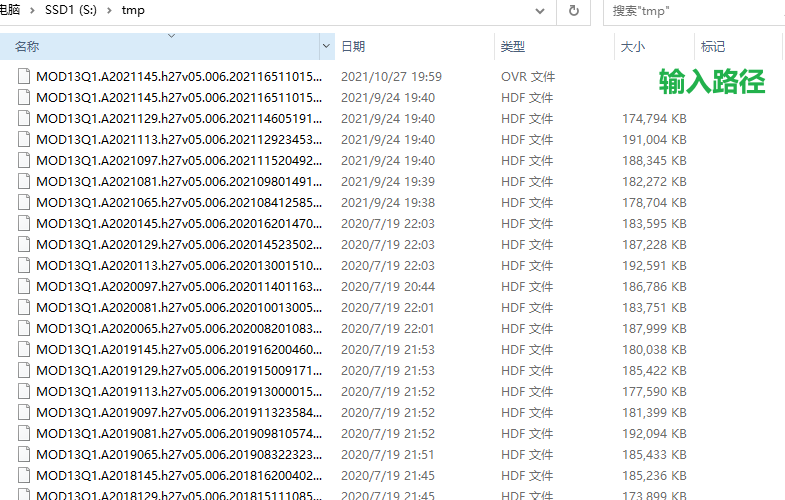
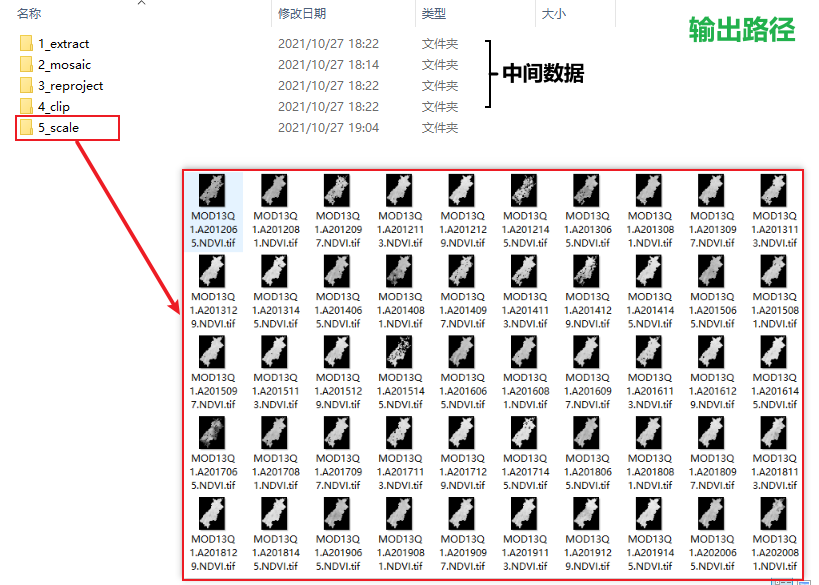
1.2 在Pycharm使用Arcpy的方法
关于如何在Pycharm导入并使用Arcpy可以参考这篇文章:
pycharm中导入并使用arcpy
这里我使用的方式是将pycharm项目的Project Interpreter更改到ArcGIS的python路径下
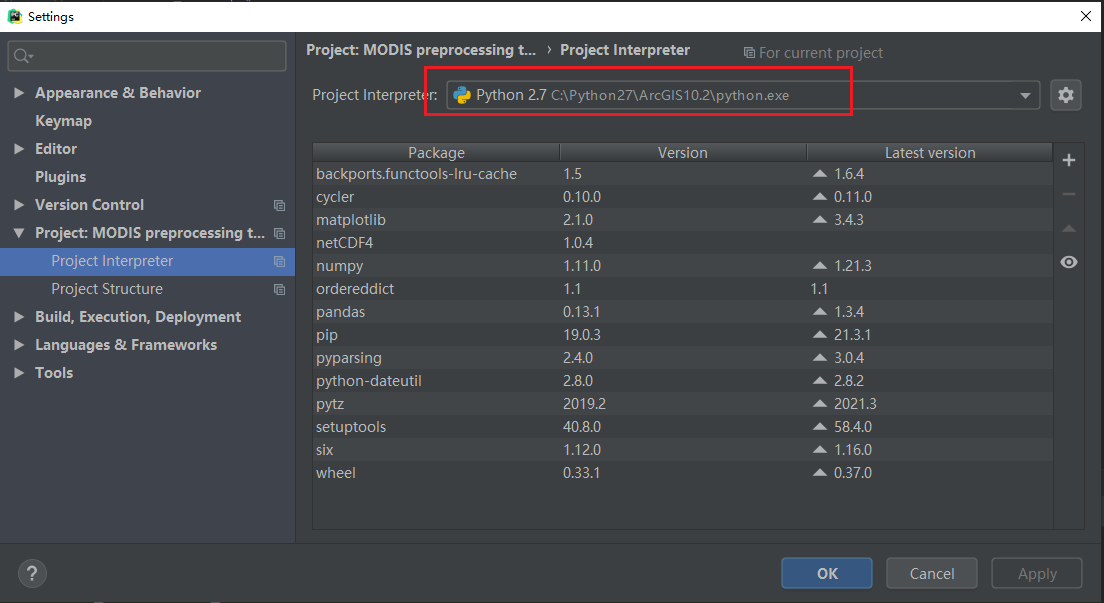
在程序运行的开始行添加下面的语句
import sys

arcpy_path = [r'C:Program Files (x86)ArcGISDesktop10.2arcpy',
              r'C:Program Files (x86)ArcGISDesktop10.2bin',
              r'C:Program Files (x86)ArcGISDesktop10.2ArcToolboxScripts']  # 修改成Arcgis安装对应路径
sys.path.extend(arcpy_path)
二、功能简介
- 批量加工MODIS产品(.hdf)数据到某坐标系(.prj)下指定研究区(.shp)的栅格数据(.tif)
三、代码
3.1 文件搜索file_picker.py
# -*- coding: utf-8 -*-

"""
@File    : file_picker.py
@Time    : 2021/8/26 18:42
"""
import os
from pprint import pprint
import re


def num_cvt_date(year, num):
    """
    将某年的日序(第几天)转为某年某月某日

    输入
    year: int
        年份
    num: int
        日序,即第几天

    输出
    (year, month, day):Tuple[int]
        由年、月、日构成的元组

    例子
    >> num_cvt_data(2000,31)
    >> 2000,1,31
    """
    breaks_ping = [0, 31, 59, 90, 120, 151, 181, 212, 243, 273, 304, 334, 365]  # 平年月末对应的日序
    breaks_run = [0, 31, 60, 91, 121, 152, 182, 213, 244, 274, 305, 335, 366]  # 闰年月末对应的日序
    breaks = breaks_ping
    if year % 4 == 0:
        breaks = breaks_run
    month = 0
    for break_point in breaks:
        if num > break_point:
            month += 1
    day = num - breaks[month - 1]
    return year, month, day


def show_files(path, out_files, suffix=".hdf"):
    """
    将path文件夹(包含子文件夹)中文件后缀为suffix(默认为.hdf)的文件的绝对路径保存到out_files中

    输入
    ----------
    path:str
        待搜索的文件夹
    out_files:List[str]
        筛选后满足特定后缀条件的文件的绝对路径构成的列表
    suffix:str
        目标文件的后缀名,默认为.hdf
    """
    dirs = os.listdir(path)
    for dir in dirs:
        cur_path = os.path.join(path, dir)
        if os.path.isdir(cur_path):
            # 当遍历的为文件夹时,递归
            show_files(cur_path, out_files)
        else:
            # 当遍历的为文件时,停止递归
            if dir.endswith(suffix):
                out_files.append(cur_path)


def file_picker(database, regex_fmt=None, year_func=None, month_func=None, day_func=None, tile_func=None):
    """
    筛选database包含的所有路径中符合条件的hdf文件,并返回符合条件的hdf文件构成的列表

    输入
    ----------
    database:List[str]
        由包含有hdf文件的文件夹组成的列表
    regex_fmt:str
        筛选用到的正则表达式
    year_func: function
        关键词 年 的筛选函数
    month_func:function
        关键词 月 的筛选函数
    day_func:function
        关键词 日 的筛选函数
    tiles_func:function,str
        关键词 区块 的筛选函数

    注意
    ------
    需保证database中的必须来自于相同的产品

    输出
    -------
    files_usable:List[str]
        由满足筛选条件的hdf文件的绝对路径构成的列表

    例子
    -------
    # 函数筛选模式:筛选时间为2010年的数据
    >> t = file_picker([r"J:MOD13A1"], year_func=lambda x: x in [2010])

    # 正则表达式筛选模式:筛选时间为2000,区块为h23v04的区块
    >> t = file_picker([r"J:MOD13A1"], regex_fmt="MOD13A1.(A2000)+.*(h23v04)+")
    """
    # 导出database中所有的.hdf文件的绝对路径导出到列表files中
    files = []
    for path in database:
        show_files(path=path, out_files=files, suffix=".hdf")

    files_usable = []

    # 筛选模式1:当正则表达式regex_fmt不为空时,启用正则表达式对符合条件的hdf文件进行筛选
    if regex_fmt is not None:
        for file in files:
            if re.search(regex_fmt, os.path.split(file)[1]):
                files_usable.append(file)

    # 筛选模式2:利用年、月、日、区块函数对hdf文件进行筛选
    if year_func is None and month_func is None and day_func is None and tile_func is None:
        # 当没有任何筛选条件时
        files_usable = files
    else:
        for file in files:
            folder, fname = os.path.split(file)
            year, month, day = num_cvt_date(year=int(fname.split(".")[1][1:5]), num=int(fname.split(".")[1][5:]))
            tile = fname.split(".")[2]
            info = year, month, day, tile
            is_available = True  # 是否满足条件
            for i, func in enumerate([year_func, month_func, day_func, tile_func]):
                if func is not None:
                    # 如果当前的筛选条件不为空时,判断是否满足条件
                    judge_res = func(info[i])
                    if not judge_res:
                        # 如果不满足条件
                        is_available = False
                        break
            if is_available:
                files_usable.append(file)
    if len(files_usable) < 1:
        raise Exception("the number of hdf files picked is zero!")
    else:
        print("%d hdf files were collected" % len(files_usable))
    return files_usable


if __name__ == "__main__":
    t = file_picker([r"J:MOD13A1"], year_func=lambda x: x in [2010])
    pprint(t)
    print("===")
    t = file_picker([r"J:MOD13A1"], regex_fmt="MOD13A1.(A2000)+.*(h23v04)+")
    pprint(t)
    print(len(t))
3.2 批处理工具batch_tools.py
# -*- coding: utf-8 -*-
import sys

arcpy_path = [r'C:Program Files (x86)ArcGISDesktop10.2arcpy',
              r'C:Program Files (x86)ArcGISDesktop10.2bin',
              r'C:Program Files (x86)ArcGISDesktop10.2ArcToolboxScripts']  # 修改成Arcgis安装对应路径
sys.path.extend(arcpy_path)

import os
import time
import arcpy


def batch_extract_sds(hdfs, out_dir, sds_index=0, suffix="NDVI"):
    """
    批量提取子数据集工具

    Parameters
    ----------
    hdfs:List[str]
        由hdf文件的绝对路径组成的列表
    out_dir:str
        提取子数据集后的输出路径
    sds_index:int
        待提取的子数据集的索引,从0开始
    suffix:str
        提取子数据集时生成新栅格文件的后缀,默认为"NDVI"

    Examples
    ----------
    # 将in_dir文件夹(不包含嵌套文件夹)中hdf文件中索引为0的子数据集提取到in_dir中并保存为栅格文件tif
    >> in_dir = r"S:mod13q1"
    >> hdfs = [os.path.join(in_dir, n) for n in os.listdir(in_dir) if n.endswith(".hdf")]
    >> batch_extract_sds(hdfs, out_dir=in_dir)
    1/6 | S:mod13q1MOD13Q1.A2021065.h27v05.006.2021084125851.NDVI.tif completed, time used 8.40s
    2/6 | S:mod13q1MOD13Q1.A2021081.h27v05.006.2021098014919.NDVI.tif completed, time used 2.95s
    3/6 | S:mod13q1MOD13Q1.A2021097.h27v05.006.2021115204928.NDVI.tif completed, time used 2.91s
    ...
    """
    nums = len(hdfs)
    num = 1
    for hdf in hdfs:
        s = time.time()
        base_name = os.path.splitext(os.path.basename(hdf))[0]  # hdf文件的名字,不含扩展名
        out_tif = os.path.join(out_dir, base_name + "." + "{0}.tif".format(suffix))
        if not os.path.exists(out_tif):
            try:
                arcpy.ExtractSubDataset_management(hdf, out_tif, sds_index)
                e = time.time()
                print("%d/%d | %s completed, time used %.2fs" % (num, nums, out_tif, e - s))
            except Exception as err:
                print("%d/%d | %s errored, %s" % (num, nums, out_tif, err))
        else:
            print("%d/%d | %s already exists" % (num, nums, out_tif))
        num += 1


def normal_mosaic_rule(fname):
    """
    执行批量拼接操作的分组规则,默认为同一产品的某一天

    Parameters
    ----------
    fname:str
        文件名,例如"MOD13Q1.A2012065.h27v05.006.2015238151959.NDVI.tif"

    Returns
    -------
        当前栅格文件所属的组名,如"MOD13Q1.A2012065.tif"

    """
    return '.'.join(fname.split('.')[:2]) + '.' + '.'.join(fname.split('.')[-2:])


def group_tifs(tif_names, group_func="mosaic"):
    """
    Parameters
    ----------
    tif_names:List[str]
        参与分组的文件名
    group_func:str,or function
        计算所属分组用到的函数

    Returns
    -------
    grouped_tifs:dict
        键为所属的分组名,值为满足当前分组的栅格文件路径组成的列表
    """
    if group_func == "mosaic":
        group_func = normal_mosaic_rule
    grouped_tifs = {}
    for tif_name in tif_names:
        k = group_func(tif_name)
        if k in grouped_tifs:
            grouped_tifs[k].append(tif_name)
        else:
            grouped_tifs[k] = []
            grouped_tifs[k].append(tif_name)
    return grouped_tifs


def batch_mosaic(in_dir, out_dir, groups=None, pixel_type="16_BIT_SIGNED", mosaic_method="MAXIMUM",
                 colormap_mode="FIRST"):
    """
    批量拼接工具

    对in_dir中的所有.tif文件按照groups中的文件名分组方式进行拼接

    Parameters
    ----------
    in_dir:str
        输入目录
    out_dir:str
        输出目录
    groups:dict
        键为组名,值为当前组对应的文件名列表
    pixel_type:str
        指定输出栅格数据集的位深度,默认为"16_BIT_SIGNED"
    mosaic_method:str
        用于镶嵌重叠的方法,默认为"LAST"
    colormap_mode:str
        对输入栅格中应用于镶嵌输出的色彩映射表进行选择的方法,默认为"FIRST"

    Examples
    ----------
    # 输入文件夹中包含h26v05、h27v05两个区块对应七个日期的栅格,共计14个文件。该工具会按照文件名命名将属于同一日期的栅格拼接到一起
    >> in_dir = r"S:M11D51_extract"
    >> batch_mosaic(in_dir, out_dir=in_dir, pixel_type="16_BIT_SIGNED", mosaic_method="MAXIMUM",
                    colormap_mode="FIRST")
    1/7 | MOD13Q1.A2000113.EVI.tif completed, time used 6.45s
    2/7 | MOD13Q1.A2000145.EVI.tif completed, time used 6.13s
    3/7 | MOD13Q1.A2000081.EVI.tif completed, time used 6.05s
    ...
    """
    tif_names = [n for n in os.listdir(in_dir) if n.endswith(".tif")]
    if groups is None:
        groups = group_tifs(tif_names, group_func="mosaic")
    arcpy.env.workspace = in_dir
    base = tif_names[0]
    out_coor_system = arcpy.Describe(base).spatialReference
    cell_width = arcpy.Describe(base).meanCellWidth
    band_count = arcpy.Describe(base).bandCount
    nums = len(groups)
    num = 1
    for i in groups:
        s = time.time()
        groups[i] = ';'.join(groups[i])
        if not os.path.exists(os.path.join(out_dir, i)):
            try:
                arcpy.MosaicToNewRaster_management(groups[i], out_dir, i, out_coor_system, pixel_type, cell_width,
                                                   band_count, mosaic_method, colormap_mode)
                e = time.time()
                print("%d/%d | %s completed, time used %.2fs" % (num, nums, i, e - s))
            except Exception as err:
                print("%d/%d | %s errored, %s" % (num, nums, i, err))
        else:
            print("%d/%d | %s already exists" % (num, nums, i))
        num = num + 1


def batch_project_raster(rasters, out_dir, prefix="pr_", out_coor_system="WGS_1984.prj",
                         resampling_type="NEAREST", cell_size="#"):
    """
    批量投影栅格工具

    Parameters
    ----------
    rasters:List[str]
        由待进行投影栅格操作的栅格文件的绝对路径组成的列表
    out_dir:str
        批量投影栅格后的输出文件夹
    prefix:str
        投影后栅格的新文件名的前缀
    out_coor_system:
        待投影到的目标坐标系文件路径(.prj)
    resampling_type:str
        要使用的重采样算法。默认设置为 NEAREST。
        NEAREST —最邻近分配法
        BILINEAR —双线性插值法
        CUBIC —三次卷积插值法
        MAJORITY —众数重采样法
    cell_size:str
        新栅格数据集的像元大小。
        若输出分辨率为250m,则为”250 250"

    Examples
    ----------
    # 将文件夹中的所有栅格投影到wgs_1984_utm48N坐标系,最邻近重采样,像元大小500m
    >> in_dir = r"S:ndvi"
    >> out_dir = r"S:ndvi500m"
    >> tifs = [os.path.join(in_dir,n) for n in os.listdir(in_dir) if n.endswith(".tif")]
    >> batch_project_raster(tifs, out_dir=out_dir, out_coor_system=r"S:utm48n.prj",
                            resampling_type="NEAREST", cell_size="500 500")
    1/6 | S:ndvi500mpr_zone_MOD13Q1.A2021065.EVI.tif completed, time used 6.84s
    2/6 | S:ndvi500mpr_zone_MOD13Q1.A2021081.EVI.tif completed, time used 1.27s
    3/6 | S:ndvi500mpr_zone_MOD13Q1.A2021097.EVI.tif completed, time used 1.28s
    ...
    """
    if arcpy.CheckExtension("Spatial") != "Available":
        print("Error!!! Spatial Analyst is unavailable")

    nums = len(rasters)
    num = 1
    for raster in rasters:
        s = time.time()
        raster_name = os.path.split(raster)[1]
        out_raster = os.path.join(out_dir, prefix + raster_name)  # 投影后栅格的绝对路径
        if not os.path.exists(out_raster):
            try:
                arcpy.ProjectRaster_management(raster, out_raster, out_coor_system, resampling_type, cell_size, "#",
                                               "#", "#")
                e = time.time()
                print("%d/%d | %s completed, time used %.2fs" % (num, nums, out_raster, e - s))
            except Exception as err:
                print("%d/%d | %s errored, %s" % (num, nums, out_raster, err))
        else:
            print("%d/%d | %s already exists" % (num, nums, raster))
        num = num + 1


def batch_clip_raster(rasters, out_dir, masks):
    """
    批量裁剪工具

    Parameters
    ----------
    rasters:List[str]
        由待进行裁剪操作的栅格文件组成的列表
    out_dir:str
        批量裁剪后的输出文件夹
    masks:List
        将作为剪切范围使用的已有栅格或矢量图层

    Examples
    ----------
    >> tifs = [u'H:\NDVI_china\scriptTest\0_ndvi\A2004001.NDVI.tif',
               u'H:\NDVI_china\scriptTest\0_ndvi\A2004032.NDVI.tif',
               u'H:\NDVI_china\scriptTest\0_ndvi\A2004061.NDVI.tif']
    >> masks = [u'H:\NDVI_china\scriptTest\0_shapefiles\anhui.shp',
                u'H:\NDVI_china\scriptTest\0_shapefiles\beijing.shp']
    >> batch_clip_raster(rasters=tifs,masks=masks,out_dir=r"S:test2")
    1/6 | anhui_A2004001.NDVI.tif Completed, time used 5.54s
    2/6 | anhui_A2004032.NDVI.tif Completed, time used 0.13s
    3/6 | anhui_A2004061.NDVI.tif Completed, time used 0.13s
    ...
    """
    nums = len(rasters) * len(masks)
    num = 1
    for i, mask in enumerate(masks):
        mask_name = os.path.splitext(os.path.basename(mask))[0]  # 当不指定裁剪后的文件前缀时,为掩膜文件的文件名
        for raster in rasters:
            s = time.time()
            old_raster_name = os.path.splitext(os.path.basename(raster))[0]
            new_raster_name = "{0}_{1}.tif".format(mask_name, old_raster_name.split("_")[-1])
            out_raster = os.path.join(out_dir, new_raster_name)
            if not os.path.exists(out_raster):
                try:
                    arcpy.Clip_management(raster, "#", out_raster, mask, "0", "ClippingGeometry")
                    e = time.time()
                    print("%d/%d | %s completed, time used %.2fs" % (num, nums, out_raster, e - s))
                except Exception as err:
                    print("%d/%d | %s errored, %s" % (num, nums, out_raster, err))
            else:
                print("%d/%d | %s already exists" % (num, nums, out_raster))
            num += 1


def batch_multiply(rasters, out_dir, scale_factor=0.0001, prefix="scaled_"):
    """
    批量乘工具

    Parameters
    ----------
    rasters:List[str]
        由待进行乘操作的栅格文件组成的列表
    out_dir:str
        批量乘后的输出文件夹
    scale_factor:float
        默认为0.0001,对应NDVI
    prefix:str,optional
        执行乘操作后文件的前缀,默认为“scaled_"

    Examples
    -------
    >> in_dir = r"S:mod13unscale"
    >> tifs = [os.path.join(in_dir, n) for n in os.listdir(in_dir) if n.endswith(".tif")]
    >> batch_multiply(tifs, out_dir=r"S:mod13scaled")
    1/6 | S:mod13scaled4_clipscaled_zone_MOD13Q1.A2021065.EVI.tif completed, time used 5.65s
    2/6 | S:mod13scaled4_clipscaled_zone_MOD13Q1.A2021081.EVI.tif completed, time used 0.07s
    3/6 | S:mod13scaled4_clipscaled_zone_MOD13Q1.A2021097.EVI.tif completed, time used 0.07s
    ...
    """
    scale_factor = str(scale_factor)
    arcpy.CheckOutExtension("Spatial")
    if arcpy.CheckExtension("Spatial") != "Available":
        print("Error!!! Spatial Analyst is unavailable")

    nums = len(rasters)
    num = 1
    for raster in rasters:
        s = time.time()
        raster_name = os.path.split(raster)[1]
        out_raster = os.path.join(out_dir, prefix + raster_name)  # 投影后栅格的绝对路径
        if not os.path.exists(out_raster):
            try:
                arcpy.gp.Times_sa(raster, scale_factor, out_raster)
                e = time.time()
                print("%d/%d | %s completed, time used %.2fs" % (num, nums, out_raster, e - s))
            except Exception as err:
                print("%d/%d | %s errored, %s" % (num, nums, out_raster, err))
        else:
            print("%d/%d | %s already exists" % (num, nums, out_raster))
        num = num + 1


def batch_setnull(rasters, out_dir, condition="VALUE>65528", prefix="sn_"):
    """
    批量将栅格的无效像元设为空

    Parameters
    ----------
    rasters:List[str]
        输入栅格文件的绝对路径组成的列表
    out_dir:str
        批量设为空的输出文件夹
    condition:str
        决定输入像元为真或假的逻辑表达式,默认为"VALUE >65528"
    prefix:str,optional
        处理后栅格文件名的前缀,默认为"sn_"

    Examples
    ----------
    >> in_dir = r"S:M11D45_scale"
    >> tifs = [os.path.join(in_dir, n) for n in os.listdir(in_dir) if n.endswith(".tif")]
    >> batch_setnull(tifs, out_dir=r"S:M11D46_sn", condition="VALUE < 0")
    1/6 | S:M11D46_snsn_zone_MOD13Q1.A2021065.EVI.tif completed, time used 5.56s
    2/6 | S:M11D46_snsn_zone_MOD13Q1.A2021081.EVI.tif completed, time used 0.06s
    3/6 | S:M11D46_snsn_zone_MOD13Q1.A2021097.EVI.tif completed, time used 0.06s
    ...
    """
    arcpy.CheckOutExtension("Spatial")
    nums = len(rasters)
    num = 1
    for raster in rasters:
        s = time.time()
        raster_name = os.path.split(raster)[1]
        out_raster = os.path.join(out_dir, prefix + raster_name)  # 投影后栅格的绝对路径
        if not os.path.exists(out_raster):
            try:
                arcpy.gp.SetNull_sa(raster, raster, out_raster, condition)
                e = time.time()
                print("%d/%d | %s completed, time used %.2fs" % (num, nums, out_raster, e - s))
            except Exception as err:
                print("%d/%d | %s errored, %s" % (num, nums, out_raster, err))
        else:
            print("%d/%d | %s already exists" % (num, nums, out_raster))
        num = num + 1
2.3 综合处理模块preprocessing.py
# -*- coding: utf-8 -*-

"""
@File    : preprocessing.py
@Author  : salierib
@Time    : 2021/11/4 15:08
@QQ群: 582151631
@Version:
"""
import batch_tools
import os
import time


def find_tifs(in_dir):
    """
    返回文件夹in_dir中所有扩展名为.tif的文件

    Parameters
    ----------
    in_dir:str
        待查找的文件夹

    Returns
    -------
    由tif文件的绝对路径组成的列表
    """
    return [os.path.join(in_dir, fname) for fname in os.listdir(in_dir) if fname.endswith(".tif")]


def localtime():
    """
    返回当前时间,格式为Thu Apr 07 10:25:09 2016

    Returns
    -------

    """
    return time.strftime("%Y-%m-%d %H:%M:%S", time.localtime())


def mod13preprocess(workspace, hdfs, masks, out_coor_system, cell_size="#",
                    sds_index=0, sds_name="NDVI",
                    pixel_type="16_BIT_SIGNED", mosaic_method="LAST", colormap_mode="FIRST",
                    pr_prefix="pr_", resampling_type="NEAREST",
                    scale_prefix="", scale_factor=0.0001):
    """
    Parameters
    ----------
    workspace:str
        整个流程的工作目录,预处理产生的中间数据会被存储到这
    hdfs:list[str]
        由待处理的.hdf文件绝对路径所在的列表
    masks:list[str]
        将作为剪切范围使用的已有栅格或矢量图层
    out_coor_system:str
        投影栅格时目标坐标系文件(.prj)的路径,扩展名为“.prj”的文件(ArcGIS自带的prj文件可在“C:Program FilesArcGISCoordinate Systems”中找到)。
    cell_size:str
        投影栅格时新栅格的目标像元大小,默认为"#",若目标分辨率为250m,则设置为”250 250"
    sds_index:int
        提取子数据集时待提取的子数据集的索引(从0开始)
    sds_name:str
        提取子数据集时生成新栅格文件的后缀,如"NDVI"
    pixel_type:str
        拼接栅格过程中指定输出栅格数据集的位深度,默认为16位有符号整型"16_BIT_SIGNED"
    mosaic_method:str
        拼接栅格过程中用于镶嵌重叠的方法,默认为"LAST"
    colormap_mode:str
        拼接栅格过程中对输入栅格中应用于镶嵌输出的色彩映射表进行选择的方法,默认为"FIRST"
    pr_prefix:str
        投影栅格时生成新栅格文件的前缀,默认为"pr_"
    resampling_type:str
        投影栅格时要使用的重采样算法,默认采用最邻近算法"NEAREST"
    scale_prefix:str
        乘以缩放因子时生成新栅格文件的前缀,默认为""
    scale_factor:float
        子数据集的缩放因子,原始像元值乘以缩放因子后得到单位换算后的真实变量值,默认为0.0001
    """
    # 在workspace工作目录中建立一个文件夹作为所有预处理操作的缓存文件夹
    if not os.path.exists(workspace):
        os.mkdir(workspace)

    # 在新建五个文件夹,分别存放五个预处理步骤中产生的文件
    dir_names = ["1_extract", "2_mosaic", "3_reproject", "4_clip", "5_scale"]
    dirs = [os.path.join(workspace, name) for name in dir_names]
    for dir in dirs:
        if not os.path.exists(dir):
            os.mkdir(dir)

    # step1
    s = time.time()
    print("Starting step 1/5: extract subdataset into {0}... {1}".format(dirs[0], localtime()))
    batch_tools.batch_extract_sds(hdfs, dirs[0], sds_index=sds_index, suffix=sds_name)
    e = time.time()
    print("Time for step1 = {0} seconds. {1}n".format(e - s, localtime()))

    # step2
    s = time.time()
    print("Starting step 2/5: mosaic raster into {0}... {1}".format(dirs[1], localtime()))
    batch_tools.batch_mosaic(dirs[0], dirs[1], pixel_type=pixel_type, mosaic_method=mosaic_method,
                             colormap_mode=colormap_mode)
    e = time.time()
    print("Time for step2 = {0} seconds. {1}n".format(e - s, localtime()))

    # step3
    s = time.time()
    print("Starting step 3/5: reproject raster into {0}... {1}".format(dirs[2], localtime()))
    rasters = find_tifs(dirs[1])
    batch_tools.batch_project_raster(rasters, dirs[2], prefix=pr_prefix, out_coor_system=out_coor_system,
                                     resampling_type=resampling_type, cell_size=cell_size)
    e = time.time()
    print("Time for step3 = {0} seconds. {1}n".format(e - s, localtime()))

    # step4
    s = time.time()
    print("Starting step 4/5: clip raster into {0}... {1}".format(dirs[3], localtime()))
    rasters = find_tifs(dirs[2])
    batch_tools.batch_clip_raster(rasters, dirs[3], masks=masks)
    e = time.time()
    print("Time for step4 = {0} seconds. {1}n".format(e - s, localtime()))

    # step5
    s = time.time()
    print("Starting step 5/5:raster times scale factor into {0}... {1}".format(dirs[4], localtime()))
    tifs = find_tifs(dirs[3])
    batch_tools.batch_multiply(tifs, out_dir=dirs[4], prefix=scale_prefix, scale_factor=scale_factor)
    e = time.time()
    print("Time for step5 = {0} seconds. {1}n".format(e - s, localtime()))


def mod16preprocess(workspace, hdfs, masks, out_coor_system, cell_size="#",
                    sds_index=0, sds_name="ET",
                    pixel_type="16_BIT_UNSIGNED", mosaic_method="LAST", colormap_mode="FIRST",
                    pr_prefix="pr_", resampling_type="NEAREST",
                    sn_prefix="sn_", condition="VALUE > 65528",
                    scale_prefix="", scale_factor=0.1):
    """
    Parameters
    ----------
    workspace:str
        整个流程的工作目录,预处理产生的中间数据会被存储到这
    hdfs:list[str]
        由待处理的.hdf文件绝对路径所在的列表
    masks:list[str]
        将作为剪切范围使用的已有栅格或矢量图层
    out_coor_system:str
        投影栅格时目标坐标系文件(.prj)的路径,扩展名为“.prj”的文件(ArcGIS自带的prj文件可在“C:Program FilesArcGISCoordinate Systems”中找到)。
    cell_size:str
        投影栅格时新栅格的目标像元大小,默认为"#",若目标分辨率为250m,则设置为”250 250"
    sds_index:int
        提取子数据集时待提取的子数据集的索引(从0开始)
    sds_name:str
        提取子数据集时生成新栅格文件的后缀,如"NDVI"
    pixel_type:str
        拼接栅格过程中指定输出栅格数据集的位深度,默认为16位有符号整型"16_BIT_SIGNED"
    mosaic_method:str
        拼接栅格过程中用于镶嵌重叠的方法,默认为"LAST"
    colormap_mode:str
        拼接栅格过程中对输入栅格中应用于镶嵌输出的色彩映射表进行选择的方法,默认为"FIRST"
    pr_prefix:str
        投影栅格时生成新栅格文件的前缀,默认为"pr_"
    resampling_type:str
        投影栅格时要使用的重采样算法,默认采用最邻近算法"NEAREST"
    sn_prefix:str
        设为空函数时生成新栅格文件的前缀,默认为""
    condition:str
        决定输入像元为真或假的逻辑表达式,默认为"VALUE >65528"
    scale_prefix:str
        乘以缩放因子生成新栅格文件的前缀,默认为""
    scale_factor:float
        子数据集的缩放因子,原始像元值乘以缩放因子后得到单位换算后的真实变量值,默认为0.0001
    """
    # 在workspace工作目录中建立一个文件夹作为所有预处理操作的缓存文件夹
    if not os.path.exists(workspace):
        os.mkdir(workspace)

    # 在新建五个文件夹,分别存放五个预处理步骤中产生的文件
    dir_names = ["1_extract", "2_mosaic", "3_reproject", "4_clip", "5_setn", "6_scale"]
    dirs = [os.path.join(workspace, name) for name in dir_names]
    for dir in dirs:
        if not os.path.exists(dir):
            os.mkdir(dir)

    # step1
    s = time.time()
    print("Starting step 1/6: extract subdataset into {0}... {1}".format(dirs[0], localtime()))
    batch_tools.batch_extract_sds(hdfs, dirs[0], sds_index=sds_index, suffix=sds_name)
    e = time.time()
    print("Time for step1 = {0} seconds. {1}n".format(e - s, localtime()))

    # step2
    s = time.time()
    print("Starting step 2/6: mosaic raster into {0}... {1}".format(dirs[1], localtime()))
    batch_tools.batch_mosaic(dirs[0], dirs[1], pixel_type=pixel_type, mosaic_method=mosaic_method,
                             colormap_mode=colormap_mode)
    e = time.time()
    print("Time for step2 = {0} seconds. {1}n".format(e - s, localtime()))

    # step3
    s = time.time()
    print("Starting step 3/6: reproject raster into {0}... {1}".format(dirs[2], localtime()))
    rasters = find_tifs(dirs[1])
    batch_tools.batch_project_raster(rasters, dirs[2], prefix=pr_prefix, out_coor_system=out_coor_system,
                                     resampling_type=resampling_type, cell_size=cell_size)
    e = time.time()
    print("Time for step3 = {0} seconds. {1}n".format(e - s, localtime()))

    # step4
    s = time.time()
    print("Starting step 4/6: clip raster into {0}... {1}".format(dirs[3], localtime()))
    rasters = find_tifs(dirs[2])
    batch_tools.batch_clip_raster(rasters, dirs[3], masks=masks)
    e = time.time()
    print("Time for step4 = {0} seconds. {1}n".format(e - s, localtime()))

    # step5
    s = time.time()
    print("Starting step 5/6: exclude invalid value, into {0}... {1}".format(dirs[4], localtime()))
    rasters = find_tifs(dirs[3])
    batch_tools.batch_setnull(rasters, dirs[4], condition=condition, prefix=sn_prefix)
    e = time.time()
    print("Time for step5 = {0} seconds. {1}n".format(e - s, localtime()))

    # step6
    s = time.time()
    print("Starting step 6/6: raster times scale factor into {0}... {1}".format(dirs[5], localtime()))
    tifs = find_tifs(dirs[4])
    batch_tools.batch_multiply(tifs, out_dir=dirs[5], prefix=scale_prefix, scale_factor=scale_factor)
    e = time.time()
    print("Time for step6 = {0} seconds. {1}n".format(e - s, localtime()))
三、使用例
代码运行时间基于如下的硬件配置:
CPU—ryzen3700x
内存—64g ddr4 2666
工作路径建议设置为固态硬盘
2.1 基于MOD13Q1加工某地NDVI栅格
- 原始hdf文件夹:S:tmp
- 研究区边界文件:S:zone.shp
- 目标坐标系:WGS_1984
from preprocessing import mod13preprocess
from file_picker import file_picker

hdf_dir = [r"S:tmp"]
hdfs = file_picker(hdf_dir)

mod13preprocess(workspace=r"S:M11D3",
                hdfs=hdfs,
                masks=[r"S:zone.shp"],
                out_coor_system=r"S:WGS_1984.prj")
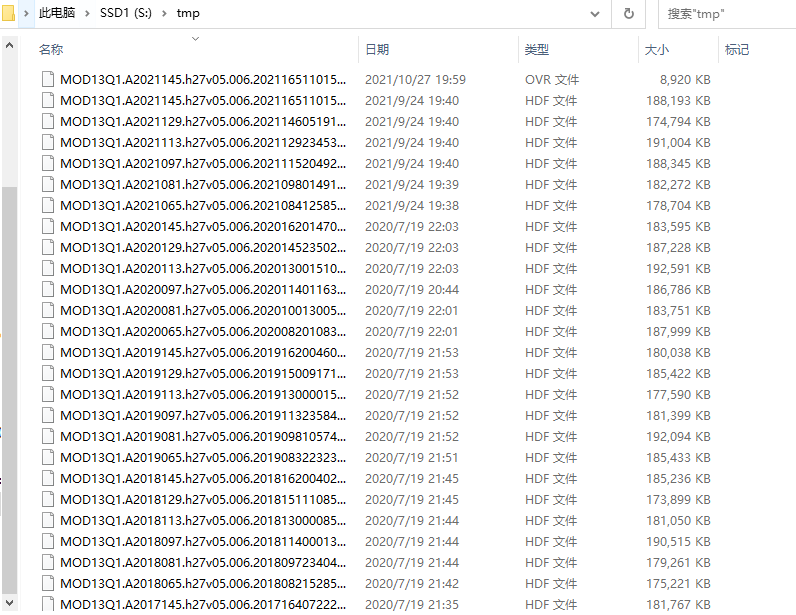
原始hdf文件
h27v05区块总计61个hdf文件
运行用时
总计用时约10分钟
C:Python27ArcGIS10.2python.exe "E:/pycharm_save/MODIS preprocessing tool/csdn_11.3.py"
60 hdf files were collected
Starting step 1/5: extract subdataset into S:M11D31_extract... 2021-11-03 21:25:29
1/60 | S:M11D31_extractMOD13Q1.A2012065.h27v05.006.2015238151959.NDVI.tif completed, time used 8.89s
...
60/60 | S:M11D31_extractMOD13Q1.A2021145.h27v05.006.2021165110153.NDVI.tif completed, time used 3.14s
Time for step1 = 194.519999981 seconds. 2021-11-03 21:28:44

Starting step 2/5: mosaic raster into S:M11D32_mosaic... 2021-11-03 21:28:44
1/60 | MOD13Q1.A2017065.NDVI.tif completed, time used 2.48s
...
60/60 | MOD13Q1.A2016129.NDVI.tif completed, time used 2.41s
Time for step2 = 149.61500001 seconds. 2021-11-03 21:31:13

Starting step 3/5: reproject raster into S:M11D33_reproject... 2021-11-03 21:31:13
1/60 | S:M11D33_reprojectpr_MOD13Q1.A2012065.NDVI.tif completed, time used 3.82s
...
60/60 | S:M11D33_reprojectpr_MOD13Q1.A2021145.NDVI.tif completed, time used 3.69s
Time for step3 = 226.832000017 seconds. 2021-11-03 21:35:00

Starting step 4/5: clip rasters into S:M11D34_clip... 2021-11-03 21:35:00
1/60 | S:M11D34_cliputm48n_MOD13Q1.A2012065.NDVI.tif completed, time used 0.14s
...
Time for step4 = 6.84899997711 seconds. 2021-11-03 21:35:07

Starting step 5/5:raster times scale factor into S:M11D35_scale... 2021-11-03 21:35:07
1/60 | S:M11D35_scaleMOD13Q1.A2012065.NDVI.tif completed, time used 0.13s
...
60/60 | S:M11D35_scaleMOD13Q1.A2021145.NDVI.tif completed, time used 0.08s
Time for step5 = 4.93000006676 seconds. 2021-11-03 21:35:12
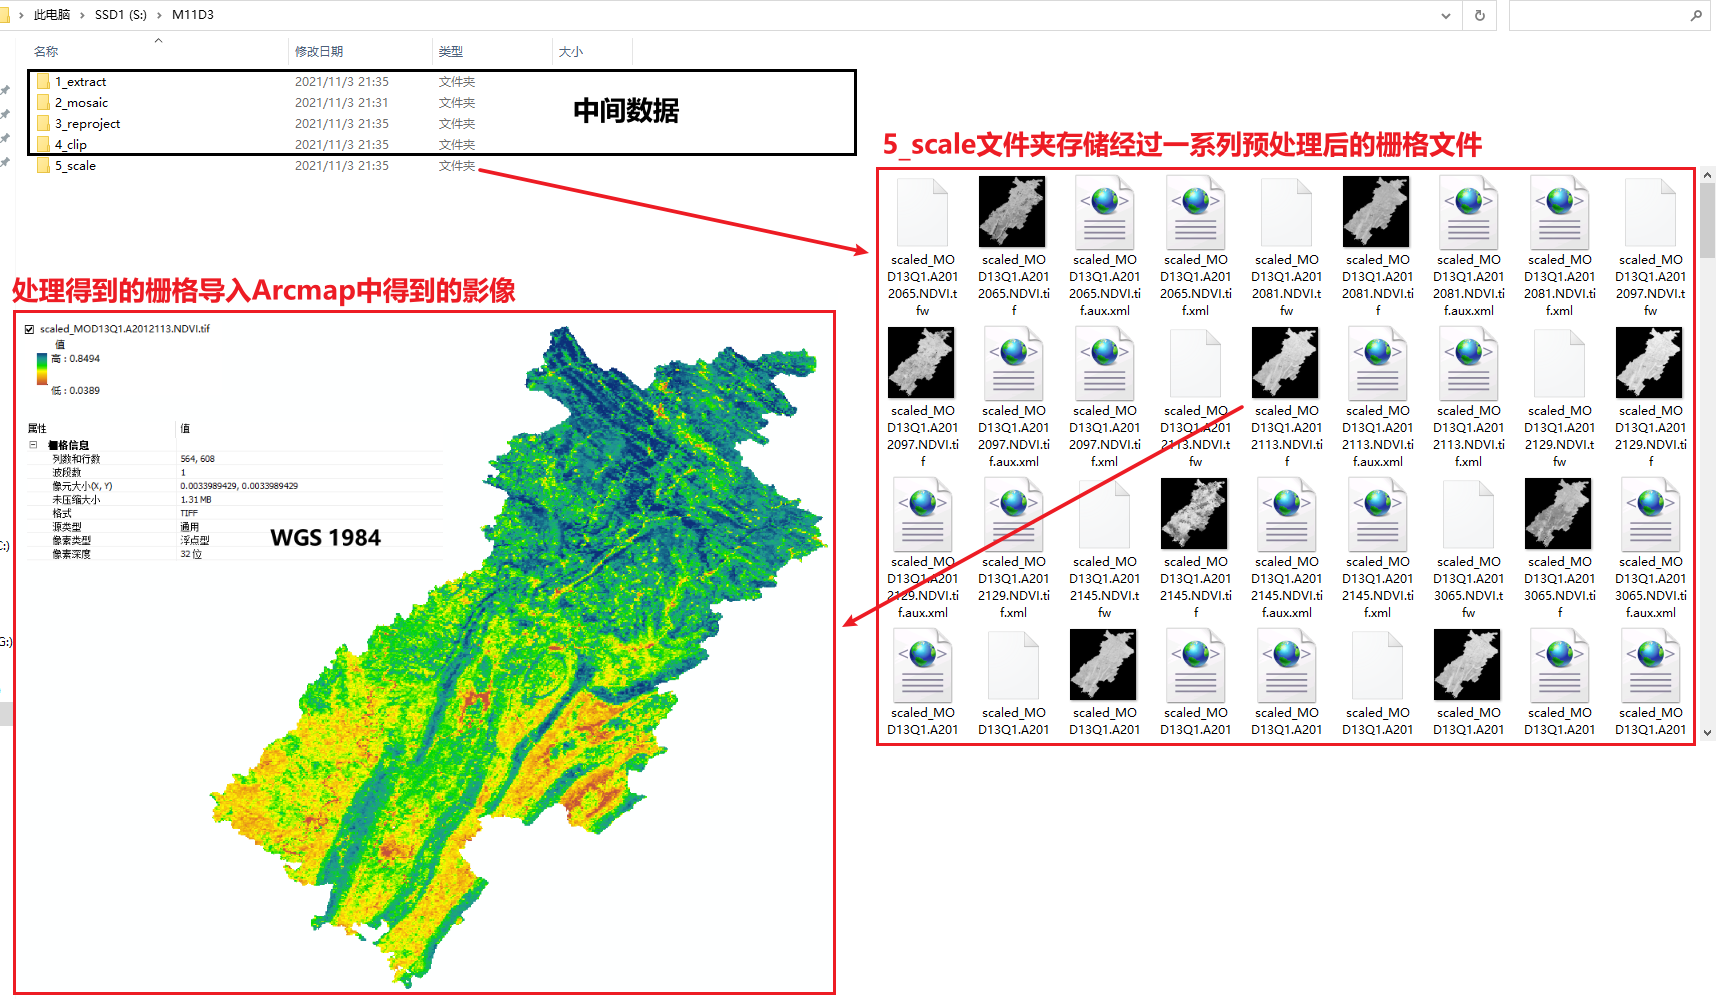
输出栅格及中间数据
2.2 基于MOD13Q1加工多地EVI栅格
from preprocessing import mod13preprocess
from file_picker import file_picker

hdf_dir = [r"S:tmp3"]
hdfs = file_picker(hdf_dir)

mod13preprocess(workspace=r"S:M11D5",
                hdfs=hdfs,
                masks=[r"S:tmp3nx.shp", r"S:tmp3sx.shp"],
                out_coor_system=r"S:WGS_1984.prj",
                cell_size="#",
                sds_index=1,
                sds_name="EVI",
                scale_prefix="scaled_")
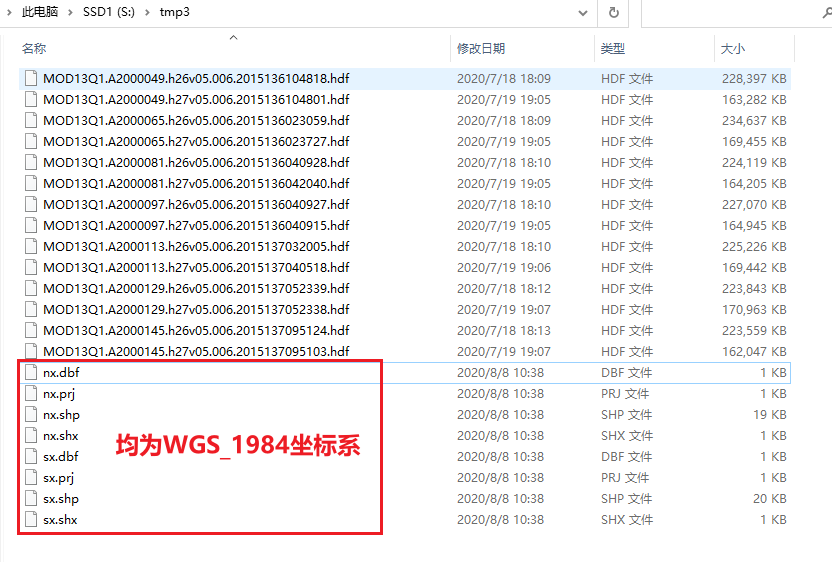
原始hdf文件
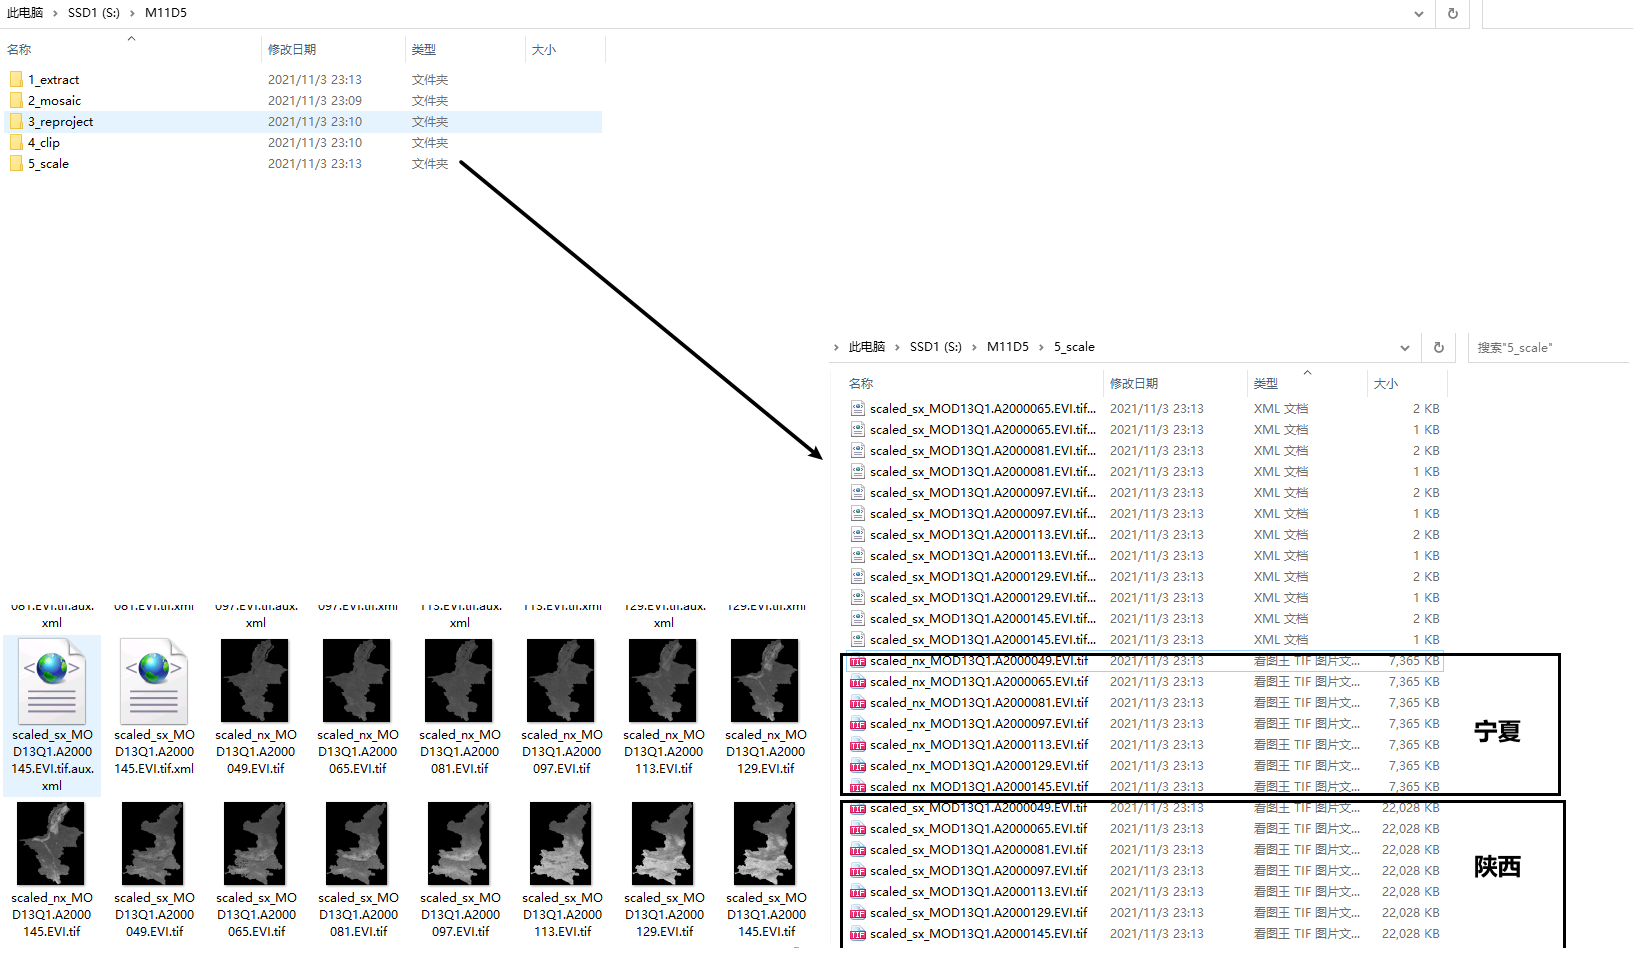
输出栅格及中间数据
2.3 基于MYD16A3加工ET、PET栅格
相比于MOD13NDVI的处理,MYD16A3中对于蒸散ET和潜在蒸散PET的加工,通常需要对特殊值区域进行排除,各子数据集的简介见下图(图来自https://lpdaac.usgs.gov/products/myd16a3gfv006/):
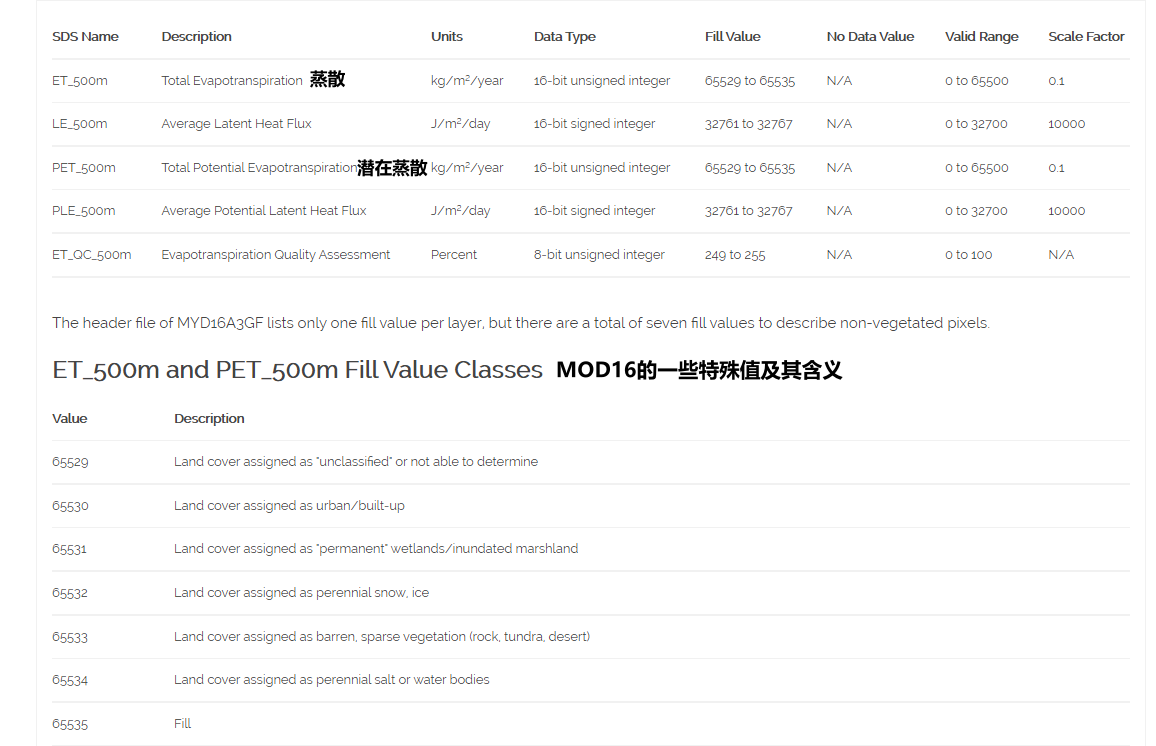
这些特殊值通常意味着裸地、水体、积雪等情况,MODIS对这些区域进行分类区分,并不会计算这些区域的ET、PET值,因此在处理过程中我们可以将这些像元视为数据缺失区域。相比于MOD13加工NDVI的操作流程,需要在裁剪之后添加设为空操作,如下
- 提取子数据集
- 镶嵌至新栅格
- 投影栅格
- 裁剪
- 特殊值区域设为空
- 乘以缩放因子
from preprocessing import mod16preprocess
from file_picker import file_picker

hdf_dir = [r"S:tmp4"]
hdfs = file_picker(hdf_dir)

mod16preprocess(workspace=r"S:ET_xj",
                hdfs=hdfs,
                masks=[r"S:tmp4xj.shp"],
                sds_index=0,
                sds_name="ET",
                out_coor_system=r"S:WGS_1984.prj")
原始hdf文件
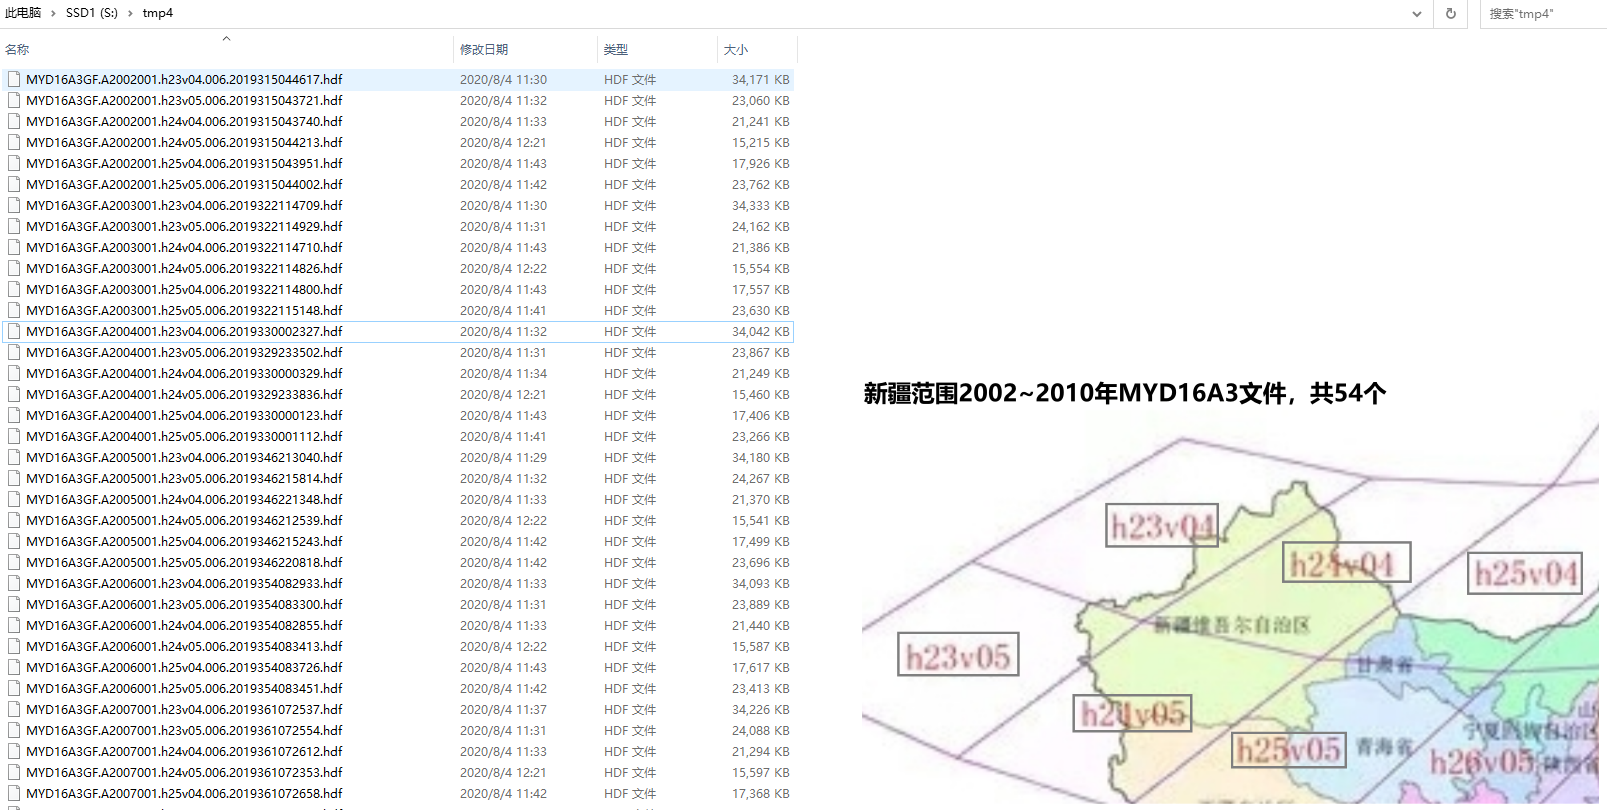
运行用时
总计用时约3分钟
C:Python27ArcGIS10.2python.exe "E:/pycharm_save/MODIS preprocessing tool/main.py"
54 hdf files were collected
Starting step 1/6: extract subdataset into S:ET_xj1_extract... 2021-11-04 22:45:35
1/54 | S:ET_xj1_extractMYD16A3GF.A2002001.h23v04.006.2019315044617.ET.tif completed, time used 6.48s
...
54/54 | S:ET_xj1_extractMYD16A3GF.A2010001.h25v05.006.2020013130707.ET.tif completed, time used 0.76s
Time for step1 = 46.4579999447 seconds. 2021-11-04 22:46:22

Starting step 2/6: mosaic raster into S:ET_xj2_mosaic... 2021-11-04 22:46:22
1/9 | MYD16A3GF.A2006001.ET.tif completed, time used 4.00s
...
9/9 | MYD16A3GF.A2002001.ET.tif completed, time used 3.79s
Time for step2 = 33.5360000134 seconds. 2021-11-04 22:46:55

Starting step 3/6: reproject raster into S:ET_xj3_reproject... 2021-11-04 22:46:55
1/9 | S:ET_xj3_reprojectpr_MYD16A3GF.A2002001.ET.tif completed, time used 5.37s
...
9/9 | S:ET_xj3_reprojectpr_MYD16A3GF.A2010001.ET.tif completed, time used 5.25s
Time for step3 = 47.4700000286 seconds. 2021-11-04 22:47:43

Starting step 4/6: clip raster into S:ET_xj4_clip... 2021-11-04 22:47:43
1/9 | S:ET_xj4_clipxj_MYD16A3GF.A2002001.ET.tif completed, time used 0.68s
...
9/9 | S:ET_xj4_clipxj_MYD16A3GF.A2010001.ET.tif completed, time used 0.61s
Time for step4 = 5.61999988556 seconds. 2021-11-04 22:47:49

Starting step 5/6: exclude invalid value, into S:ET_xj5_setn... 2021-11-04 22:47:49
1/9 | S:ET_xj5_setnsn_xj_MYD16A3GF.A2002001.ET.tif completed, time used 0.84s
...
9/9 | S:ET_xj5_setnsn_xj_MYD16A3GF.A2010001.ET.tif completed, time used 0.72s
Time for step5 = 6.60199999809 seconds. 2021-11-04 22:47:55

Starting step 6/6: raster times scale factor into S:ET_xj6_scale... 2021-11-04 22:47:55
1/9 | S:ET_xj6_scalesn_xj_MYD16A3GF.A2002001.ET.tif completed, time used 0.40s
...
9/9 | S:ET_xj6_scalesn_xj_MYD16A3GF.A2010001.ET.tif completed, time used 0.42s
Time for step5 = 3.82000017166 seconds. 2021-11-04 22:47:59
输出栅格及中间数据
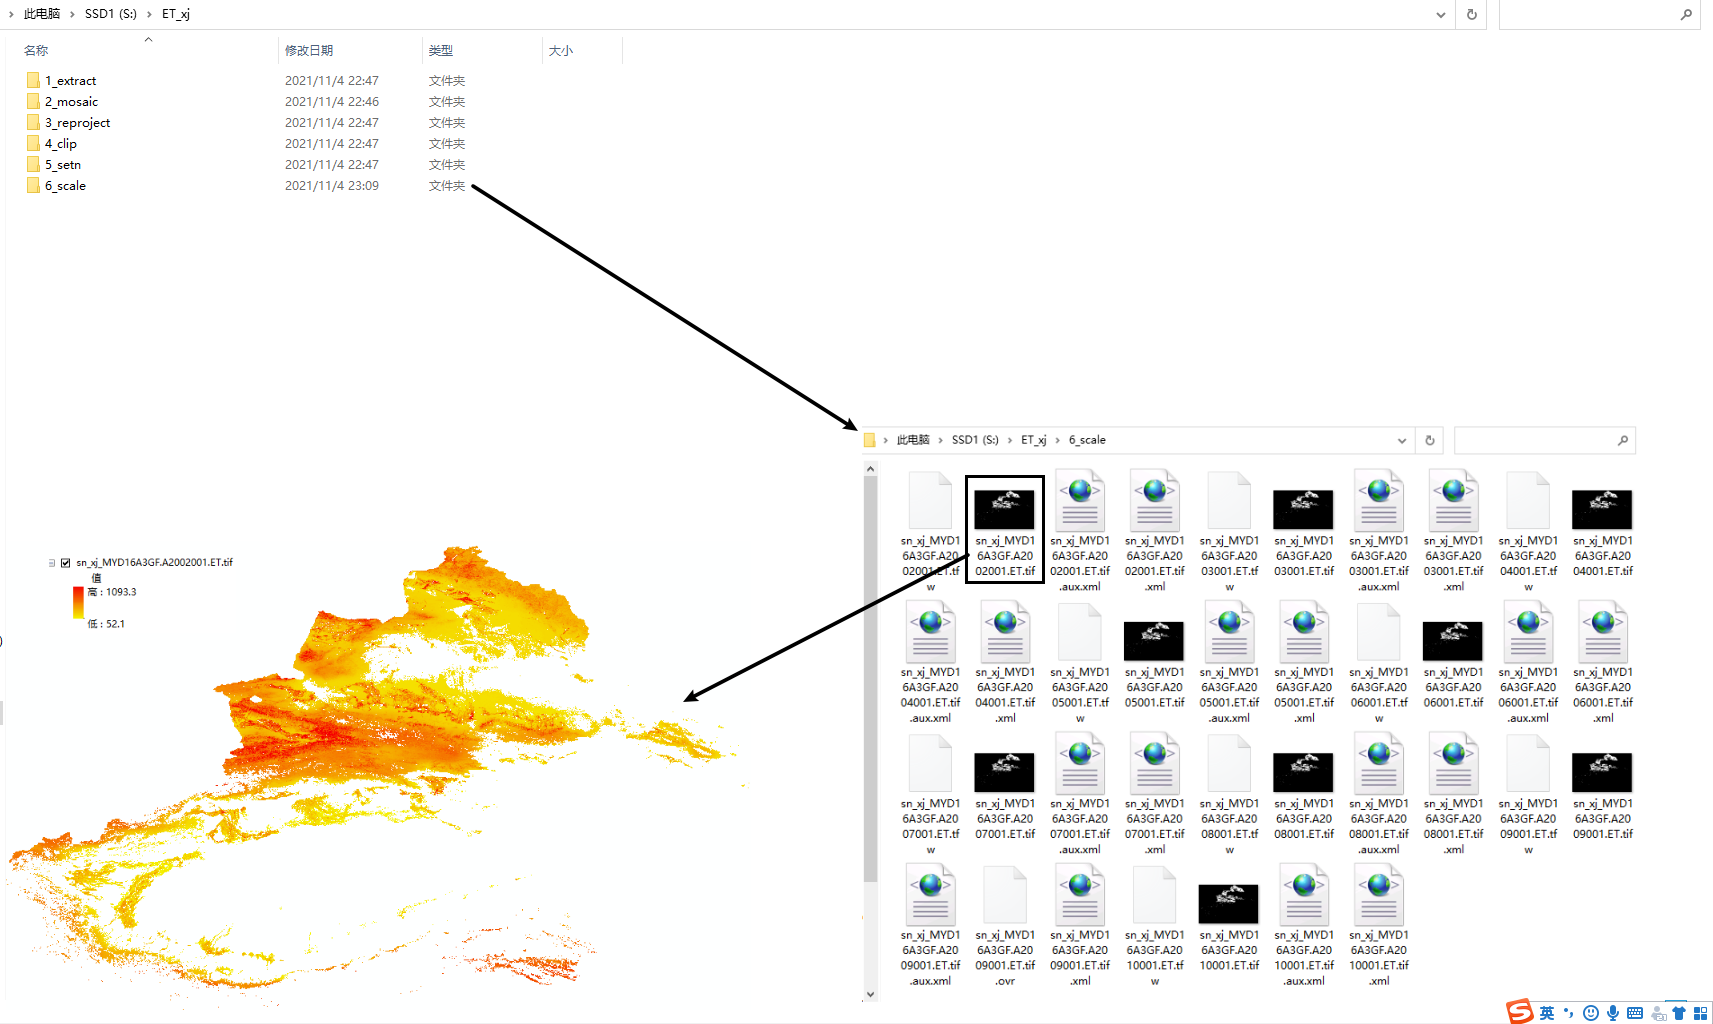
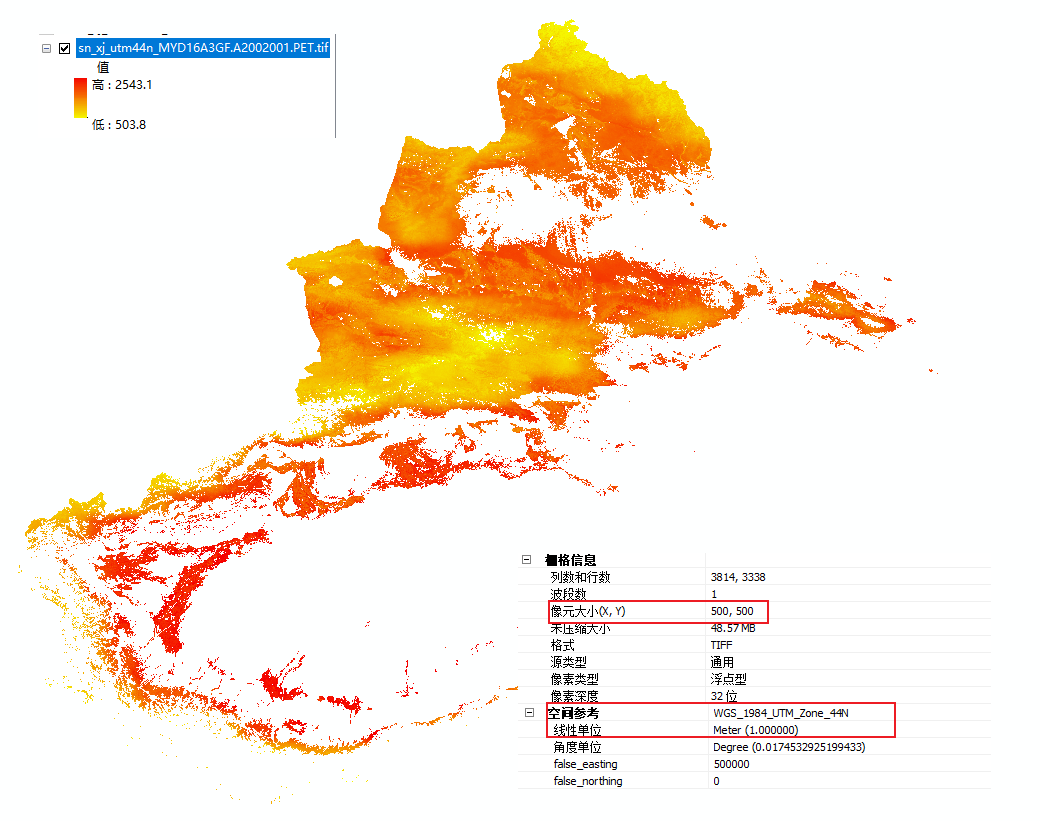
还可以提取PET,坐标系设置为wgs84_utm44n投影坐标系,像元大小为500m,参考代码如下所示
from preprocessing import mod16preprocess
from file_picker import file_picker

hdf_dir = [r"S:tmp4"]
hdfs = file_picker(hdf_dir)

mod16preprocess(workspace=r"S:ET_xj_utm44n",
                hdfs=hdfs,
                masks=[r"S:tmp4xj_utm44n.shp"],
                sds_index=2,
                sds_name="PET",
                cell_size="500 500",
                out_coor_system=r"S:tmp4xj_utm44n.prj")
运行后得到的PET栅格文件参考下图:
四、问题解答
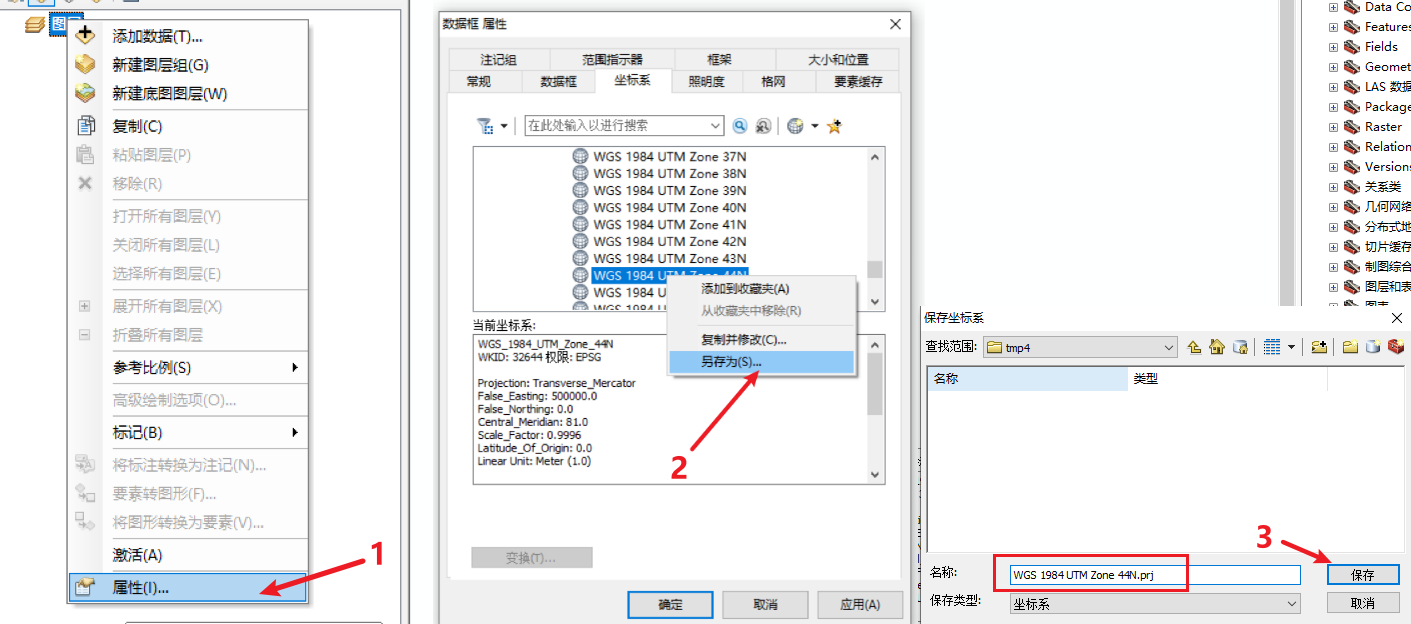
4.1 .prj文件的获取
- 在Arcmap中右键可选的坐标系另存为.prj文件
- 可以直接利用裁剪边界文件.shp对应的同名.prj文件

4.2 代码下载地址
MODIS数据加工代码下载地址,密码k3va

4.3 其他
- 本人编程能力也就是个入门水平,如有写的不对的地方还请各位指正
- 本代码基本没有处理异常的能力,因此强烈建议已经有在Arcmap处理MODIS数据经验的人使用该代码
- 常见的几种报错
1、投影坐标系和地理坐标系搞不清,像元大小设置有误
2、投影文件(.prj)和研究区边界文件(.shp)坐标系不一致
3、输出路径过长或有中文。中文导致出错的原因是因为python2.7对于中文路径的支持并不是很好。输出路径过长报错的原因是因为Arcpy中的某些工具对输出栅格文件的文件名长度有限制。综上,建议将工作目录设置为较短的英文路径。
4、hdf文件名命名方式有问题,并非是原始的modis文件命名方式

最后
以上就是清新小刺猬最近收集整理的关于【MODIS数据处理#13】使用Arcpy一键加工长时间序列MODIS数据一、前言二、功能简介三、代码三、使用例四、问题解答的全部内容,更多相关【MODIS数据处理#13】使用Arcpy一键加工长时间序列MODIS数据一、前言二、功能简介三、代码三、使用例四、问题解答内容请搜索靠谱客的其他文章。


发表评论 取消回复