引言:YOLO作为划时代的目标检测网络(我们当时哦,现在也是同样的重要),YOLO横空出世,火炮全球,整个目标检测领域的大咖、研究者、小学妹都纷纷开始研究YOLO网络,以至于在知网上查文献,都是《基于YOLO点的。。。研究》,确实值得一提的是YOLO网络无论在检测精度、还是在检测精度上都有一定的优势,更为重要的是它是正儿八经的端到端的目标检测网络。总之贡献很大。
1.首先我们看一下YOLO网络的结构。
depth_multiple: 0.33  # model depth multiple
width_multiple: 0.50  # layer channel multiple

# anchors
anchors:
  - [10,13, 16,30, 33,23]  # P3/8
  - [30,61, 62,45, 59,119]  # P4/16
  - [116,90, 156,198, 373,326]  # P5/32

# YOLOv5 backbone
backbone:
  # [from, number, module, args]
  [[-1, 1, Focus, [64, 3]],  # 0-P1/2
   [-1, 1, Conv, [128, 3, 2]],  # 1-P2/4
   [-1, 3, BottleneckCSP, [128]],
   [-1, 1, Conv, [256, 3, 2]],  # 3-P3/8
   [-1, 9, BottleneckCSP, [256]],
   [-1, 1, Conv, [512, 3, 2]],  # 5-P4/16
   [-1, 9, BottleneckCSP, [512]],
   [-1, 1, Conv, [1024, 3, 2]],  # 7-P5/32
   [-1, 1, SPP, [1024, [5, 9, 13]]],
   [-1, 3, BottleneckCSP, [1024, False]],  # 9
  ]

# YOLOv5 head
head:
  [[-1, 1, Conv, [512, 1, 1]],
   [-1, 1, nn.Upsample, [None, 2, 'nearest']],
   [[-1, 6], 1, Concat, [1]],  # cat backbone P4
   [-1, 3, BottleneckCSP, [512, False]],  # 13

   [-1, 1, Conv, [256, 1, 1]],
   [-1, 1, nn.Upsample, [None, 2, 'nearest']],
   [[-1, 4], 1, Concat, [1]],  # cat backbone P3
   [-1, 3, BottleneckCSP, [256, False]],  # 17 (P3/8-small)

   [-1, 1, Conv, [256, 3, 2]],
   [[-1, 14], 1, Concat, [1]],  # cat head P4
   [-1, 3, BottleneckCSP, [512, False]],  # 20 (P4/16-medium)

   [-1, 1, Conv, [512, 3, 2]],
   [[-1, 10], 1, Concat, [1]],  # cat head P5
   [-1, 3, BottleneckCSP, [1024, False]],  # 23 (P5/32-large)

   [[17, 20, 23], 1, Detect, [nc, anchors]],  # Detect(P3, P4, P5)
  ]
其实这个就是网络的大体结构,通过读取这些从而构建起YOLO网络。
2.然后介绍一下YOLO网络的预测代码。(detact.py)
def parse_opt():
    parser = argparse.ArgumentParser()
    parser.add_argument('--weights', nargs='+', type=str, default=ROOT / 'yolov5s.pt', help='model path(s)') #选择权重
    parser.add_argument('--source', type=str, default=ROOT / 'data/images', help='file/dir/URL/glob, 0 for webcam') #训练是的图片路径
    parser.add_argument('--imgsz', '--img', '--img-size', nargs='+', type=int, default=[640], help='inference size h,w') #图像尺度大小,必须为32的整数倍
    parser.add_argument('--conf-thres', type=float, default=0.25, help='confidence threshold') #置信度阈值,如果你只是detact,不需要修改
    parser.add_argument('--iou-thres', type=float, default=0.45, help='NMS IoU threshold')#IOU阈值设置,如果你只是detact,不需要修改
    parser.add_argument('--max-det', type=int, default=1000, help='maximum detections per image')
    parser.add_argument('--device', default='', help='cuda device, i.e. 0 or 0,1,2,3 or cpu')
    parser.add_argument('--view-img', action='store_true', help='show results') #是否显示预测图像,这个可以修改为True
    parser.add_argument('--save-txt', action='store_true', help='save results to *.txt')
    parser.add_argument('--save-conf', action='store_true', help='save confidences in --save-txt labels')
    parser.add_argument('--save-crop', action='store_true', help='save cropped prediction boxes')
    parser.add_argument('--nosave', action='store_true', help='do not save images/videos')
    parser.add_argument('--classes', nargs='+', type=int, help='filter by class: --classes 0, or --classes 0 2 3')
    parser.add_argument('--agnostic-nms', action='store_true', help='class-agnostic NMS')
    parser.add_argument('--augment', action='store_true', help='augmented inference')
    parser.add_argument('--visualize', action='store_true', help='visualize features')
    parser.add_argument('--update', action='store_true', help='update all models')
    parser.add_argument('--project', default=ROOT / 'runs/detect', help='save results to project/name')
    parser.add_argument('--name', default='exp', help='save results to project/name')
    parser.add_argument('--exist-ok', action='store_true', help='existing project/name ok, do not increment')
    parser.add_argument('--line-thickness', default=3, type=int, help='bounding box thickness (pixels)')
    parser.add_argument('--hide-labels', default=False, action='store_true', help='hide labels')
    parser.add_argument('--hide-conf', default=False, action='store_true', help='hide confidences')
    parser.add_argument('--half', action='store_true', help='use FP16 half-precision inference')
    opt = parser.parse_args()
    opt.imgsz *= 2 if len(opt.imgsz) == 1 else 1  # expand
    print_args(FILE.stem, opt)
    return opt
备注:这里没有给大家展示所有的源码是因为,这里面的其它部分不用修改,都是默认,只需要修改def parse_opt():里面的参数即可。例如路径问题、权重文件路径。上面已经为大家备注好意思了,需要修改的其实没几个,如果你只是实现一下。
3.YOLO网络的权重文件。
网络权重有好几个最常用的是YOLO5sml 等,因为这些权重比较相对来说是轻量级,性能还不错。上述说的各种权重文件在这里
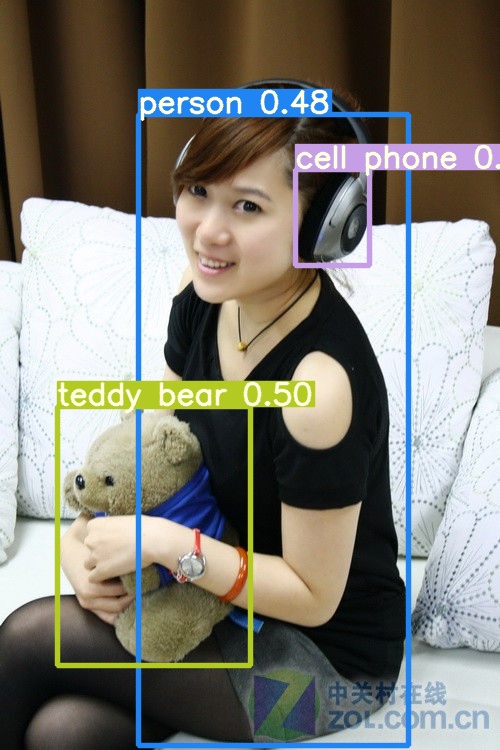
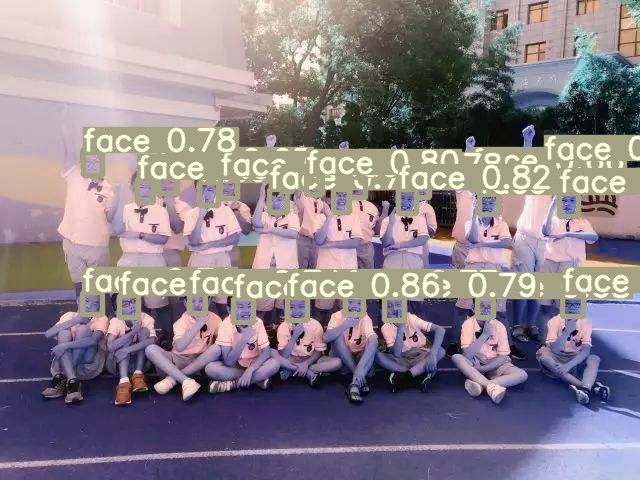
4.YOLO网络的实现结果。
人体检测、耳机检测
人脸检测
smoke detaction
总结:
尽量书写出关于自己的经历,和小伙伴梦一起成长起来!!!
GAME OVER
如果小伙伴梦有疑问欢迎在评论区留言哦!!!
如果感觉不错的话!你懂得(O(∩_∩)O哈哈~)
欢迎和小伙伴梦一起学习,共同努力,加油!!!
最后
以上就是活力狗最近收集整理的关于YOLO网络代码分析《目标检测》的全部内容,更多相关YOLO网络代码分析《目标检测》内容请搜索靠谱客的其他文章。
本图文内容来源于网友提供,作为学习参考使用,或来自网络收集整理,版权属于原作者所有。


发表评论 取消回复