奇技 · 指南
之前一直使用tornado做项目,数据库一直使用mongo与redis居多,凭借其优异的异步特性工作的也很稳定高效,最近的项目需要使用 mysql ,由于之前在使用mongo与redis时所使用的moto与aioredis来异步的执行数据库操作,所以在网上查询了异步操作mysql的库, 本文记录一下异步操作中所遇到的问题与相应的解决方案。
Aiomysql 介绍
我们在使用tornado开发网站的时候,利用python3中新加入的异步关键词 async/await , 我们使用各种异步操作为来执行各种异步的操作,如使用 aiohttp 来代替 requests 来执行异步的网络请求操作,使用 motor 来代替同步的 pymongo 库来操作mongo数据库,同样,我们在开发同步的python程序时,我们会使用PyMySQL来操作mysql数据库,同样,我们会使用aiomysql来异步操作mysql 数据库。
Aiomysql 连接
为了简单,我使用docker 下载了mysql:5.7镜像,然后启一个容器,密码是123456
docker run --name mysql -e MYSQL_ROOT_PASSWORD=123456 -p 3306:3306 -d mysql:5.7
这样,一个mysql数据库就有了,之后我们就以这个数据库为例,执行各种测试代码工作。
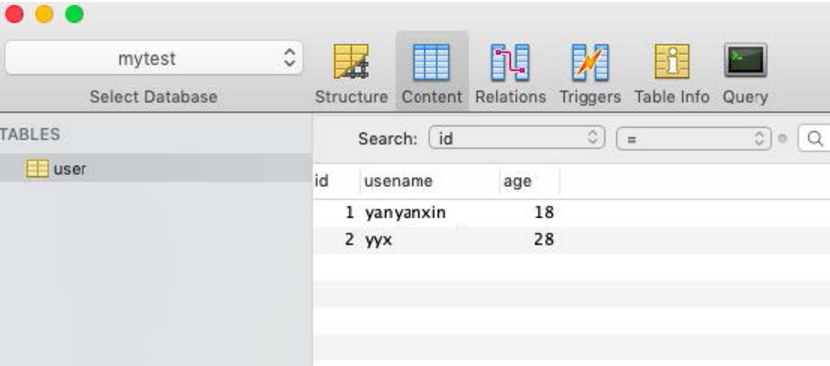
我们先准备一些测试数据,创建一个mytest的数据库,创建一个user表,里面有三个字段,id, username, age, 简单的三个字段,并且添加两条数据。
首先我们先明确一下,aiomysql可以是原生的连接mysql服务器,也可以使用sqlalchemy(后面简称sa)来连接mysql服务,首先我们先使用原生的引擎来连接 ,后面再说sa连接数据库。
#coding: utf-8

import aiomysql
import asyncio

loop = asyncio.get_event_loop()

async def test():
    conn = await aiomysql.connect(
        host='127.0.0.1',
        port=3306,
        user='root',
        password='123456',
        db='mytest',
        loop=loop
    )

    cur = await conn.cursor()
    await cur.execute("select * from user")
    r = await cur.fetchall()
    if r:
        for i in r:
            print(i)
    else:
        print("no data")
    await cur.close()
    conn.close()

loop.run_until_complete(test())
上面的脚本就可以将数据库中的所有数据打印出来。
我们来看下代码,来顺一下执行流程
1. 创建连接
首先我们使用 aiomysql.connect() 创建一个连接对象conn,代码里只是使用了最常用的连接选项,这个connect() 方法返回一个Connection类对象,这个对象里的参数非常多,我们在后面的代码中,如果遇到会进行相应的介绍。
2. 创建游标
之后我们使用 conn 这个对象的cursor方法获取Cursor对象cur,我们只有使用cursor对象才能对数据库进行各种操作。
3. 执行SQL语句
我们使用cur 对象的execute() 方法执行SQL语句。这里执行 select * from user ,这个方法返回影响的行数,对于查询而言,是命中查询的数据量,我们也可以根据这里的返回值,如果是0的话则说明没有符合查询条件的数据。
如将上面的代码改成
cur = await conn.cursor()
   count = await cur.execute("select * from user where id = 4")
   print("count:{}".format(count))
   if count:
       r = await cur.fetchall()
       for i in r:
           print(i)
   else:
       print("no data")
   await cur.close()
   conn.close()
4. 关闭游标cur
5. 关闭连接conn
注意conn对象的关闭函数不是协程,直接调用close() 即可。
aiomysql中的Connect类和Cursor类都通过实现了 __aexit__ 方法来保证游标与连接的关闭,所以我们更多的时候是使用with上下文管理来写代码,这样我们不用再去处理游标与连接的关闭操作。
async with conn.cursor() as cur:
    count = await cur.execute("select * from user")
    if count:
        r = await cur.fetchall()
        for i in r:
            print(i)
    else:
        print("no user")
Aiomysql简单的CURD
上面我们简单地使用游标对象进行了查询,这节我们来看看更多CURD操作,其实这里已经和aiomysql没有太多的关系,主要是考查各位的mysql能力了,一个execute方法走天
下。但是这里我们来看一个老生常谈的问题,sql注入问题。
SQL注入的问题
首先我们看一下以下的代码
username = "yyx"

async with conn.cursor() as cur:
    sql = "select * from user where username = '%s'" % username
    print(sql)
    count = await cur.execute(sql)
    if count:
        r = await cur.fetchall()
        for i in r:
            print(i)
    else:
        print("no user")
假设,username是我们从用户的输入中获取到的,比如通过网页post或者get过来的参数输入,未经过我们的处理然后我们在数据库中查找这个用户,比如username是yyx时,我们拼接的sql语句是 select * from user where username = 'yyx' ,这时一切还比较顺利,我们可以得到username为yyx的数据, 但是,如果用户恶意构造sql,将 yyx' or 1=1# 传过来,这时我们接接的sql字符串为 select * from user where username = 'yyx' or 1=1#' , 这个语句会执行username为yyx或者1=1的结果,1=1这是个永真的条件,加了一个# 会将之后的语句当成注释,所以这个SQL语句会将数据库中的所有数据都返回。这样就存在了注入的漏洞了。
如何避免SQL注入
这是个很大的话题,展开来说可以说好多,这里我们只是从框架的角度,来防止一些基本的注入漏洞,防止注入漏洞更多的还是需要程序员对于用户的输入进行必要的检查过滤,永远记住,不要相信用户的输入。我们查看 Cursor类的execute方法
async def execute(self, query, args=None):
    """Executes the given operation

    Executes the given operation substituting any markers with
    the given parameters.

    For example, getting all rows where id is 5:
      cursor.execute("SELECT * FROM t1 WHERE id = %s", (5,))

    :param query: ``str`` sql statement
    :param args: ``tuple`` or ``list`` of arguments for sql query
    :returns: ``int``, number of rows that has been produced of affected
    """
    conn = self._get_db()

    while (await self.nextset()):
        pass

    if args is not None:
        query = query % self._escape_args(args, conn)

    await self._query(query)
    self._executed = query
    if self._echo:
        logger.info(query)
        logger.info("%r", args)
    return self._rowcount
execute有二个参数,一个是query, 另外是args,我们看注释,query是 sql的语句, args是 tulpe 或者 list 类型的参数。如果args非空,脚本会通过 query = query % self._escape_args(args, conn) 重新组织query, 再来看下 _escape_args(args, conn) 的实现
def _escape_args(self, args, conn):
    if isinstance(args, (tuple, list)):
        return tuple(conn.escape(arg) for arg in args)
    elif isinstance(args, dict):
        return dict((key, conn.escape(val)) for (key, val) in args.items())
    else:
        # If it's not a dictionary let's try escaping it anyways.
        # Worst case it will throw a Value error
        return conn.escape(args)
如果是list或者tuple,则返回使用 conn.escape 转换之后的tuple, 如果是dict字典类型的话,则返回一个字典,key还是原来的key, value为 conn.escape(val) , 最终都是使用 conn.escape() 函数来进行转换,再来看下这个函数的实现
def escape(self, obj):
    """ Escape whatever value you pass to it"""
    if isinstance(obj, str):
        return "'" + self.escape_string(obj) + "'"
    return escape_item(obj, self._charset)

def escape_string(self, s):
    if (self.server_status &
            SERVER_STATUS.SERVER_STATUS_NO_BACKSLASH_ESCAPES):
        return s.replace("'", "''")
    return escape_string(s)
函数将在传入的字符串两边加上两个单引号 ' , 并且将 字符串中的单引号替换成两个单引号,这样就可以避免大多的sql注入问题,我们修改一下脚本
username = 'yanyanxin'
async with conn.cursor() as cur:
    count = await cur.execute("select * from user where username = %s", username)
    if count:
        r = await cur.fetchall()
        for i in r:
            print(i)
    else:
        print("no user")
此时我们可以正常的获取到用户名为yanyanxin的数据, 再将用户名换成 yyx' or 1=1# 试试
此时转换后的SQL语句为 select * from user where username = 'yyx' or 1=1#' 已经将单引号进行了转义,此时就不会查找到用户了。
注意为了避免SQL注入的问题,我们一定不要自己进行拼接SQL语句,一定要对用户的输入进行检查转义。
多参数的查询
上面只是用到了一个参数,我们来看一下多参数的查询使用,比如我们想要查询age在19到29之间的用户, 正常我们写sql应该是
select * from user WHERE age >19 and age<29
我们使用aiomysql的实现
async with conn.cursor() as cur:
    count = await cur.execute("select * from user where age>%s and age<%s", (19, 29))
    if count:
        r = await cur.fetchall()
        for i in r:
            print(i)
    else:
        print("no user")
这里注意,不能使用 %d , 因为使用escape转义的值返回的是字符串类型的,即使传的是int类型的,所回的也是str。
联合查询
我们再创建一个表,表示用户表中用户的职业, 创建三条数据, userid对应于user表中的id, 这里之所以没有用外键,之后再讨论,只是记住,这里的userid只是一个普通的列,它表示user表中的id。
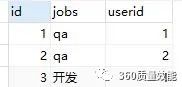
这里有三条数据,user表中id为1的是qa和开发,id为2的qa,我们来查找一下,user表中名为yyx的用户的jobs是什么, 正常我们写sql语句应该是下面这个样子
SELECT jobs.jobs, user.username from jobs INNER JOIN user ON user.id=jobs.userid where user.username='yyx'
将会得到如下结果

使用aiomysql实现
async with conn.cursor() as cur:
    sql = 'SELECT jobs.jobs, user.username from jobs INNER JOIN user ON user.id=jobs.userid where user.username=%s'
    count = await cur.execute(sql, ('yyx',))
    if count:
        r = await cur.fetchall()
        for i in r:
            print(i)
    else:
        print("no user")
总的来说,使用aiomysql进行查询操作,和使用普通的工具进行mysql查询是一样, 需要注意的是注入的问题,一定要使用框架的转义功能。
日期格式的查询
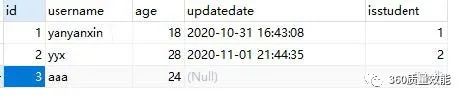
很多时候我们需要进行日期类型的查询,如查询大于某一天的数据, 我们先在user表中添加一个代码更新日期的updatedate列,并且填上一些数据,我们再次使用 count = await cur.execute("select * from user") 查询数据,将会得到如下的数据
(1, 'yanyanxin', 18, datetime.datetime(2020, 10, 31, 16, 43, 8))
(2, 'yyx', 28, datetime.datetime(2020, 11, 1, 21, 44, 35))
如果我们想要查询日期大于2020年10月31日的数据我们可以这样写SQL
select * from user WHERE DATE_FORMAT(updatedate,'%Y%m%d') > '20201031'
使用aiomysql 该如果写sql呢?
如果我们写成以下的样子
datestr = datetime.datetime(2020, 10, 31).strftime('%Y%m%d')
count = await cur.execute("select * from user WHERE  DATE_FORMAT(updatedate,'%Y%m%d') > %s", (datestr,))
将会得到一个异常
ValueError: unsupported format character 'Y' (0x59) at index 51
上面在转换拼接字符串的时候, 由于有个%Y的存在, python默认是不支持这个转换的,所以这样写是不行的,这里其实不需要将datetime.datetime类型的数据进行转换,aiomysql会自动的进行转换
datestr = datetime.datetime(2020, 10, 31)
count = await cur.execute("select * from user WHERE  updatedate > %s", (datestr,))
我们只需要将datetime.datetime类型的数据传到参数里即可,pymysql 内置了基本类型的处理方法
encoders = {
    bool: escape_bool,
    int: escape_int,
    long_type: escape_int,
    float: escape_float,
    str: escape_str,
    text_type: escape_unicode,
    tuple: escape_sequence,
    list: escape_sequence,
    set: escape_sequence,
    frozenset: escape_sequence,
    dict: escape_dict,
    type(None): escape_None,
    datetime.date: escape_date,
    datetime.datetime: escape_datetime,
    datetime.timedelta: escape_timedelta,
    datetime.time: escape_time,
    time.struct_time: escape_struct_time,
    Decimal: escape_object,
这些类型不用我们再去手动处理, 直接传入args参数即可
添加数据
有了上面查询数据的基础,我们再来看下插入数据, 我们同样以正常的mysql语句再结合aiomysql中的query语句进行对比。
1. 插入单条语句
经过表的修改,目前我们的表字段如下
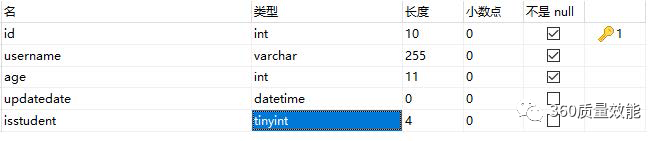
其中id为主键自增,新添加的时候可以不用传参数,mysql会自动添加, username和age是不能为空的,添加的时候必须要传
先使用SQL语句进行添加
INSERT INTO `user` (username, age) VALUES ("aaa", 24);
这时就会添加一条数据
使用aiomysql来添加
async with conn.cursor() as cur:
    count = await cur.execute("insert into user (username, age, updatedate) VALUES(%s, %s, %s)", ("ccc", 33, datetime.datetime.now()))
    await conn.commit()
    print(count)
    if count:
        r = await cur.fetchall()
        for i in r:
            print(i)
    print("#########")
    count = await cur.execute("select * from user")
    if count:
        r = await cur.fetchall()
        for i in r:
            print(i)
    else:
        print("no user")
这里注意到,和查询不一样的是,插入数据会多一个 await conn.commit() 操作, 这里如果不调用commit方法, 下面的查询也是可以查询到刚刚添加的数据,但是此时数据并没有真正的添加到数据库里,必须要调用一下commit方法,当然也可以不调用,那么要初始化connect时需要加入 autocommit=True, 参数,这个后面我们讲事务的时候再详细说一下。
对于日期类型的数据,我们也无需进行处理,直接传入参数即可
2. 插入多条语句
cursor 除了execute方法以外,还有一个executemany方法,可以执行多条SQL语句,非常适合插入多条数据
async with conn.cursor() as cur:
 users = [
     ("eee", 26, datetime.datetime(2019, 10, 23)),
     ("fff", 28, datetime.datetime(2018, 11, 13)),
     ("ggg", 27, datetime.datetime(2016, 9, 15)),
 ]
 count = await cur.executemany("insert into user  ( username, age, updatedate) VALUES(%s, %s, %s)", users)
 print(count)
 if count:
     r = await cur.fetchall()
     for i in r:
         print(i)
 print("#########")
 count = await cur.execute("select * from user")
 if count:
     r = await cur.fetchall()
     for i in r:
         print(i)
 else:
     print("no user")
将要插入的数据按照格式放入元组或者列表里,再使用executemany方法一次性的插入多条数据
其实查看executemany的实现,它并不是一次性的写入多条数据,而是通过循环多次调用execute方法
for arg in args:
    await self.execute(query, arg)
    rows += self._rowcount
self._rowcount = rows
如何处理插入失败
插入失败常有,比如主键重复,数据类型不对等,我们需要去抓住这些异常来进行处理
比如如下语句
count = await cur.execute("insert into user (id, username, age, updatedate) VALUES(%s, %s, %s, %s)",(1, "ddd", 34, datetime.datetime.now()))
尝试添加一个主键id为1的数据,但是由于数据库中已经存在了该主键,所以这次插入肯定会失败
程序会报
pymysql.err.IntegrityError: (1062, "Duplicate entry '1' for key 'PRIMARY'")
pymysql.err 错误
async with conn.cursor() as cur:
    try:
        count = await cur.execute("insert into user  (id, username, age, updatedate) VALUES(%s, %s, %s, %s)", (1, "ddd", 34, datetime.datetime.now()))
        print(count)
    except pymysql.err.IntegrityError as e:
        print(e)
    except Exception as e:
        raise e
此时将打印 (1062, "Duplicate entry '1' for key 'PRIMARY'") 异常信息
cursor 类型
可以初始化cursor类型时,选择不同的类,默认返回是以元组形式
(1, 'yanyanxin', 18, datetime.datetime(2020, 10, 31, 16, 43, 8), 0)
(2, 'yyx', 28, datetime.datetime(2020, 11, 1, 21, 44, 35), 2)
(3, 'aaa', 24, None, None)
(8, 'ccc', 33, datetime.datetime(2020, 11, 2, 17, 59, 38), None)
(27, 'aaa', 16, None, None)
可以使用 aiomysql.cursors.DictCursor 类初始化
conn.cursor(aiomysql.cursors.DictCursor) as cur
获取到的结果将以字典的形式返回
{'id': 1, 'username': 'yanyanxin', 'age': 18, 'updatedate': datetime.datetime(2020, 10, 31, 16, 43, 8), 'isstudent': 0}
{'id': 2, 'username': 'yyx', 'age': 28, 'updatedate': datetime.datetime(2020, 11, 1, 21, 44, 35), 'isstudent': 2}
{'id': 3, 'username': 'aaa', 'age': 24, 'updatedate': None, 'isstudent': None}
{'id': 8, 'username': 'ccc', 'age': 33, 'updatedate': datetime.datetime(2020, 11, 2, 17, 59, 38), 'isstudent': None}
{'id': 27, 'username': 'aaa', 'age': 16, 'updatedate': None, 'isstudent': None}
连接池的使用
之前我们一直使用 aiomysql.connect() 方法来连接到数据库,aiomysql 还提供了连接池的接口,有了连接池的话,不必频繁打开和关闭数据库连接。
上面的代码,我们都是执行一个函数就创建一个连接,我们知道,客户端在与服务端创建连接也是一个比较耗时耗资源的操作,所以我们会通过连接池来减少与mysql数据库的频繁打开和关闭连接。
这只是其中一个原因,还有一个更重要的原因,因为在协程程序里,大家是共用一个线程, 比如有两个函数,一个函数是查询user表,一个函数是查询jobs表
loop = asyncio.get_event_loop()
async def test():
    conn = await aiomysql.connect(
        host='127.0.0.1',
        port=3306,
        user='root',
        password='123456',
        db='mytest',
        loop=loop
    )
    async def get_user():
        async with conn.cursor() as cur:
            count = await cur.execute("select * from user")
            if not count:
                return
            r = await cur.fetchall()
            print("get data from user")
            for i in r:
                print(i)

    async def get_jobs():
        async with conn.cursor() as cur:
            count = await cur.execute("select * from jobs")
            if not count:
                return
            r = await cur.fetchall()
            print("get data from jobs......")
            for i in r:
                print(i)

    await asyncio.gather(get_jobs(), get_user())
loop.run_until_complete(test())
我们在test() 函数里写了两个子函数,get_user和get_jobs分别从user表和jobs表中获取数据,当然我们可以使用
await get_user()
await get_jobs()
来分别执行,但是这种方式是同步的,并没有异步去执行,我们想要这两个函数异步进行,所以我们使用
await asyncio.gather(get_jobs(), get_user())
这种方式调用,让这两个协程并行执行, 但是这样写就会报错
RuntimeError: readexactly() called while another coroutine is already waiting for incoming data
意思是,一个协程在等待数据传过来,但是这个时候另外一个协程也要开始读数据,因为这两个协程用的是同一个连接对象conn。
所以这里我们需要用两个不同的连接, 当然可以在每个函数中都重新对mysql数据进行连接,在执行完查询操作以后再关闭,但是这样就会造成之前说有频繁的创建连接会造成一些资源的浪费,同时网站的性能也会受到影响。
所以这时我们需要使用连接池,连接池会保存一定数量的连接对象,每个函数在需要使用的时候从池子中拿一个连接对象, 使用完以后再将连接对象放到池子中, 这样避免了频繁的和mysql数据库进行打开关闭操作,同时也避免出现上面的同个连接在不同的协程对象中使用而出现的异常。
修改以上代码
loop = asyncio.get_event_loop()

async def test():
    pool = await aiomysql.create_pool(
        host='127.0.0.1',
        port=3306,
        user='root',
        password='123456',
        db='mytest',
        minsize=1,
        maxsize=2,
        echo=True,
        autocommit=True,
        loop=loop
    )

async def get_user():
    async with pool.acquire() as conn:
        print(id(conn), 'in get user')
        async with conn.cursor() as cur:
            count = await cur.execute("select * from user")
            if not count:
                return
            r = await cur.fetchall()
            print("get data from user")
            for i in r:
                print(i)

async def get_jobs():
    async with pool.acquire() as conn:
        print(id(conn), 'in get jobs')
        async with conn.cursor() as cur:
            count = await cur.execute("select * from jobs")
            if not count:
                return
            r = await cur.fetchall()
            print("get data from jobs......")
            for i in r:
                print(i)

async def get_email():
    async with pool.acquire() as conn:
        print(id(conn), 'in get email')
        async with conn.cursor() as cur:
            count = await cur.execute("select * from email")
            if not count:
                return
            r = await cur.fetchall()
            print("get data from email......")
            for i in r:
                print(i)

await asyncio.gather(get_jobs(), get_user(), get_email())


loop.run_until_complete(test())
连接池的初始化函数 aiomysql.create_pool 和 aiomysql.connect 参数差不多,数据库的基本信息, 这里多了两个参数 minsize,maxsize, 最少连接数和最大连接数,我这里为了实验,将最大连接数设置为2,然后下面用了三个函数来获取连接池,我们将连接对象conn的id信息打印出来看下
2977786527496 in get jobs
2977786527496 in get user
2977786590984 in get email
可以看出, get jobs函数和get user函数用的是同一个连接对象
上面的脚本也不再报错,并且可以正常的获取到数据库里的信息,且都是异步的进行查询
我们也要注意一下,由于是演示代码,我们在开发过程中,不太会写这样的代码,更多的时候,我们是写web程序,比如用tornado 写个web程序, 不同的接口需要进行不同的查询操作,为了保证查询同时进行,此时我们就需要用连接池了。
事务的处理
关于事务的介绍,网上有好多,关于数据库事务具有ACID这4个特性:原子性,一致性,隔离性,持久性以及不同的隔离级别所带来的脏读、不可重复读、幻读等问题,推荐廖雪峰的sql教程, 讲的很清晰。
这里介绍一下在aiomysql中事务的处理,
之前我们在初始化连接或者连接池的时候,都加上了autocommit=True, 这个设置, autocommit=True
意味着自动提交,在使用事务的时候,需要将其关闭,或者不设置,默认是False
async with pool.acquire() as conn:
    async with conn.cursor() as cur:
        await cur.execute("insert into user(username, age) values(%s, %s)", ("aaa", 16))
        # 不调用conn.commit()
        c = await cur.execute("select * from user")
        result = await cur.fetchall()
        for i in result:
            print(i)
此时我们是可以获取到刚才插入的数据的,但是如果使用别的mysql客户端查看,刚才的数据是没有提交进来的,这时需要调用 conn.commit() 来提交事务才可以真正的将数据写入数据库。
当然,在执行 conn.commit() 时,是有可能失败的,比如插入一半的数据,被别的事务所干扰,此时这里就会抛异常。
现在有一个问题,既然可以设置 autocommit=True 让数据库自动提交事务,我们为什么还要自己来开启事务,然后再手动调用 conn.commit() 来提交呢?
我们假设有这样的一个场景, 假如你要用两个sql语句分别更新两张表,如传统的转账为例, 你的余额减200, 他的余额加200, 在 autocommit=True 的情况下, 先使用一行代码更新一张表,这时在更新另外一张表的时候崩溃了,这时由于使用了 autocommit=True , 第一条语句更新成功 ,第二条语句失败了
async with pool.acquire() as conn:
    async with conn.cursor(aiomysql.cursors.DictCursor) as cur:
        try:
            await cur.execute("insert into user(username, age) values(%s, %s)", ("aaa", 16))
            await cur.execute("insert into user(username, age) values(%s, %s)", ("aaa2", 13, 1111))
        except Exception as e:
            print(e)
        c = await cur.execute("select * from user")
        result = await cur.fetchall()
        for i in result:
            print(i)
在上面的语句中, 第一次insert语句没有问题,可以正常的插入数据库,但是第二个语句,由于格式转换有问题,这时会崩溃,第二条语句不会插入成功,但是现在问题就来了,我要求是这两条语句要么全执行,要么都不执行, 上面的代码没法保证数据的一致性, 破坏了事务的原子性与一致性,所以这时我们需要使用自己手工来处理事务。
async with pool.acquire() as conn:
    async with conn.cursor(aiomysql.cursors.DictCursor) as cur:
        await conn.begin() # 开启事务
        try:
            await cur.execute("insert into user(username, age) values(%s, %s)", ("aaa", 16))
            await cur.execute("insert into user(username, age) values(%s, %s)", ("aaa2", 13, 1111))
            await conn.commit()
        except Exception as e:
            print(e)
            await conn.rollback()  #回滚
        c = await cur.execute("select * from user")
        result = await cur.fetchall()
        for i in result:
            print(i)
上面通过 await conn.begin() 来开启事务, 后面通过 await conn.commit() 来提交事务, 过程中如果有失败或者崩溃的情况则执行 await conn.rollback() 回滚。
此时第一条语句就不会被插入成功了. 如果在初始化连接或者连接池时设置了 autocommit=True 参数,则这里需要调用 conn.begin()` ,如果没有设置autocommit参数则默认是False, 后面也不用显示的调用conn.begin(), 但是需要显示的调用 conn.commit() 。
Sqlalchemy 介绍
SQLAlchemy是Python编程语言下的一款开源软件。提供了SQL工具包及对象关系映射(ORM)工具,使用MIT许可证发行。
SQLAlchemy“采用简单的Python语言,为高效和高性能的数据库访问设计,实现了完整的企业级持久模型”。SQLAlchemy的理念是,SQL数据库的量级和性能重要于对象集合;而对象集合的抽象又重要于表和行。因此,SQLAlchmey采用了类似于Java里Hibernate的数据映射[4]模型,而不是其他ORM框架采用的Active Record模型。不过,Elixir[5]和declarative等可选插件可以让用户使用声明语法。
SQLAlchemy首次发行于2006年2月,并迅速地在Python社区中最广泛使用的ORM工具之一,不亚于Django的ORM框架。
ORM介绍
ORM, 全称Object-Relational Mapping,将关系数据库的表结构映射到对象上, 使得操作数据库的关系转换成操作python中的对象
在Aiomysql中使用Sqlalchemy
在使用aiomysql原生的mysql连接时,我们使用 aiomysql.connect 函数来获取aiomysql连接对象,在使用sqlalchemy时,需要使用 aiomysql.sa.create_engine 函数来创建一个引擎对象。
在aiomysql中,不能使用类来定义, 需要使用aiomysql.sa.Table来返回ORM对象, 也不能使用session, 执行查询操作需要在一个连接对象上
import aiomysql
import asyncio
import logging
import pymysql
import sqlalchemy as sa
from aiomysql.sa import create_engine

loop = asyncio.get_event_loop()

metadata = sa.MetaData()
user = sa.Table(
    "user",
    metadata,
    sa.Column("id", sa.Integer, primary_key=True, autoincrement=True),
    sa.Column('username', sa.String(255), nullable=False, default=""),
    sa.Column('age', sa.Integer, nullable=False, default=0),
    sa.Column('updatedate', sa.DateTime, nullable=True),
    sa.Column('isstudent', sa.Boolean, nullable=True)
)

async def test():
    engine = await create_engine(
        host='127.0.0.1',
        port=3306,
        user='root',
        password='123456',
        db='mytest',
        autocommit=True,
        loop=loop
    )
    async with engine.acquire() as conn:
        query = sa.select([user])
        result = await conn.execute(query)
        for i in await result.fetchall():
            print(i)

loop.run_until_complete(test())
在使用sqlalchemy 时, 要先定义ORM关系,可以使用sqlalchemy.Table来定义
1. 创建元类
使用 metadata = sa.MetaData() 创建一个元类,这个元类会包含各种表的关系,之后会介绍
2. 创建表
使用上面创建的元类 metadata 来创建表结构, 第一个字段为表名, 第二个参数为元类对象,之后为每个字段的信息对象,第一个为字段名,第二个为类型,之后会是一些字段选项
以下是一些常用的数据类型
| 类型 | 描述 |
|---|---|
| Integer | 整形 |
| String (size) | 字符串 |
| Text | 文本 |
| DateTime | python datetime对应的时间 |
| Float | 浮点 |
| Boolean | 布尔 |
| PickleType | python 内存对象 |
| LargeBinary | 二进制数据 |
以下是一些常见的字段属性
primary_key: 是否为主键
autoincrement: 是否自增
index: 是否为索引
nullable: 是否可以为空, True的时候为可以为空
comment: 注释
3. 创建引擎
4. 获取连接
通过engine.acquire() 来获取一个连接
5. 执行查询语句
这里和aiomysql不一样,这里直接使用连接对象conn的 execute(query) 方法
6. 打印显示结果
这里调用的SQL语句和直接使用SQL或者上面使用aiomysql的execute来执行sql语句来讲,比较晦涩难懂, 下面详细记录一下各种查询在sqlalchemy中的实现。
使用Sqlalchemy的CURD
简单查询数据
query = sa.select([user])
result = await conn.execute(query)
可以通过 str(query) 来打印构造出来的SQL语句
上面的query转换为SQL语句为
SELECT "user".id, "user".username, "user".age, "user".updatedate, "user".isstudent
FROM "user"
和 select * from user 同一意思
sa.select([user]) select() 函数参数必须是个列表或者可迭代对象,这个简单的查询不用提供 from 表, sa会自动算出需要在哪张表中查询。
选择哪些返回列
默认会将表中的所有字段返回,当需要指定返回哪些列的字段时,需要设置一下
query = sa.select([user.columns.updatedate, user.c.username])
可以通过user.columns.updatedate, 来返回updatedate字段,columns也可以简写成c, 如后面的 user.c.username , 上面的query转换成SQL语句为 SELECT user.updatedate, user.username FROM user。
带条件的查询
可以在select() 函数后面加上调用where() 函数来设置查询条件
1. 查询username为yyx的数据
query = sa.select([user]).where(user.columns.username == "yyx")
注意这里也要使用user.columns, 或者user.c
在返回值中,由于我们在定义user的时候,isstudent 字段我们设置的是 sa.Boolean ,这时,当值为0时该值为False, 非0时为True
上面的打印输出为 (2, 'yyx', 28, datetime.datetime(2020, 11, 1, 21, 44, 35), True)
2. 防注入
上面的代码,如果我们使用之前构造的可以被注入的查询条件, 我们来看下是什么情况
query = sa.select([user]).where(user.columns.username == "yyx' or 1=1#")
得到的query语句为
SELECT user.id, user.username, user.age, user.updatedate, user.isstudent
FROM user
WHERE user.username = 'yyx' or 1=1#'
并且没有获取到任务结果,我们注意到,sa已经帮我们将单引号给转义了. 所以这里我们无需再做处理
3. 多条件查询
有时我们会使用多个条件查询, 比如我们要查找age大于24, id 小于11的用户信息。
逻辑查询关系可以分为或(or)且(and)非(not)的关系,我们可以使用sqlalchemy.sql中的and_, or_, not_ 来指定逻辑关系.注意这里为了和python中的关键字作为区分都有一个下划线。
这里的查询条件可以看成是且的关系,我们可以使用and_操作
async with engine.acquire() as conn:
   w = and_(
       user.columns.id < 11,
       user.columns.age > 14
   )
   query = sa.select([user]).where(w)
   print(str(query))
   result = await conn.execute(query)
   for i in await result.fetchall():
       print(i)
这里我们定义一个and_对象, 它里面设置好要查询的条件, 然后将这个变量放到where()函数中。
上面有query转换成SQL语句为
SELECT user.id, user.username, user.age, user.updatedate, user.isstudent
FROM user
WHERE user.id < 11 AND user.age > 14
OR或者NOT同理,只需要将设置的查询依次放入即可
4. 日期查询
我们要查询updatedate大于2020-11-02 的用户信息
这里比较简单,直接使用datetime对象就可以做比较
query = sa.select([user]).where(user.columns.updatedate>datetime.datetime(2020, 11, 2))
当然也可以精确到秒,总之传入一个datetime对象就行
转换为SQL语句为
SELECT user.id, user.username, user.age, user.updatedate, user.isstudent
FROM user
WHERE user.updatedate > '2020-11-02 00:00:00'
5. False查询与None查询
我们将user的isstudent定义为Boolean类型,我们可以通过
query = sa.select([user]).where(user.columns.isstudent==False)
来查找isstudent是False的数据
查询到一条数据
(1, 'yanyanxin', 18, datetime.datetime(2020, 10, 31, 16, 43, 8), False)
但是表中还有没有设置该字段的数据是查不到的,这里的False和None是不一样的,如果想要获取到没有设置isstudens字段的数据需要使用
query = sa.select([user]).where(user.columns.isstudent==None)
来获取。
插入操作
sa的插入操作很灵活,有好多种插入方法,下面依次进行试验
1. 使用values函数
await conn.execute(user.insert().values(username="fan", age=16))
这种方式将必填参数以values函数的参数形式传递, 定义为nullable为True的参数在这里可以不用传了。
2. 使用字典dict格式插入
userinfo = {"username": "hhh","age": 33,"id": None,"updatedate":None,"isstudent":None}
result = await conn.execute(user.insert(), userinfo)
这种方法需要将定义Table表中的各个字段都要定义上,即使字段设置为nullable=True, 这里如果不想赋值的话也要写上None
3. 使用元组tuple插入
result = await conn.execute(user.insert(), (None, "yang", 88, None, True))
这种方式需要按定义Table中字段顺序将值传进去,同样为空的值即使现在不想设置也要使用None来占位,并且顺序也是要按照定义表结构时的顺序
4. 使用命名参数的方式
result = await conn.execute(user.insert(), id=None, username="lllll", age=99,
                                       updatedate=datetime.datetime.now(), isstudent=True)
这种方式参数可以不必按照定义时的顺序。
5. 按位置插入数据
result = await conn.execute(user.insert(), None, "mmmm", 9, None, None)
这种方法是不用写上字段名,但是也需要按照顺序来传入参数。
复杂的查询 join
还是以之前的例子,想要查询user表中是名为yyx的用户的jobs是什么, 正常我们写sql语句应该是下面这个样子
SELECT jobs.jobs, user.username from jobs INNER JOIN user ON user.id=jobs.userid where user.username='yyx'
在sa中,我们需要使用 select_from 函数来定义JOIN
# 定义jobs表结构
jobs = sa.Table(
    'jobs', metadata,
    sa.Column("id", sa.Integer, primary_key=True, autoincrement=True),
    sa.Column("jobs", sa.String(50), nullable=False, default="qa"),
    sa.Column("userid", sa.Integer, nullable=False)
)

    async with engine.acquire() as conn:
        j = user.join(jobs, user.c.id == jobs.c.userid)
        query = sa.select([user.c.username, jobs.c.jobs]).select_from(j).where(user.c.username == 'yyx')
        result = await conn.execute(query)
        for i in await result.fetchall():
            print(i)
首先sa.select传入需要返回的字段, 这里使用 `user.c.username, jobs.c.jobs` , 然后使用select_from 定义join条件, join的第一个参数是要连接的表,后面是定义连接的条件。
上面的代码得到的SQL语句为
SELECT user.username, jobs.jobs
FROM user INNER JOIN jobs ON user.id = jobs.userid
WHERE user.username = 'yyx'
这里是INNER JOIN, 对应的还有outerjoin
use_labels 问题
如果我们这样定义query
j = user.join(jobs, user.c.id == jobs.c.userid)
query = sa.select([user, jobs]).select_from(j).where(user.c.username == 'yyx')
我们想要获取user和jobs的所有字段,此时会报错
aiomysql.sa.exc.InvalidRequestError: Ambiguous column name 'id' in result set! try 'use_labels' option on select statement.
这是由于user和jobs表中都有 id 这个字段,返回的话将无法确定是谁的,需要使用 use_labels 参数,
query = sa.select([user, jobs], use_labels=True).select_from(j).where(user.c.username == 'yyx')
上面的结果返回为
(2, 'yyx', 28, datetime.datetime(2020, 11, 1, 21, 44, 35), True, 2, 'qa', 2)
获取返回值字段属性
上面的结果是一个元组,我们还可以打印指定的字段
当没有使用 use_labels=True 时,可以直接调用结果的字段属性
for i in await result.fetchall():
    print(i.username, i.jobs)
如果加了 use_labels=True 时,也需要添加上表名, 表名_字段
for i in await result.fetchall():
    print(i.user_username, i.jobs_jobs)
是否需要使用外键
上面无论是使用aiomysql还是使用sa,都没有使用外键进行约束,关于是否使用外键,业内有两种不同的意见,支持使用的会认为,人为的写程序难免会有bug, 会有不注意的地方,就好比jobs表中插入了一个userid为100的数据,但是userid为100的用户并没有在user表中,这时如果使用外键约束,则插入会失败. 在mysql数据库的层面上对数据一致性增加了一层保障。
但是反对使用外键的人认为,这样会增加数据库本身的负担,数据的一致性正确性应该由开发人员来保障,数据库有了外键的约束在处理数据速度上会受到影响。
业内现在大多数公司已经不使用外键了,甚至在数据库层面上已经将该功能禁掉以保障数据库的速度,所以我们在以后的开发中,也尽量的少使用甚至不使用外键,当然,这个也看业务,但是如果公司将mysql的外键都禁掉的话就只能人为的来保障数据的正确性了。
数据库重连问题
有时候会出现这种情况,数据库偶尔的宕机或者网络抖动,造成了程序与数据库连接断了, 此时,当网络恢复了,正常来讲我们不希望再重启的我们的web服务,而是程序会自动的进行重新连接。
我们来写一个程序试验一下
loop = asyncio.get_event_loop()

async def test():
    conn = await aiomysql.connect(
        host='127.0.0.1',
        port=3306,
        user='root',
        password='123456',
        db='mytest',
        loop=loop
    )

    while True:
        try:
            async with conn.cursor(aiomysql.cursors.DictCursor) as cur:
                c = await cur.execute("select * from user where id = 1")
                result = await cur.fetchall()
                for i in result:
                    print(i)
        except:
            pass
        finally:
            await asyncio.sleep(1)

loop.run_until_complete(test())
程序先创建一个connect对象,然后使用该对象,不停的从数据库中获取数据,当出现异常的时候不做任务操作
在程序运行过程中,我们人为的将本机的网络断掉来模拟断网的情况,此时由于这个conn和数据库已经失去了连接,当我们再恢复网络以后,这个连接还是没能自动恢复
{'id': 1, 'username': 'yanyanxin', 'age': 18, 'updatedate': datetime.datetime(2020, 10, 31, 16, 43, 8), 'isstudent': 0}
{'id': 1, 'username': 'yanyanxin', 'age': 18, 'updatedate': datetime.datetime(2020, 10, 31, 16, 43, 8), 'isstudent': 0}
2020-11-03 18:24:31,206 - asyncio - WARNING - C:Python37libasyncioselector_events.py[:863] - socket.send() raised exception.
....
....
....
一直打印socket 错误
我们试下使用连接池的方式
loop = asyncio.get_event_loop()

async def test():
    pool = await aiomysql.create_pool(
        host='127.0.0.1',
        port=3306,
        user='root',
        password='123456',
        db='mytest',
        loop=loop
    )

    while True:
        try:
            async with pool.acquire() as conn:
                async with conn.cursor(aiomysql.cursors.DictCursor) as cur:
                    c = await cur.execute("select * from user where id = 1")
                    result = await cur.fetchall()
                    for i in result:
                        print(i)
        except:
            pass
        finally:
            await asyncio.sleep(1)

loop.run_until_complete(test())
使用连接池的方式也不能自动重连, 这可如何是好?
由于aiomysql本身没有提供自动重连的方法,所以这里需要我们再重新封装一个类,要执行execute方法时,自动的检查连接是否还有效,如果无法,则尝试重新连接,当然重新连接也不一定能连接上,只有mysql服务器正常上线了,才可以正常的连接。
import aiomysql
from functools import wraps

def mysql_connection_check(func):
    @wraps(func)
    async def wrapper(*args, **kwargs):
        mysql = args[0]
        if mysql:
            if not mysql.isconnect:
                # 进行重连
                await mysql._lock.acquire()
                try:
                    await mysql.restart()
                except:
                    print(traceback.format_exc())
                finally:
                    await mysql._lock.release()
            try:
                return await func(*args, **kwargs)
            except (OperationalError, ConnectionResetError, OSError):
                mysql.isconnect = False
            except Exception as e:
                print(traceback.format_exc())
    return wrapper

class PMysql:
    '''
    对于aiomysql进行封,实现自动重连功能
    '''
    def __init__(self, host, user, password, db, port=3306, **kwargs):
        '''

        :param host:
        :param user:
        :param password:
        :param db:
        :param port:
        :param kwargs: minsize=1, maxsize=10,echo=False
        '''
        self.isconnect = False
        self.host = host
        self.user = user
        self.password = password
        self.db = db
        self.port = port
        self.kwargs = kwargs
        self._lock = asyncio.Lock()
        self._pool = None
        self.isconnect = False


    async def init_pool(self):
        try:
            self._pool = await aiomysql.create_pool(
                host=self.host,
                port=self.port,
                user=self.user,
                password=self.password,
                db=self.db,
                **self.kwargs
            )
            self.isconnect = True
        except:
            self.isconnect = False

    async def close(self):
        try:
            if self._pool:
                self._pool.close()
                await self._pool.wait_closed()
                self._pool = None
                self.isconnect = False
        except:
            print("close error", traceback.format_exc())
            self.pool = None
            self.isconnect = False

    async def restart(self):
        print("will restart connect..... ")
        await self.close()
        await self.init_pool()

    @mysql_connection_check
    async def execute(self, query, args=None):
        '''
        执行execute语句
        :param query:
        :param args:
        :return:
        '''
        async with self._pool.acquire() as conn:
            async with conn.cursor() as cur:
                await cur.execute(query, args)
                return cur
这里我们重新封装了一个类PMysql,并将 aiomysql.create_pool 返回的pool作为这个类的_pool属性,PMysql有一个isconnect属性,只有当正常连接的时候这个属性才为True,之后我们又写了一个 mysql_connection_check 的装饰器, 在装饰器里执行查询操作,当遇到OperationalError, ConnectionResetError, OSError 错误的时候,我们认为可能是与mysql数据库连接出了问题,将尝试进行重新连接。
这次使用PMysql重新写一下刚才的测试程序
loop = asyncio.get_event_loop()
async def test():
    t = PMysql(
        host='127.0.0.1',
        port=3306,
        user='root',
        password='123456',
        db='mytest',
        autocommit=True,
        minsize=1,
        maxsize=2,
        loop=loop)

    await t.init_pool()

    while True:
        try:
            cur = await t.execute("select * from user where id = %s", 1)
            for i in await cur.fetchall():
                print(i)
        except:
            pass
        finally:
            await asyncio.sleep(1)
这时再进行刚才的试验,启动程序可以正常获取数据,然后再断网, 这时会报错,然后再将网络恢复,此时,可以不用重新启脚本就会自动连接上数据库了。
但是由于重新封装了类,所以在aiomysql中一些方法就不能用了,还需要重新再定义一下
    @mysql_connection_check
    async def get_a_conn(self):
        return await self._pool.acquire()

    @mysql_connection_check
    async def releaseconn(self, conn):
        return await self._pool.release(conn)

    @mysql_connection_check
    async def get_a_cursor(self, conn):
        return await conn.cursor()

    @mysql_connection_check
    async def release_a_cur(self, cur):
        await cur.close()

    @mysql_connection_check
    async def transaction(self, conn):
        await conn.begin()

    @mysql_connection_check
    async def commit(self, conn):
        await conn.commit()

    @mysql_connection_check
    async def rollback(self, conn):
        await conn.rollback()

    @mysql_connection_check
    async def execute(self, query, args=None):
        '''
        执行execute语句
        :param query:
        :param args:
        :return: 游标
        '''
        async with self._pool.acquire() as conn:
            async with conn.cursor() as cur:
                await cur.execute(query, args)
                return cur

    @mysql_connection_check
    async def executemany(self, query, args=None):
        async with self._pool.acquire() as conn:
            async with conn.cursor() as cur:
                await cur.executemany(query, args)
                return cur
上面我将在平时使用过程中用的比较多的函数进行了重新封装,关于事务的处理会相应的麻烦一些,我这里通过acquire和release来获取连接和游标的方法
在事务中执行我们可以这样写
loop = asyncio.get_event_loop()
async def test():
    t = PMysql(
        host='127.0.0.1',
        port=3306,
        user='root',
        password='123456',
        db='mytest',
        autocommit=True,
        minsize=1,
        maxsize=2,
        loop=loop)

    await t.init_pool()

    conn = await t.get_a_conn()
    cur = cur = await t.get_a_cursor(conn)
    try:
        await t.transaction(conn)
        await cur.execute("insert into user (username, age) values(%s, %s)", ("xxx", 11))
        await cur.execute("insert into user (username, age) values(%s, %s)", ("xxx", 11, 333))
        print(cur.lastrowid)
        await t.commit(conn)
    except:
        await conn.rollback()
    finally:
        if cur:
            await t.release_a_cur(cur)
        if conn:
            await t.releaseconn(conn)
这里由于第二次插入数据时,故意多加了一个参数333, 这样会导致触发异常,然后执行`await conn.rollback()` 这里再查看数据库,上面这两条数据都没有插入成功,这样就符合我们对事务的需求了。
是否使用Sqlalchemy
通过上面的介绍,想必大家也可以看出,sa在代码的可读性方面似乎没有直接SQL语句好,但是sa的存在意义在于,你现在使用的是MySQL, 没准哪天项目需要迁移到oracle或者sqlite,这时你几乎不用修改什么代码就可以顺利的完成迁移,如果直接使用SQL语言你就需要修改大量的代码.再者ORM会在底层对查询做一些转换,像之前提到的注入问题,如果有手写SQL时难免会写出漏洞来。但是我们做项目,又很少能过遇到修改数据库的情况,所以是否要使用sa,看各位的需求!

END
查看历史文章
Kubevirt在360的探索之路(K8S接管虚拟化)
如何提高大规模正则匹配的效能
360Stack裸金属服务器部署实践


360技术公众号
技术干货|一手资讯|精彩活动
扫码关注我们
最后
以上就是无情铃铛最近收集整理的关于Aiomysql 与 Sqlalchemy 的使用的全部内容,更多相关Aiomysql内容请搜索靠谱客的其他文章。


发表评论 取消回复