Flutter Key的LocalKey和GlobalKey用法介绍
文章目录
- Flutter Key的LocalKey和GlobalKey用法介绍
- 前言
- 一、LocalKey解析及其使用方法
- 一.ValueKey(同一级别下使用)
- 为什么要使用ValueKey(举例) 当然用其他key也可以实现一样的效果只是ValueKey适用场景
- ValueKey使用
- 二、ObjectKey解析及其使用方法
- 三、UniqueKey(独一无二的key)解析及其使用方法
- 丢状态
- 二、GolbalKey
- 示例一
- 示例二
- 总结
前言
这篇文章是上一篇Key文章的续写,如果对Key的作用和用法还不是很了解可以先去看一下我上一篇关于Key的文章。Flutter Key作用和原理
一、LocalKey解析及其使用方法
一.ValueKey(同一级别下使用)
为什么要使用ValueKey(举例) 当然用其他key也可以实现一样的效果只是ValueKey适用场景
我们编写一个简单程序
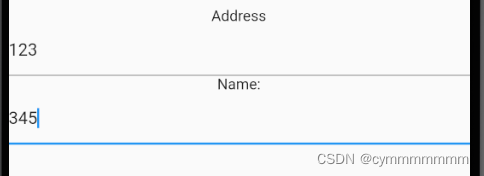
代码如下(示例):
child: Column(
          mainAxisAlignment: MainAxisAlignment.center,
          children: <Widget>[
            Text("Address"),
            TextField(),
            Text("Name:"),
            TextField(),
          ],
        ),
当我们输入数据 然后再把控件调换位置

children: <Widget>[
            Text("Name:"),
            TextField(),
            Text("Address"),
            TextField(),

          ],
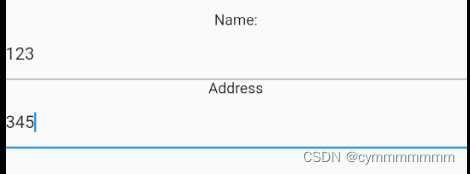
发现我们仅调换的Text组件 TextField组件并没有变化。这是为什么呢,通过我们上一篇对Key的了解,我们可以认为对于有状态的组件(ful)(无状态的组件则不需要key(例如上述的Text)) 如果我们要改变他的位置和更改他的数据,需要用key给该组件一个唯一ID,在我们Flutter中叫做key,那么Key里面也有很多种有类型,那我们就来学习一下ValueKey的具体使用
ValueKey使用
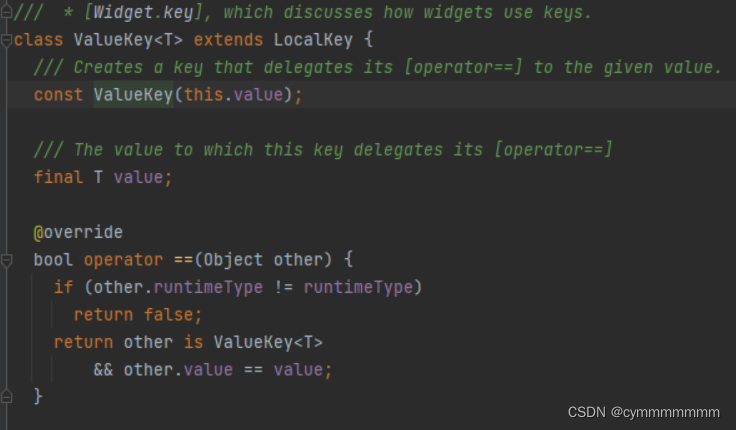
源码也解释的比较清楚了 ValueKey继承LocalKey,可以接受任何类型的参数(T),但同一个ValueKey不能出现两次甚至多次,所以要使用Operator函数去鉴别ValueKey是否唯一,也就是ValueKey的值相等
代码如下(示例):
children: <Widget>[
            Text("Name:"),
            TextField(key:ValueKey("name")),
            Text("Address"),
            TextField(key:ValueKey("Address")),
          ],
当我们给了ValueKey之后,就可以
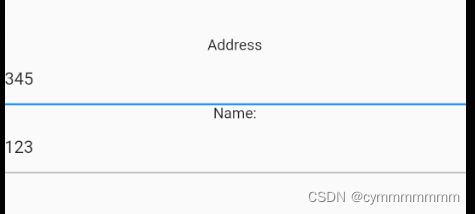
非常好用
二、ObjectKey解析及其使用方法
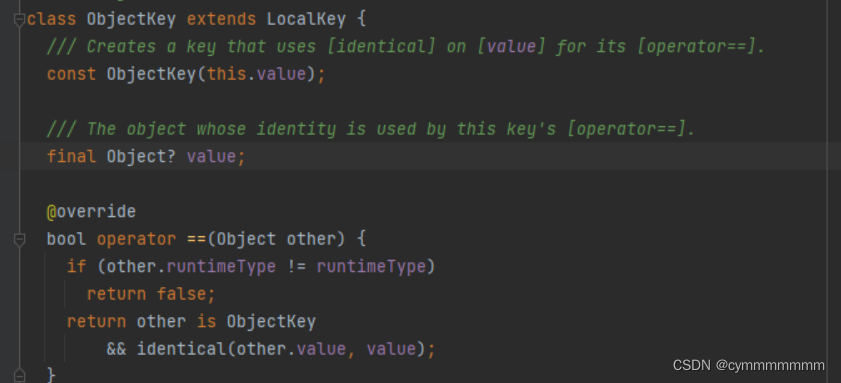
ObjectKey和ValueKey的区别再于Identical 和 == 。Identical是判断是否为同一内存(内存中的指针是否相同)。在java中用 (==) 判断
当然Key这个东西简便好,使用ObjectKey的情况下也比较少。当然如果Key比较复杂的话使用ObjectKey也是个不错的选择
例如:
children: <Widget>[
         Text("Address"),
         TextField(key:ObjectKey(new Student())),
         Text("Name:"),
         TextField(key:ObjectKey(new Student())),


       ],
       因为New出来的对象不再同一内存所以可以使用,ValueKey则不能使用
三、UniqueKey(独一无二的key)解析及其使用方法
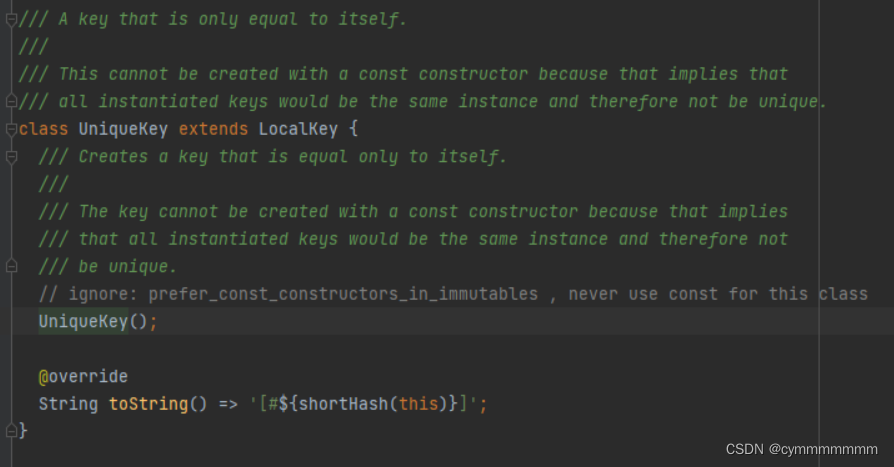
源码以看啥也没有 就只剩下一些翻译,那下面我们再来看看这个独一无二的Key怎么理解把。
丢状态
AnimatedSwitcher(
           duration: const Duration(seconds: 1),
           child: Text("no keyrrths", key: UniqueKey()),
         )
每次改变文字时,假如不传uniqueKey,就不会有动画的渐变效果,而如果传了UniqueKey,则会有渐变动画效果。因为不传uniqueKey时,每次都只会认为text的widget发生了变化,只会将text的widget给替换为新的widget,而element还是同一个不会变化,所以会认为UI没有发生变化,因此不会改变;而如果传了uniqueKey时,每次widget比较时都会因为自身的key不一致而被认为是不同的widget,导致会重建element和renderObject,前后两个UI不一致,此时就会发生动画效果。
二、GolbalKey
示例一
代码如下(示例):
class MyHomePage extends StatefulWidget {
  MyHomePage({Key key, this.title}) : super(key: key);
  final String title;
  @override
  _MyHomePageState createState() => _MyHomePageState();
}
class _MyHomePageState extends State<MyHomePage> {
  int _counter = 0;
  void _incrementCounter() {
    setState(() {
      _counter++;
    });
  }
final _globalKey1 = GlobalKey();
  final _globalKey2 = GlobalKey();
  @override
  Widget build(BuildContext context) {
    return Scaffold(
      appBar: AppBar(
        title: Text(widget.title),
      ),
      body: Center(
        child:Flex(
          direction: MediaQuery.of(context).orientation == Orientation.portrait
          ? Axis.vertical
          : Axis.horizontal,
          mainAxisAlignment: MainAxisAlignment.center,
          children: <Widget>[
            Counter(),
            Counter(_globalKey2),
          ],
        )
      ),
      floatingActionButton: FloatingActionButton(
        onPressed: _incrementCounter,
        tooltip: 'Increment',
        child: Icon(Icons.add),
      ), // This trailing comma makes auto-formatting nicer for build methods.
    );
  }
}
class Counter extends StatefulWidget{

  Counter([Key key]) :super(key: key);
  @override
  _CounterState createState() => _CounterState();

}
class _CounterState extends State<Counter>{

  int _count = 0 ;
  @override
  Widget build(BuildContext context) {
    // TODO: implement build
    return RaisedButton(
        child: Text("$_count",style: TextStyle(fontSize: 72),),
      onPressed: ()=> setState(() => _count++),
    );
  }

}
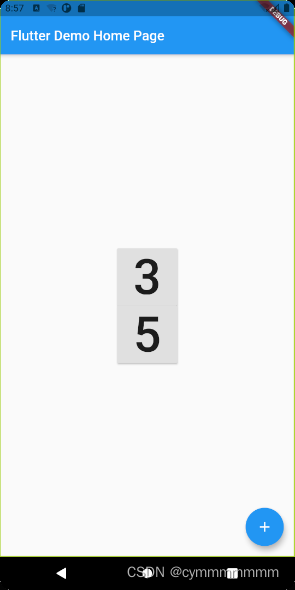
当我们竖屏显示时,点击按钮添加点击次数后,我们把屏幕反转过来
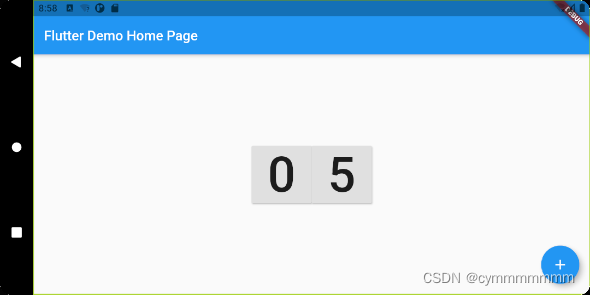
没有添加GolbalKey的Counter状态被删除了,添加了GolbalKey状态依旧存在
示例二
代码如下(示例):
class MyHomePage extends StatefulWidget {
  MyHomePage({Key key, this.title}) : super(key: key);
  final String title;
  @override
  _MyHomePageState createState() => _MyHomePageState();
}
class _MyHomePageState extends State<MyHomePage> {
  int _counter = 0;
  void _incrementCounter() {
    setState(() {
      _counter++;
    });
  }
final _globalKey1 = GlobalKey();
  final _globalKey2 = GlobalKey();
  @override
  Widget build(BuildContext context) {
    return Scaffold(
      appBar: AppBar(
        title: Text(widget.title),
      ),
      body: Center(
        child:Flex(
          direction: MediaQuery.of(context).orientation == Orientation.portrait
          ? Axis.vertical
          : Axis.horizontal,
          mainAxisAlignment: MainAxisAlignment.center,
          children: <Widget>[
            Counter(),
            Counter(_globalKey2),
          ],
        )
      ),
      floatingActionButton: FloatingActionButton(
        onPressed: (){
          final state = (_globalKey2.currentState as _CounterState); //找到组件为CounterState的GoublaeKey
          state.setState(() {
            state._count++;
          });
        },
        tooltip: 'Increment',
        child: Icon(Icons.add),
      ), // This trailing comma makes auto-formatting nicer for build methods.
    );
  }
}
class Counter extends StatefulWidget{

  Counter([Key key]) :super(key: key);
  @override
  _CounterState createState() => _CounterState();

}
class _CounterState extends State<Counter>{

  int _count = 0 ;
  @override
  Widget build(BuildContext context) {
    // TODO: implement build
    return RaisedButton(
        child: Text("$_count",style: TextStyle(fontSize: 72),),
      onPressed: ()=> setState(() => _count++),
    );
  }

}
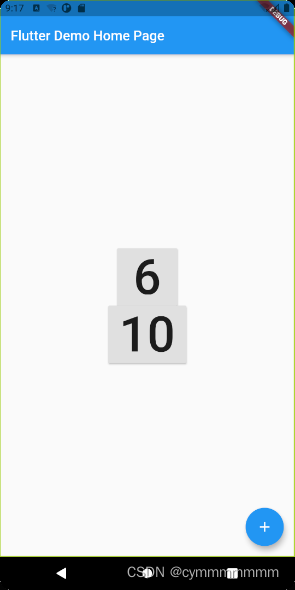
点击加号和数字都可以添加状态
总结
GolbalKey两个示例很粗糙,后续有比较深的理解再来改善
最后
以上就是甜蜜航空最近收集整理的关于Flutter Key的LocalKey和GlobalKey用法介绍Flutter Key的LocalKey和GlobalKey用法介绍前言一、LocalKey解析及其使用方法二、GolbalKey总结的全部内容,更多相关Flutter内容请搜索靠谱客的其他文章。


发表评论 取消回复