1、 Centos7 最小化安装
2、 .net安装
1 sudo rpm -Uvh https://packages.microsoft.com/config/rhel/7/packages-microsoft-prod.rpm
2 sudo yum install dotnet-sdk-2.2
3 dotnet –version
3、 安装Nginx
1、添加Nginx 源
sudo rpm -Uvh http://nginx.org/packages/centos/7/noarch/RPMS/nginx-release-centos-7-0.el7.ngx.noarch.rpm
2、安装
sudo yum install nginx
编辑 /etc/nginx/nginx.conf
server {
listen 80;
server_name localhost;
location / {
proxy_set_header Host $http_host;
proxy_set_header X-Real-IP $remote_addr;
proxy_set_header X-Forwarded-For $proxy_add_x_forwarded_for;
proxy_pass http://localhost:5000;
root html;
index index.html index.htm;
}
}
}
3、启动、重启、加载 Nginx
sudo systemctl start nginx.service
sudo systemctl enable nginx.service
nginx -s reload
nginx -t -c nginx.conf 检测配置文件
4、 关闭防火墙及selinux
sudo systemctl disable firewalld 永久关闭防火墙
sudo systemctl status firewalld 查看运行状态
vi /etc/selinux/config SELINUX=enforcing改为SELINUX=disabled
getenforce 查看状态
5、 配置多个dotnet 转发
1、 配置 nginx.conf

2、 在 conf.d 下面复制 default.conf 并取名自己识别格式
server {
listen 80;
server_name hello.leodev.cn;
index index.html;
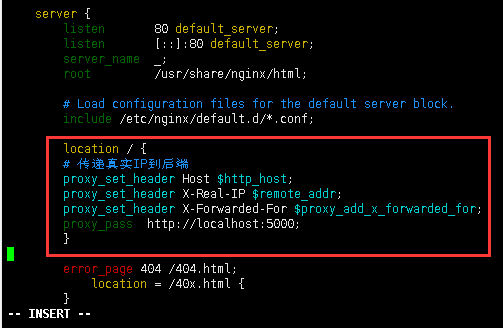
    location / {
    # 传递真实IP到后端
    proxy_set_header Host $http_host;
    proxy_set_header X-Real-IP $remote_addr;
    proxy_set_header X-Forwarded-For $proxy_add_x_forwarded_for;
    proxy_pass  http://localhost:5000;
    }
}
可以看到,配置中,和之前nginx.conf的文件基本是一样的。 我们只是为项目绑定了一个域名
然后重启 nginx 服务,这个时候,我们就可以通过 绑定的域名,访问到我们的 .Net Core 程序了。
6、 使用 supervisor 为程序创建守护进程
1、yum install epel-release 安装源
2、yum install -y supervisor
3、systemctl enable supervisord 开机自启
systemctl start supervisord 启动supervisord
systemctl status supervisord 查看状态
修改文件启动 WEB
vim /etc/supervisord.conf


[inet_http_server]
port=192.168.1.108:9001
(或者0.0.0.0:9001)
username=root
password=123456
supervisorctl reload 重新加载配置文件
cat /etc/supervisord.conf 查看配置文件所在目录
进入 /etc/supervisord.d/ 新建 .ini文件
Vi napi.ini
[program:napi]
command=dotnet ZT.WebApi.dll
directory=/home/napi
environment=ASPNETCORE_ENVIRONMENT=Development
user=root
autopsignal=INT
autostart=true
autorestart=true
startsecs=3
stderr_logfile=/var/log/ossoffical.err.log
stdout_logfile=/var/log/ossoffical.out.log
supervisord -c /etc/supervisord.conf #启动服务
supervisorctl reload #重新加载配置
#其他相关操作
supervisorctl shutdown #关闭
systemctl enable supervisord #开机启动
systemctl is-enabled supervisord #验证是否开机启动
7、 环境变量设置
Vi /etc/profile
最后一行加:
export ASPNETCORE_ENVIRONMENT=Development
Development(开发) Production(生产) Staging(预演)
最后
以上就是忧心篮球最近收集整理的关于Centos 安装 Dotnet 并启动的全部内容,更多相关Centos内容请搜索靠谱客的其他文章。


发表评论 取消回复