操作系统:windows10
演示工具:eclipse
原文提供源码与相关工具下载
查看原文
串口通讯建议使用RXTX,RXTX是一个java库,支持串行和并行通信,RXTX提供的接口与JavaComm一样,所以从JavaComm迁移到RXTX也非常简单,换一下项目中导入的库就行,不用修改代码。
准备开发环境
在 eclipse 中创建新的 Java 项目,命名为 JavaSerial。
下载RXTX库
在你刚刚创建的 JavaSerial 项目的根目录下,创建一个文件夹,命名为 lib,
下载 RXTX,将压缩包解压,然后将 RXTXcomm.jar, rxtxSerial.dll and rxtxParallel.dll 拷贝到lib文件夹。
添加RXTXcomm.jar
在eclipse中刷新项目,在 JavaSerial 项目上 单击右键->Properties->Build Path,选择Libraries 选项卡,然后单击 Add JARs ,选择RXTXcomm.jar然后确定。
添加dll文件
把拷贝过来的dll文件,添加到 JavaSerial 项目中,在 JavaSerial 项目 上单击右键->Properties->Build Path,选择 Source 选项卡,展开 JavaSerial/src,单击Native library location: (None) ,然后单击 Edit,在弹出的对话框中单击 Workspace ,然后选择 JavaSerial/lib 文件夹,接下来一直点击确定。
到这里,已经完成了开发环境的搭建
测试开发环境
这里我们测试一下上一步搭建的开发环境是否成功,创建一个新类,TestRXTXEnv.java 然后将下面的代码复制进去
import gnu.io.CommPortIdentifier;
import java.util.Enumeration;

public class TestRXTXEnv {

    public void list() {
        Enumeration ports = CommPortIdentifier.getPortIdentifiers();

        //列出所有本机串口
        while(ports.hasMoreElements())
            System.out.println(((CommPortIdentifier)ports.nextElement()).getName());
    }

    public static void main(String[] args) {
        new TestRXTXEnv().list();
    }
}
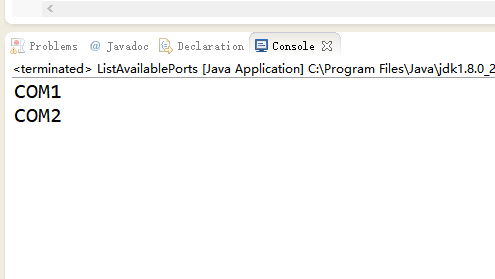
单击运行按钮,我的机器上有两个串口,所以输出内容如下,如果你的机器上没有串口,控制台为空白。
关于串口设备
如果你手头上没有串口设备,有以下两种方式可以帮助你进行下一步的开发测试。
1.将两个串口用一根串口线连接,这时候从一个串口发出去的数据会被另一个串口接收到,将一个串口作为发送端,另一个串口作为接收端,再进行测试。
2.使用Virtual Serial Port Driver 6.0(本文使用的是这种方式)
如果你电脑连串口也没有,你可以安装Virtual Serial Port Driver 6.0,该软件可以在windows上创建一对虚拟串口,并将两个串口(虚拟的)连接到一起,
开发示例
下面是一个基于RXTX库的一个样例,SendMessage 从串口发送信息,ReceiveMessage 从串口接收信息,读者可在此基础上自行扩展。
SendMessage 与 ReceiveMessage 工作流程相似,大致流程如下
- 获取 CommPortIdentifier 对象,参数 portName 为端口名(例如COM1),如果该端口正在被其他应用占用,可能会获取失败。
- 若正常获取到 CommPortIdentifier 对象,下一步与该端口建立连接,并设置波特率,数据位,停止位,奇偶校验方式。
- 获取 InputStream 或 OutputStream 来进行接收或发送数据。
代码
- CommPortReceiver.java
import java.io.IOException;
import java.io.InputStream;

public class CommPortReceiver extends Thread {

	InputStream in;
	byte[] buffer = new byte[1024];
	int tail = 0;

	public CommPortReceiver(InputStream in) {
		this.in = in;
	}

	public void onReceive(byte b) {
		// 将收到的信息以行分隔
		if (b == 'n') {
			onMessage();
		} else {
			buffer[tail] = b;
			tail++;
		}
	}

	public void onStreamClosed() {
		onMessage();
	}

	private void onMessage() {
		if (tail != 0) {
			// 将收到的字节转为字符串
			String message = new String(buffer, 0, tail);
			System.out.println("收到信息: " + message);
			tail = 0;
		}
	}

	public void run() {
		try {
			int b;
			while (true) {
				while ((b = in.read()) != -1) {
					onReceive((byte) b);
				}
				onStreamClosed();
				sleep(10);
			}
		} catch (IOException e) {
			e.printStackTrace();
		} catch (InterruptedException e) {
			e.printStackTrace();
		}
	}
}
- CommPortSender.java
import java.io.IOException;
import java.io.OutputStream;

public class CommPortSender {

    static OutputStream out;

    public static void setWriterStream(OutputStream out) {
        CommPortSender.out = out;
    }

    public static void send(byte[] bytes) {
        try {
            System.out.println("发送: " + new String(bytes, 0, bytes.length));

            //写入输出流中的内容会通过串口发送出去
            out.write(bytes);
            out.flush();
        } catch (IOException e) {
            e.printStackTrace();
        }
    }
}
- ReceiveMessage.java
package com;

import gnu.io.CommPortIdentifier;
import gnu.io.SerialPort;

public class ReceiveMessage {

	public void connect(String portName) throws Exception {

		CommPortIdentifier portIdentifier = CommPortIdentifier.getPortIdentifier(portName);

		if (portIdentifier.isCurrentlyOwned()) {
			System.out.println("端口被占用!");
		} else {
			SerialPort serialPort = (SerialPort) portIdentifier.open(this
					.getClass().getName(), 2000);

			// 设置串口参数
			serialPort.setSerialPortParams(38400, SerialPort.DATABITS_8,
					SerialPort.STOPBITS_1, SerialPort.PARITY_NONE);

			// 串口输出流
			// CommPortSender.setWriterStream(serialPort.getOutputStream());

			// 串口输入流
			new CommPortReceiver(serialPort.getInputStream()).start();
		}
	}

	public static byte[] String2Bytes(String message) {
		return (message + "n").getBytes();
	}

	public static void main(String[] args) throws Exception {

		// 连接串口,等待消息
		new ReceiveMessage().connect("COM2");
	}

}
- SendMessage.java
package com;

import gnu.io.CommPortIdentifier;
import gnu.io.SerialPort;

public class SendMessage {

    public void connect(String portName) throws Exception {

        CommPortIdentifier portIdentifier = CommPortIdentifier.getPortIdentifier(portName);

        if (portIdentifier.isCurrentlyOwned()) {
            System.out.println("端口被占用!");
        } else {
            //参数一:自定义名字,这里我们直接将类名填入;参数二为Timeout
            SerialPort serialPort = (SerialPort) portIdentifier.open(this.getClass().getName(), 2000);

            //设置串口参数
            serialPort.setSerialPortParams(  38400, SerialPort.DATABITS_8, SerialPort.STOPBITS_1, SerialPort.PARITY_NONE);

            // 串口输出流
            CommPortSender.setWriterStream(serialPort.getOutputStream());

            // 串口输入流
            //new CommPortReceiver(serialPort.getInputStream()).start();
        }
    }

       public static byte[] String2Bytes(String message) {
    	   		return (message+"n").getBytes();
       }

    public static void main(String[] args) throws Exception {

        // 连接串口
    	new SendMessage().connect("COM1");
    	//循环发送测试信息
    	while(true){
    		Thread.sleep(1000);
    		CommPortSender.send(String2Bytes("HELLO"));
    	}

    }
}
运行代码
1.选中在 JavaSerial 项目中的 SendMessage.java ,单击运行按钮。
2.选中在 JavaSerial 项目中的 ReceiveMessage.java ,单击运行按钮。
这时,步骤1和步骤2的两个进程同时运行起来,点击 控制台右侧 的 监视器图标 可以切选择切换不同进程对应的控制台,注意图中蓝色方框内的几个按钮不要选中。

欢迎在下方留言。
最后
以上就是坦率大米最近收集整理的关于java RS232串口通讯 windows(附源码)准备开发环境关于串口设备开发示例的全部内容,更多相关java内容请搜索靠谱客的其他文章。








发表评论 取消回复