
作者|GIT提交不上|简书
一、Shiro简介
Apache Shiro是Java的一个安全框架。功能强大,使用简单的Java安全框架,它为开发人员提供一个直观而全面的认证,授权,加密及会话管理的解决方案。
Shiro基本功能点如下所示:
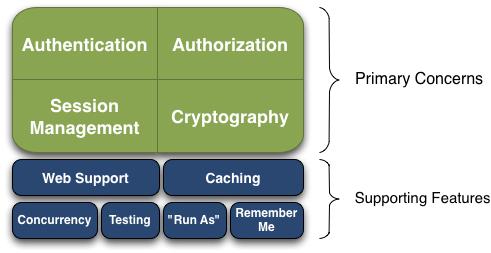
图1.1 Shiro基本功能点.png
Shiro工作流程如下所示:
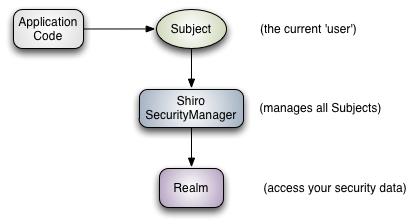
图1.2 Shiro工作流程-应用程序角度.png
Shiro内部架构如下所示:
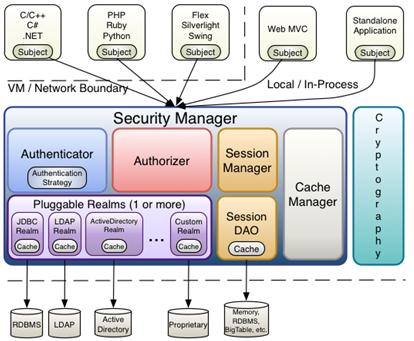
图1.3 Shiro内部架构.png
Shiro官网
认证与Shiro安全框架
二、Spring Boot整合Shiro
本文实现源码如下,欢迎Star和Fork。
https://github.com/just-right/shiro
2.1 前后端分离
实现思路:用户登录时生成token信息,设置过期时间,使用Redis存储。前端调用接口时将token作为参数传给服务端,服务端根据token信息认证用户。
参考链接一:一看就懂!Springboot +Shiro +VUE 前后端分离式权限管理系统
参考链接二:人人开源-renren-fast
自定义AuthFilter过滤器,继承AuthenticatingFilter重写createToken、isAccessAllowed、onAccessDenied、onLoginFailure方法。
AuthenticatingFilte类executeLogin方法如下所示:
protected boolean executeLogin(ServletRequest request, ServletResponse response) throws Exception { AuthenticationToken token = this.createToken(request, response); if (token == null) { String msg = "createToken method implementation returned null. A valid non-null AuthenticationToken must be created in order to execute a login attempt."; throw new IllegalStateException(msg); } else { try { Subject subject = this.getSubject(request, response); subject.login(token); return this.onLoginSuccess(token, subject, request, response); } catch (AuthenticationException var5) { return this.onLoginFailure(token, var5, request, response); } }}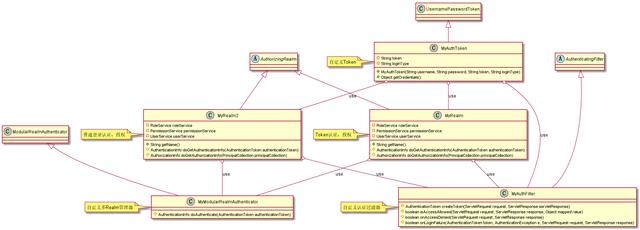
图2-1 前后端分离-Shiro核心类.png
用户登录时删除旧Token信息,重新生成Token信息,退出登录时删除Token信息。使用Redis存储Token信息时,同时存储已用户ID为键,Token为值和已Token为键、用户ID为值的信息。
//用户登录 -- String oldToken = tokenService.getUserToken(uid);/** * 删除旧Token信息 * { token: userId } * { userId: [tokenList] } */tokenService.delUserToken(uid);tokenService.delTokenUser(oldToken);/** * 创建新Token信息 */String token = tokenService.createUserToken(uid);tokenService.createTokenUser(uid,token);//用户退出登录 -- /** * 删除Token信息 */tokenService.delUserToken(Integer.valueOf(uid));tokenService.delTokenUser(token);整体实现流程图如下所示,图源来自参考链接一,侵删。
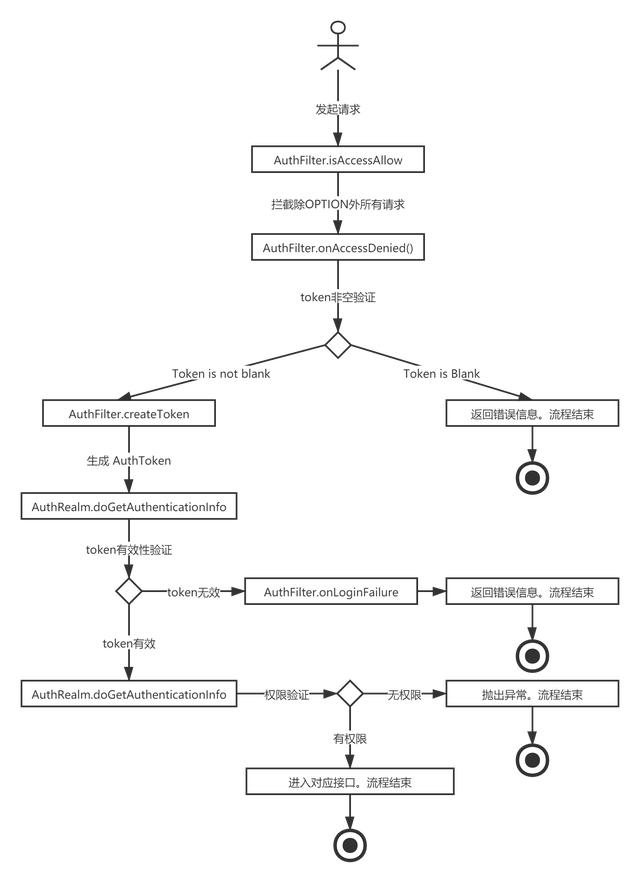
图2-2 前后端分离-接口请求流程图.png
2.2 多Realm管理
实现思路:自定义ModularRealmAuthenticator管理多Realm,结合自定义认证Token关联不同的Realm。
参考链接一:SpringBoot Shiro多realm实现免密登录
SecurityManager和ModularRealmAuthenticator配置如下:
@Bean(value = "securityManager")public SessionsSecurityManager securityManager(@Qualifier("myRealm") Realm myRealm,@Qualifier("myRealm2") Realm myRealm2) { DefaultWebSecurityManager securityManager = new DefaultWebSecurityManager(); //指定多 realm 先配置Authenticator-顺序不能相反 securityManager.setAuthenticator(modularRealmAuthenticator()); List list = Arrays.asList(myRealm,myRealm2); securityManager.setRealms(list); securityManager.setRememberMeManager(null); return securityManager;}@Beanpublic ModularRealmAuthenticator modularRealmAuthenticator() { //自己重写的ModularRealmAuthenticator MyModularRealmAuthenticator modularRealmAuthenticator = new MyModularRealmAuthenticator(); //至少一个成功 modularRealmAuthenticator.setAuthenticationStrategy(new AtLeastOneSuccessfulStrategy()); return modularRealmAuthenticator;}自定义认证Token,重写getCredentials方法,根据loginType返回不同的比较对象。
/** * 自定义Token * @author: luffy */@Data@NoArgsConstructorpublic class MyAuthToken extends UsernamePasswordToken { private String token; private String loginType; public MyAuthToken(final String username, final String password,final String token, final String loginType) { super(username, password); this.token = token; this.loginType = loginType; } /** * 祖父类 --- AuthenticationToken * Object getPrincipal(); --- 资源对象 * Object getCredentials(); --- 比较对象 * 1.如果是普通登陆 返回密码 * 2.如果是Token访问 返回token * 目前只有两种Realm * ... ... * @return */ @Override public Object getCredentials() { if (IShiroConst.TOKEN_REALM_NAME.equals(this.getLoginType())){ return getToken(); } return getPassword(); }}普通登陆Realm认证逻辑如下所示:
@Overrideprotected AuthenticationInfo doGetAuthenticationInfo(AuthenticationToken authenticationToken) throws AuthenticationException { MyAuthToken token = (MyAuthToken) authenticationToken; User user = userService.queryByUserName(token.getUsername()); if (user == null){ throw new UnknownAccountException("用户不存在!"); } SimpleAuthenticationInfo info = new SimpleAuthenticationInfo(token.getPrincipal(), user.getPassword(), getName()); if (user.getSalt() != null){ info.setCredentialsSalt(ByteSource.Util.bytes(user.getSalt())); } return info;}Token关联的Realm认证逻辑如下所示:
@Overrideprotected AuthenticationInfo doGetAuthenticationInfo(AuthenticationToken authenticationToken) throws AuthenticationException { MyAuthToken authToken = (MyAuthToken) authenticationToken; String token = authToken.getToken(); /** * 存缓存中获取token token为key,uid为value */ if (StringUtils.isEmpty(token) || !TokenUserRedisUtils.isExistedKey(token) || StringUtils.isEmpty(TokenUserRedisUtils.getValueByKey(token))){ throw new IncorrectCredentialsException("token失效,请重新登录"); } String uid = TokenUserRedisUtils.getValueByKey(token); assert uid != null; User user = userService.queryById(Integer.parseInt(uid)); if (user == null){ throw new UnknownAccountException("用户不存在!"); } SimpleAuthenticationInfo info = new SimpleAuthenticationInfo(user, token, getName()); return info;}自定义ModularRealmAuthenticator,管理多Realm,实现逻辑如下所示:
/** * 多Realm配置管理 * @author: luffy */public class MyModularRealmAuthenticator extends ModularRealmAuthenticator { @Override protected AuthenticationInfo doAuthenticate(AuthenticationToken authenticationToken) throws AuthenticationException { // 判断getRealms()是否返回为空 assertRealmsConfigured(); // 强制转换回自定义的CustomizedToken MyAuthToken userToken = (MyAuthToken) authenticationToken; // 登录类型 String loginType = userToken.getLoginType(); // 所有Realm Collection realms = getRealms(); // 登录类型对应的所有Realm List typeRealms = new ArrayList<>(); for (Realm realm : realms) { if (realm.getName().contains(loginType)) { typeRealms.add(realm); } } // 判断是单Realm还是多Realm if (typeRealms.size() == 1){ return doSingleRealmAuthentication(typeRealms.get(0), userToken); } else{ return doMultiRealmAuthentication(typeRealms, userToken); } }}三、测试
用户登录,返回生成的token信息:
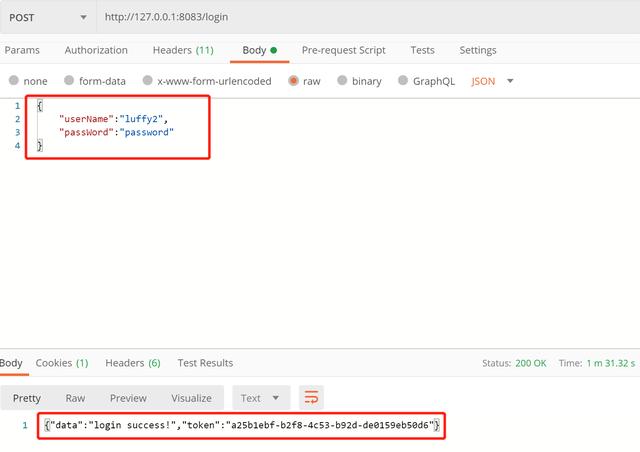
图3-1 用户登录.png
用户携带token信息查询文章(有对应权限):
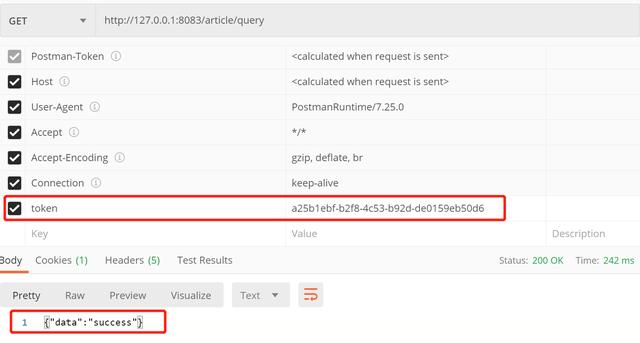
图3-2 用户携带token信息查询文章.png
用户携带token信息删除用户(无权限):
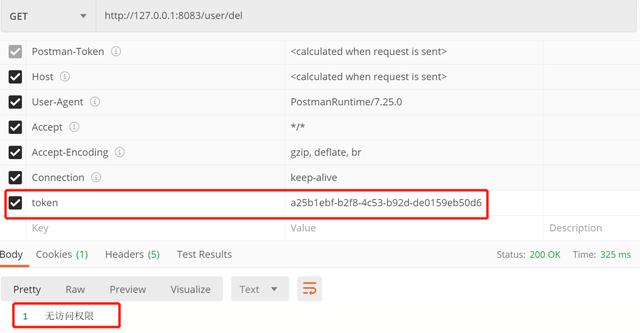
图3-3 用户携带token信息删除用户.png
用户携带token信息退出登录:
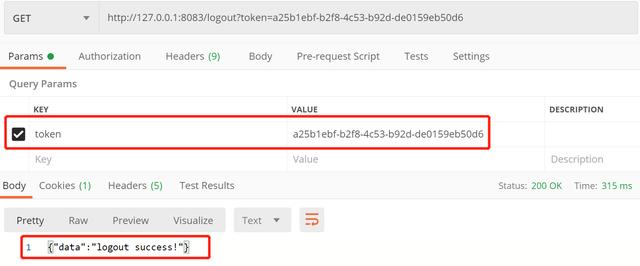
图3-4 用户携带token信息退出登录.png
用户退出登录后携带原token信息删除用户:
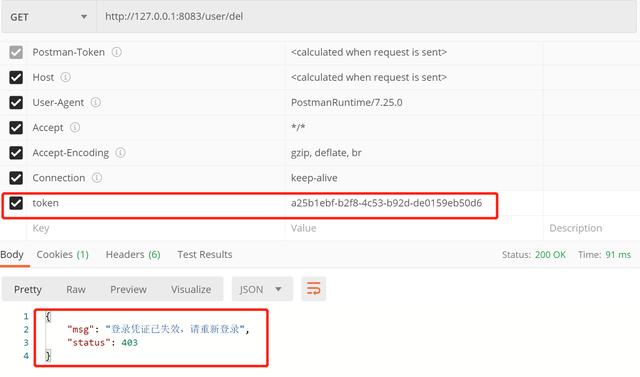
图3-5 用户退出登录后携带原token信息删除用户.png
最后
以上就是大力水池最近收集整理的关于shiro 前后端分离_Spring Boot整合Shiro实现前后端分离一、Shiro简介二、Spring Boot整合Shiro2.1 前后端分离2.2 多Realm管理三、测试的全部内容,更多相关shiro内容请搜索靠谱客的其他文章。


发表评论 取消回复