一:CentOS上Nginx的安装参考我的上一篇博客:http://blog.csdn.net/u013082989/article/details/50496291
二:
总的说明:
1、我在根目录下建立了webapps文件夹用于放置项目文件:/webapps,我的项目文件是VindicateWallProj;
2、apache-tomcat-7-1和apache-tomcat-7-2在/home文件夹下;
3、nginx安装文件在/usr/local/nginx下。
(1)下载tomcat,并解压缩,我这里解压缩了三份,用到的是后两个,apache-tomcat-7-1和apache-tomcat-7-2,这些基本的就不多说了。

(2)进去apache-tomcat-7-1的conf文件夹下,修改server.xml,cd apache-tomcat-7-1/conf
我这里将端口改为了8099,

这里appBase 是你的项目文件所在的目录,
并且添加,如下代码,注意dacBase的目录
<Context path="" docBase="/webapps/VindicateWallProj" debug="0" reloadable="true" />

(3)配置nginx的配置文件(nginx.conf):events中添加epoll,使用的网络I/O模型,Linux中推荐epoll模型
(4)include proxy.cnf,引入反向代理规则配置文件,把proxy.cnf文件与nginx.cnf文件放在同一目录下即可;具体如下图所示:


proxy.conf文件的内容:(这里也是在网上找的一个)
# proxy.conf #反向代理(负载均衡)规则
proxy_redirect off; #代理重定向关闭
proxy_set_header Host $host; #从header头中获取的主机名
proxy_set_header X-Real-IP
$remote_addr;
#获取header头中获取的主机的真实IP
proxy_set_header
X-Forwarded-For
$proxy_add_x_forwarded_for;
#获取header头中获取代理者的真实ip
server_names_hash_bucket_size 128;
large_client_header_buffers 4 32k; #设置请求缓存
client_header_buffer_size 64k; #客户端上传文件缓存大小
client_max_body_size 300m; #设置客户端能够上传文件大小
client_body_buffer_size 512k;
proxy_connect_timeout 60; #跟后台服务器连接超时时间发起握手等待响应超时时间
proxy_send_timeout 90; #后台服务器数据回传时间,就是在规定时间内后端服务器必须传完所有数据
proxy_read_timeout 90; #连接成功后,等待服务器响应时间,其实已经进入后端的排队之中等待处理
proxy_buffer_size 16k; #设置请求缓存区,这个缓存区会保存用户的头信息,以供nginx进行规则处理,一般只要能保存下头信息即可
proxy_buffers 4 64k; #告诉nginx保留单个用到几个Buffer最大用多少空间
proxy_busy_buffers_size 128k; #代理忙碌时使用的缓冲区大小
proxy_temp_file_write_size 128k;#缓存临时文件的大小
(5)启动两个tomcat服务器,
/home/apache-tomcat-7-1/startup.sh
/home/apache-tomcat-7-2/startup.sh

(6)启动nginx服务器,我这里nginx配置了一下,直接输入nginx即可启动,具体参考上一篇博客

(7)访问域名,成功!

三:总结
初涉nginx,很多不懂得地方,虽是走了不少弯路,但在部署的过程中也学到了很多的东西,总之还有很多东西需要学习。
附:nginx.cnf配置文件
#user nobody;
worker_processes 1;
#error_log logs/error.log warn;
#error_log logs/error.log notice;
#error_log logs/error.log info;
pid logs/nginx.pid;
events {
use epoll;
worker_connections 2048;
}
http {
include mime.types;
default_type application/octet-stream;
include proxy.conf; #导入自己新建的反向代理(负载均衡)规则配置文件
#log_format main '$remote_addr - $remote_user [$time_local] "$request" '
# '$status $body_bytes_sent "$http_referer" '
# '"$http_user_agent" "$http_x_forwarded_for"';
#access_log logs/access.log main;
sendfile on;
#tcp_nopush on;
#keepalive_timeout 0;
keepalive_timeout 65;
#gzip on;
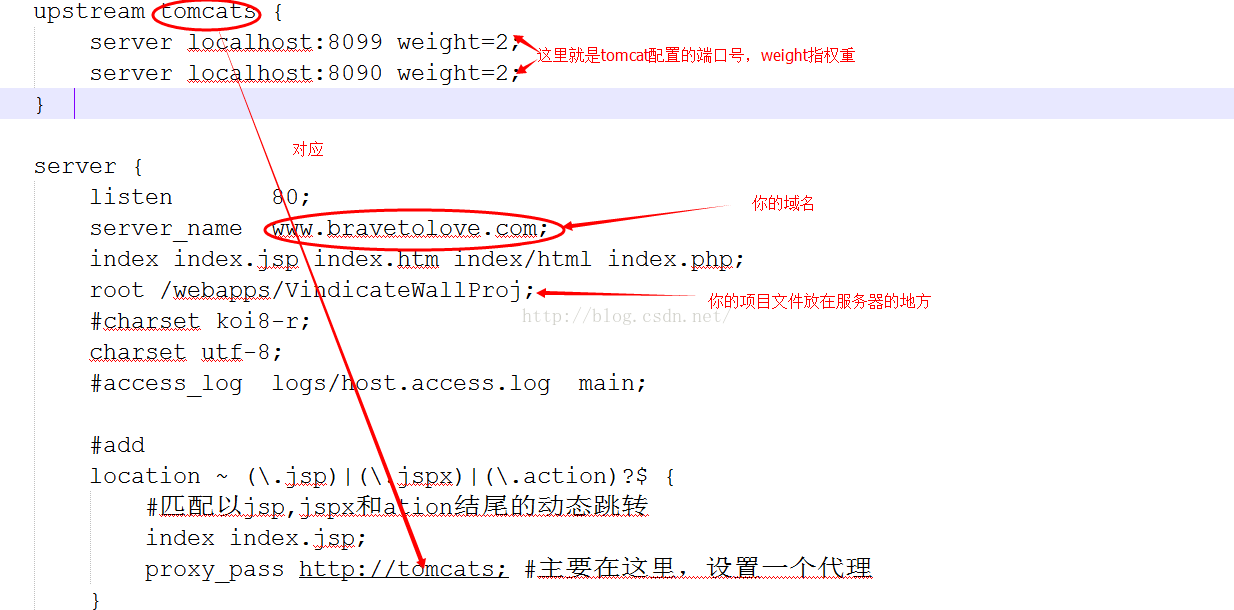
upstream tomcats {
server localhost:8099 weight=2;
server localhost:8090 weight=2;
}
server {
listen 80;
server_name www.bravetolove.com;
index index.jsp index.htm index/html index.php;
root /webapps/VindicateWallProj;
#charset koi8-r;
charset utf-8;
#access_log logs/host.access.log main;
#add
location ~ (.jsp)|(.jspx)|(.action)?$ {
#匹配以jsp,jspx和ation结尾的动态跳转
index index.jsp;
proxy_pass http://tomcats; #主要在这里,设置一个代理
}
#error_page 404 /404.html;
# redirect server error pages to the static page /50x.html
#
error_page 500 502 503 504 /50x.html;
location = /50x.html {
root html;
}
# proxy the PHP scripts to Apache listening on 127.0.0.1:80
#
#location ~ .php$ {
# proxy_pass http://127.0.0.1;
#}
# pass the PHP scripts to FastCGI server listening on 127.0.0.1:9000
#
#location ~ .php$ {
# root html;
# fastcgi_pass 127.0.0.1:9000;
# fastcgi_index index.php;
# fastcgi_param SCRIPT_FILENAME /scripts$fastcgi_script_name;
# include fastcgi_params;
#}
# deny access to .htaccess files, if Apache's document root
# concurs with nginx's one
#
#location ~ /.ht {
# deny all;
#}
}
# another virtual host using mix of IP-, name-, and port-based configuration
#
#server {
# listen 8000;
# listen somename:8080;
# server_name somename alias another.alias;
# location / {
# root html;
# index index.html index.htm;
# }
#}
# HTTPS server
#
#server {
# listen 443 ssl;
# server_name localhost;
# ssl_certificate cert.pem;
# ssl_certificate_key cert.key;
# ssl_session_cache shared:SSL:1m;
# ssl_session_timeout 5m;
# ssl_ciphers HIGH:!aNULL:!MD5;
# ssl_prefer_server_ciphers on;
# location / {
# root html;
# index index.html index.htm;
# }
#}
}
最后
以上就是哭泣服饰最近收集整理的关于CentOS服务器,Nginx+Tomcat 上部署javaEE项目,负载均衡的全部内容,更多相关CentOS服务器,Nginx+Tomcat内容请搜索靠谱客的其他文章。


发表评论 取消回复