上一篇我们主要分析了spring自带的自定义标签componet-scan 注解标签。为了加深大家对这些内容的理解,今天我们自己创建一个自定义标签,融入到spring框架中,体现其扩展性;
1、在spring.xml 文件中 创建一个自定义标签
<nandao:redis id="redis" ip="192.168.80.107" port="6379"/>
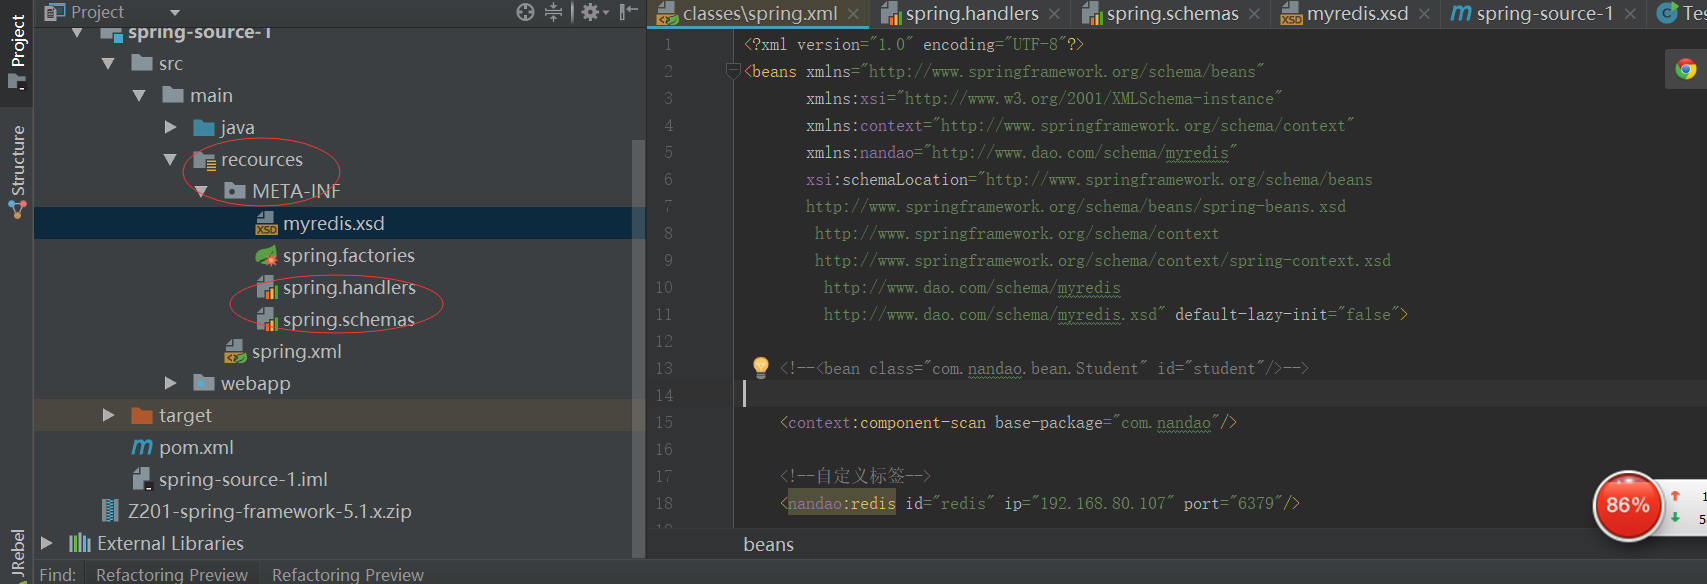
连接redis 服务。spring.xml 文件如图:
<?xml version="1.0" encoding="UTF-8"?>
<beans xmlns="http://www.springframework.org/schema/beans"
       xmlns:xsi="http://www.w3.org/2001/XMLSchema-instance"
       xmlns:context="http://www.springframework.org/schema/context"
       xmlns:nandao="http://www.dao.com/schema/myredis"
       xsi:schemaLocation="http://www.springframework.org/schema/beans
       http://www.springframework.org/schema/beans/spring-beans.xsd
        http://www.springframework.org/schema/context
        http://www.springframework.org/schema/context/spring-context.xsd
         http://www.dao.com/schema/myredis
         http://www.dao.com/schema/myredis.xsd" default-lazy-init="false">

    <!--<bean class="com.nandao.bean.Student" id="student"/>-->

    <context:component-scan base-package="com.nandao"/>

    <!--前缀为 nandao 自定义标签 连接 redis-->
    <nandao:redis id="redis" ip="192.168.80.107" port="6379"/>

</beans>
其实正常流程是创建自定义标签之前,先建立命名空间 xmlns:nandao="http://www.dao.com/schema/myredis"
和xsd 约束文件(xsd文件是用来效验自定义标签里面的属性的,一会可以演示),
2、在recourse-->MATE-INF 目录下 创建 命名空间,如图:
其中spring.handlers 和spring.schemas 是约定在这个目录下(你可以看一下spring源码,我就不截图了),打开spring.handlers
创建命名空间 : http://www.dao.com/schema/myredis=com.nandao.tag.TagsNamespaceHandler
打开spring.schemas 创建xsd 相应配置:
http://www.dao.com/schema/myredis.xsd=META-INF/myredis.xsd
myredis.xsd 内容如下:里面redis ip id port 都是一一对应的,否则报错,这就是xsd文件对标签的效验功能。
<?xml version="1.0" encoding="UTF-8"?>
<xsd:schema xmlns="http://www.dao.com/schema/myredis"
   xmlns:xsd="http://www.w3.org/2001/XMLSchema" targetNamespace="http://www.dao.com/schema/myredis"
 elementFormDefault="qualified" attributeFormDefault="unqualified">
<!--  <nandao:redis id="redis" ip="192.168.80.107" port="6379"/>  -->
   <xsd:element name="redis">
      <xsd:complexType>
         <xsd:attribute name="id" type="xsd:string"></xsd:attribute>
         <xsd:attribute name="ip" type="xsd:string"></xsd:attribute>
         <xsd:attribute name="port" type="xsd:string"></xsd:attribute>
      </xsd:complexType>
   </xsd:element>
</xsd:schema>
3、这里解析一下这个类 TagsNamespaceHandler ,它继承 NamespaceHandlerSupport ,这个类很熟悉吧,上一篇介绍默认标签和自定义标签的时候说过。
package com.nandao.tag;

import org.springframework.beans.factory.config.BeanDefinitionHolder;
import org.springframework.beans.factory.xml.NamespaceHandlerSupport;
import org.springframework.beans.factory.xml.ParserContext;
import org.w3c.dom.Node;

public class TagsNamespaceHandler extends NamespaceHandlerSupport {
    //初始化方法 处理redis标签
    public void init() {
        this.registerBeanDefinitionParser("redis",
                new RedisBeanDifinitionParser());
    }

    @Override
    public BeanDefinitionHolder decorate(Node node, BeanDefinitionHolder definition, ParserContext parserContext) {
        return super.decorate(node, definition, parserContext);
    }
}
4、创建这个类 RedisBeanDifinitionParser 继承 AbstractSingleBeanDefinitionParser,处理redis 连接问题。
package com.nandao.tag;

import org.springframework.beans.factory.support.BeanDefinitionBuilder;
import org.springframework.beans.factory.xml.AbstractSingleBeanDefinitionParser;
import org.w3c.dom.Element;
import redis.clients.jedis.Jedis;

public class RedisBeanDifinitionParser extends
        AbstractSingleBeanDefinitionParser {

    protected Class<?> getBeanClass(Element element) {
        return Jedis.class;
    }

    protected void doParse(Element element, BeanDefinitionBuilder builder) {
        String ip = element.getAttribute("ip");
        String port = element.getAttribute("port");

        builder.addConstructorArgValue(ip);
        builder.addConstructorArgValue(Integer.parseInt(port));
    }
}
5、最后我们测试一下 :先启动相应ip 的redis 服务
package com.nandao.tag;

import org.springframework.context.ApplicationContext;
import org.springframework.context.support.ClassPathXmlApplicationContext;
import redis.clients.jedis.Jedis;

public class Test {
    public static void main(String[] args) {
        ApplicationContext app = new ClassPathXmlApplicationContext(
                "spring.xml");
        System.out.println(app);
        Jedis client1 = (Jedis)app.getBean("redis");
        System.out.println(client1);
        System.out.println(client1.set("name", "nandao"));
    }
}
执行之后,我们去redis 客户端查看一下
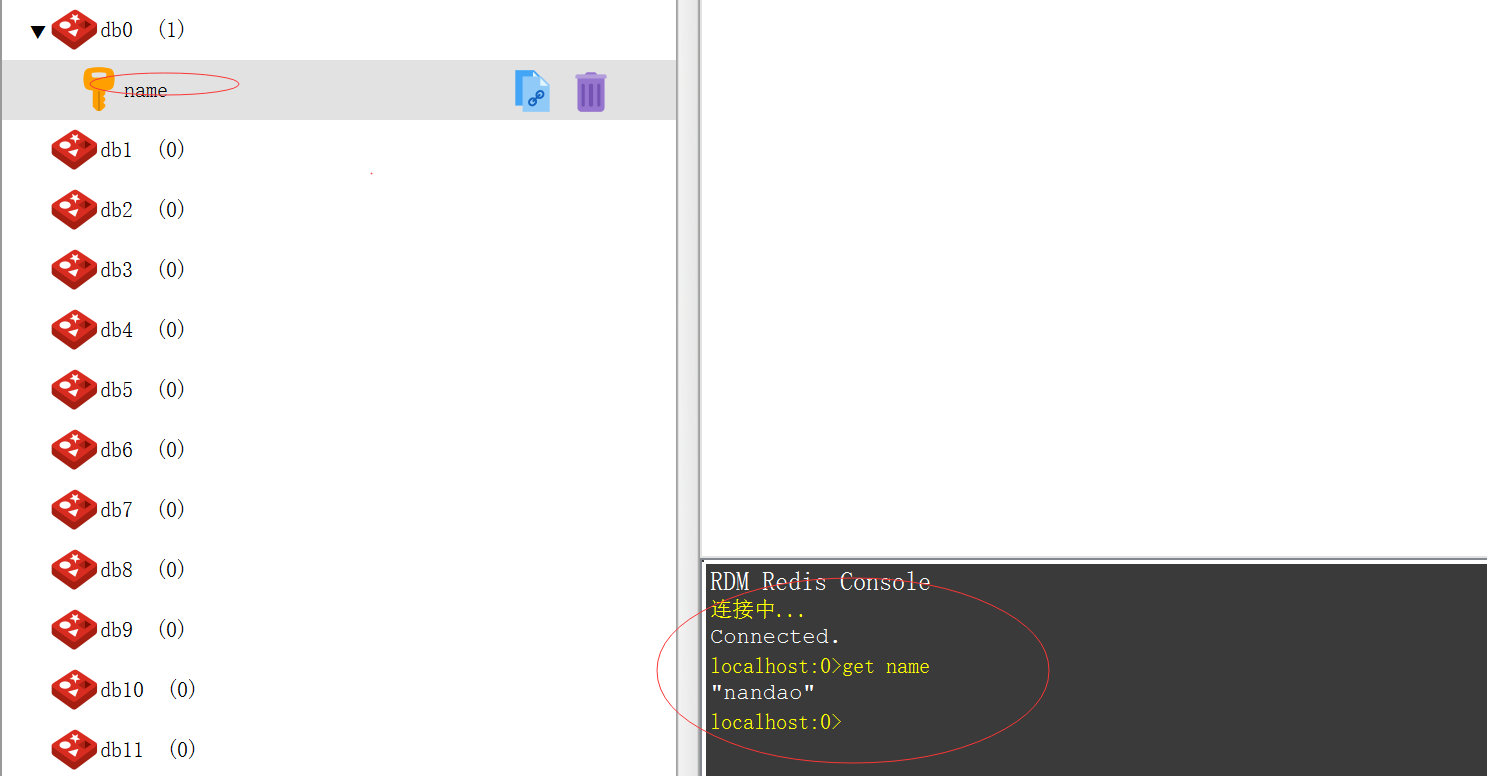
测试成功!如果有不明白的地方,可以留言!
最后
以上就是矮小翅膀最近收集整理的关于spring 采用 SPI 设计思想 扩展自定义标签 实现原理 (四)的全部内容,更多相关spring内容请搜索靠谱客的其他文章。


发表评论 取消回复