云服务器 Presto 集群搭建
- 集群规划
- 环境准备
- node1(Coordinator) 安装及配置
- node2/node3(Worker) 安装及配置
- Presto-Cli 客户端安装
- 启动 coordinator、worker
- 启动客户端
- 停止 coordinator、worker
- 安装目录及配置详解
- 常见错误排查
集群规划
集群规划
| node1/1.117.160.1 | node2/1.117.160.2 | node3/1.117.160.3 | |
|---|---|---|---|
| Coordinator | ✔ | ✘ | ✘ |
| Worker | ✔ | ✔ | ✔ |
环境准备
① 环境要求
JDK8 、 Python 2.4+
② 搭建好 Hadoop 环境
可参考:云服务器搭建CM/CDH6.2.1 环境
| 应用 | node1 | node2 | node3 |
|---|---|---|---|
| CM管理服务 | ✔ | ✘ | ✘ |
| NameNode | ✔ | ✘ | ✘ |
| DataNode | ✔ | ✔ | ✔ |
| SecondNameNode | ✘ | ✔ | ✘ |
| ResourceManager | ✔ | ✘ | ✘ |
| NodeManager | ✔ | ✔ | ✔ |
| JobHistory Server | ✔ | ✘ | ✘ |
| Zookeeper | ✔ | ✔ | ✔ |
| Hive | ✘ | ✘ | ✔ |
③ 下载 Presto 安装包
Presto | Download (prestodb.io)
下载版本:presto-server-0.257.tar.gz
④ 下载 Presto-Cli
Central Repository: com/facebook/presto/presto-cli/0.245.1 (maven.org)
下载版本:presto-cli-0.245.1-executable.jar
node1(Coordinator) 安装及配置
① presto-server-0.245.1.tar.gz 解压
# 创建目录并将 安装包 上传到该目录
mkdir /opt/server

# 解压并重命名安装目录
tar -xzvf presto-server-0.245.1.tar.gz
mv presto-server-0.245.1 presto
② 创建指定目录
# 创建日志存储目录
mkdir /opt/server/data

# 创建配置文件存放目录
mkdir /opt/server/presto/etc
③ 配置 config.properties
# 编辑文件
vim /opt/server/presto/etc/config.properties

# 新增以下内容
coordinator=true
node-scheduler.include-coordinator=false
http-server.http.port=8090
query.max-memory=3GB
query.max-memory-per-node=1GB
discovery-server.enabled=true
discovery.uri=http://node1:8090
④ 配置 jvm.config
# 编辑文件
vim /opt/server/presto/etc/jvm.config

# 新增以下内容
-server
-Xmx2G
-XX:+UseG1GC
-XX:G1HeapRegionSize=32M
-XX:+UseGCOverheadLimit
-XX:+ExplicitGCInvokesConcurrent
-XX:+HeapDumpOnOutOfMemoryError
-XX:+ExitOnOutOfMemoryError
⑤ 配置 node.properties
# 编辑文件
vim /opt/server/presto/etc/node.properties

# 新增以下内容
node.environment=cdhpresto
node.id=presto-cdh01
node.data-dir=/opt/server/data
⑥ 配置 catalog/hive.properties
# 编辑文件
vim /opt/server/presto/etc/catalog/hive.properties

# 新增以下内容
connector.name=hive-hadoop2
hive.metastore.uri=thrift://node3:9083
node2/node3(Worker) 安装及配置
① 重复 node1(Server) 安装及配置 中的 ① - ②
② 配置 config.properties
# 编辑文件
vim /opt/server/presto/etc/config.properties

# 新增以下内容
coordinator=false
http-server.http.port=8090
query.max-memory=3GB
query.max-memory-per-node=1GB
discovery.uri=http://node1:8090
③ 配置 jvm.config
# 编辑文件
vim /opt/server/presto/etc/jvm.config

# 新增以下内容
-server
-Xmx2G
-XX:+UseG1GC
-XX:G1HeapRegionSize=32M
-XX:+UseGCOverheadLimit
-XX:+ExplicitGCInvokesConcurrent
-XX:+HeapDumpOnOutOfMemoryError
-XX:+ExitOnOutOfMemoryError
④ 配置 node.properties
# 编辑文件
vim /opt/server/presto/etc/node.properties

# 新增以下内容
node.environment=cdhpresto
# 注意:node2 和 node3 的 node.id 是不同的,在整个集群是唯一的,名称相同 worker 的数量只会显示 1 个
# node2 -> node.id=presto-cdh02
# node3 -> node.id=presto-cdh03
node.id=presto-cdh02
node.data-dir=/opt/server/data
⑥ 配置 catalog/hive.properties
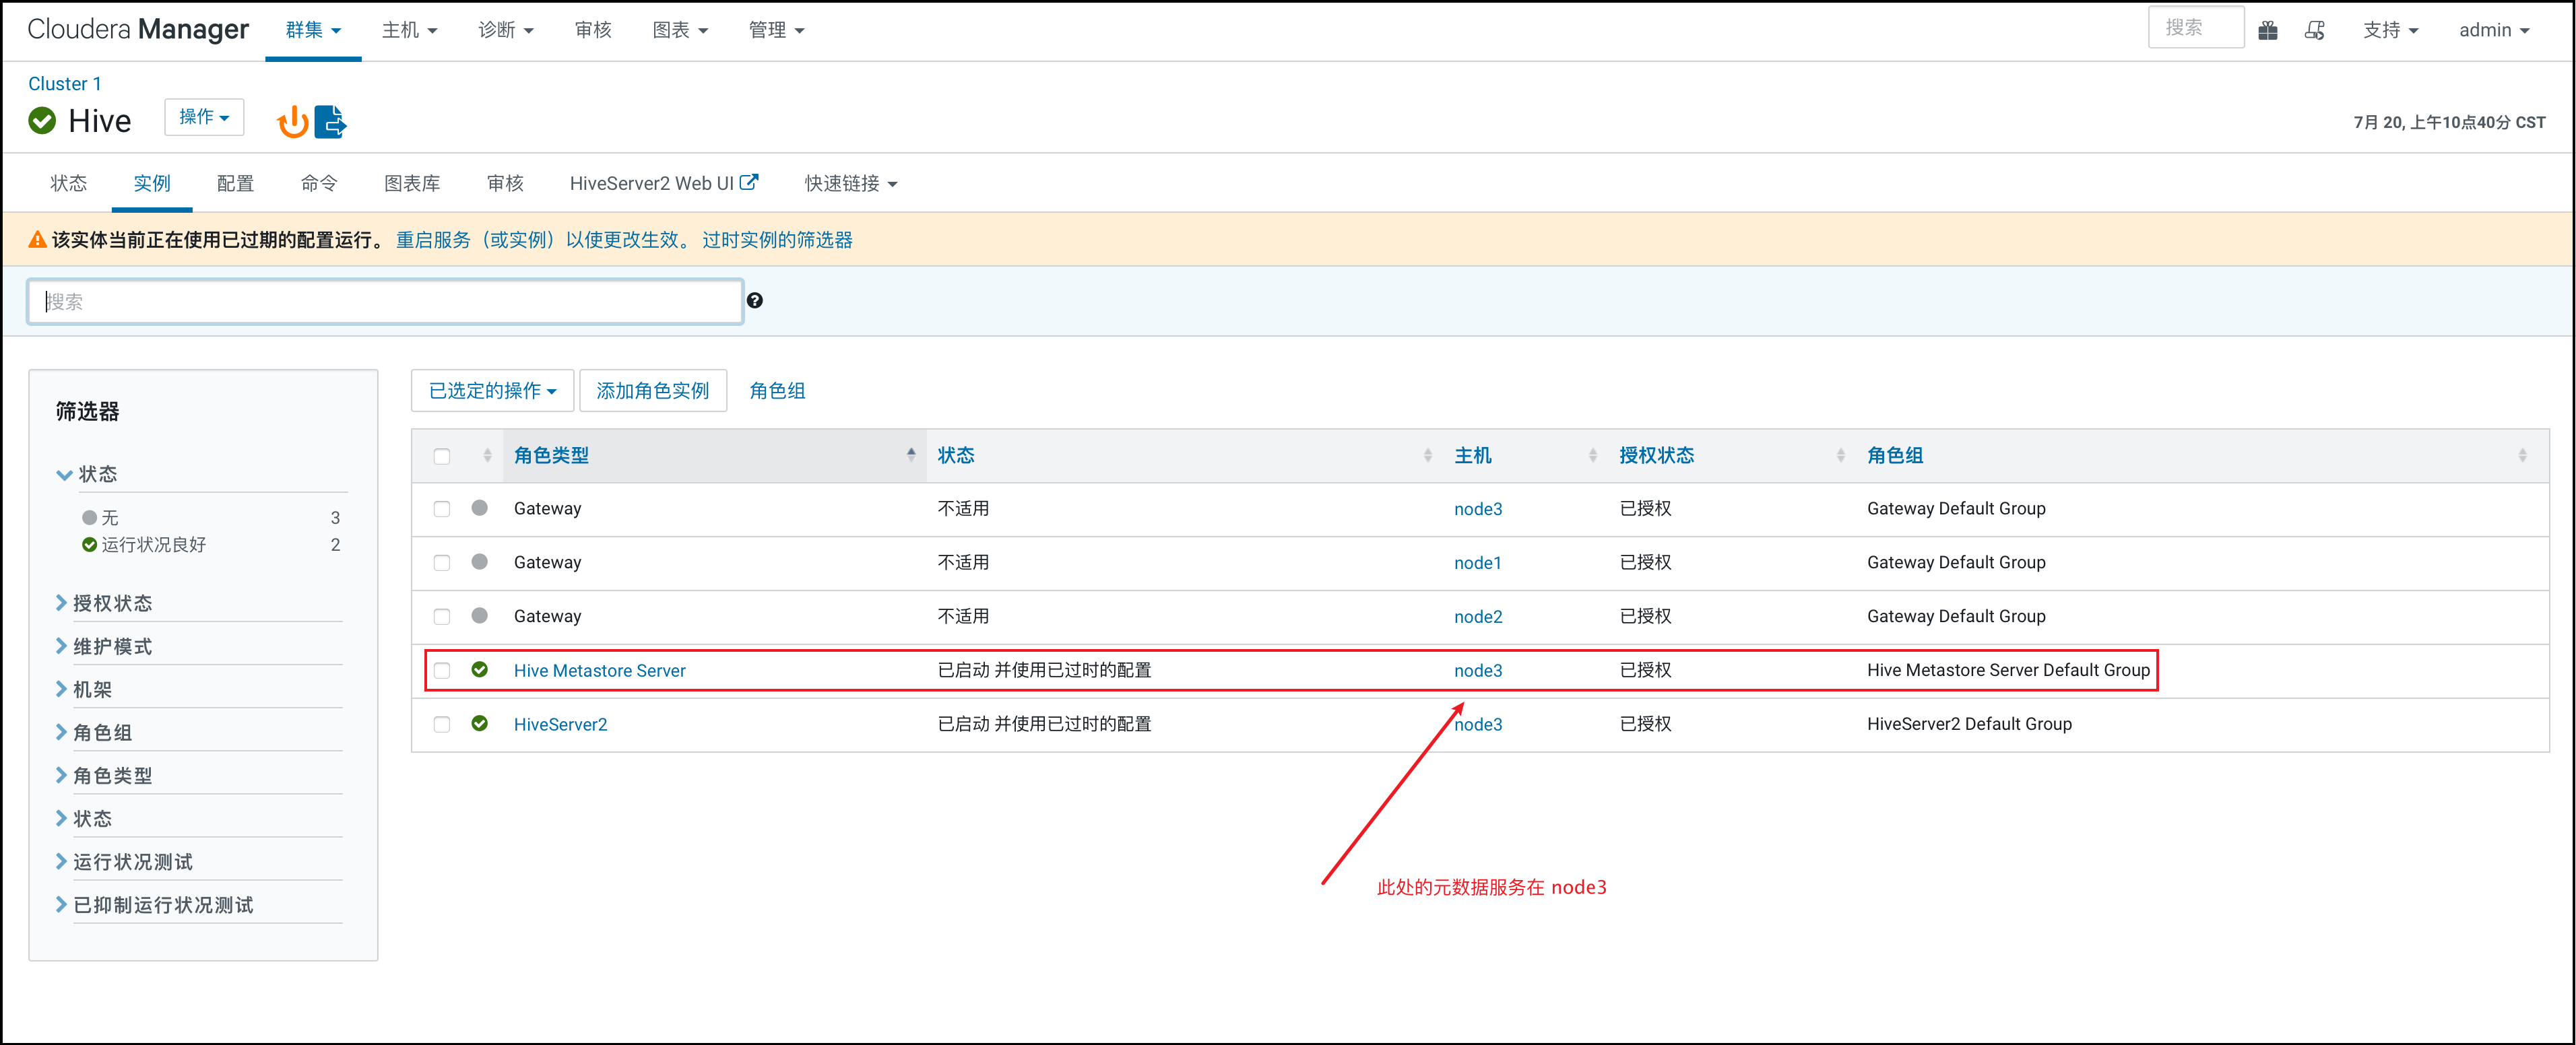
注意:这里需要配置 hive 的元数据服务的地址和端口,由于我用的是 CDH,所以我通过查看得知,我的 hive 元数据服务的地址为 node3:9083
# 编辑文件
vim /opt/server/presto/etc/catalog/hive.properties

# 新增以下内容
# 对应自己的 hive 元数据服务地址即可
connector.name=hive-hadoop2
hive.metastore.uri=thrift://node3:9083

Presto-Cli 客户端安装
注意:3 台都要安装,这样一来,在3台服务器都可以启动客户端执行命令
# 1.上传 presto-cli-0.245.1-executable.jar 到 /opt/server/presto/bin

# 2.重命名
mv presto-cli-0.245.1-executable.jar presto

# 3.赋权
chmod +x presto
启动 coordinator、worker
注意:3 台 都要启动,node1 为 coordinator ,node2 、node3 为 worker
创建快捷启动脚本
# 1.创建启动脚本
cd ~
vim start_presto.sh

# 2.增加以下内容
/opt/server/presto/bin/launcher start

# 3.分配执行权限
chmod +x start_presto.sh
在用户根目录下启动
# 1.启动
./start_presto.sh

# 2.验证
ps -aux | grep presto

# 3.日志位置,如果启动失败,可以去查看日志
/opt/server/data/var/log/server.log

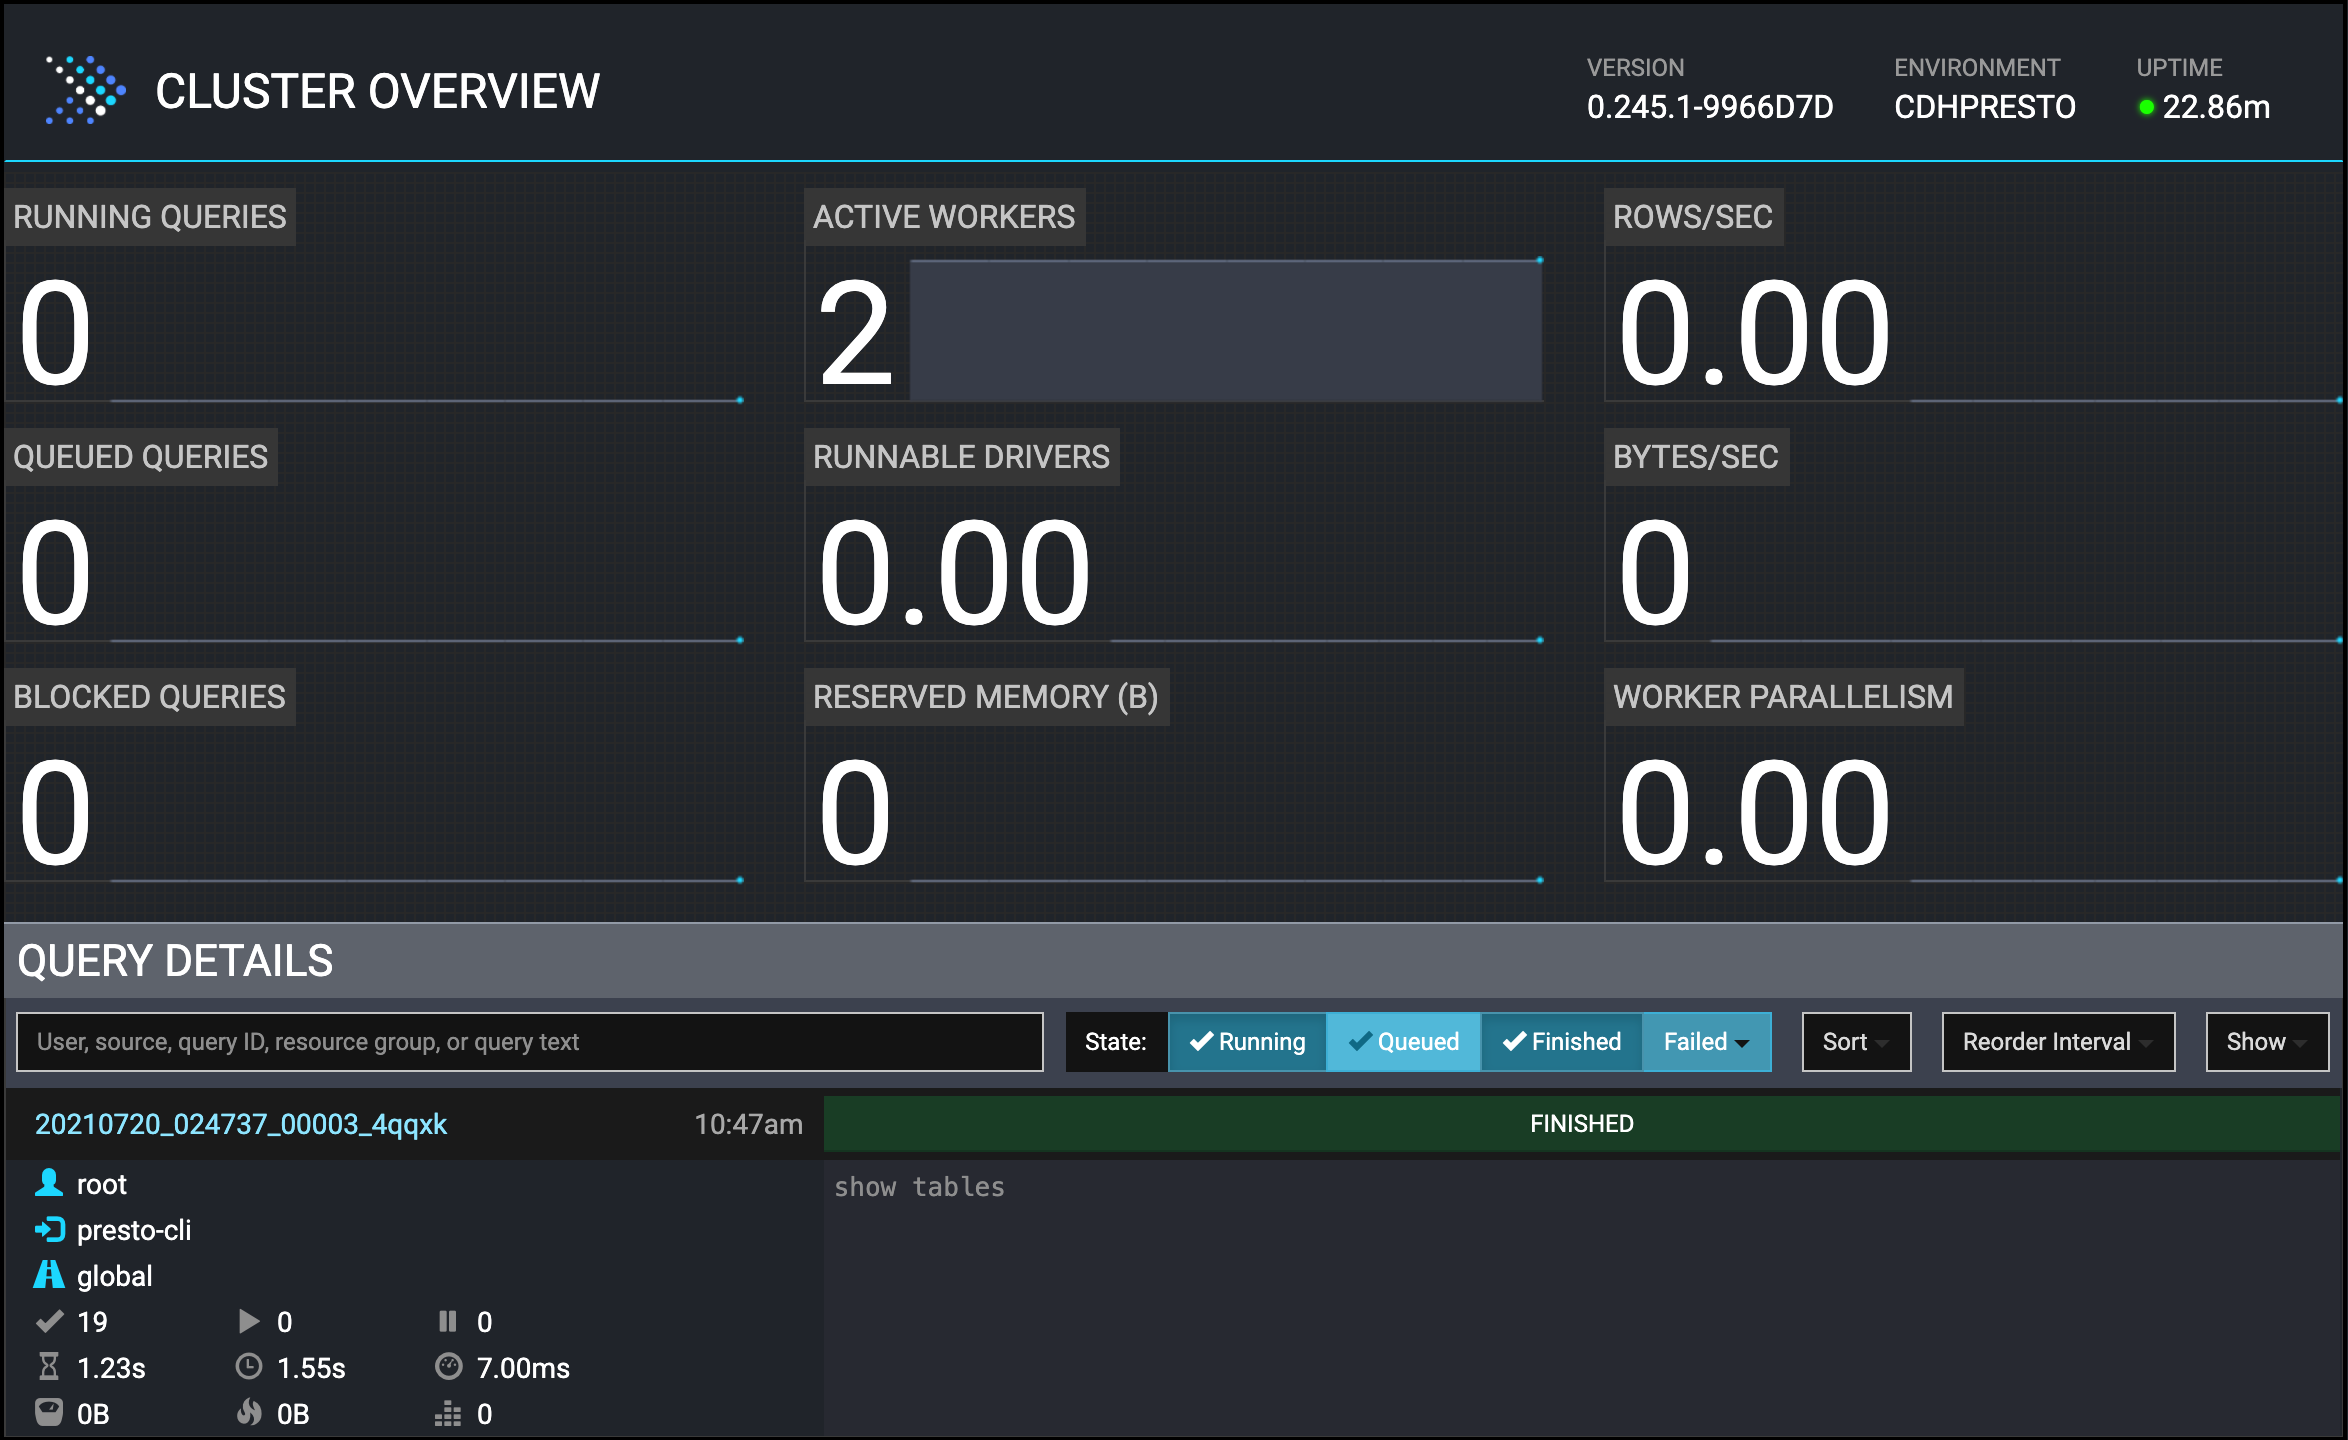
在浏览器访问 presto-server 页面
http://1.117.160.1:8090/ui/

启动客户端
注意:任意一台启动即可,只要能通过客户端输入命令交互就行,输入命令后,在浏览器页面即可显示
设置环境变量
# 1.编辑配置文件
vim /etc/profile

# 2.增加以下内容
export PRESTO_HOME=/opt/server/presto
export PATH=$PATH:$PRESTO_HOME/bin

# 3.生效
source /etc/profile
启动 presto 客户端
# 启动,在不同的节点使用不同的 主机名称
presto --server node1:8090 --catalog hive --schema default

# 验证
show tables;

停止 coordinator、worker
停止命令
/opt/server/presto/bin/launcher stop
安装目录及配置详解
目录结构详解
① data 目录:日志等的存放目录,需要手动创建,建议在安装目录之外创建一个 data 目录,以便在升级 Presto 时可以保留此目录
② bin 目录:可执行文件
③ lib 目录:对应的jar包
④ plugin 目录:第三方库插件
配置文件详解
① node.properties: 每个节点的环境配置
# node.environment
环境的名称,群集中的所有 Presto 节点必须具有相同的环境名称

# node.id
集群中 Presto 安装的唯一标识符,这对于每个节点都必须是唯一的。在重新启动或升级Presto时,此标识符应保持一致。如果在一台计算机上运行多个Presto安装(即同一台计算机上有多个节点),则每个安装必须具有唯一的标识符

# node.data-dir
数据目录的位置(文件系统路径),Presto 将在此处存储日志和其他数据
② jvm.config: JVM的命令行选项,包含用于启动 Java 虚拟机的命令行选项列表。文件的格式是选项列表,每行一个。不能使用空格或其他特殊字符
③ config.properties: Presto Server的配置项
Presto服务有三种角色:coordinator、worker、coordinator&worker (单机版)
每个Presto服务都可以充当 coordinator 和 worker,但是独立出一台服务器专用于 coordinator 协调工作将在较大的群集上提供最佳性能
# coordinator 节点配置
coordinator=true
node-scheduler.include-coordinator=false
http-server.http.port=8090
query.max-memory=4GB
query.max-memory-per-node=1GB
query.max-total-memory-per-node=2GB
discovery-server.enabled=true
discovery.uri=http://example.net:8090

# worker 节点的配置
coordinator=false
http-server.http.port=8090
query.max-memory=4GB
query.max-memory-per-node=1GB
query.max-total-memory-per-node=2GB
discovery.uri=http://example.net:8090

# coordinator&worker 配置(单台服务器即是 coordinator,同时又是 worker)
coordinator=true
node-scheduler.include-coordinator=true
http-server.http.port=8090
query.max-memory=4GB
query.max-memory-per-node=1GB
query.max-total-memory-per-node=2GB
discovery-server.enabled=true
discovery.uri=http://192.168.88.80:8090
# coordinator
允许此Presto实例充当coordinator协调器角色(接受来自客户端的查询并管理查询执行

# node-scheduler.include-coordinator
允许此Presto实例充当coordinator&worker角色。对于较大的群集,coordinator上的worker工作可能会影响查询性能,因为两者互相争抢计算机的资源会导致调度的关键任务受到影响

# http-server.http.port
指定HTTP服务器的端口。Presto使用HTTP进行内部和外部所有通信

# query.max-memory
单个query操作可以使用的最大集群内存量

# query.max-memory-per-node
单个query操作在单个节点上用户内存能用的最大值

# query.max-total-memory-per-node
单个query操作可在单个节点上使用的最大用户内存量和系统内存量,其中系统内存是读取器、写入器和网络缓冲区等在执行期间使用的内存

# discovery-server.enabled
Presto使用发现服务Discovery service来查找群集中的所有节点。每个Presto实例在启动时都会向Discovery服务注册。为了简化部署并避免运行其他服务,Presto协调器coordinator可以运行Discovery服务的嵌入式版本。它与Presto共享HTTP服务器,因此使用相同的端口。

# discovery.uri
Discovery服务的URI地址。由于启用了Presto coordinator内嵌的Discovery 服务,因此这个uri就是Presto coordinator的uri。修改example.net:8090,根据你的实际环境设置该URI。此URI不得以“/“结尾
④ catalog/hive.properties: 数据源连接器的配置,这里使用的是 hive 数据源
Presto 通过 catalogs 中的连接器 connectors 访问数据。connector 提供了对应 catalog 中的所有 schema 和 table。比如,如果在catalog 中配置了 Hive connector,并且此 Hive 的 ’web’ 数据库中有一个 ’clicks’ 表,该表在 Presto 中就可以通过 hive.web.clicks 来访问
通过在 etc/catalog 目录中创建配置文件来注册 connector。比如,通过创建 etc/catalog/hive.properties,即可用来注册 hive 的connector
⑤ etc/log.properties:日志配置
# 配置日志级别
# DEBUG,INFO,WARN,ERROR
# 这会将 com.facebook.presto.server 和 com.facebook.presto.hive 的日志级别都设置为 INFO
com.facebook.presto=INFO
常见错误排查
错误 1 :hive 的 Metastore Server 地址配置错误
详情:
Required table missing : “VERSION” in Catalog “” Schema “”. DataNucleus requires this table to perform its persistence operations. Either your MetaData is incorrect, or you need to enable “datanucleus.schema.autoCreateTables”
org.datanucleus.store.rdbms.exceptions.MissingTableException: Required table missing : “VERSION” in Catalog “” Schema “”. DataNucleus requires this table to perform its persistence operations. Either your MetaData is incorrect, or you need to enable “datanucleus.schema.autoCreateTables”
Failed connecting to Hive metastore

解决方案:
检查 hive.properties 中的 hive.metastore.uri 配置项,确定 hive 元数据服务在哪台服务器上,然后配置,通过该命令在 3 台服务器查找 元数据服务
# 根据端口查看进程
netstat -tunlp | grep 9083

错误 2 :节点的可用内存不够
详情:
Max query memory per node (query.max-memory-per-node) cannot be greater than the max query total memory per node
解决方案:
节点的可用内存需要大于 query.max-memory-per-node
建议通过以下检查
# 1.检查当前节点的可用内存
free -h

# 2.重新配置 config.properties
# 由于我的每个节点的可用内存都只剩下 900M,所以我的配置如下

# 集群可以使用的最大内存
query.max-memory=2GB
# 当前节点可以使用的最大内存
query.max-memory-per-node=512MB
错误 3 :hive 的 hive.properties 配置文件路径错误
详情:
Catalog ‘hive’ does not exist
解决方案:
# 1.结束 presto 的进程

# 2.正确的 hive.properties 配置文件路径
# 路径格式:presto 的安装路径 + etc/catalog/hive.properties
# 示例:
/opt/server/presto/etc/catalog/hive.properties
最后
以上就是甜美牛排最近收集整理的关于云服务器 Presto 集群搭建的全部内容,更多相关云服务器内容请搜索靠谱客的其他文章。


发表评论 取消回复