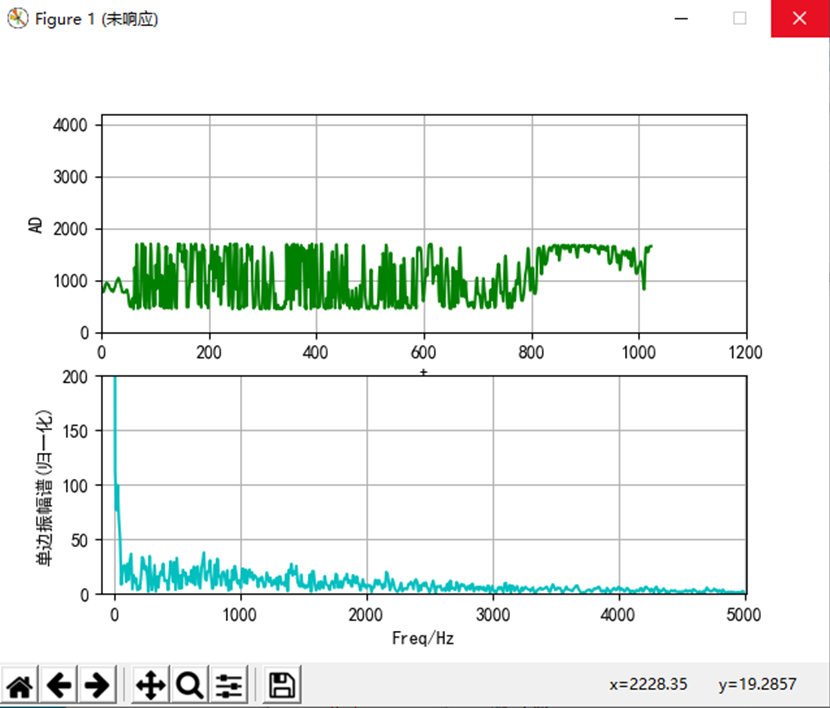
1. Python3.7 代码
#-*- coding: utf-8 -*-

import serial
import matplotlib.pyplot as plt
import numpy as np
import time
import re
import pdb
import datetime
import time
from scipy.fftpack import fft,ifft
from matplotlib.pylab import mpl

mpl.rcParams['font.sans-serif'] = ['SimHei']   #显示中文
mpl.rcParams['axes.unicode_minus']=False       #显示负号

try:

	#端口,GNU / Linux上的/ dev / ttyUSB0 等 或 Windows上的 COM3 等
	portx="COM6"
	#波特率,标准值之一:50,75,110,134,150,200,300,600,1200,1800,2400,4800,9600,19200,38400,57600,115200
	bps=115200    #14400
	#超时设置,None:永远等待操作,0为立即返回请求结果,其他值为等待超时时间(单位为秒)
	timex=0.5
	# 打开串口,并得到串口对象
	serialport=serial.Serial(portx,bps,timeout=timex)
	if serialport.isOpen():
		print("open success")
		print("串口详情参数:", serialport)
		print(serialport.port)#获取到当前打开的串口名
		print(serialport.baudrate)#获取波特率
		#serialport.close()
	else:
		print("open failed")


	plt.ion()	# interactive mode
	fig = plt.figure(1)

	t = [0]
	y = [0]
	f = [0]

	Fs = 10000              #ADC采样频率
	N = 1024        	#采样点数
	BYTES_NUM = N * 2        #数据字节数

	xmin1 = 0
	xmax1 = 1200
	ymin1 = 0
	ymax1 = 4200
	plt.subplot(2,1,1)
	plt.xlabel('t')
	plt.ylabel('AD')
	plt.xlim(xmin1, xmax1)
	plt.ylim(ymin1, ymax1)
	plt.grid(True) # 添加网格

	xmin2 = -100
	xmax2 = Fs / 2 + 10
	ymin2 = 0
	ymax2 = 200
	ax2 = plt.subplot(2,1,2)
	plt.xlabel('Freq/Hz')
	plt.ylabel('单边振幅谱(归一化)')
	plt.xlim(xmin2, xmax2)
	plt.ylim(ymin2, ymax2)
	plt.grid(True) # 添加网格

	count = 0
	while True:
		count = serialport.inWaiting()
		if count == BYTES_NUM:
			i = 0
			#1 处理数据
			while count > 0:
				data = serialport.read(2)               #读2个字节,AD为16bit
				data16 = int.from_bytes(data, byteorder='big', signed = False)
				if count == BYTES_NUM:
					i = 0
					t = [0]
					y = [data16]
				else:
					t.append(i)
					y.append(data16)
				i = i+1
				count = count - 2


			plt.subplot(2,1,1)
			plt.cla()
			plt.xlabel('t')
			plt.ylabel('AD')
			plt.xlim(xmin1, xmax1)
			plt.ylim(ymin1, ymax1)
			plt.grid(True) # 添加网格
			plt.plot(t, y, '-g')
			print(len(y))
			print(y[0],y[1],y[2],y[N-3],y[N-2],y[N-1])

			#2 FFT处理
			fft_y=fft(y)                          #快速傅里叶变换
			abs_y=np.abs(fft_y)                # 取复数的绝对值,即复数的模(双边频谱)
			normalization_y=abs_y/N            #归一化处理(双边频谱)
			normalization_half_y = normalization_y[range(int(N/2))]      #由于对称性,只取一半区间(单边频谱)
			k = np.arange(N)
			fx = k * Fs / N
			half_fx = fx[range(int(N/2))]
			print(len(abs_y))
			print(abs_y[0],abs_y[1],abs_y[2],abs_y[N-3],abs_y[N-2],abs_y[N-1])

			plt.subplot(2,1,2)
			plt.cla()
			plt.xlabel('Freq/Hz')
			plt.ylabel('单边振幅谱(归一化)')
			plt.xlim(xmin2, xmax2)
			plt.ylim(ymin2, ymax2)
			plt.grid(True) # 添加网格
			plt.plot(half_fx,normalization_half_y,'-c')


			#plt.draw()
			plt.show()
			#t1 = datetime.datetime.now()
			plt.pause(0.001)                                #0.001  实际延时0.1s,
			#t2 = datetime.datetime.now()
			#print(i,t2-t0)
			#time.sleep(3)

except Exception as e:
	print("---异常---:",e)
- 仿真图

最后
以上就是知性钻石最近收集整理的关于Python串口接收数据显示时域波形和FFT频谱的全部内容,更多相关Python串口接收数据显示时域波形和FFT频谱内容请搜索靠谱客的其他文章。
本图文内容来源于网友提供,作为学习参考使用,或来自网络收集整理,版权属于原作者所有。


![14、频率域滤波基础——傅里叶变换计算及应用基础1、理解傅里叶变换2、基于傅里叶变换的数字信号处理3、图像的傅里叶变换基础4、傅里叶反变换复原图像5、傅里叶功率谱和相位谱对图像参考资料:下面这个方波分解示意图用matlab怎么画?如何理解傅里叶变换公式?傅里叶频域,复数域,冲激函数,香农采样(不介绍公式-只介绍是啥)另一种思维DFTopencv学习(十五)之图像傅里叶变换dft[数字图像处理]频域滤波(1)--基础与低通滤波器CS425 Lab: Frequency Domain Process](https://www.shuijiaxian.com/files_image/reation/bcimg2.png)


发表评论 取消回复