基于MATLAB的手写体数字识别系统
一、课题介绍
手写体数字识别是模式识别中一个非常重要和活跃的研究领域,数字识别也不是一项孤立的技术,它所涉及的问题是模式识别的其他领域都无法回避的;应用上,作为一种信息处理手段,字符识别有广阔的应用背景和巨大的市场需求。因此,对数字识别的研究具有理论和应用的双重意义。
人工神经网络识别方法是近年该研究领域的一种新方法,该方法具有一些传统技术所没有的优点:良好的容错能力、分类能力强、并行处理和自学习能力,并且是离线训练和在线识别的。这些优点使它在手写体字符的识别中能对大量数据进行快速实时处理,并达到良好的识别效果。
由于手写体数字识别难于建立精确的数学模型,所以本文采用BP神经网络对这一问题进行处理。神经网络模式识别的一个关键步骤是预处理和特征提取,对于手写体数字识别,本文采用了一种基于结构特征和统计特征的提取方法,并用程序实现了这一特征提取过程。
通过测试,本识别系统对于较规范的手写体数字的识别达到了很好的识别效果。
参考源码 :MATLAB手写数字识别GUI设计.zip-专业指导文档类资源-CSDN下载matlab手写数字识别GUI设计,带界面,输入字符测试图片,进行预处理,每个步骤都出图片,显示结果更多下载资源、学习资料请访问CSDN下载频道.https://download.csdn.net/download/m0_65908410/72023619
关键词: 手写体数字识别,特征提取,人工神经网络,MATLAB
二、手写体数字识别研究的发展及研究现状
模式识别[2]是六十年代初迅速发展起来的一门学科。由于它研究的是如何用机器来实现人(及某些动物)对事物的学习、识别和判断能力,因而受到了很多科技领域研究人员的注意,成为人工智能研究的一个重要方面。一个模式识别系统的基本职能是对系统所要处理的模式归属于哪一类做出判别,从该系统的模式输入到系统做出判别之间,主要包括信息检测、预处理、特征提取和分类几大环节。
字符识别是模式识别领域中的一个非常活跃的分支。一方面是由于问题本身的难度使之成为一个极具挑战性的课题;另一方面,是因为字符识别不是一项孤立的应用技术,其中包含的模式识别领域中其他分支都会遇到的一些基本和共性的问题。从50年代开始,许多的研究者就在这一研究领域开展了广泛的探索并为模式识别的发展产生了积极的影响。
字符识别,从采用的输入设备来分,可分为脱机识别(又称为光学字符识别Optical Character Recognition ,OCR)和联机识别,脱机字符又分为印刷体和手写字符识别,从对书写者要求来分,手写字符又分为限制性和非限制性的手写字符识别。在联机手写字符识别中,计算机能够通过与计算机相连的手写输入设备获得输入字符笔划的顺序、笔划的方向以及字符的形状,所以相对OCR来说它更容易识别一些。但联机字符识别有一个重要的不足就是要求输入者必须在指定的设备上书写,然而人们在生活中大部分的书写情况是不满足这一要求的,比如人们填写各种表格资料,开具支票等。如果需要计算机去认识这些已经成为文字的东西,就需要OCR技术。比起联机字符识别来,OCR不要求书写者在特定输入设备上书写,它可以与平常一样书写,所以OCR的应用更为广泛。OCR所使用的输入设备可以是任何一种图像采集设备,如扫描仪、数字相机等。通过使用这类采集设备,OCR系统将书写者已经写好的文字作为图像输入到计算机中,然后由计算机去识别。由于OCR的输入只是简单的一副图像,它就不能像联机输入那样比较容易的从物理上获得字符笔划的顺序信息,因此OCR是一个更具挑战性的问题。
脱机字符识别(OCR)分为印刷体OCR和手写OCR。印刷体字符比手写体字符少了随机性,它的识别相对容易些,难点已经不在识别环节,而在于字符的分割上。印刷体识别的错误绝大多数都是错误的分割引起的[3]。对于手写体OCR,无论是联机还是脱机识别,手写体的识别都要经历由限制性手写体识别到非限制性手写体识别两个阶段。本文将以手写体数字为代表,讨论非限制性手写体字符的识别。脱机字符识别的研究最早始于上个世纪六十年代,是为了应付汉英翻译的需要。八十年代后的研究重心转移到脱机手写字符的识别上。对于小类别数的字符集如数字、字母的识别,已经可以做到对书写不加任何的限制。非限制性手写OCR的研究始终以阿拉伯数字为主导。这事因为,第一,十个阿拉伯数字是全世界的一套通用字符。第二,在数字的许多应用场合,如报表、账单、支票等,手写体还难以被印刷体所替代,而且对识别的可靠性要求极高。三,由于类别数少,所以模式识别中的许多方法研究均可以以数字识别作为实验背景。对脱机手写体字符的研究,人们由简单集成笔画密度、笔画方向和背景特征方法过渡到特征匹配方法,进而过渡到结合神经网络方法,随着对识别可靠性要求的提高,九十年代以后,多分类器集成方法成为了一个研究重点。
三、 算法流程
预处理是字符识别重要的一环, 它把原始的图像转换成识别器所能接受的二进制形式。
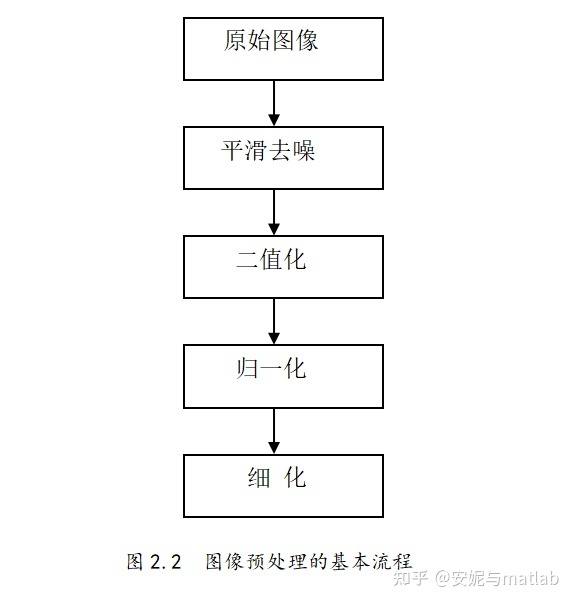
要识别手写体数字首先要对其字符图像进行预处理。预处理的主要目的是去除字符图像中的噪声、压缩冗余信息, 得到规范化的点阵, 为识别做好准备。这就要求预处理在消除图像中与识别无关的因素时尽量保持原图像的字符特征。
手写体数字图像预处理的过程,就一般情况而言,主要经过如图2.2所示的几个步骤。不同的识别方法对预处理的项目和要求有所不同。如结构识别方法[7],对字符规范化可以从简,甚至不需要。有的识别方法对细化要求很高,有的则不需要细化。本章中将分别对平滑去噪、二值化、归一化和细化分小节讨论。

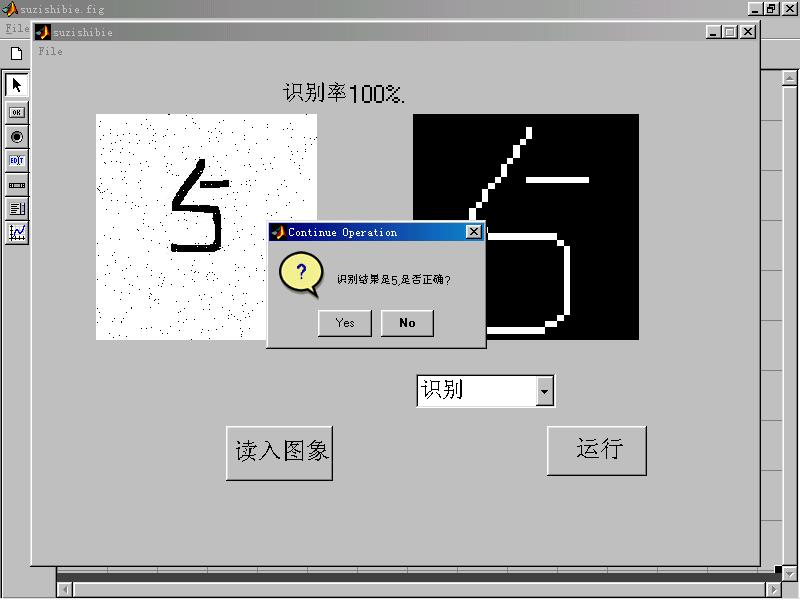
四、GUI界面设计结果

五、参考代码
附录1 预处理
%% 数字识别 (I):Image Pre-processing
%% Manual Cropping
img = imread('sample.bmp');
imshow(img)
imgGray = rgb2gray(img);
imgCrop = imcrop(imgGray);
imshow(imgCrop)
imgLGE = imresize(imgCrop, 5, 'bicubic');
imshow(imgLGE)
参考 源码:MATLAB手写数字识别GUI设计.zip-专业指导文档类资源-CSDN下载
imgRTE = imrotate(imgLGE, 35);
imshow(imgRTE)
imgBW = im2bw(imgLGE, 0.90455);
imshow(imgBW)
附录2
%% 数字识别 (II):Automating Image Pre-processing
I = imread('sample.bmp');
imshow(I)
pause;
Igray = rgb2gray(I);
imshow(Igray)
pause;
Ibw = im2bw(Igray,graythresh(Igray));
imshow(Ibw)
pause;
Iedge = edge(uint8(Ibw));
imshow(Iedge)
pause;
se = strel('square',2);
Iedge2 = imdilate(Iedge, se);
imshow(Iedge2);
pause;
Ifill= imfill(Iedge2,'holes');
imshow(Ifill)
pause;
pause;
hold on;
for cnt = 1:50
rectangle('position',Ibox(:,cnt),'edgecolor','r');
end
附录3
%% 神经网络的设计与训练ining a Simple NN for
%% classification
I = imread('sample.bmp');
img = edu_imgpreprocess(I);
for cnt = 1:50
bw2 = edu_imgcrop(img{cnt});
charvec = edu_imgresize(bw2);
out(:,cnt) = charvec;
end
P = out(:,1:40);
T = [eye(10) eye(10) eye(10) eye(10)];
Ptest = out(:,41:50);
附录4
%%图形界面
function varargout = charGUI(varargin)
% CHARGUI M- charGUI.fig
% CHARGUI, by itself, creates a new CHARGUI or raises the existing
% singleton*.
% H = CHARGUI returns the handle to a new CHARGUI or the handle to
% the existing singleton*.
% CHARGUI('CALLBACK',hObject,eventData,handles,...) calls the local
% function named CALLBACK in CHARGUI.M with the given input arguments.
% CHARGUI('Property','Value',...) creates a new CHARGUI or raises the
% existing singleton*. Starting from the left, property value pairs are
% applied to the GUI before charGUI_OpeningFunction gets called. An
% unrecognized property name or invalid value makes property application
% stop. All inputs are passed to charGUI_OpeningFcn via varargin.
% *See GUI Options on GUIDE's Tools menu. Choose "GUI allows only one
% instance to run (singleton)".
% See also: GUIDE, GUIDATA, GUIHANDLES
% Edit the above text to modify the response to help charGUI
% Last Modified by GUIDE v2.5 03-Jul-2008 17:55:35
% Begin initialization code - DO NOT EDIT
gui_Singleton = 1;
gui_State = struct('gui_Name', m, ...
'gui_Singleton', gui_Singleton, ...
'gui_OpeningFcn', @charGUI_OpeningFcn, ...
'gui_OutputFcn', @charGUI_OutputFcn, ...
'gui_LayoutFcn', [] , ...
'gui_Callback', []);
if nargin && ischar(varargin{1})
gui_State.gui_Callback = str2func(varargin{1});
end
if nargout
[varargout{1:nargout}] = gui_mainfcn(gui_State, varargin{:});
else
gui_mainfcn(gui_State, varargin{:});
end
% End initialization code - DO NOT EDIT
% --- Executes just before charGUI is made visible.
function charGUI_OpeningFcn(hObject, eventdata, handles, varargin)
% This function has no output args, see OutputFcn.
% hObject handle to figure
% eventdata reserved - to be defined in a future version of MATLAB
% handles structure with handles and user data (see GUIDATA)
% varargin command line arguments to charGUI (see VARARGIN)
load data;
assignin('base','net',net);
% Choose default command line output for charGUI
handles.output = hObject;
% Update handles structure
guidata(hObject, handles);
% UIWAIT makes charGUI wait for user response (see UIRESUME)
% uiwait(handles.figure1);
% --- Outputs from this function are returned to the command line.
function varargout = charGUI_OutputFcn(hObject, eventdata, handles)
% varargout cell array for returning output args (see VARARGOUT);
% hObject handle to figure
% eventdata reserved - to be defined in a future version of MATLAB
% handles structure with handles and user data (see GUIDATA)
% Get default command line output from handles structure
varargout{1} = handles.output;
% --- Executes on button press in pbLoad.
function pbLoad_Callback(hObject, eventdata, handles)
% hObject handle to pbLoad (see GCBO)
% eventdata reserved - to be defined in a future version of MATLAB
% handles structure with handles and user data (see GUIDATA)
[, pathname] = uigetfile({'*.bmp';'*.jpg';'*.gif';'*.*'}, 'Pick an Image File');
S = imread([pathname,]);
axes(handles.axes1);
imshow(S);
handles.S = S;
guidata(hObject, handles);
% --- Executes on button press in pbSelect.
function pbSelect_Callback(hObject, eventdata, handles)
% hObject handle to pbSelect (see GCBO)
% eventdata reserved - to be defined in a future version of MATLAB
% handles structure with handles and user data (see GUIDATA)
S = handles.S;
axes(handles.axes1);
img_crop = imcrop(S);
axes(handles.axes2);
imshow(img_crop);
handles.img_crop = img_crop;
guidata(hObject, handles);
% --- Executes on button press in pbPreprocess.
function pbPreprocess_Callback(hObject, eventdata, handles)
% hObject handle to pbPreprocess (see GCBO)
% eventdata reserved - to be defined in a future version of MATLAB
% handles structure with handles and user data (see GUIDATA)
img_crop = handles.img_crop;
imgGray = rgb2gray(img_crop);
bw = im2bw(img_crop,graythresh(imgGray));
axes(handles.axes3);
imshow(bw);
bw2 = edu_imgcrop(bw);
axes(handles.axes4);
imshow(bw2);
handles.bw2 = bw2;
guidata(hObject, handles);
% --- Executes on button press in pbExtract.
function pbExtract_Callback(hObject, eventdata, handles)
% hObject handle to pbExtract (see GCBO)
% eventdata reserved - to be defined in a future version of MATLAB
% handles structure with handles and user data (see GUIDATA)
handles.charvec = charvec;
guidata(hObject, handles);
% --- Executes on button press in pbRecognize.
function pbRecognize_Callback(hObject, eventdata, handles)
% hObject handle to pbRecognize (see GCBO)
% eventdata reserved - to be defined in a future version of MATLAB
% handles structure with handles and user data (see GUIDATA)
charvec = handles.charvec;
selected_net = get(handles.editNN,'string');
selected_net = evalin('base',selected_net);
result = sim(selected_net,charvec);
[val, num] = max(result);
set(handles.editResult, 'string',num);
% --- Executes on button press in pbNN.
function pbNN_Callback(hObject, eventdata, handles)
% hObject handle to pbNN (see GCBO)
% eventdata reserved - to be defined in a future version of MATLAB
% handles structure with handles and user data (see GUIDATA)
function editNN_Callback(hObject, eventdata, handles)
% hObject handle to editNN (see GCBO)
% eventdata reserved - to be defined in a future version of MATLAB
% handles structure with handles and user data (see GUIDATA)
% Hints: get(hObject,'String') returns contents of editNN as text
% str2double(get(hObject,'String')) returns contents of editNN as a double
% --- Executes during object creation, after setting all properties.
function editNN_CreateFcn(hObject, eventdata, handles)
% hObject handle to editNN (see GCBO)
% eventdata reserved - to be defined in a future version of MATLAB
% handles empty - handles not created until after all CreateFcns called
% Hint: edit controls usually have a white background on Windows.
% See ISPC and COMPUTER.
if ispc && isequal(get(hObject,'BackgroundColor'), get(0,'defaultUicontrolBackgroundColor'))
set(hObject,'BackgroundColor','white');
end
function editResult_Callback(hObject, eventdata, handles)
% hObject handle to editResult (see GCBO)
% eventdata reserved - to be defined in a future version of MATLAB
% handles structure with handles and user data (see GUIDATA)
% Hints: get(hObject,'String') returns contents of editResult as text
% str2double(get(hObject,'String')) returns contents of editResult as a double
% --- Executes during object creation, after setting all properties.
function editResult_CreateFcn(hObject, eventdata, handles)
% hObject handle to editResult (see GCBO)
% eventdata reserved - to be defined in a future version of MATLAB
% handles empty - handles not created until after all CreateFcns called
% Hint: edit controls usually have a white background on Windows.
% --- Executes on button press in pbCrop.
function pbCrop_Callback(hObject, eventdata, handles)
% hObject handle to pbCrop (see GCBO)
% eventdata reserved - to be defined in a future version of MATLAB
% handles structure with handles and user data (see GUIDATA)
附录5 运行界面
%% Rearranging CHARGUI to Make it Resizable and Dockable
% This script reverse-engineers |charGUI| and rebuilds it in a way that is
% both resizable and dockable. It does so using |uipanel| and positioning
% with normalized units.
%% Create a New CHARGUI
% First, create a new instance of |charGUI|.
f = charGUI;
%% Cache the Major GUI Components
% Next, find the major GUI components: |axes|, |uipanel|, and |uicontrol|.
% Keeping references to these items will allow us to lay them out later.
% In the meantime, turn off their visiblity so that the steps taken below
% appear clearly in the GUI.
set(uis,'visible','off');
%% Construct a New Layout Framework
% Use |uipanel| to create the framework for the new GUI layout. Divide the
% space into three portions using normalized units. The first, occupying
% the upper left-hand portion of the GUI, will contain the main axes. The
% second, occupying the right-hand quarter of the GUI, will contain the
% every |uicontrol|. The third, occupuying the bottom 30% of the GUI in
% the left-hand 75%, will contain the processing |axes|.
newpans = zeros(1,3);
for i = 1:3
newpans(i) = uipanel('parent',f,'units','normalized');
end
set(newpans(1),'position',[0 .3 .75 .7]);
set(newpans(2),'position',[.75 0 .25 1]);
set(newpans(3),'position',[0 0 .75 .3]);
%% Populate the First Panel
% By putting the main set of |axes| into a |uipanel|, it can be laid out
% relative to the panel, as opposed to the whole GUI. Use normalized
% units to make sure that the |axes| grow when the |uipanel| grows.
% Position it starting 10% up from the bottom and 10% right from the
% left-hand side of the GUI and have it occupy 80% of the horizontal and
% vertical |uipanel| space.
set(axs(1),'parent',newpans(1),'units','normalized',...
'position',[.1 .1 .8 .8]);
set(get(newpans(1),'children'),'visible','on');
%% Populate the Second Panel
% Parent the |uicontrol| items to the second |uipanel|. Maintain the
% use of characters units so that each |uicontrol| will not grow and shrink
% along with the |uipanel|. Instead, each will maintain the same size and
% placement.
set(uis,'parent',newpans(2));
newuipos = get(uis(1),'position');
newuipos(1:2) = [2 1];
set(uis(1),'position',newuipos);
newuipos = get(uis(3),'position');
newuipos(1:2) = [2 14];
set(uis(3),'position',newuipos);
newuipos(1:2) = [2 18];
set(uis(4),'position',newuipos);
newuipos(1:2) = [2 30];
set(uis(2),'position',newuipos);
newuipos(1:2) = [2 34];
set(uis(7),'position',newuipos);
set(get(newpans(2),'children'),'visible','on');
%% Populate the Third Panel
% Each processing |axes| are already contained within a |uipanel|, which
% merely needs to be positioned within one containing |uipanel|. Again,
% use normalized units so that these will grow and shrink with the
% containing |uipanel|.
%
% Also apply normalized units and new positions to the |axes| contained in
% the subpanels. Doing so will fill in the GUI space and allow us, as the
% GUI grows, to see more detail in the processing.
set(pans,'parent',newpans(3),'units','normalized');
set(pans(4),'position',[.01 .025 .23 .95]);
set(pans(3),'position',[.26 .025 .23 .95]);
set(pans(2),'position',[.51 .025 .23 .95]);
set(pans(1),'position',[.76 .025 .23 .95]);
set(axs(2:5),'units','normalized','position',[.05 .05 .9 .9]);
set(get(newpans(3),'children'),'visible','on');
%% Touch Up the GUI and Make it Resizable
% Put the finishing touches on the GUI. Apply the same background colors
% that exsited before to each new |uipanel| and remove the border. The
% |figure| can now be made resizable. Try docking it by setting its
% |windowstyle| property!
for i = 1:3
set(newpans(i),'backgroundcolor',get(pans(1),'backgroundcolor'),...
'bordertype','none');
end
set(f,'resize','on');
最后
以上就是有魅力百合最近收集整理的关于基于MATLAB的手写体数字识别系统的全部内容,更多相关基于MATLAB内容请搜索靠谱客的其他文章。


![手写数字识别代码函数解读(MATLAB实现)1、tf = strcmp(s1,s2)2、out_files=dir(xxx)3、图像预处理4、粗网格特征提取5、[B,I] = sort(A)6、fullfile(filepart1,filepart2,…,filepartN)错误](https://www.shuijiaxian.com/files_image/reation/bcimg14.png)

发表评论 取消回复