实验一:
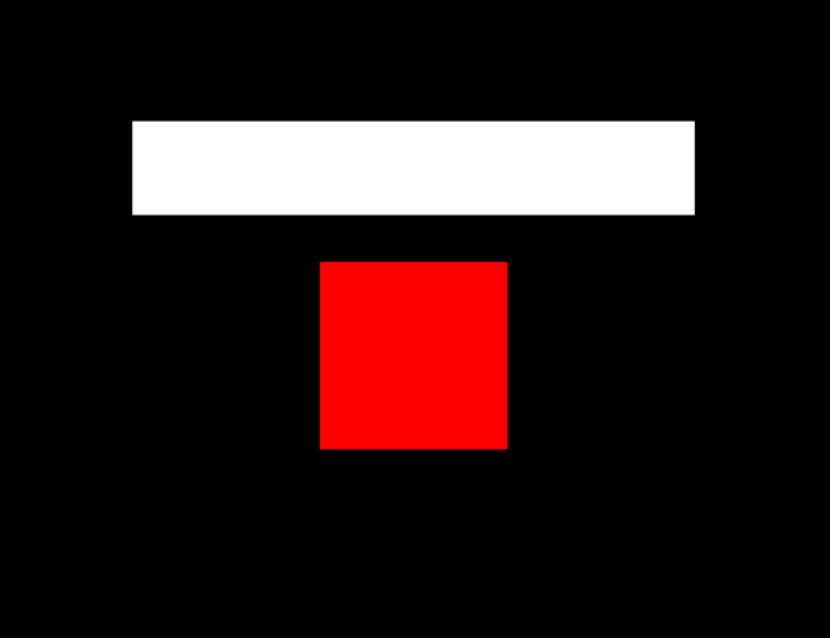
实验步骤:首先要进行背景颜色的设定和显示的范围和图形的绘制,画一个凸多边形可以调用glBegin(GL_POLYGON),后边用glVertex2f( , )指定顶点坐标,需要注意凸多边形的顶点指定需要按逆时针方向
然后在myDraw函数里面设置颜色 红色:glColor3f(1.0,0.0,0.0); 绿色:glColor3f(0.0,1.0,0.0);蓝色: glColor3f(0.0,1.0,0.0);
平移函数 :glTranslatef(0.0, 2.0, 0.0); //向Y方向平移俩个单位
缩放函数: glScalef(3.0, 0.5, 1.0);//X方向变为原来的3倍,y方向缩放为原来的0.5倍
然后设置颜色为白色,调用绘制函数即可
code:
// 提示:写完代码请保存之后再进行评测
#include <GL/freeglut.h>
#include<stdio.h>

// 评测代码所用头文件-开始
#include<opencv2/core/core.hpp>
#include<opencv2/highgui/highgui.hpp>
#include<opencv2/imgproc/imgproc.hpp>
// 评测代码所用头文件-结束

void init(void)
{
    glClearColor(0.0, 0.0, 0.0, 0.0);       //设置背景颜色
	glMatrixMode(GL_PROJECTION);
	gluOrtho2D(-5.0, 5.0, -5.0, 5.0);       //设置显示的范围是X:-5.0~5.0, Y:-5.0~5.0
	glMatrixMode(GL_MODELVIEW);
}

void drawSquare(void)						//绘制中心在原点,边长为2的正方形
{
   // 请在此添加你的代码
   /********** Begin ********/
    glBegin (GL_POLYGON);
        				//顶点指定需要按逆时针方向
	glVertex2f (-1.0f,-1.0f);			//左下点
	glVertex2f (1.0f,-1.0f);				//右下点
	glVertex2f (1.0f, 1.0f);				//右上点
	glVertex2f (-1.0f,1.0f);				//左上点
	glEnd ( );


   /********** End **********/
}

void myDraw(void)                           //二维几何变换
{
   // 请在此添加你的代码
   /********** Begin ********/
    glColor3f(1.0,0.0,0.0);
    drawSquare();

    glColor3f(1.0,1.0,1.0);
    glTranslatef(0.0, 2.0, 0.0);
    glScalef(3.0, 0.5, 1.0);//缩放0.5倍,水平方向镜像
    drawSquare();

   /********** End **********/
	glFlush();
}

int main(int argc, char *argv[])
{
	GLubyte* pPixelData = (GLubyte*)malloc(400 * 400 * 3);//分配内存
   GLint viewport[4] = {0};
	glutInit(&argc, argv);
	glutInitWindowPosition(100, 100);
	glutInitWindowSize(400, 400);
	glutCreateWindow("几何变换示例");

    init();
	 glutDisplayFunc(&myDraw);
    glutMainLoopEvent();


    /*************以下为评测代码,与本次实验内容无关,请勿修改**************/
    glReadBuffer(GL_FRONT);
    glPixelStorei(GL_UNPACK_ALIGNMENT, 4);
    glGetIntegerv(GL_VIEWPORT, viewport);
    glReadPixels(viewport[0], viewport[1], viewport[2], viewport[3], GL_RGB, GL_UNSIGNED_BYTE, pPixelData);

	 cv::Mat img;
    std::vector<cv::Mat> imgPlanes;
    img.create(400, 400, CV_8UC3);
    cv::split(img, imgPlanes);

        for(int i = 0; i < 400; i ++) {
            unsigned char* plane0Ptr = imgPlanes[0].ptr<unsigned char>(i);
            unsigned char* plane1Ptr = imgPlanes[1].ptr<unsigned char>(i);
            unsigned char* plane2Ptr = imgPlanes[2].ptr<unsigned char>(i);
            for(int j = 0; j < 400; j ++) {
                int k = 3 * (i * 400 + j);
                plane2Ptr[j] = pPixelData[k];
                plane1Ptr[j] = pPixelData[k+1];
                plane0Ptr[j] = pPixelData[k+2];
            }
        }
        cv::merge(imgPlanes, img);
        cv::flip(img, img ,0);
        cv::namedWindow("openglGrab");
        cv::imshow("openglGrab", img);
        //cv::waitKey();
        cv::imwrite("../img_step1/test.jpg", img);
	return 0;
}
实验结果:

实验二:
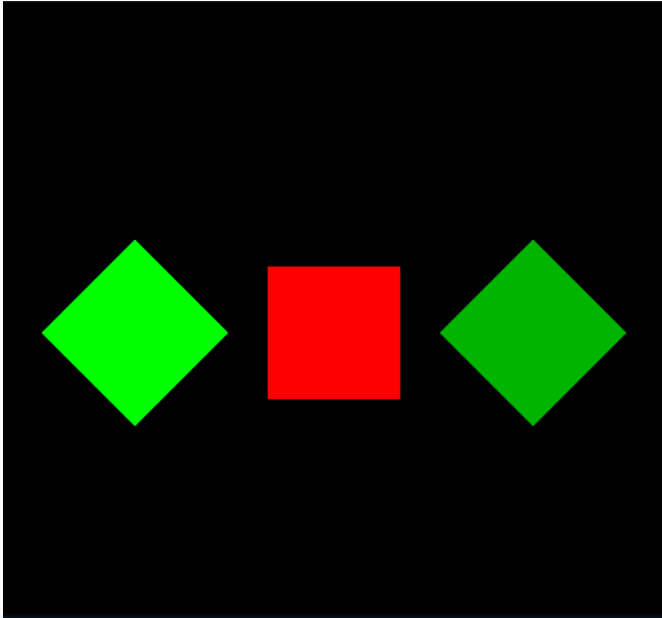
在实验一的基础上加上了旋转函数
glTranslatef(-3.0, 0.0, 0.0);//x方向左平移 3
glRotatef(45.0, 0.0, 0.0, 1.0);//逆时针旋转45度
此时画右边的图形的时候,需要先进行右平移6个单位
glTranslatef(6.0, 0.0, 0.0);
这里我们用glPushMatrix(); glPopMatrix();来保存原来的图形
下面时左移3,旋转45度
glPushMatrix();
glTranslatef(-3.0, 0.0, 0.0);
glRotatef(45.0, 0.0, 0.0, 1.0);
glColor3f(0.0, 1.0, 0.0);
drawSquare();
glPopMatrix();
下面是右移3 ,旋转45度
glPushMatrix();
glTranslatef(3.0, 0.0, 0.0);
glRotatef(45.0, 0.0, 0.0, 1.0);
glColor3f(0.0, 0.7, 0.0);
drawSquare();
glPopMatrix();
code:
// 提示:写完代码请保存之后再进行评测
#include <GL/freeglut.h>
#include<stdio.h>

// 评测代码所用头文件-开始
#include<opencv2/core/core.hpp>
#include<opencv2/highgui/highgui.hpp>
#include<opencv2/imgproc/imgproc.hpp>
// 评测代码所用头文件-结束

void init(void)
{
    glClearColor(0.0, 0.0, 0.0, 0.0);       //设置背景颜色
	glMatrixMode(GL_PROJECTION);
	gluOrtho2D(-5.0, 5.0, -5.0, 5.0);       //设置显示的范围是X:-5.0~5.0, Y:-5.0~5.0
	glMatrixMode(GL_MODELVIEW);
}
void drawSquare(void)						//绘制中心在原点,边长为2的正方形
{
   // 请在此添加你的代码
   /********** Begin ********/
     glBegin (GL_POLYGON);
        				//顶点指定需要按逆时针方向
	glVertex2f (-1.0f,-1.0f);			//左下点
	glVertex2f (1.0f,-1.0f);				//右下点
	glVertex2f (1.0f, 1.0f);				//右上点
	glVertex2f (-1.0f,1.0f);				//左上点
	glEnd ( );


   /********** End **********/
}

void myDraw(void)                           //二维几何变换
{
   // 请在此添加你的代码
   /********** Begin ********/
    glClear(GL_COLOR_BUFFER_BIT);
	glLoadIdentity();

    glPushMatrix();
	glColor3f(1.0, 0.0, 0.0);
	drawSquare();
	glPopMatrix();


	glPushMatrix();
    glTranslatef(-3.0, 0.0, 0.0);
	glRotatef(45.0, 0.0, 0.0, 1.0);
	glColor3f(0.0, 1.0, 0.0);
	drawSquare();
	glPopMatrix();


	glPushMatrix();
    glTranslatef(3.0, 0.0, 0.0);
	glRotatef(45.0, 0.0, 0.0, 1.0);
	glColor3f(0.0, 0.7, 0.0);
	drawSquare();
    glPopMatrix();


   /********** End **********/
	glFlush();
}

int main(int argc, char *argv[])
{
	GLubyte* pPixelData = (GLubyte*)malloc(400 * 400 * 3);//分配内存
   GLint viewport[4] = {0};
	glutInit(&argc, argv);
	glutInitWindowPosition(100, 100);
	glutInitWindowSize(400, 400);
	glutCreateWindow("几何变换示例");

    init();
	 glutDisplayFunc(&myDraw);
    glutMainLoopEvent();


    /*************以下为评测代码,与本次实验内容无关,请勿修改**************/
    glReadBuffer(GL_FRONT);
    glPixelStorei(GL_UNPACK_ALIGNMENT, 4);
    glGetIntegerv(GL_VIEWPORT, viewport);
    glReadPixels(viewport[0], viewport[1], viewport[2], viewport[3], GL_RGB, GL_UNSIGNED_BYTE, pPixelData);

	 cv::Mat img;
    std::vector<cv::Mat> imgPlanes;
    img.create(400, 400, CV_8UC3);
    cv::split(img, imgPlanes);

        for(int i = 0; i < 400; i ++) {
            unsigned char* plane0Ptr = imgPlanes[0].ptr<unsigned char>(i);
            unsigned char* plane1Ptr = imgPlanes[1].ptr<unsigned char>(i);
            unsigned char* plane2Ptr = imgPlanes[2].ptr<unsigned char>(i);
            for(int j = 0; j < 400; j ++) {
                int k = 3 * (i * 400 + j);
                plane2Ptr[j] = pPixelData[k];
                plane1Ptr[j] = pPixelData[k+1];
                plane0Ptr[j] = pPixelData[k+2];
            }
        }
        cv::merge(imgPlanes, img);
        cv::flip(img, img ,0);
        cv::namedWindow("openglGrab");
        cv::imshow("openglGrab", img);
        //cv::waitKey();
        cv::imwrite("../img_step2/test.jpg", img);
	return 0;
}
实验结果:

实验三:
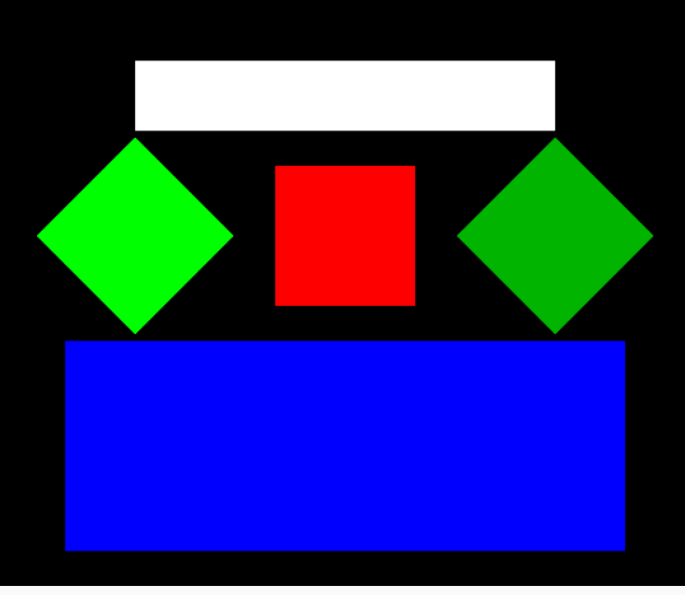
没啥好说的就是先2俩个实验的结合
code;
// 提示:写完代码请保存之后再进行评测
#include <GL/freeglut.h>
#include<stdio.h>

// 评测代码所用头文件-开始
#include<opencv2/core/core.hpp>
#include<opencv2/highgui/highgui.hpp>
#include<opencv2/imgproc/imgproc.hpp>
// 评测代码所用头文件-结束

void init(void)
{
    glClearColor(0.0, 0.0, 0.0, 0.0);       //设置背景颜色
	glMatrixMode(GL_PROJECTION);
	gluOrtho2D(-5.0, 5.0, -5.0, 5.0);       //设置显示的范围是X:-5.0~5.0, Y:-5.0~5.0
	glMatrixMode(GL_MODELVIEW);
}
void drawSquare(void)						//绘制中心在原点,边长为2的正方形
{
   // 请在此添加你的代码
   /********** Begin ********/
    glBegin (GL_POLYGON);
        				//顶点指定需要按逆时针方向
	glVertex2f (-1.0f,-1.0f);			//左下点
	glVertex2f (1.0f,-1.0f);				//右下点
	glVertex2f (1.0f, 1.0f);				//右上点
	glVertex2f (-1.0f,1.0f);				//左上点
	glEnd ( );


   /********** End **********/
}

void myDraw(void)                           //二维几何变换
{
   // 请在此添加你的代码
   /********** Begin ********/


    glPushMatrix();
	glColor3f(1.0, 0.0, 0.0);
	drawSquare();
	glPopMatrix();

    glPushMatrix();
    glColor3f(1.0,1.0,1.0);
    glTranslatef(0.0, 2.0, 0.0);
    glScalef(3.0, 0.5, 1.0);//缩放0.5倍,水平方向镜像
    drawSquare();
    glPopMatrix();

    glPushMatrix();
    glColor3f(0.0,0.0,1.0);
    glTranslatef(0.0, -3.0, 0.0);
    glScalef(4.0, 1.5, 1.0);//缩放0.5倍,水平方向镜像
    drawSquare();
    glPopMatrix();

	glPushMatrix();
	glTranslatef(-3.0, 0.0, 0.0);

	glPushMatrix();
	glRotatef(45.0, 0.0, 0.0, 1.0);
	glColor3f(0.0, 1.0, 0.0);
	drawSquare();
	glPopMatrix();


	glTranslatef(6.0, 0.0, 0.0);

	glPushMatrix();
	glRotatef(45.0, 0.0, 0.0, 1.0);
	glColor3f(0.0, 0.7, 0.0);
	drawSquare();
    glPopMatrix();


   /********** End **********/
	glFlush();
}

int main(int argc, char *argv[])
{
	GLubyte* pPixelData = (GLubyte*)malloc(400 * 400 * 3);//分配内存
   GLint viewport[4] = {0};
	glutInit(&argc, argv);
	glutInitWindowPosition(100, 100);
	glutInitWindowSize(400, 400);
	glutCreateWindow("几何变换示例");

    init();
	 glutDisplayFunc(&myDraw);
    glutMainLoopEvent();


    /*************以下为评测代码,与本次实验内容无关,请勿修改**************/
    glReadBuffer(GL_FRONT);
    glPixelStorei(GL_UNPACK_ALIGNMENT, 4);
    glGetIntegerv(GL_VIEWPORT, viewport);
    glReadPixels(viewport[0], viewport[1], viewport[2], viewport[3], GL_RGB, GL_UNSIGNED_BYTE, pPixelData);

	 cv::Mat img;
    std::vector<cv::Mat> imgPlanes;
    img.create(400, 400, CV_8UC3);
    cv::split(img, imgPlanes);

        for(int i = 0; i < 400; i ++) {
            unsigned char* plane0Ptr = imgPlanes[0].ptr<unsigned char>(i);
            unsigned char* plane1Ptr = imgPlanes[1].ptr<unsigned char>(i);
            unsigned char* plane2Ptr = imgPlanes[2].ptr<unsigned char>(i);
            for(int j = 0; j < 400; j ++) {
                int k = 3 * (i * 400 + j);
                plane2Ptr[j] = pPixelData[k];
                plane1Ptr[j] = pPixelData[k+1];
                plane0Ptr[j] = pPixelData[k+2];
            }
        }
        cv::merge(imgPlanes, img);
        cv::flip(img, img ,0);
        cv::namedWindow("openglGrab");
        cv::imshow("openglGrab", img);
        //cv::waitKey();
        cv::imwrite("../img_step3/test.jpg", img);
	return 0;
}
实验结果:

实验四
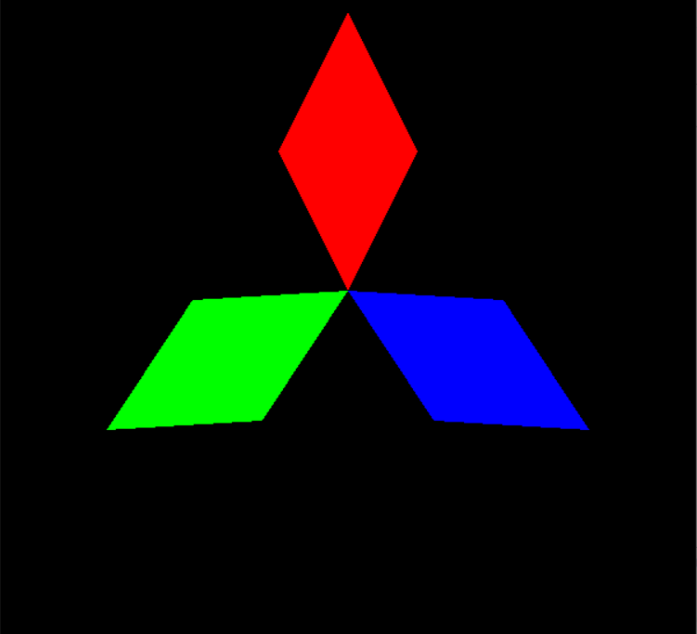
这里需要重新设置一下绘制函数drawDiamond
glBegin (GL_POLYGON);
//顶点指定需要按逆时针方向
glVertex2f (0.0f,0.0f); //左下点
glVertex2f (1.0f,2.0f); //右下点
glVertex2f (0.0f,4.0f); //右上点
glVertex2f (-1.0f,2.0f); //左上点
glEnd ( );// 注意这里的顶点的输入一定要是逆时针的
然后运用之前的旋转函数
glRotatef
code:
// 提示:写完代码请保存之后再进行评测
#include <GL/freeglut.h>
#include<stdio.h>

// 评测代码所用头文件-开始
#include<opencv2/core/core.hpp>
#include<opencv2/highgui/highgui.hpp>
#include<opencv2/imgproc/imgproc.hpp>
// 评测代码所用头文件-结束

void init(void)
{
    glClearColor(0.0, 0.0, 0.0, 0.0);       //设置背景颜色
	glMatrixMode(GL_PROJECTION);
	gluOrtho2D(-5.0, 5.0, -5.0, 5.0);       //设置显示的范围是X:-5.0~5.0, Y:-5.0~5.0
	glMatrixMode(GL_MODELVIEW);
}
void drawDiamond(void)						//绘制一个菱形
{
   // 请在此添加你的代码
   /********** Begin ********/
    glBegin (GL_POLYGON);
        				//顶点指定需要按逆时针方向
	glVertex2f (0.0f,0.0f);			//左下点
	glVertex2f (1.0f,2.0f);				//右下点
	glVertex2f (0.0f,4.0f);				//右上点
	glVertex2f (-1.0f,2.0f);				//左上点
	glEnd ( );// 注意这里的顶点的输入一定要是逆时针的


   /********** End **********/
}

void myDraw(void)                           //二维几何变换
{
   // 请在此添加你的代码
   /********** Begin ********/

    glPushMatrix();
	glColor3f(1.0, 0.0, 0.0);
	drawDiamond();
	glPopMatrix();


	glPushMatrix();
	glRotatef(120.0, 0.0, 0.0, 1.0);
	glColor3f(0.0, 1.0, 0.0);
	drawDiamond();
	glPopMatrix();


	// glTranslatef(6.0, 0.0, 0.0);

	glPushMatrix();
	glRotatef(-120.0, 0.0, 0.0, 1.0);
	glColor3f(0.0, 0.0, 1.0);
	drawDiamond();
    glPopMatrix();


   /********** End **********/
	glFlush();
}

int main(int argc, char *argv[])
{
	GLubyte* pPixelData = (GLubyte*)malloc(400 * 400 * 3);//分配内存
    GLint viewport[4] = {0};
	glutInit(&argc, argv);
	glutInitWindowPosition(100, 100);
	glutInitWindowSize(400, 400);
	glutCreateWindow("几何变换示例");

    init();
	glutDisplayFunc(&myDraw);
    glutMainLoopEvent();


    /*************以下为评测代码,与本次实验内容无关,请勿修改**************/
    glReadBuffer(GL_FRONT);
    glPixelStorei(GL_UNPACK_ALIGNMENT, 4);
    glGetIntegerv(GL_VIEWPORT, viewport);
    glReadPixels(viewport[0], viewport[1], viewport[2], viewport[3], GL_RGB, GL_UNSIGNED_BYTE, pPixelData);

	 cv::Mat img;
    std::vector<cv::Mat> imgPlanes;
    img.create(400, 400, CV_8UC3);
    cv::split(img, imgPlanes);

        for(int i = 0; i < 400; i ++) {
            unsigned char* plane0Ptr = imgPlanes[0].ptr<unsigned char>(i);
            unsigned char* plane1Ptr = imgPlanes[1].ptr<unsigned char>(i);
            unsigned char* plane2Ptr = imgPlanes[2].ptr<unsigned char>(i);
            for(int j = 0; j < 400; j ++) {
                int k = 3 * (i * 400 + j);
                plane2Ptr[j] = pPixelData[k];
                plane1Ptr[j] = pPixelData[k+1];
                plane0Ptr[j] = pPixelData[k+2];
            }
        }
        cv::merge(imgPlanes, img);
        cv::flip(img, img ,0);
        cv::namedWindow("openglGrab");
        cv::imshow("openglGrab", img);
        //cv::waitKey();
        cv::imwrite("../img_step4/test.jpg", img);
	return 0;
}
实验结果:

最后
以上就是安静玉米最近收集整理的关于OpenGL二维几何变换(1 - 4)的全部内容,更多相关OpenGL二维几何变换(1内容请搜索靠谱客的其他文章。


发表评论 取消回复