目录
此文主要用于状态机的理解,及代码书写的对比(同之前写的交通灯)。
状态机
状态机注意要点:
依据久思路重写交通灯
控制模块
仿真截图
显示模块
解决上次遗留问题(新代码的控制)
此文主要用于状态机的理解,及代码书写的对比(同之前写的交通灯)。
原来的交通灯:https://blog.csdn.net/qq_41467882/article/details/83651966
对于状态机的理解,此处参考这三篇博文(感谢)
FPGA三段式状态机的思维陷阱:https://blog.csdn.net/NarutoInspire/article/details/53893779
fpga状态机详解:https://blog.csdn.net/ruanyz_nobody/article/details/49892037
FPGA 学习之路(八)深入理解状态机:https://blog.csdn.net/GOGOmusic/article/details/54768462
状态机
笔者将重写交通灯,同之前的进行对比同时解决上次文章末尾留下来的一段代码的问题。这些文章中所提及的知识点笔者将尽可能的体现在代码的书写中。
由于之博文前介绍了原理等其他问题,这里直接上代码,所有问题我将在代码注释或者代码后边解决。
//第一个进程,同步时序always块,形式固定
always@(posedge clk or negedge rst_n)
begin
	if(!rst_n)
		current_state <= idle;
	else
		current_state <= next_state;
end
//第二个always,组合逻辑模块,描述状态迁移条件判断
always@(*)
begin
	case(current_state)
	idle:
		begin
			if(...)
				next_state =
			else
				next_state =
		end
        s0:
		begin

		end
	s1:
		begin

		end
	default:
		begin
			next_state = idle;
		end
	endcase
end
//第三个进程,描述输出,同步时序always块
always@(posedge clk or negedge rst_n)
begin
	if(!rst_n)
		dout <= 1'b0;
	else
		begin
			case(next_state)
			idle 	    : dout <= ;
			s0 	 	    : dout <= ;
			s1	 	    : dout <= ;
			default	    : dout <= ;
			endcase
		end
end
状态机注意要点:
- 三个always块,第一个第三个为同步时序always块(用非阻塞赋值方式)。第二个为组合逻辑always块(使用阻塞赋值方式)。
- 组合逻辑模块敏感列表采用*
- 第三段状态输出为next_state。用current_state会晚一个时钟周期(应该是由于D触发器的原因)
- 三段式并不是有三个always块。后面一段是(第三个,第四个......)是用来描述状态输出的
依据久思路重写交通灯
接下来我用上面这个模板写出来新的交通灯。这里只用了A路口,B路口只不过就是改改转换条件。代码过程中的异或我会加在注释里。同样只写控制模块。
控制模块
module traffic_control(clk,rst_n,emgercy_brake,digitA,ledA);
input clk;
input rst_n;
input emgercy_brake;

output [5:0] digitA;
output [2:0] ledA;
parameter 	idle = 4'b0001,
			s0 	 = 4'b0010,
			s1   = 4'b0100,
			s2   = 4'b1000;
reg [3:0] stateA;
//第一个进程,同步时序always块
/*
reg [3:0] next_state;
reg [3:0] current_state;
always@(posedge clk or negedge rst_n)
begin
	if(!rst_n)
		current_state <= idle;
	else
		current_state <= state;
end
//后面的state全部替换成next_state。不然会延时一个时钟周期
*/
/*第二个always,组合逻辑模块,描述状态迁移条件(这一段笔者是在无能,因
为计数器不知道怎么在下一个时钟周期中表示出来并且同时控制状态的跳转)
另外,实在是觉得这种思路的交通灯用三段式不是那么好表示,觉得非要写成
组合逻辑没多大意义,下面将下面一个代码将写成组合逻辑*/
//注释解释A路口
reg [5:0] cntA;
always@(posedge clk or negedge rst_n)
begin
	if(!rst_n)
		begin
			stateA <= idle;
			cntA <= 6'd35;
		end
	else
	case(stateA)
	idle:
		begin
			if(emgercy_brake == 1'b0)
				stateA <= s0;
			else
				stateA <= idle;
		end
	s0:
		begin
			if(emgercy_brake == 1'b1)
				stateA <= idle;
			else
				begin
					if(cntA == 1)
						begin
							stateA <= s1;
							cntA <= 6'd20;
						end
					else
						begin
							cntA <= cntA - 1'b1;
						end
				end
		end
	s1:
		begin
			if(emgercy_brake == 1'b1)
				stateA <= idle;
			else
				begin
					if(cntA == 1)
						begin
							stateA <= s2;
							cntA <= 6'd5;
						end
					else
						begin
							cntA <= cntA - 1'b1;
						end
				end
		end
	s2:
		begin
			if(emgercy_brake == 1'b1)
				stateA <= idle;
			else
				begin
					if(cntA == 1)
						begin
							stateA <= s0;
							cntA <= 6'd35;
						end
					else
						begin
							cntA <= cntA - 1'b1;
						end
				end
		end
	default:
		begin
			stateA <= idle;
		end
	endcase
end

assign digitA = cntA;
//第三个进程,描述输出,同步时序always块
reg [2:0] doutA;
always@(posedge clk or negedge rst_n)
begin
	if(!rst_n)
		doutA <= 3'b100;
	else
		begin
			case(stateA)
			idle 	: doutA <= 3'b100;
			s0 	 	: doutA <= 3'b100;
			s1	 	: doutA <= 3'b001;
			s2		: doutA <= 3'b010;
			default	: doutA <= 3'b100;
			endcase
		end
end

assign ledA = doutA;

endmodule
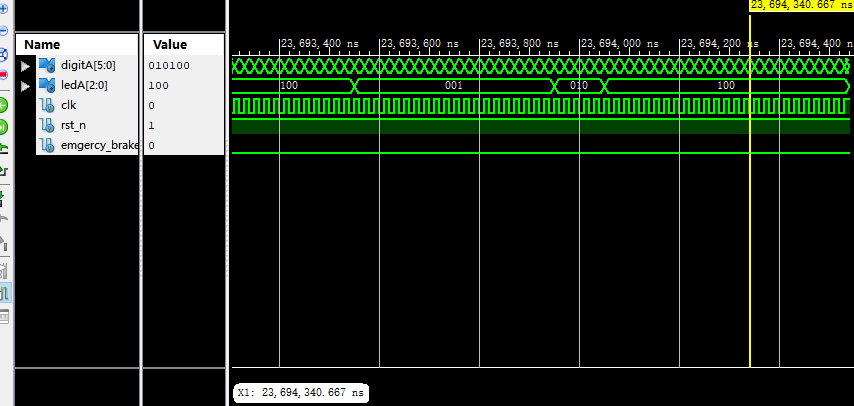
仿真截图

显示模块
这里的显示模块比较有趣。
assign H_A = cntA / 10;
assign L_A = cntA % 10;
//依次取cntA的十位和个位
这样简单改写前面的显示模块就很容易完成了。
解决上次遗留问题(新代码的控制)
module traffic_control_1(led,clk,zhidong,cntA_h,cntA_l,cntB_l,cntB_h,rst_n
    );
input rst_n;
input clk;
input zhidong;

output reg [3:0] cntA_h;
output reg [3:0] cntA_l;
output reg [3:0] cntB_h;
output reg [3:0] cntB_l;
output reg [5:0] led;

reg flag;
reg [1:0] current_state;
reg [1:0] next_state;

parameter [1:0] idle=2'd0,s1=2'd1,s2=2'd2,s3=2'd3;

always@(posedge clk or negedge rst_n)
begin
	if(!rst_n)
		current_state <= idle;
	else
		current_state <= next_state;
end
always@(*)
begin
	case(current_state)
	idle 	: next_state = flag ? s1	:	current_state;
	s1 		: next_state = flag ? s2	:	current_state;
	s2	 	: next_state = flag ? s3	:	current_state;
	s3	 	: next_state = flag ? idle	:	current_state;
	endcase
end

always@(posedge clk or negedge rst_n)
begin
	if(!rst_n)
	begin
		cntA_h <= 4'd5;
		cntA_l <= 4'd0;
		cntB_h <= 4'd4;
		cntB_l <= 4'd5;
		flag <= 0;
	end
	else
		if(zhidong)
			led <= 6'b100_100;//A红黄绿B红黄绿
		else
		case(current_state)
		idle:
			begin
				flag<=0;
				led<=6'b100_001;//Ared Bgreen  45s
				if(cntB_h==0&&cntB_l==0)
					begin
						flag<=1;
						cntA_h<=0;
						cntA_l<=5;
						cntB_h<=0;
						cntB_l<=5;
					end
				else if(!cntB_h==0&&cntB_l==0)
						begin
							cntB_h<=cntB_h-1;
							cntB_l<=9;
						end
					else if(!cntA_h==0&&cntA_l==0)
							begin
								cntA_h<=cntA_h-1;
								cntA_l<=9;
							end
						else
							begin
								cntA_l<=cntA_l-1;
								cntB_l<=cntB_l-1;
							end
			end
		s1:
			begin
				flag<=0;
				led<=6'b100_010;//Ared Byellow 5s
				if(cntB_h==0&&cntB_l==0 && cntB_h==0&&cntB_l==0)
					begin
						flag<=1;
						cntA_h<=4;
						cntA_l<=5;
						cntB_h<=5;
						cntB_l<=0;
					end
					else if(!cntB_h==0 && cntB_l==0)
							begin
								cntB_h<=cntB_h-1;
								cntB_l<=9;
							end
						else if(!cntA_h==0 && cntA_l==0)
								begin
									cntA_h<=cntA_h-1;
									cntA_l<=9;
								end
							else
								begin
									cntA_l<=cntA_l-1;
									cntB_l<=cntB_l-1;
								end
			end
		s2:
			begin
				flag<=0;
				led<=6'b001_100;//Agreen Bred 45s
				if(cntB_h==0&&cntB_l==0 && cntB_h==0&&cntB_l==0)
					begin
						flag<=1;
						cntA_h<=0;
						cntA_l<=5;
						cntB_h<=0;
						cntB_l<=5;
					end
					else if(!cntB_h==0 && cntB_l==0)
							begin
								cntB_h<=cntB_h-1;
								cntB_l<=9;
							end
						else if(!cntA_h==0&&cntA_l==0)
								begin
									cntA_h<=cntA_h-1;
									cntA_l<=9;
								end
							 else
								begin
									cntA_l<=cntA_l-1;
									cntB_l<=cntB_l-1;
								end
			end
		s3:
			begin
				flag<=0;
				led<=6'b100_010;//Ayellow Bred
				if(cntB_h==0&&cntB_l==0 && cntB_h==0&&cntB_l==0)
					begin
						flag<=1;
						cntA_h<=5;
						cntA_l<=0;
						cntB_h<=4;
						cntB_l<=5;
					end
				else if(!cntB_h==0&&cntB_l==0)
						begin
							cntB_h<=cntB_h-1;
							cntB_l<=9;
						end
					else if(!cntA_h==0&&cntA_l==0)
							begin
								cntA_h<=cntA_h-1;
								cntA_l<=9;
							end
						else
							begin
								cntA_l<=cntA_l-1;
								cntB_l<=cntB_l-1;
							end
			end
		endcase
end

endmodule
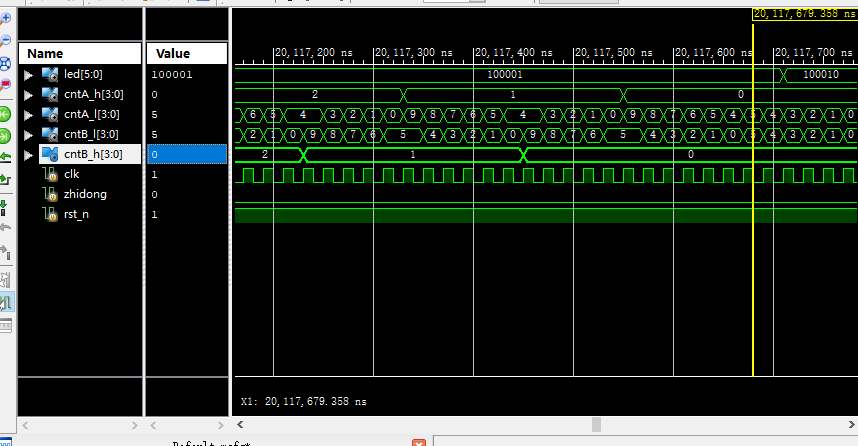
代码仿真

最后
以上就是甜美月亮最近收集整理的关于Verilog实现交通灯(数电课设)-----新--及对于状态机的理解此文主要用于状态机的理解,及代码书写的对比(同之前写的交通灯)。的全部内容,更多相关Verilog实现交通灯(数电课设)-----新--及对于状态机内容请搜索靠谱客的其他文章。


发表评论 取消回复