树莓派4B 使用Onenet 视频能力
OneNET Video视频能力为用户提供物联网行业视频设备接入能力,方便快捷的接入使用流程,快速稳定的平台性能,低成本的使用方式,让物联网企业可以更加方便对视频业务进行开发,从而解决物联网视频行业的并发、分发的业务痛点。
所以这个Onenet平台视频能力如何在树莓派平台部署呢?接下来让我们一起看看。

文章目录
- 树莓派4B 使用Onenet 视频能力
- 一、硬软平台基本环境
- 二、搭建RPOS服务器
- 三、交叉编译Onenet视频推流服务
- 1. 下载树莓派交叉编译工具
- 2.使用交叉编译工具编译libssl库
- 3.交叉编译OneNET SDK
- 四、创建Onenet视频服务并部署
- 1.创建Onenet视频服务
- 2.部署到树莓派
- 五、参考资料
一、硬软平台基本环境
硬件平台:树莓派4B
系统镜像:2020-02-13-raspbian-buster.img
摄像头:USB摄像头
二、搭建RPOS服务器
基于 Node.js 的 ONVIF 摄像头/NVT 软件,可将 Raspberry Pi、Windows、Linux 或 Mac 计算机转变为 ONVIF 摄像头和 RTSP 服务器。参照其中的步骤即可完成RPOS服务器的搭建。
RPOS项目主页
RPOS Gitee项目主页(我克隆滴)
配置文件rposConfig.json,我使用的室USB摄像头,所以写的如下(注意:服务器配置了用户名和密码都是admin):
{
  "NetworkAdapters" : ["awdl0","eth0", "wlan0", "en0"],
  "IpAddress" : "127.0.1.1",
  "ServicePort" : 8081,
  "Username" : "admin",
  "Password" : "admin",
  "CameraType" : "usbcam",
  "CameraDevice" : "/dev/video0",
  "RTSPAddress" : "", "//":"Normally left blank. Used to set RTSP Server Address",
  "RTSPPort" : 8554,
  "RTSPName" : "h264",
  "MulticastEnabled"  : false, "MulticastEnabledComment" : "## Multicast is not supported for USB camera",
  "RTSPMulticastName" : "h264m",
  "MulticastAddress"  : "224.0.0.1",
  "MulticastPort"     : "10001",
  "RTSPServer" : 3, "RtspServerComment" : "## Select RTSP Server > 1:RPOS RTSP Server 2:V4L2 RTSP Server by mpromonet (auto selected if MulticastEnabled=true)",
  "PTZDriver" : "none", "PTZDriverComment": "## valid values are none,tenx,pelcod,visca and pan-tilt-hat",
  "PTZOutput" : "none", "PTZOutputComment": "## values are none (eg Tenx), serial and tcp",
  "PTZSerialPort" : "/dev/ttyUSB0",
  "PTZSerialPortSettings" : { "baudRate":2400, "dataBits":8, "parity":"none", "stopBits":1 },
  "PTZOutputURL": "127.0.0.1:9999",
  "PTZCameraAddress": 1,
  "DeviceInformation" : {
    "Manufacturer" : "Raspberry Pi",
    "Model" : "4 B",
    "HardwareId" : ""
  },
  "logLevel" : 3, "logLevelComment": "## LogLevels are > 1:Error 2:Warning 3:Info 4:Debug",
  "logSoapCalls" : false
}
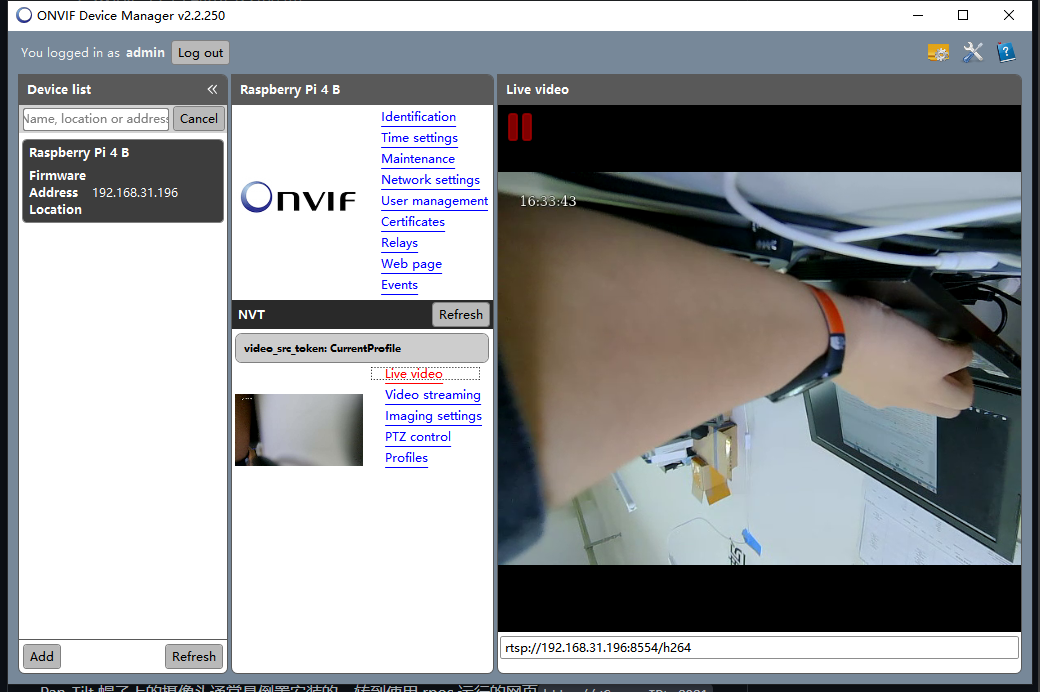
最后使用sudo node rpos.js运行后,会出现如下输出,接着我们打开ONVIF Device Manger软件,该软件会自动搜索局域网内的IPC终端,电机Live video就可以看到局域网内实时画面了。
pi@raspberrypi:~/Desktop/rpos $ sudo node rpos.js
Read IP address 192.168.31.196 from wlan0
Manufacturer : Raspberry Pi
Model : 4 B
HardwareId :
SerialNumber : 100000007458e142
FirmwareVersion : 2.1.0
Starting camera settings webserver on http://192.168.31.196:8081/
unknown control 'h264_profile'
Could not retrieve Controlvalue 'red_balance'
Could not retrieve Controlvalue 'blue_balance'
Could not retrieve Controlvalue 'horizontal_flip'
Could not retrieve Controlvalue 'vertical_flip'
Could not retrieve Controlvalue 'color_effects'
Could not retrieve Controlvalue 'rotate'
Could not retrieve Controlvalue 'color_effects_cbcr'
Could not retrieve Controlvalue 'video_bitrate_mode'
Could not retrieve Controlvalue 'video_bitrate'
Could not retrieve Controlvalue 'repeat_sequence_header'
Could not retrieve Controlvalue 'h264_i_frame_period'
Could not retrieve Controlvalue 'h264_level'
Could not retrieve Controlvalue 'h264_profile'
Could not retrieve Controlvalue 'auto_exposure'
Could not retrieve Controlvalue 'exposure_time_absolute'
Could not retrieve Controlvalue 'exposure_dynamic_framerate'
Could not retrieve Controlvalue 'auto_exposure_bias'
Could not retrieve Controlvalue 'white_balance_auto_preset'
Could not retrieve Controlvalue 'image_stabilization'
Could not retrieve Controlvalue 'iso_sensitivity'
Could not retrieve Controlvalue 'exposure_metering_mode'
Could not retrieve Controlvalue 'scene_mode'
Could not retrieve Controlvalue 'compression_quality'
Binding DeviceService to http://192.168.31.196:8081/onvif/device_service
Binding MediaService to http://192.168.31.196:8081/onvif/media_service
Binding PTZService to http://192.168.31.196:8081/onvif/ptz_service
Binding ImagingService to http://192.168.31.196:8081/onvif/imaging_service
discovery_service started
Starting Live555 rtsp server
media_service started
ptz_service started
device_service started
imaging_service started
rtspServer: INFO:root:StreamServer initialized

rtspServer: INFO:root:Video settings loaded from v4l2ctl.json

rtspServer: DEBUG:root:StreamServer.launch
INFO:root:USB camera ignored most of the parameters
DEBUG:root:( v4l2src device=/dev/video0 brightness=0 contrast=32 saturation=64 ! image/jpeg,width=640,height=480,framerate=25/1 ! jpegdec ! clockoverlay ! omxh264enc target-bitrate=10000000 control-rate=variable ! video/x-h264,profile=baseline ! h264parse ! rtph264pay name=pay0 pt=96 )

rtspServer: INFO:root:Starting service on port 8554 at url /h264

rtspServer: INFO:root:Running RTSP Server

以上就完成了一个局域网内的视频推流服务,但是目前在很多情况下局域网推流已经无法满足我们的需求,我们就需要用到中移的Onenet平台进行互联网平台的转发工作。
三、交叉编译Onenet视频推流服务
Raspberry Pi本身的硬件性能不是很高,所以在pi上直接编译源代码,需要消耗很多的时间。因此在选择在性能呢强大的台式机上来配置一个交叉编译平台,再将编译后的bin文件和config.json文件拷贝到树莓派来执行;主要参考来自:
OneNET视频推流------使用树莓派交叉编译工具
1. 下载树莓派交叉编译工具
选用的交叉编译工具链,是Raspberry Pi 基金会官方发布的 交叉编译工具包,也就是官方用来编译Raspbian操作系统所用的交叉编译工具链。
1).直接使用git clone命令直接获取源代码,其中的gcc-linaro-arm-linux-gnueabihf-raspbian-x64就是我们需要的文件夹。
git clone git://github.com/raspberrypi/tools.git
2).接下来跳转到文件夹中查看下:
cd tools/arm-bcm2708/
3).正常会有如下文件:
arm-bcm2708hardfp-linux-gnueabi  arm-rpi-4.9.3-linux-gnueabihf
arm-bcm2708-linux-gnueabi        gcc-linaro-arm-linux-gnueabihf-raspbian
arm-linux-gnueabihf              gcc-linaro-arm-linux-gnueabihf-raspbian-x64
整体命令运行有如下结果:
xxx@virtual-machine:~$ git clone git://github.com/raspberrypi/tools.git
正克隆到 'tools'...
remote: Enumerating objects: 25407, done.
remote: Counting objects: 100% (33/33), done.
remote: Compressing objects: 100% (27/27), done.
remote: Total 25407 (delta 18), reused 12 (delta 6), pack-reused 25374
接收对象中: 100% (25407/25407), 610.89 MiB | 2.29 MiB/s, 完成.
处理 delta 中: 100% (14899/14899), 完成.
正在检出文件: 100% (19060/19060), 完成.
xxx@virtual-machine:~$ cd tools
xxx@virtual-machine:~/tools$ cd arm-bcm2708/
xxx@virtual-machine:~/tools/arm-bcm2708$ ls
arm-bcm2708hardfp-linux-gnueabi  arm-rpi-4.9.3-linux-gnueabihf
arm-bcm2708-linux-gnueabi        gcc-linaro-arm-linux-gnueabihf-raspbian
arm-linux-gnueabihf              gcc-linaro-arm-linux-gnueabihf-raspbian-x64
2.使用交叉编译工具编译libssl库
1).下载libssl源码文件,Onenet SDK推荐使用的openssl版本为:openssl-1.0.1g,我们打开新终端。
xxx@virtual-machine:~$ wget http://www.openssl.org/source/openssl-1.0.1g.tar.gz
解压文件
xxx@virtual-machine:~$ tar xf openssl-1.0.1g.tar.gz
2).使用export命令声明编译目录,需要注意你的编译工具的目录。
xxx@virtual-machine:~$ export CROSSCOMP_DIR=/home/xxx/tools/arm-bcm2708/gcc-linaro-arm-linux-gnueabihf-raspbian-x64/bin
3).声明安装目录
xxx@virtual-machine:~$ export INSTALL_DIR=/home/xxx/libssl
4).进入libssl源文件,针对树莓派平台进行交叉编译
xxx@virtual-machine:~$ cd openssl-1.0.1g
changliu@changliu-virtual-machine:~/openssl-1.0.1g$Configure linux-generic32
--prefix=$INSTALL_DIR --openssldir=$INSTALL_DIR/openssl
--cross-compile-prefix=$CROSSCOMP_DIR/arm-linux-gnueabihf-
5).交叉编译libssl库
xxx@virtual-machine:~/openssl-1.0.1g$ make depend
xxx@virtual-machine:~/openssl-1.0.1g$ make
xxx@virtual-machine:~/openssl-1.0.1g$ make install
编译完成后我们可以在主目录中看到如下文件夹:
xxx@virtual-machine:~$cd libssl
xxx@virtual-machine:~/libssl$ ls
bin  include  lib  openssl
6).make install可能会遇到openssl make install : *** [install_docs] 错误 255解决方法如下:
xxx@virtual-machine:~$ sudo nano /usr/bin/pod2man
注释其中的71行$parser->parse_from_file (@files);
注:ctrl+c可查看当前行数。
3.交叉编译OneNET SDK
1).打开openssl安装地址将其lib中的内容复制到/tools/arm-bcm2708/gcc-linaro-arm-linux-gnueabihf-raspbian-x64/lib/gcc/arm-linux-gnueabihf/4.8.3:
xxx@virtual-machine:~$ cd libssl
xxx@virtual-machine:~$ cd ~/tools/arm-bcm2708/gcc-linaro-arm-linux-gnueabihf-raspbian-x64/lib/gcc/arm-linux-gnueabihf/4.8.3
xxx@virtual-machine:~/tools/arm-bcm2708/gcc-linaro-arm-linux-gnueabihf-raspbian-x64/lib/gcc/arm-linux-gnueabihf/4.8.3$ ls
crtbegin.o   crtendS.o  include-fixed    libgcc.a            libssl.a
crtbeginS.o  engines    install-tools    libgcc_eh.a         pkgconfig
crtbeginT.o  finclude   libcaf_single.a  libgcov.a           plugin
crtend.o     include    libcrypto.a      libgfortranbegin.a
2).打开新终端获取Onenet视频服务SDK源码:
xxx@virtual-machine:~$ git clone https://github.com/cm-heclouds/video_sdk.git
xxx@virtual-machine:~$ cd video_sdk/
xxx@virtual-machine:~/video_sdk$ ls
bin             gm813x   linux-arm.txt  sample  tools
CMakeLists.txt  include  platforms      src     video-plugin
g813x-arm.txt   lib      README.md      test
3).打开配置文件进行编译配置:
SET(CMAKE_SYSTEM_NAME Linux)
SET(TOOLCHAIN_DIR "/home/changliu/tools/arm-bcm2708/gcc-linaro-arm-linux-gnueabihf-raspbian-x64/")
SET(CMAKE_FIND_ROOT_PATH "${TOOLCHAIN_DIR}")
SET(CMAKE_C_COMPILER "${TOOLCHAIN_DIR}/bin/arm-linux-gnueabihf-gcc-4.8.3")
SET(CMAKE_CXX_COMPILER "${TOOLCHAIN_DIR}/bin/arm-linux-gnueabihf-g++")
SET(CMAKE_FIND_ROOT_PATH_MODE_PROGRAM NEVER)
4).安装依赖库
sudo apt-get install libssl-dev
5).修改sample/onvif/device_onvif.c文件防止INFO: profile [0: level=1 bitrate=10000 framterate=25] 段错误
将所有指针未初始化为NULL的初始化为NULL
6).编译,在/video_sdk/video_sample_build_on_arm_linux文件夹中:
xxx@virtual-machine:~/video_sdk/video_sample_build_on_arm_linux$ make
编译成功没有错误即可,生成sample_video_s文件。
四、创建Onenet视频服务并部署
1.创建Onenet视频服务
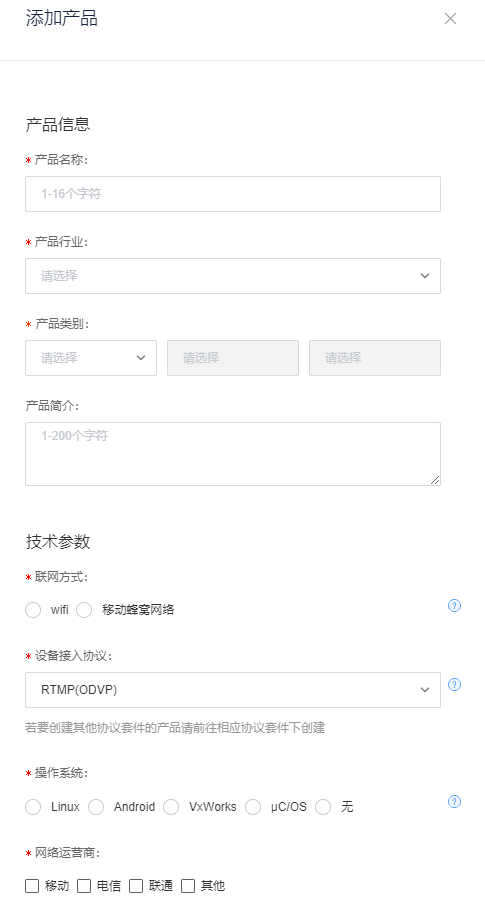
我们打开Onenet视频服务平台,添加产品即可:

2.部署到树莓派
首先我们先启动RPOS服务,可以看到服务启动在http://192.168.31.196:8081/onvif/device_service
pi@raspberrypi:~/Desktop/rpos $ sudo node rpos.js
Read IP address 192.168.31.196 from wlan0
Manufacturer : Raspberry Pi
Model : 4 B
HardwareId :
SerialNumber : 100000007458e142
FirmwareVersion : 2.1.0
Starting camera settings webserver on http://192.168.31.196:8081/
unknown control 'h264_profile'
Could not retrieve Controlvalue 'red_balance'
Could not retrieve Controlvalue 'blue_balance'
Could not retrieve Controlvalue 'horizontal_flip'
Could not retrieve Controlvalue 'vertical_flip'
Could not retrieve Controlvalue 'color_effects'
Could not retrieve Controlvalue 'rotate'
Could not retrieve Controlvalue 'color_effects_cbcr'
Could not retrieve Controlvalue 'video_bitrate_mode'
Could not retrieve Controlvalue 'video_bitrate'
Could not retrieve Controlvalue 'repeat_sequence_header'
Could not retrieve Controlvalue 'h264_i_frame_period'
Could not retrieve Controlvalue 'h264_level'
Could not retrieve Controlvalue 'h264_profile'
Could not retrieve Controlvalue 'auto_exposure'
Could not retrieve Controlvalue 'exposure_time_absolute'
Could not retrieve Controlvalue 'exposure_dynamic_framerate'
Could not retrieve Controlvalue 'auto_exposure_bias'
Could not retrieve Controlvalue 'white_balance_auto_preset'
Could not retrieve Controlvalue 'image_stabilization'
Could not retrieve Controlvalue 'iso_sensitivity'
Could not retrieve Controlvalue 'exposure_metering_mode'
Could not retrieve Controlvalue 'scene_mode'
Could not retrieve Controlvalue 'compression_quality'
Binding DeviceService to http://192.168.31.196:8081/onvif/device_service
Binding MediaService to http://192.168.31.196:8081/onvif/media_service
Binding PTZService to http://192.168.31.196:8081/onvif/ptz_service
Binding ImagingService to http://192.168.31.196:8081/onvif/imaging_service
discovery_service started
Starting Live555 rtsp server
media_service started
ptz_service started
device_service started
imaging_service started
rtspServer: INFO:root:StreamServer initialized

rtspServer: INFO:root:Video settings loaded from v4l2ctl.json

rtspServer: DEBUG:root:StreamServer.launch
INFO:root:USB camera ignored most of the parameters
DEBUG:root:( v4l2src device=/dev/video0 brightness=0 contrast=32 saturation=64 ! image/jpeg,width=640,height=480,framerate=25/1 ! jpegdec ! clockoverlay ! omxh264enc target-bitrate=10000000 control-rate=variable ! video/x-h264,profile=baseline ! h264parse ! rtph264pay name=pay0 pt=96 )

rtspServer: INFO:root:Starting service on port 8554 at url /h264

rtspServer: INFO:root:Running RTSP Server
接着我们配置Onenet服务:打开Onenet_sdk,进入bin文件,进行如下配置:
{
    "profile":{
                "productid":45xx26,  # 产品ID 需删除注释
                "deviceid":xx,  # 设备ID,未用 需删除注释
                "pass":"VUHPxxxxjt1k", # "设备注册码" 需删除注释
                "id":"xxx"  # "设备标识" 需删除注释
    },

    "onvif":
    [
        {
                "title":"Channl1",
                "channel_id":1,
                "url": "http://192.168.31.196:8081/onvif/device_service",
                "user": "admin",
                "passwd": "admin",
                "desc":"Machine 1",
                "defaultlevel": 1
        }
    ],

    "rvod":
    [
        {
           "channel_id":1,
           "location":"./test1.mp4",
           "beginTime":"2010-12-08 00:00:00",
           "endTime":"2010-12-08 00:22:59",
           "videoTitle":"title1"
        }
    ]
}
先给文件加可执行权限,然后启动Onenet服务:
pi@raspberrypi:~/Desktop/video_sdk/bin $ sudo chmod +x sample_video_s
pi@raspberrypi:~/Desktop/video_sdk/bin $ ./sample_video_s
INFO: [info]:url=http://192.168.31.196:8081/onvif/device_service has profiles-------------------------------------------------------:

INFO: profile [0: level=1 bitrate=10000 framterate=25]

no this level 4
no this level 3
no this level 2
8554INFO: ip 47.106.46.251 port 9201 token
INFO: 3c 82 11 8b f2 c7 39 7a 90 64 6a 76 04 c4 20 81
INFO: 70 9d a4 3a 17 a6 7d ff 82 a7 d9 01 e3 3f 73 8d
INFO: get dev id 769789491
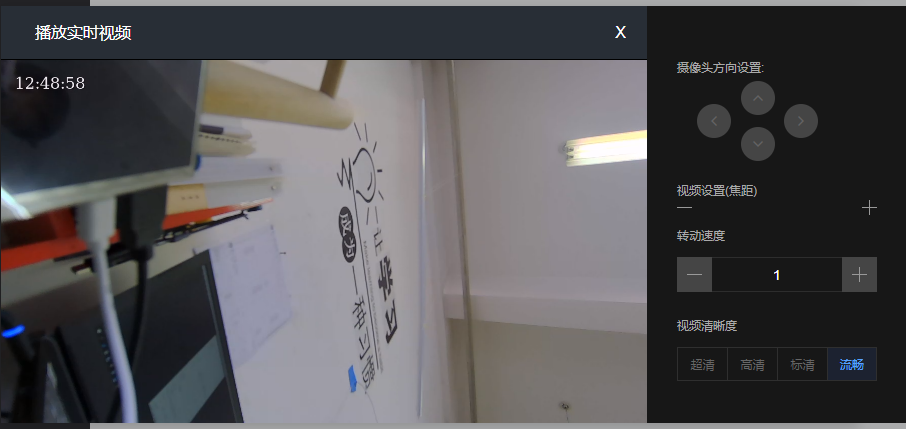
最后在Onenet视频服务界面中播放实时视频即可:

五、参考资料
OneNET文档中心
Ubuntu下视频接入到onenet
OneNET视频能力体验------使用树莓派摄像头推流
最后
以上就是爱笑鸵鸟最近收集整理的关于树莓派4B 使用Onenet 视频能力树莓派4B 使用Onenet 视频能力的全部内容,更多相关树莓派4B内容请搜索靠谱客的其他文章。


发表评论 取消回复