ARDUINO MEGA2560 经过ESP8266 WIFI模块上传温湿度数据到 OneNet 服务器 https://www.cnblogs.com/Mysterious/p/5734104.html
转载
简述
原来写了一个C++的wifi库但是发现用c++ arduino这小身板有点扛不住,代码比较大,使用String类型数据处理速度慢,而且很容易无缘无故跑飞。而且封装成库后使用还需要修改arduino的串口缓存大小才能使用。
今天抽空重新用c写了一下代码,运行速度明显加快,也不需要修改Arduino IDE了。本代码主要借鉴 中移物联-周家绪 的http头合成的库,和 DFRobot-Strictus 对AT指令数据处理的方法,在这里感谢两位发布的代码。
下面把测试成功的代码发不出来,供后来者使用。代码有不足之处欢迎指正。
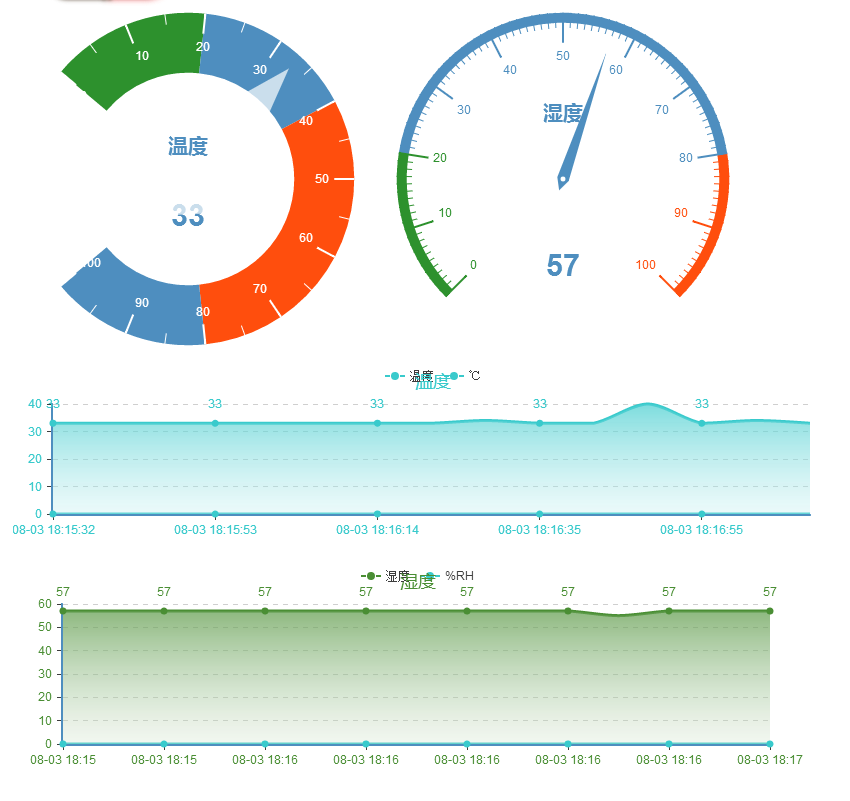
最终效果
发布链接: 温湿度-中国移动物联网开放平台

硬件概述
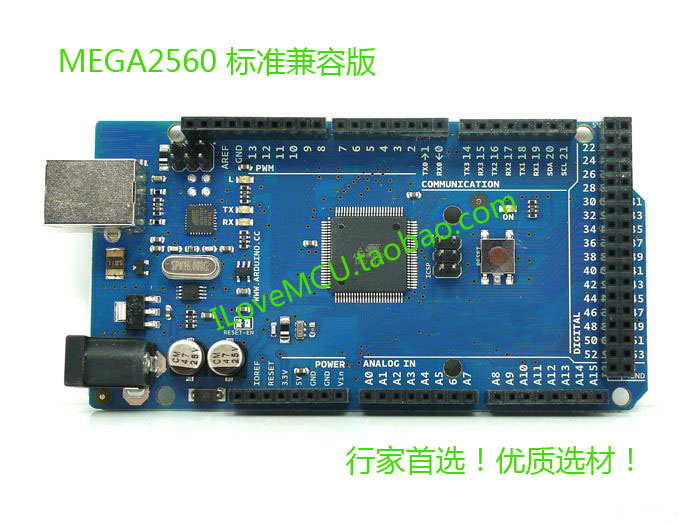
1.主控:ARDUINO MEGA2560开发板
特点:多个串口,IO口丰富,内存比较大,使用方便

2.WIFI模块:使用ARDUINO MEGA2560的带ESP8266的扩展板
特点:带有贴片的ESP8266 WIFI模块,DHT11温湿度传感器,继电器等功能,和ARDUINO MEGA2560即插即用,扩展很多IO和电源接口方便后续扩展各种传感器。
3.温湿度传感器:DHT11单总线温湿度传感器(扩展板带的有这个传感器)
软件思路
1.使用DHT11温湿度传感器的库<dht11.h>,读取温湿度值。
2.使用定时器<TimerOne.h>库,监控AT指令发送和获取返回数据的时间。
3.使用OneNet提供的<HttpPacket.h>库,合成POST请求的HTTP头
4.使用<ArduinoJson.h>库,合成需要的JSON数据流
5.使用ESP8266连接路由器将数据发送到OneNet服务器
用到的库文件下载地址:
链接:百度网盘-链接不存在 密码:y8ks
传感器和硬件的对应接口
ESP8266 ---> Serial3(TX3/RX3) 用户发送和读取WIFI指令
DHT11 ---> D8 单总线读取温湿度数据值
DEBUG接口---> Serial(D0/D1) 1.把发送给ESP8266的数据,也在DEBUG串口输出,观看指令运行到哪一步,2.ESP8266接收的数据,也通过DEBUG口转发出来,观看反馈数据是否正确。 3.错误跳转,观看错误发生的位置
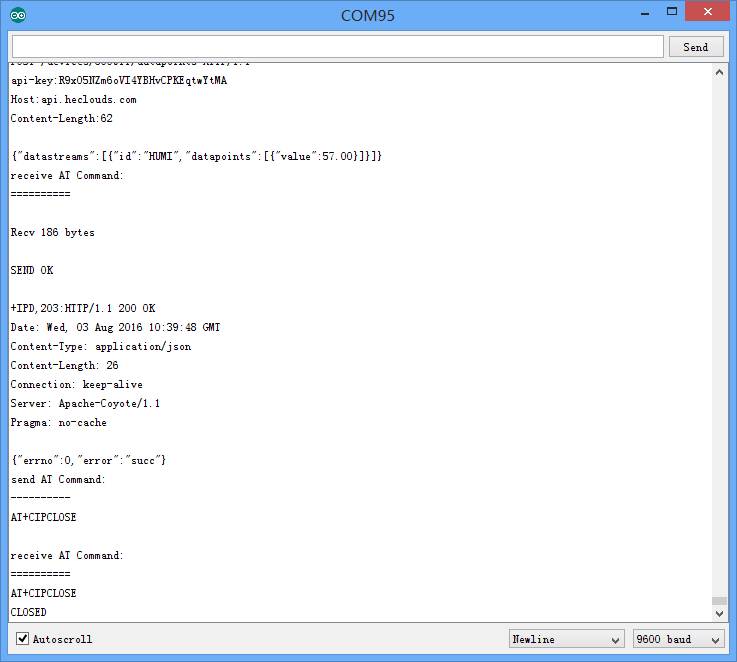
串口反馈数据界面

源代码(使用ARDUINO IDE 1.06版本测试)
#include <TimerOne.h>
#include <HttpPacket.h>
#include <ArduinoJson.h>
#include <dht11.h>
dht11 DHT11;
#define DHT11PIN 8 //DHT11 连接ARDUINO 8


HttpPacketHead packet;


#define DebugSerial Serial
#define ESP8266Serail Serial3

#define Success 1U
#define Failure 0U

int L = 13;	//LED指示灯引脚

unsigned long  Time_Cont = 0;		//定时器计数器

const unsigned int esp8266RxBufferLength = 600;
char esp8266RxBuffer[esp8266RxBufferLength];
unsigned int ii = 0;
char OneNetServer[] = "api.heclouds.com";		//不需要修改

const char ssid[] = "PushPull";		//修改为自己的路由器用户名
const char password[] = "********";	//修改为自己的路由器密码


char device_id[] = "600911";	//修改为自己的设备ID
char API_KEY[] = "R9xO5NZm6oVI4YBHvCPKEqtwYtMA";	//修改为自己的API_KEY
char sensor_id1[] = "TEMP";
char sensor_id2[] = "HUMI";


void setup() {
	pinMode(L, OUTPUT);
	digitalWrite(L, LOW);
	DebugSerial.begin(9600);
	ESP8266Serail.begin(115200);

	Timer1.initialize(1000);
	Timer1.attachInterrupt(Timer1_handler);

	initEsp8266();


	DebugSerial.println("setup end!");
}

void loop() {
	//获取温湿度数据
	int chk = DHT11.read(DHT11PIN);								//读取温湿度值

	  //串口调试DHT11输出信息
	  DebugSerial.print("Read sensor: ");
	  switch (chk)
	  {
	  case DHTLIB_OK:
	    DebugSerial.println("OK");
	    break;
	  case DHTLIB_ERROR_CHECKSUM:
	    DebugSerial.println("Checksum error");
	    break;
	  case DHTLIB_ERROR_TIMEOUT:
	    DebugSerial.println("Time out error");
	    break;
	  default:
	    DebugSerial.println("Unknown error");
	    break;
	  }

	  //发送数据到Onenet
	  postDataToOneNet(API_KEY,device_id,sensor_id1,DHT11.temperature);
          delay(100);
	  postDataToOneNet(API_KEY,device_id,sensor_id2,DHT11.humidity);

	  delay(5000);
}

void postDataToOneNet(char* API_VALUE_temp,char* device_id_temp,char* sensor_id_temp,double thisData)
{
		//合成POST请求
	StaticJsonBuffer<200> jsonBuffer;


	JsonObject& value = jsonBuffer.createObject();
	value["value"] = thisData;

	JsonObject& id_datapoints = jsonBuffer.createObject();
	id_datapoints["id"] = sensor_id_temp;
	JsonArray& datapoints = id_datapoints.createNestedArray("datapoints");
	datapoints.add(value);

	JsonObject& myJson = jsonBuffer.createObject();
	JsonArray& datastreams = myJson.createNestedArray("datastreams");
	datastreams.add(id_datapoints);

	char p[200];
	int num = myJson.printTo(p, sizeof(p));


	packet.setHostAddress(OneNetServer);
	packet.setDevId(device_id_temp);   //device_id
	packet.setAccessKey(API_VALUE_temp);  //API_KEY
	// packet.setDataStreamId("<datastream_id>");    //datastream_id
	// packet.setTriggerId("<trigger_id>");
	// packet.setBinIdx("<bin_index>");

	/*create the http message about add datapoint */
	packet.createCmdPacket(POST, TYPE_DATAPOINT, p);
	// if (strlen(packet.content))
	// 	Serial.print(packet.content);
	// Serial.print(p);
	int httpLength = strlen(packet.content) + num;


		//连接服务器
	char cmd[400];
	memset(cmd, 0, 400);	//清空cmd
	strcpy(cmd, "AT+CIPSTART="TCP","");
	strcat(cmd, OneNetServer);
	strcat(cmd, "",80rn");
	if (sendCommand(cmd, "CONNECT", 7, 10000, 5) == Success);
	else ESP8266_ERROR(1);

	//发送数据
	memset(cmd, 0, 400);	//清空cmd
	sprintf(cmd, "AT+CIPSEND=%drn", httpLength);
	if (sendCommand(cmd, ">", 1, 3000, 1) == Success);
	else ESP8266_ERROR(2);

	memset(cmd, 0, 400);	//清空cmd
	strcpy(cmd, packet.content);
	strcat(cmd, p);
	if (sendCommand(cmd, ""succ"}", 7, 3000, 3) == Success);
	else ESP8266_ERROR(3);

	if (sendCommand("AT+CIPCLOSErn", "CLOSED", 6, 3000, 1) == Success);
	else ESP8266_ERROR(4);
}

void initEsp8266()
{
	if (sendCommand("ATrn", "OK", 2, 3000, 10) == Success);
	else ESP8266_ERROR(5);

	if (sendCommand("AT+RSTrn", "ready", 5, 10000, 10) == Success);
	else ESP8266_ERROR(6);

	if (sendCommand("AT+CWMODE=1rn", "OK", 2, 3000, 10) == Success);
	else ESP8266_ERROR(7);

	char cmd[50];
	strcpy(cmd, "AT+CWJAP="");
	strcat(cmd, ssid);
	strcat(cmd, "","");
	strcat(cmd, password);
	strcat(cmd, ""rn");

	if (sendCommand(cmd, "OK", 2, 20000, 10) == Success);
	else ESP8266_ERROR(8);

	if (sendCommand("AT+CIPMUX=0rn", "OK", 2, 3000, 10) == Success);
	else ESP8266_ERROR(9);

	if (sendCommand("AT+CIFSRrn", "OK", 2, 20000, 10) == Success);
	else ESP8266_ERROR(10);
}

void(* resetFunc) (void) = 0; //制造重启命令

void ESP8266_ERROR(int num)
{
	DebugSerial.print("ERROR");
	DebugSerial.println(num);
	while (1)
	{
		digitalWrite(L, HIGH);
		delay(300);
		digitalWrite(L, LOW);
		delay(300);

		if (sendCommand("ATrn", "OK", 2, 100, 10) == Success)
		{
			DebugSerial.print("rnRESET!!!!!!rn");
			resetFunc();
		}
	}
}


unsigned int sendCommand(char *Command, char *Response, unsigned int Res_Length, unsigned long Timeout, unsigned char Retry)
{
	clrEsp8266RxBuffer();
	for (unsigned char n = 0; n < Retry; n++)
	{
		DebugSerial.print("rnsend AT Command:rn----------rn");
		DebugSerial.write(Command);

		ESP8266Serail.write(Command);

		Time_Cont = 0;
		while (Time_Cont < Timeout)
		{
			esp8266ReadBuffer();
			if ((mystrstr(esp8266RxBuffer, Response, ii, Res_Length)) != NULL)
			{
				DebugSerial.print("rnreceive AT Command:rn==========rn");
				DebugSerial.print(esp8266RxBuffer);	//输出接收到的信息
				clrEsp8266RxBuffer();
				return Success;
			}
		}
		Time_Cont = 0;
	}
	DebugSerial.print("rnreceive AT Command:rn==========rn");
	DebugSerial.print(esp8266RxBuffer);//输出接收到的信息
	clrEsp8266RxBuffer();
	return Failure;
}

unsigned char mystrstr(char *s, char *t, unsigned int Length_s, unsigned int Length_t)
{	char x = 0; char *p; p = t;
	int i = 0, j = 0;
	for (; i < Length_s; s++, i++)
	{
		while (*t == *s)
		{	s++; t++; i++; j++;
			if (j >= Length_t) return 1;
		}
		s -= j;
		t = p; j = 0;
	}
	return NULL;
}


void Timer1_handler(void)
{
	Time_Cont++;
}


void esp8266ReadBuffer() {
	while (ESP8266Serail.available())
	{
		esp8266RxBuffer[ii++] = ESP8266Serail.read();
		if (ii == esp8266RxBufferLength)clrEsp8266RxBuffer();
	}
}

void clrEsp8266RxBuffer(void)
{
	memset(esp8266RxBuffer, 0, esp8266RxBufferLength);		//清空
	ii = 0;
}
最后
以上就是悲凉毛巾最近收集整理的关于ARDUINO MEGA2560 经过ESP8266 WIFI模块上传温湿度数据到 OneNet 服务器ARDUINO MEGA2560 经过ESP8266 WIFI模块上传温湿度数据到 OneNet 服务器https://www.cnblogs.com/Mysterious/p/5734104.html简述最终效果硬件概述软件思路传感器和硬件的对应接口源代码(使用ARDUINO IDE 1.06版本测试)的全部内容,更多相关ARDUINO内容请搜索靠谱客的其他文章。


发表评论 取消回复