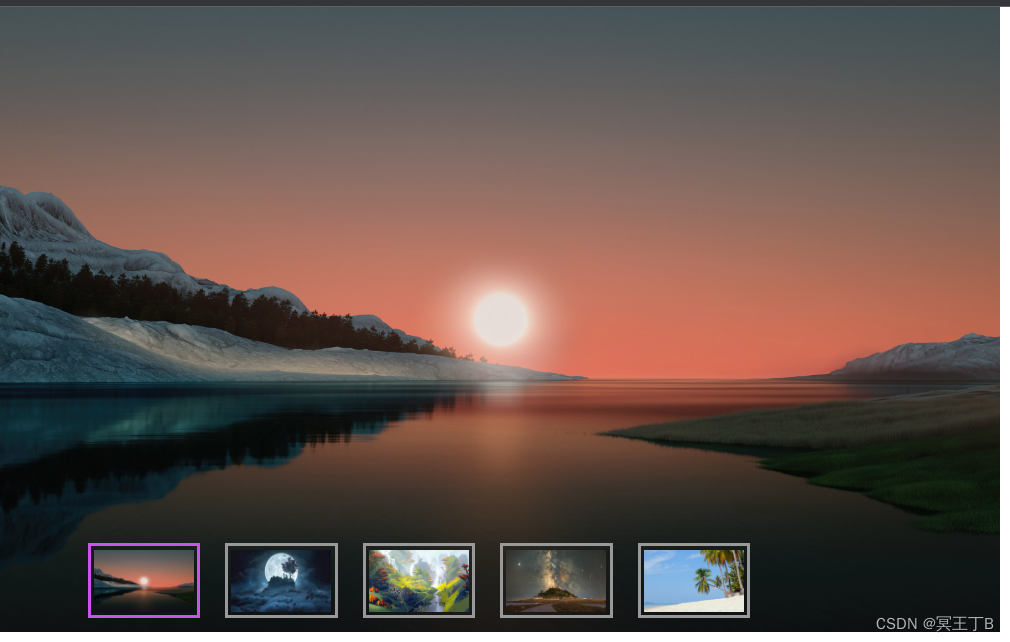
本来按照B站上的视频教程敲了一遍,视频链接:【【前端研究所】前端开发教程-jQuery特效案例精讲- jquery常用焦点轮播图】 https://www.bilibili.com/video/BV1Dt411B72y?share_source=copy_web&vd_source=ecb2eb0190c26c9a8538d087481562ec
敲出来的效果如下
视频中的JS代码
    <script>
        $(function(){
            //arryImgs[ times ]
            var arryImgs = new Array(
                "img/1.png",
                "img/2.png",
                "img/3.png",
                "img/4.png",
                "img/5.png"
            );
            var times = 1;
            function changeImage(){
                if(times==6){
                    times=1;
                }
                $(".btn a").removeClass("active");
                $(".btn a:nth-child("+times+")").addClass("active");
                $(".imgs img").attr("src",arryImgs[times-1]);
                times++;
            }
            var interval = window.setInterval(function(){
                changeImage();
            },2000);
            $(".btn a").each(function(index){
                $(this).hover(function(){
                    $(".btn a").removeClass("active");
                    $(this).addClass("active");
                    clearInterval(interval);
                    $(".imgs img").attr("src",arryImgs[index]);
                    times=index+1;
                },function(){
                    interval = window.setInterval(function(){
                        changeImage();
                    },1000)
                })
            })
            console.log(times);

        })
    </script>
敲完后想要添加上一页 下一页的切换按钮,并将视频中下方缩略图:hover属性改为jQuery的click切换。
我根据自己思路将JS部分代码重新编写了
最终效果
开始的HTML部分比较简单
<div class="slider">
        <!-- 大图 -->
        <div class="imgs">
            <a href="#">
                <img src="img/1.png" width="800" height="500">
            </a>
        </div>
        <!-- 缩略图 -->
        <div class="btn">
            <div id="1" class="xuanzhong"><img src="img/1.png" width="80" height="50"></div>
            <div id="2" class="#"><img src="img/2.png" width="80" height="50"></div>
            <div id="3" class="#"><img src="img/3.png" width="80" height="50"></div>
            <div id="4" class="#"><img src="img/4.png" width="80" height="50"></div>
            <div id="5" class="#"><img src="img/5.png" width="80" height="50"></div>
        </div>
        <div class="prve">◀</div>
        <div class="next">▶</div>
    </div>
css部分 可以自行修改
*{
    margin: 0;
    padding: 0;
}
.sloder{
    height: 500px;
    border-bottom: 1px solid #666;
    box-shadow: 3px 4px #333;
}
.btn{
    position: absolute;
    display: flex;
    width: 80px;
    height: 50px;
    margin-top: -70px;
    margin-left: 60px;
    align-items: center;
}
.btn div{
    height: 50px;
    margin: 10px;
    padding: 2px;
    border: 3px solid #999;
    float: left;
}
div.xuanzhong{
    border-color: rgb(200, 84, 235);
}
.prve{
    background-color: rgb(255, 255, 255, 0.5);
    width: 40px;
    height: 40px;
    border-radius: 50%;
    color: #fff;
    text-align: center;
    line-height: 40px;
    position: absolute;
    margin-top: -280px;
    cursor: pointer;
}
.next{
    background-color: rgb(255, 255, 255, 0.5);
    width: 40px;
    height: 40px;
    border-radius: 50%;
    color: #fff;
    text-align: center;
    line-height: 40px;
    position: absolute;
    cursor: pointer;
    margin-top: -280px;
    margin-left: 759px;
}
JS部分代码
我的思路是 无论是自动切换还是点击缩略图或者左右两个切换按钮,都将其转换为i的变换,将操作后的 i 传入切换代码,每进行一次操作,都将产生的 i 放入函数中运行,来达到转换图片的效果
$(function(){
            //arryImgs[ times ] 将图片地址存入数组中
            var arryImgs = new Array(
                "img/1.png",
                "img/2.png",
                "img/3.png",
                "img/4.png",
                "img/5.png"
            );
            // 大图切换函数
            function qiehuan(num){
                $(".imgs img").attr("src",arryImgs[num-1]);
            }
            //缩略图切换
            function xqiehuan(num) {
                $(".btn div").each(function(index){
                        $(".btn div").removeClass("xuanzhong");
                    })
            $(".btn div:nth-child("+i+")").addClass("xuanzhong");
            }

            $(".btn div").each(function(index){
                        $(".btn div").removeClass("xuanzhong");
                    })
            //点击缩略图函数
            dianji();
            var i =0;
            function dianji(){

                $(".btn div").click(function() {
                    $(".btn div").each(function(index){
                        $(".btn div").removeClass("xuanzhong");
                    })
                    $(this).addClass("xuanzhong")
                    i = $(this).attr("id");
                    console.log(i);
                    qiehuan($(this).attr("id"));
            })
        }

        //自动切换
        function run(){
            if(i<5){
                    i++
                }else{
                    i=1;
                }
                qiehuan(i);
                xqiehuan(i);
        }
        var interval = window.setInterval(function(){
                run()
            },2000);
        // 上一页
        $(".prve").click(function(){
            if(i<1){
                i=4;
            }else{
                i--
            }
            console.log(i);
            run();
            i--;
        })
        // 下一页
        $(".next").click(function(){
            if(i>4){
                i=0;
            }else{
                i++
            }
            console.log(i);
            run();
            i--;
        })
            //鼠标移入关闭定时器
            $('.slider').mouseover(function() {
                    clearInterval(interval);
                })
            //鼠标离开继续定时器
            $('.slider').mouseout(function() {
                clearInterval(interval); //定时器先清后开
                interval = setInterval(function() {
                    run();
                }, 2000);
            })
        })
总的代码如下:
<!DOCTYPE html>
<html lang="en">
<head>
    <meta charset="UTF-8">
    <meta http-equiv="X-UA-Compatible" content="IE=edge">
    <meta name="viewport" content="width=device-width, initial-scale=1.0">
    <title>Document</title>
    <style>
        *{
        margin: 0;
    padding: 0;
}
.sloder{
    height: 500px;
    border-bottom: 1px solid #666;
    box-shadow: 3px 4px #333;
}
.btn{
    position: absolute;
    display: flex;
    width: 80px;
    height: 50px;
    margin-top: -70px;
    margin-left: 60px;
    align-items: center;
}
.btn div{
    height: 50px;
    margin: 10px;
    padding: 2px;
    border: 3px solid #999;
    float: left;
}
div.xuanzhong{
    border-color: rgb(200, 84, 235);
}
.prve{
    background-color: rgb(255, 255, 255, 0.5);
    width: 40px;
    height: 40px;
    border-radius: 50%;
    color: #fff;
    text-align: center;
    line-height: 40px;
    position: absolute;
    margin-top: -280px;
    cursor: pointer;
}
.next{
    background-color: rgb(255, 255, 255, 0.5);
    width: 40px;
    height: 40px;
    border-radius: 50%;
    color: #fff;
    text-align: center;
    line-height: 40px;
    position: absolute;
    cursor: pointer;
    margin-top: -280px;
    margin-left: 759px;
}
    </style>
    <script src="jquery-3.6.0.js"></script>
</head>
<body>
    <div class="slider">
        <!-- 大图 -->
        <div class="imgs">
            <a href="#">
                <img src="img/1.png" width="800" height="500">
            </a>
        </div>
        <!-- 缩略图 -->
        <div class="btn">
            <div id="1" class="xuanzhong"><img src="img/1.png" width="80" height="50"></div>
            <div id="2" class="#"><img src="img/2.png" width="80" height="50"></div>
            <div id="3" class="#"><img src="img/3.png" width="80" height="50"></div>
            <div id="4" class="#"><img src="img/4.png" width="80" height="50"></div>
            <div id="5" class="#"><img src="img/5.png" width="80" height="50"></div>
        </div>
        <div class="prve">◀</div>
        <div class="next">▶</div>
    </div>
    <script>
        $(function(){
            //arryImgs[ times ]
            var arryImgs = new Array(
                "img/1.png",
                "img/2.png",
                "img/3.png",
                "img/4.png",
                "img/5.png"
            );
            // 大图切换
            function qiehuan(num){
                $(".imgs img").attr("src",arryImgs[num-1]);
            }
            //缩略图切换
            function xqiehuan(num) {
                $(".btn div").each(function(index){
                        $(".btn div").removeClass("xuanzhong");
                    })
            $(".btn div:nth-child("+i+")").addClass("xuanzhong");

            }

            $(".btn div").each(function(index){
                        $(".btn div").removeClass("xuanzhong");
                    })
            //点击缩略图函数
            dianji();
            var i =0;
            function dianji(){

                $(".btn div").click(function() {
                    $(".btn div").each(function(index){
                        $(".btn div").removeClass("xuanzhong");
                    })
                    $(this).addClass("xuanzhong")
                    i = $(this).attr("id");
                    console.log(i);
                    qiehuan($(this).attr("id"));
            })
        }

        //自动切换
        function run(){
            if(i<5){
                    i++
                }else{
                    i=1;
                }
                qiehuan(i);
                xqiehuan(i);
        }
        var interval = window.setInterval(function(){
                run()
            },2000);
        // 上一页
        $(".prve").click(function(){
            if(i<1){
                i=4;
            }else{
                i--
            }
            console.log(i);
            run();
            i--;
        })
        // 下一页
        $(".next").click(function(){
            if(i>4){
                i=0;
            }else{
                i++
            }
            console.log(i);
            run();
            i--;
        })
            //鼠标移入关闭定时器
            $('.slider').mouseover(function() {
                    clearInterval(interval);
                })
            //鼠标离开继续定时器
            $('.slider').mouseout(function() {
                clearInterval(interval); //定时器先清后开
                interval = setInterval(function() {
                    run();
                }, 2000);
            })
        })

    </script>
</body>
</html>
最后
以上就是俊逸皮卡丘最近收集整理的关于HTML+css+jQuery轮播图修改思路以及过程的全部内容,更多相关HTML+css+jQuery轮播图修改思路以及过程内容请搜索靠谱客的其他文章。
本图文内容来源于网友提供,作为学习参考使用,或来自网络收集整理,版权属于原作者所有。


发表评论 取消回复