构建一个简单的CNN卷积神经网络——手写体数字识别(通过摄像头测试)
文章目录
- 构建一个简单的CNN卷积神经网络——手写体数字识别(通过摄像头测试)
- 前言
- 1.构建一个卷积层
- 2.在类里面使用函数堆积一个卷积层
- 3.构建一个简单的卷积网络
- 总结
前言
从简单学起,,,
1.构建一个卷积层
Conv2d
import torch

input=torch.randn(1,5,100,100)
juanji=torch.nn.Conv2d(5,10,kernel_size=3)
output=juanji(input)
print(input.shape)
print(output.shape)
print(juanji.weight.shape)#卷积层权重的形状
torch.Size([1, 5, 100, 100])
torch.Size([1, 10, 98, 98])
torch.Size([10, 5, 3, 3])
MaxPool2d
import torch
input=[3,4,6,5,2,4,6,8,1,6,7,8,9,7,4,6]
input=torch.Tensor(input).view(1,1,4,4)
maxpooling_layer=torch.nn.MaxPool2d(kernel_size=2)#相当于步长为2
output=maxpooling_layer(input)
print(input)
print(output)
2.在类里面使用函数堆积一个卷积层
# 导入用到的包
import math
from collections import OrderedDict
import torch.nn as nn

#   主干网络 类
class DarkNet(nn.Module):
    # 初始化  最先执行
    def __init__(self):
        super(DarkNet, self).__init__()
        #调用这个函数  跟类的实例化一样
        self.layer1 = self._make_layer([32, 64])

    # --------------------------------------------------------------------- #
    #   定义的函数层  给主干网络类实例化时调用
    # --------------------------------------------------------------------- #
    def _make_layer(self, planes):
        layers = []  # 创建一个空的网络层数组
        # 下采样,步长为2,卷积核大小为3
        # 在网络层数组里添加 3*3卷积层 详解看上面
        # 下行代码参数的解释   32*3*3卷积
        # 参数:in 输入通道数  out 输出通道数  卷积核大小 、步长 、填充  无偏置
        layers.append(("ds_conv", nn.Conv2d(inplanes, planes, kernel_size=3, stride=2, padding=1, bias=False)))
        # 在网络层数组后面添加 标准化
        # 参数:out
        layers.append(("ds_bn", nn.BatchNorm2d(planes)))
        # 在网络层数组后面添加 LeakyReLU激活函数
        # 0.1为x为负数时的需要的一个系数,控制负斜率的角度
        layers.append(("ds_relu", nn.LeakyReLU(0.1)))
        # OrderedDict 中是按照 添加顺序存储的有序字典 ;
        # Sequential 会将这些模块组成一个流水线,输入将依次通过这些模块得到一个输出。
        # 最后返回这个残差层
        return nn.Sequential(OrderedDict(layers))
    # 主干网络的前向传播  初始化后执行
    def forward(self, x):
        x = self.layer1(x)
        return x

# 定义 darknet53 函数 实例化DarkNet 类 传入参数
def darknet53():
    model = DarkNet()
    return model  # 返回模型
3.构建一个简单的卷积网络
先跑完训练部分,再跑测试部分。
手写体识别——CNN训练部分
import torch
from torch.utils.data import DataLoader
from torchvision import datasets
from torchvision import transforms
import torch.nn.functional as F
import matplotlib.pyplot as plt
import numpy as np
import os  # 添加代码①
os.environ["KMP_DUPLICATE_LIB_OK"] = "TRUE"  # 添加代码②

batch_size = 256    #设置batch大小

transform = transforms.Compose([
    transforms.ToTensor(),                        #转换为张量
    transforms.Normalize((0.1307,), (0.3081,))    #设定标准化值
])
#训练集
train_dataset = datasets.MNIST( root='../data/mnist',train=True,transform=transform,download=True)
#测试集
test_dataset = datasets.MNIST(root='../data/mnist',train=False,transform=transform,download=True)
#训练集加载器
train_loader = DataLoader(dataset=train_dataset,batch_size=batch_size,shuffle=True)
#测试集加载器
test_loader = DataLoader(dataset=test_dataset, batch_size=batch_size, shuffle=False)

# 设计模型   CNN
class CNN(torch.nn.Module):
    def __init__(self):
        super(CNN, self).__init__()
        self.conv1 = torch.nn.Conv2d(1, 10, kernel_size=(5,5))      #卷积层1
        self.conv2 = torch.nn.Conv2d(10, 20, kernel_size=(5,5))     #卷积层2
        self.pooling = torch.nn.MaxPool2d(2)                        #池化层
        self.fc1 = torch.nn.Linear(320, 256)                #全连接层1
        self.fc2 = torch.nn.Linear(256, 128)                #全连接层2
        self.fc3 = torch.nn.Linear(128, 10)                 #全连接层3

    def forward(self, x):
        # x.shape = 256*1*28*28
        batch_size = x.size(0)   # 256
        # 1*28*28 -> 10*24*24 -> 10*12*12
        x = F.relu(self.pooling(self.conv1(x)))    #卷积层1->池化层->激活函数Relu
        # 10*12*12-> 20*8*8 ->20*4*4
        x = F.relu(self.pooling(self.conv2(x)))    #卷积层2->池化层->激活函数Relu
        # 20*4*4 -> 320
        x = x.view(batch_size, -1)        #改变张量的维度
        # 320 -> 256
        x = self.fc1(x)            #全连接层1
        # 256 -> 128
        x = self.fc2(x)            #全连接层2
        # 128 ->10
        x = self.fc3(x)            #全连接层3
        return x

model = CNN()    #实例化()模型为model

device=torch.device("cuda:0"if torch.cuda.is_available()else"cpu")#使用GPU进行计算
model.to(device)#把model模型传入GPU

# 构造损失函数和优化函数
# 损失
criterion = torch.nn.CrossEntropyLoss()
# 优化
optimizer = torch.optim.SGD(model.parameters(), lr=0.1, momentum=0.5)

def train(epoch):
    running_loss = 0.0        #每一轮训练重新记录损失值
    for batch_idx, data in enumerate(train_loader, 0):    #提取训练集中每一个样本
        inputs, target = data
        inputs, target = inputs.to(device), target.to(device)  # 这里的数据(原数据)也要迁移到GPU
        # outputs输出为0-9的概率  256*10
        outputs = model(inputs)              #代入模型
        loss = criterion(outputs, target)    #计算损失值
        loss.backward()                      #反向传播计算得到每个参数的梯度值
        optimizer.step()                     #梯度下降参数更新
        optimizer.zero_grad()                #将梯度归零
        running_loss += loss.item()          #损失值累加

        if batch_idx % 300 == 299:           #每300个样本输出一下结果
            print('[%d,%5d] loss: %.3f' % (epoch + 1, batch_idx + 1, running_loss / 300))
            running_loss = 0.0          # (训练轮次,  该轮的样本次,  平均损失值)
    return running_loss

def test():
    correct = 0
    total = 0
    with torch.no_grad():            #执行计算,但不希望在反向传播中被记录
        for data in test_loader:     #提取测试集中每一个样本
            images, labels = data
            images, labels = images.to(device), labels.to(device)# 这里的数据(原数据)也要迁移到GPU
            # outputs输出为0-9的概率  256*10
            outputs = model(images)  #带入模型
            # torch.max()这个函数返回的是两个值,第一个值是具体的value(我们用下划线_表示)
            # 第二个值是value所在的index(也就是predicted)
            _, pred = torch.max(outputs.data, dim=1)    #获得结果中的最大值
            total += labels.size(0)                     #测试数++
            correct += (pred == labels).sum().item()    #将预测结果pred与标签labels对比,相同则正确数++
        print('%d %%' % (100 * correct / total))    #输出正确率


if __name__ == '__main__':
    # 这两个数组主要是为了画图
    lossy = []        #定义存放纵轴数据(损失值)的列表
    epochx = []       #定义存放横轴数据(训练轮数)的列表

    for epoch in range(1):    #训练10轮
        epochx.append(epoch)   #将本轮轮次存入epochy列表
        lossy.append(train(epoch))  #执行训练,将返回值loss存入lossy列表
        test()                 #每轮训练完都测试一下正确率
    path = "D:/code/text/model1.pth"
    #torch.save(model,path)
    torch.save(model.state_dict(),path)   # 保存模型
    model = torch.load("D:/code/text/model1.pth")  # 加载模型

    #可视化一下训练过程
    plt.plot(epochx, lossy)
    plt.grid()
    plt.show()
手写体识别——摄像头测试部分
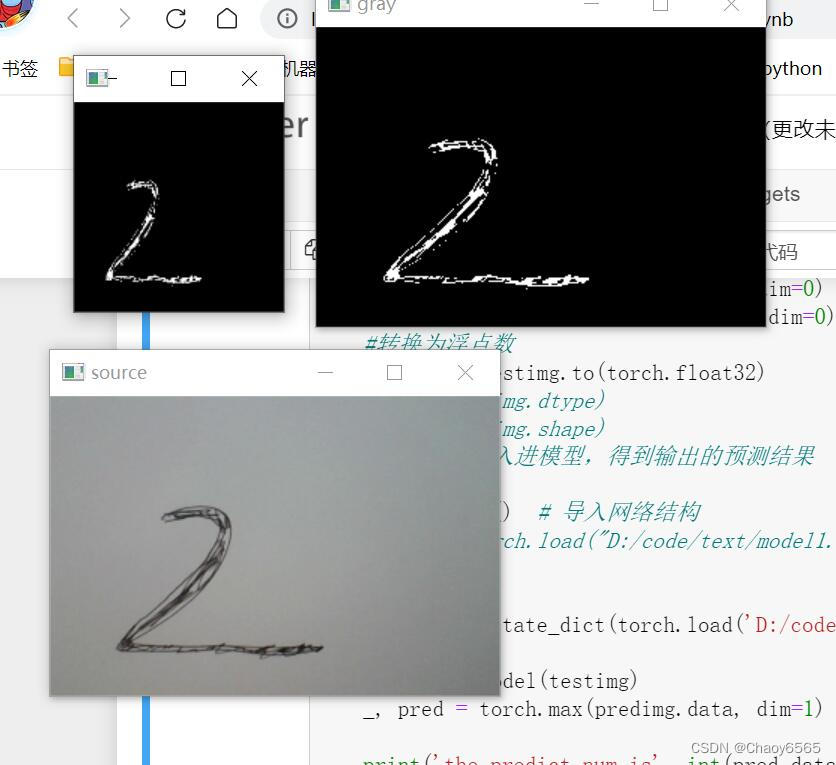
import cv2
import os
import torch

#1.调用摄像头,拿出每一帧
#cap =cv2.VideoCapture(0,cv2.CAP_DSHOW)
cap = cv2.VideoCapture(0)    #定义视频来源为摄像头
while 1:
    ret, frame = cap.read()  # 摄像头读取,ret为是否读取成功,frame为视频的每一帧图像

    #展示原图像
    frame = cv2.resize(frame, (300, 200))
    cv2.imshow("source", frame)

    #展示灰度,二值化后图像
    frame = cv2.cvtColor(frame, cv2.COLOR_RGB2GRAY)    #灰度化
    res, frame = cv2.threshold(frame, 90, 255, cv2.THRESH_BINARY_INV)   #反向二值化
    cv2.imshow("gray", frame)

    #展示输入模型的图像(方形)
    frame = cv2.resize(frame, (140, 140))
    cv2.imshow("28*28", frame)
    cv2.waitKey(100)       #延时,控制帧率

    frame = cv2.resize(frame, (28, 28))    #转换成28*28大小

    frame= torch.from_numpy(frame)  # 转tensor

    #两次升维,使其能送入模型
    testimg = torch.unsqueeze(frame , dim=0)
    testimg = torch.unsqueeze(testimg, dim=0)
    #转换为浮点数
    testimg = testimg.to(torch.float32)
 # 2.将每一帧输入进模型,得到输出的预测结果
    # 加载模型


    #model = torch.load("D:/code/text/model1.pth")    # 报错
    # 解决pytorch加载模型报错TypeError: ‘collections.OrderedDict‘ object is not callable
    # 错误原因:之前保存网络时用的方法是torch.save(model, 'Nei.pkl'),这样保存下来的Net.pkl是一个状态字典,而不是模型本身,
    # 也就是说Net.pkl中保存的只是网络的参数,而没有网络结构。

    model = CNN()  # 导入网络结构
    model.load_state_dict(torch.load('D:/code/text/model1.pth')) # 导入网络的参数

    predimg = model(testimg)                           #进行预测
    _, pred = torch.max(predimg.data, dim=1)           #获得最大值

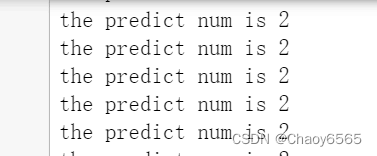
    print('the predict num is', int(pred.data[0]))     #输出结果
输出结果:


代码注释很详细,这里就不进行讲解了。
总结
未完待续,,,
最后
以上就是调皮夕阳最近收集整理的关于构建一个简单的卷积神经网络——手写体识别(通过摄像头测试)构建一个简单的卷积神经网络——手写体识别总结的全部内容,更多相关构建一个简单内容请搜索靠谱客的其他文章。
本图文内容来源于网友提供,作为学习参考使用,或来自网络收集整理,版权属于原作者所有。


![mmClassification学习笔记前言mmcv安装mmcv库文件夹架构mmcv概要mmcvclassification文件夹官方给的demo[只是一个模型推理]根据官方教程进行学习](https://www.shuijiaxian.com/files_image/reation/bcimg7.png)


发表评论 取消回复