玩人脸识别的同学应该知道于仕琪老师主导的人脸识别开源项目libfacedetection, 相比传统的Haar特征级联,利用CNN训练的人脸识别模型能够更准确,更高效的检测到人脸位置。原来用过这个项目做人脸识别,但是经过一段时间,实在找不到相关的程序了,最近就开始尝试重新配置项目到VS2019上。本篇博客就来介绍一下具体的配置细节。
1. Cmake编译
首先需要在github上下载libfacedetection项目,链接如下:https://github.com/ShiqiYu/libfacedetection
下载后,使用cmake进行编译,具体如下所示,首先打开cmake,配置好相关路径。

配置完成后,如下图:
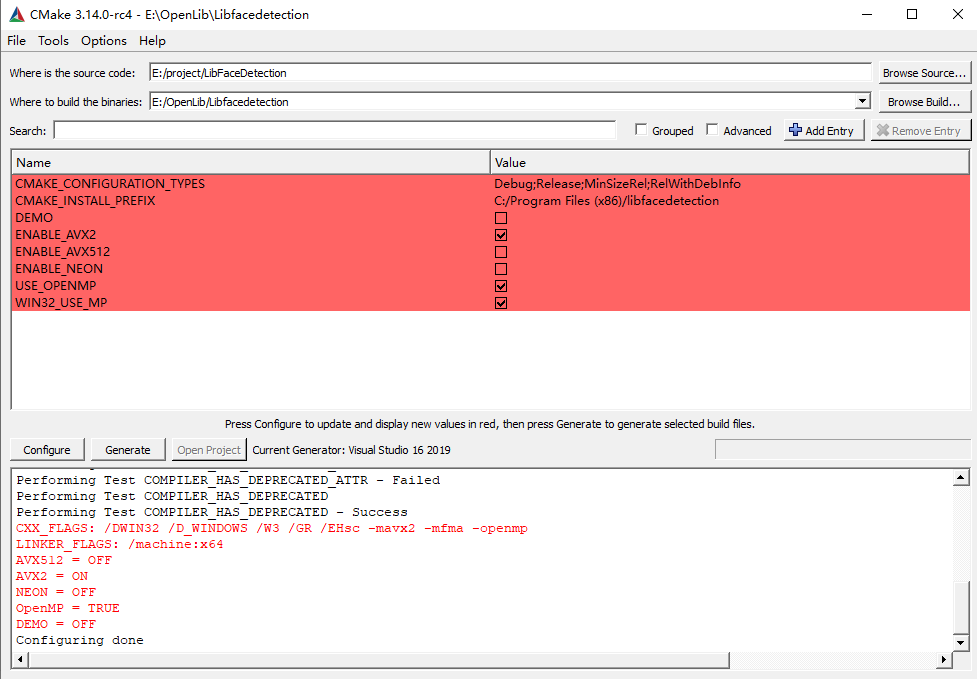
红色的报警不用管,直接点生成,就可以得到目标路径的相关文件,如下:

选择libfacedetection.sln,build ALL_BUILD,以获得Lib文件,见下图:

Build后,得到如下文件:

将facedetection_export.h文件拷贝到github下载文件路径中的src文件夹,将debug目录下的facedetection.lib拷贝到你希望存储的库目录下。到此,对源项目的编译完成。
2. VS配置
新建一个VS空项目

首先配置好opencv,我是用的是3.4.6版本。配置方法在此不再赘述。
配置好opencv后,开始配置libfacedetection, VC++->include->

Libiary->

这里,我没有动lib的位置,如果你把lib移动到你定义的库目录,那这里写你的库目录地址。
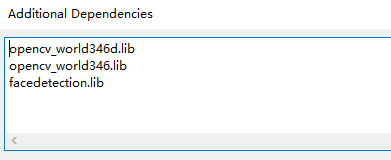
Linker->Input->
之后再项目中的头文件添加:

需要注意的是facedetection_export.h要和facedetectcnn.h放在一个目录下。在之前我们已经把facedetection_export.h放在src中。我试过不动文件位置,但是编译不识别。至此,全部配置完成。我们接下来试一段代码。
3. 代码示例
#pragma once
#include <iostream>
#include <opencv2/opencv.hpp>
#include <opencv2/core/core.hpp>
#include <opencv2/highgui/highgui.hpp>
#include "facedetectcnn.h"
#define DETECT_BUFFER_SIZE 0x20000
using namespace cv;

int main()
{

    string imagePath = "D:/instance.jpg";
    //load an image and convert it to gray (single-channel)
    Mat image = imread(imagePath);
    if (image.empty())
    {
        fprintf(stderr, "Can not load the image file %s.n", argv[1]);
        return -1;
    }

    int* pResults = NULL;
    //pBuffer is used in the detection functions.
    //If you call functions in multiple threads, please create one buffer for each thread!
    unsigned char* pBuffer = (unsigned char*)malloc(DETECT_BUFFER_SIZE);
    if (!pBuffer)
    {
        fprintf(stderr, "Can not alloc buffer.n");
        return -1;
    }


    ///
    // CNN face detection
    // Best detection rate
    //
    //!!! The input image must be a BGR one (three-channel) instead of RGB
    //!!! DO NOT RELEASE pResults !!!
    TickMeter cvtm;
    cvtm.start();

    pResults = facedetect_cnn(pBuffer, (unsigned char*)(image.ptr(0)), image.cols, image.rows, (int)image.step);

    cvtm.stop();
    printf("time = %gmsn", cvtm.getTimeMilli());

    printf("%d faces detected.n", (pResults ? *pResults : 0));
    Mat result_image = image.clone();
    //print the detection results
    for (int i = 0; i < (pResults ? *pResults : 0); i++)
    {
        short* p = ((short*)(pResults + 1)) + 142 * i;
        int confidence = p[0];
        int x = p[1];
        int y = p[2];
        int w = p[3];
        int h = p[4];

        //show the score of the face. Its range is [0-100]
        char sScore[256];
        snprintf(sScore, 256, "%d", confidence);
        cv::putText(result_image, sScore, cv::Point(x, y - 3), cv::FONT_HERSHEY_SIMPLEX, 0.5, cv::Scalar(0, 255, 0), 1);
        //draw face rectangle
        rectangle(result_image, Rect(x, y, w, h), Scalar(0, 255, 0), 2);
        //draw five face landmarks in different colors
        cv::circle(result_image, cv::Point(p[5], p[5 + 1]), 1, cv::Scalar(255, 0, 0), 2);
        cv::circle(result_image, cv::Point(p[5 + 2], p[5 + 3]), 1, cv::Scalar(0, 0, 255), 2);
        cv::circle(result_image, cv::Point(p[5 + 4], p[5 + 5]), 1, cv::Scalar(0, 255, 0), 2);
        cv::circle(result_image, cv::Point(p[5 + 6], p[5 + 7]), 1, cv::Scalar(255, 0, 255), 2);
        cv::circle(result_image, cv::Point(p[5 + 8], p[5 + 9]), 1, cv::Scalar(0, 255, 255), 2);

        //print the result
        printf("face %d: confidence=%d, [%d, %d, %d, %d] (%d,%d) (%d,%d) (%d,%d) (%d,%d) (%d,%d)n",
            i, confidence, x, y, w, h,
            p[5], p[6], p[7], p[8], p[9], p[10], p[11], p[12], p[13], p[14]);

    }
    imshow("result", result_image);

    waitKey();

    //release the buffer
    free(pBuffer);

    return 0;
}
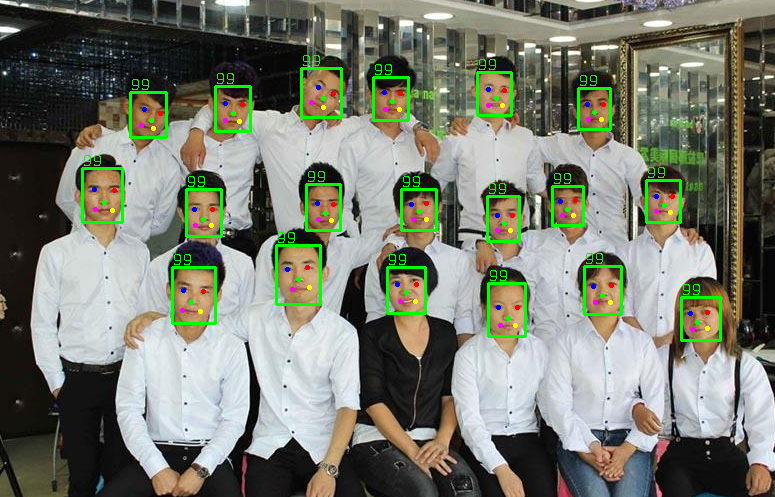
这段代码是example提供的示例代码,输入图片路径到imagePath,最终得到detection的结果。下面展示一个实例。
输入图片:

结果图:
最后
以上就是勤奋未来最近收集整理的关于Libfacedetection项目配置,基于VS2019+OpenCV3.4.61. Cmake编译2. VS配置3. 代码示例的全部内容,更多相关Libfacedetection项目配置,基于VS2019+OpenCV3.4.61.内容请搜索靠谱客的其他文章。

![[OpenCV] cv::VideoCapture中read和grab+retrieve的区别说明:例子:小结:](https://www.shuijiaxian.com/files_image/reation/bcimg13.png)


发表评论 取消回复