系统说明(两个系统数据库用户信息username是同步的,都是唯一的)
- 第三方平台
- 若依系统(ruoyi分离版)
登录需求:
我登录到第三方平台,第三方平台嵌入我们的若依,所以在跳若依的管理页面时不想再登录了。但是验证是需要把第三方平台的token解析成username,拿到username只走我们自己只验证账号的认证。(默认是用户名+密码)
实现构想:
通过前端新加一个页面没有任何样式,只接收第三方平台传来的token,拿到token请求我们自定义的登录controller解析到对应的用户名,直接走用户名认证,认证成功返回生成的jwtToken。前端的新页面拿到请求成功的jwtToken后直接延用原来登录的逻辑跳转到若依的首页!
待优化:
拿到第三方平台的token可以再请求下第三方的接口验证对方的token是否有效。如果该账号在若依不存在可以在请求第三方时 获取对方的账号部门信息新建一个。(是防止对方传过来的token被多次使用,因为双方token过期时间不一致)
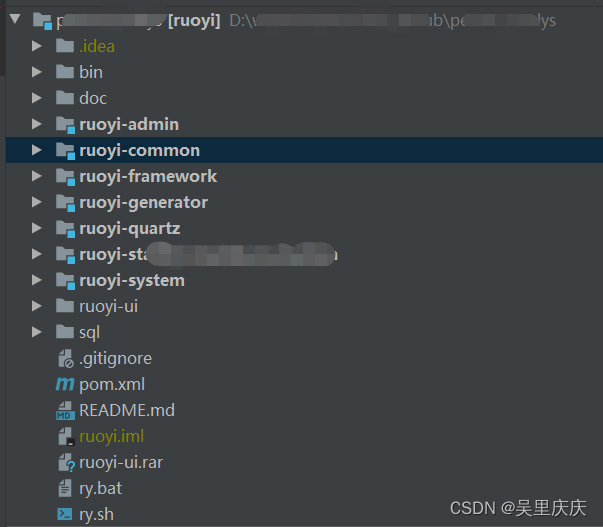
项目目录结构:(给个大概,截图太累了)

代码实现(全部在若依端进行改造)
- login.js中添加 (请求后端接口)
export function ywgllogin(data) {
  return request({
    url: '/ywgllogin',
    method: 'post',
    data: data
  })
}
-
user.js中添加(引用组件,添加方法)

 //ywgl通过它自己的accessToken登录
      YwglLogin({ commit }, data) {

        return new Promise((resolve, reject) => {
          ywgllogin(data).then(res => {
            setToken(res.token)
            commit('SET_TOKEN', res.token)
            resolve()
          }).catch(error => {
            reject(error)
          })
        })
},- index.js中添加
{
        path: '/ywgllogin',
        component: () =>
            import ('@/views/ywgllogin'),
        hidden: true
},- views下面同原来login.vue同级新建ywgllogin.vue
<template>
  <div>ywgl跳转登录中...</div>
</template>

<script>
export default {
  name: "YwglLogin",
  data() {
    return {
      loginRules: {},
      loginForm: {
        username: "",
        password: "",
        rememberMe: false,
        code: "",
        uuid: "",
      },
      loading: false,
      // 验证码开关
      captchaOnOff: true,
      // 注册开关
      register: false,
      redirect: undefined,
    };
  },
  watch: {
    $route: {
      handler: function (route) {
        this.redirect = route.query && route.query.redirect;
      },
      immediate: true,
    },
  },
  created() {
    //平台单独的登录  2022年4月19日11:23:58
    this.getLoginByNameAndTokenJ();
  },
  methods: {
    /**
     * 三方平台单点登陆系统 2022年4月19日11:22:33
     * 只传递token
     */
    getLoginByNameAndTokenJ() {
      //获取地址栏中的token
      var accessToken = this.$route.query.accessToken;
      //调用登录的接口
      if (accessToken == "" || accessToken == undefined || accessToken == null) {
        //不是那边系统过来的,不走这个地方(阻止created的方法继续向下走)
        this.$message.error("用户token为空");
      } else {
        //转圈圈,不要看到登陆页面,无感体验
        this.loading = true;
        var logininfo = {
            accessToken: accessToken,
        };

        //执行另一套登录操作
        //不是本系统的用户,去J平台登陆去
        this.$store
          .dispatch("YwglLogin", logininfo)
          .then(() => {
            //this.$message.success("登录成功");
            this.loading = false;
            this.$router.push({ path: this.redirect || "/" }).catch(() => {});
          })
          .catch((err) => {
            console.log("有异常信息", err);
            //异常信息
            this.loading = false;
            // if (this.captchaOnOff) {
            //   this.getCode();
            // }
          });


      }
    },
  },
};
</script>

<style rel="stylesheet/scss" lang="scss">
</style>
- permission.js添加白名单放行(两处)
const whiteList = ['/ywgllogin','/login', '/auth-redirect', '/bind', '/register']
if (to.path === '/login'||to.path === '/ywgllogin') {
- 后端登录新接口(controller)
package com.ruoyi.web.controller.system;

import com.ruoyi.common.constant.Constants;
import com.ruoyi.common.core.domain.AjaxResult;
import com.ruoyi.common.core.domain.model.LoginBody;
import com.ruoyi.common.utils.StringUtils;
import com.ruoyi.framework.web.service.YwglTokenService;
import com.ruoyi.system.service.ISysUserService;
import org.springframework.beans.factory.annotation.Autowired;
import org.springframework.web.bind.annotation.PostMapping;
import org.springframework.web.bind.annotation.RequestBody;
import org.springframework.web.bind.annotation.RestController;


/**
 * 登录验证
 *
 * @author qwu
 */
@RestController
public class YwglAccessTokenLoginController {


    @Autowired
    private ISysUserService sysUserService;
    @Autowired
    private YwglTokenService ywglTokenService;

    /**
     * 登录方法
     *
     * @return 结果
     */
    @PostMapping("/ywgllogin")
    public AjaxResult ywgllogin(@RequestBody LoginBody loginBody) {

        String accessToken = loginBody.getAccessToken();
        if (StringUtils.isNotEmpty(accessToken)) {
            String tokenNew = ywglTokenService.ywglLogin(accessToken);
            AjaxResult ajax = AjaxResult.success();
            ajax.put(Constants.TOKEN, tokenNew);
            return ajax;

        } else {
            return AjaxResult.error();
        }


    }


}
注意:LoginBody新增变量accessToken
- service添加登录验证走自己的
 public String ywglLogin(String accessToken)
    {
        // 用户验证
        Authentication authentication = null;
        String username =accessToken;
        try
        {
            username="这里填自己如何解析我们第三方传来的accessToken变成系统的username这里我就省略了";
            authentication = authenticationManager
                    .authenticate(new YwglAuthenticationToken(username));
        }
        catch (Exception e)
        {
            if (e instanceof BadCredentialsException)
            {
                AsyncManager.me().execute(AsyncFactory.recordLogininfor(username, Constants.LOGIN_FAIL, MessageUtils.message("user.password.not.match")));
                throw new UserPasswordNotMatchException();
            }
            else
            {
                AsyncManager.me().execute(AsyncFactory.recordLogininfor(username, Constants.LOGIN_FAIL, e.getMessage()));
                throw new ServiceException(e.getMessage());
            }
        }
        AsyncManager.me().execute(AsyncFactory.recordLogininfor(username, Constants.LOGIN_SUCCESS, MessageUtils.message("user.login.success")));
        LoginUser loginUser = (LoginUser) authentication.getPrincipal();
        recordLoginInfo(loginUser.getUserId());
        // 生成token
        return tokenService.createToken(loginUser);
}- 添加自定义认证 YwglAuthenticationToken
package com.ruoyi.framework.ywglsecurity;

import org.springframework.security.authentication.AbstractAuthenticationToken;
import org.springframework.security.core.GrantedAuthority;

import java.util.Collection;

public class YwglAuthenticationToken extends AbstractAuthenticationToken {

    private final Object principal;

    public YwglAuthenticationToken(Object principal) {
        super(null);
        this.principal = principal;
        this.setAuthenticated(false);
    }

    public YwglAuthenticationToken(Object principal, Collection<? extends GrantedAuthority> authorities) {
        super(authorities);
        this.principal = principal;
        super.setAuthenticated(true);
    }

    @Override
    public Object getCredentials() {
        return null;
    }

    @Override
    public Object getPrincipal() {
        return this.principal;
    }

    @Override
    public void setAuthenticated(boolean isAuthenticated) throws IllegalArgumentException {
        if (isAuthenticated) {
            throw new IllegalArgumentException(
                    "Cannot set this token to trusted - use constructor which takes a GrantedAuthority list instead");
        }

        super.setAuthenticated(false);
    }

    @Override
    public void eraseCredentials() {
        super.eraseCredentials();
    }
}
- 添加 YwglAuthenticationProvider
package com.ruoyi.framework.ywglsecurity;

import com.ruoyi.framework.web.service.UserDetailsServiceImpl;
import org.springframework.beans.factory.annotation.Autowired;
import org.springframework.security.authentication.AuthenticationProvider;
import org.springframework.security.core.Authentication;
import org.springframework.security.core.AuthenticationException;
import org.springframework.security.core.userdetails.UserDetails;
import org.springframework.stereotype.Component;

import java.util.Collections;

@Component
public class YwglAuthenticationProvider   implements AuthenticationProvider {
    @Autowired
    private UserDetailsServiceImpl userDetailsService;

    /**
     * 认证逻辑
     */
    @Override
    public Authentication authenticate(Authentication authentication) throws AuthenticationException {
        YwglAuthenticationToken ywglAuthenticationToken = (YwglAuthenticationToken) authentication;

        String username = (String) ywglAuthenticationToken.getPrincipal();
        UserDetails user = userDetailsService.loadUserByUsername(username);
        YwglAuthenticationToken result = new YwglAuthenticationToken(user, Collections.emptyList());
        /*
        Details 中包含了 ip地址、 sessionId 等等属性 也可以存储一些自己想要放进去的内容
        */
        result.setDetails(ywglAuthenticationToken.getDetails());
        return result;
    }

    /**
     *UserIdAuthenticationToken交给UserIdAuthenticationProvider处理
     * @param aClass
     * @return
     */
    @Override
    public boolean supports(Class<?> aClass) {
        return YwglAuthenticationToken.class.isAssignableFrom(aClass);

    }
}
- 修改SecurityConfig 放行我们的请求登录路径 并把自定义认证加进来
.antMatchers("/hello","/ywgllogin","/login", "/register", "/captchaImage").anonymous()
@Override
protected void configure(AuthenticationManagerBuilder auth) throws Exception
{
    auth.userDetailsService(userDetailsService).passwordEncoder(bCryptPasswordEncoder());
    auth.authenticationProvider(ywglAuthenticationProvider);
}
主要参考:
若依 Spring Security 自定义认证集成_高德新的博客-CSDN博客_若依 认证
若依实现系统单点登录(可绕过验证码)_穆雄雄的博客-CSDN博客
最后
以上就是尊敬大炮最近收集整理的关于若依ruoyi实现单点登录的全部内容,更多相关若依ruoyi实现单点登录内容请搜索靠谱客的其他文章。
本图文内容来源于网友提供,作为学习参考使用,或来自网络收集整理,版权属于原作者所有。


发表评论 取消回复