本系列教程包括:
IOT云平台 simple(0)IOT云平台简介
IOT云平台 simple(1)netty入门
IOT云平台 simple(2)springboot入门
IOT云平台 simple(3)springboot netty实现TCP Server
IOT云平台 simple(4)springboot netty实现简单的mqtt broker
IOT云平台 simple(5)springboot netty实现modbus TCP Master
IOT云平台 simple(6)springboot netty实现IOT云平台基本的架构(mqtt、Rabbitmq)
前提:安装软件:串口网络调试助手
本章首先本地建立TCP Server,用串口网络调试助手模拟终端设备与Server进行通信。

server:springboot+netty
client:串口网络调试助手
1 集成开发
第1步:引入POM文件:
        <dependency>
            <groupId>io.netty</groupId>
            <artifactId>netty-all</artifactId>
            <version>4.1.20.Final</version>
        </dependency>
创建主要的类:
1) TCPServerHandler:
server channel处理的类;
2 )TCPServerChannelInitializer
server channel初始化的类
3)TCPServer
server类。
4)TCPServerStartListener :监听到springboot启动后,启动netty Server。
1.1 server channel的处理
@Component
@Slf4j
public class TCPServerHandler extends ChannelInboundHandlerAdapter {
    public ChannelGroup clients = new DefaultChannelGroup(GlobalEventExecutor.INSTANCE);
    @Override
    public void channelRead(ChannelHandlerContext ctx, Object msg) throws Exception {
        //从 channel  中取到msg  转换为buf
        ByteBuf byteBuf = (ByteBuf) msg;
        try {
            log.info("终端IP:" + ctx.channel().remoteAddress());
            log.info("收到数据:" + byteBuf.toString(CharsetUtil.UTF_8));

            ctx.channel().eventLoop().execute(new Runnable() {
                @Override
                public void run() {
                    try {
                        Thread.sleep( 1000);
                        String resStr = "01 03 00 02 00 23 A5 D3";
                        ctx.writeAndFlush(Unpooled.copiedBuffer(resStr, CharsetUtil.UTF_8));
                    }catch (Exception e){
                        e.printStackTrace();
                    }
                }
            });
        } catch (Exception e) {
            e.printStackTrace();
        }
    }

    @Override
    public void exceptionCaught(ChannelHandlerContext ctx, Throwable cause) { // (4)
        // 当出现异常就关闭连接
        cause.printStackTrace();
        ctx.close();
    }
}
1.2 server channel的初始化
@Component
public class TCPServerChannelInitializer extends ChannelInitializer {

    @Resource
    TCPServerHandler tcpServerHandler;

    protected void initChannel(Channel channel) throws Exception {
//        //心跳超时控制
        channel.pipeline().addLast("idle",
                new IdleStateHandler(15, 0, 0, TimeUnit.MINUTES));

        channel.pipeline().addLast(tcpServerHandler);
    }
}
1.3 创建TCP server
@Slf4j
@Component
public class TCPServer {
    @Value("${netty.port:8082}")
    private int port;
    @Value("${netty.bossThreadNum:1}")
    private int bossThreadNum;

    @Resource
    private TCPServerChannelInitializer TCPServerChannelInitializer;

    // 多线程事件循环器:接收的连接
    private EventLoopGroup bossGroup;
    // 实际工作的线程组 多线程事件循环器:处理已经被接收的连接
    private EventLoopGroup workGroup;
    private ChannelFuture channelFuture;

    public TCPServer() {
    }

    public void start() {
        log.info("TCPServer start:" + port);
        bossGroup = new NioEventLoopGroup(this.bossThreadNum);
        workGroup = new NioEventLoopGroup();

        try {
            ServerBootstrap serverBootstrap = new ServerBootstrap();

            serverBootstrap.group(bossGroup, workGroup)
                    .channel(NioServerSocketChannel.class)
                    .childHandler(TCPServerChannelInitializer)
                    .option(ChannelOption.SO_BACKLOG, 128)
                    .childOption(ChannelOption.SO_KEEPALIVE, true);

            // 绑定端口,开始接收进来的连接
            channelFuture = serverBootstrap.bind(port).sync();

        } catch (Exception e) {
            e.printStackTrace();
        } finally {
            destroy();
        }
    }

    public void destroy() {
        // 关闭socket
        try {
            channelFuture.channel().closeFuture().sync();
        } catch (Exception e) {
            e.printStackTrace();
        }

        bossGroup.shutdownGracefully();
        workGroup.shutdownGracefully();
        bossGroup = null;
        workGroup = null;
    }
}
1.4 监听到springboot启动后,启动netty Server
@Component
public class TCPServerStartListener implements ApplicationRunner {
    @Resource
    TCPServer tcpServer;

    @Override
    public void run(ApplicationArguments args) throws Exception {
        tcpServer.start();
    }
}
2 测试验证
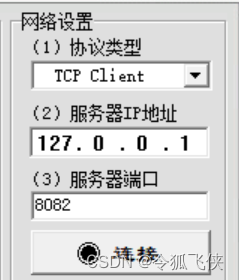
这里设置netty端口为8082,然后启动netty,串口网络调试助手设置好线相关参数,就可以进行i连接:

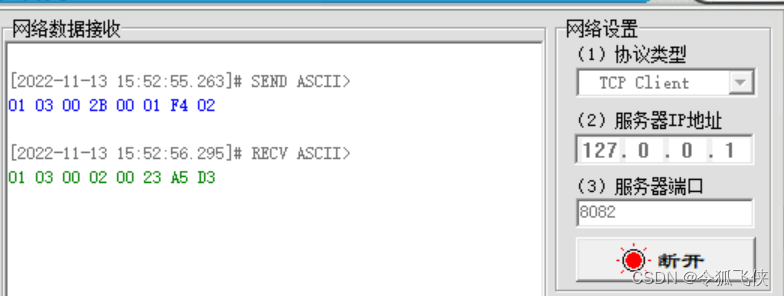
首先串口网络调试助手发送数据:01 03 00 2B 00 01 F4 02

可以看到,springboot控制输入log,说明server收到终端发送的数据:

然后,可以看到串口网络调试助手收到数据,说明终端收到Server返回的数据:

这样实现了云平台和终端之间的通信。
代码详见:
https://gitee.com/linghufeixia/iot-simple
code2
最后
以上就是义气心锁最近收集整理的关于IOT云平台 simple(3)springboot netty实现TCP Server1 集成开发2 测试验证的全部内容,更多相关IOT云平台内容请搜索靠谱客的其他文章。


发表评论 取消回复