搭建一个简单的物联网平台
之所以产生自己搭建平台的想法,是因为本来要使用 one* 平台完成一项作业,但是这个平台的官方文档写的太混乱了,有些地方写的有很简略,对我这种想要入门的小白来说不太友好,而且网上的第三方资料又新旧版本掺杂。随后一想,干脆自己搭一个平台直接当作业吧。。。。
项目介绍
什么是物联网平台
要搭建之前,一定要先搞明白一个概念,那就是什么是物联网平台。笔者作为一个准备入门的小白自然也是两眼一抹黑。在笔者大致查了些资料,实际上手使用一些物联网平台后,大致搞明白,物联网平台可以实现的功能有一下大致几点
- 终端设备接入
- 数据上报
- 数据持久化
- 终端设备管理
- 命令下发
搞明白了目标之后,我就在脑中考虑出了系统的雏形,大致分为以下几部分
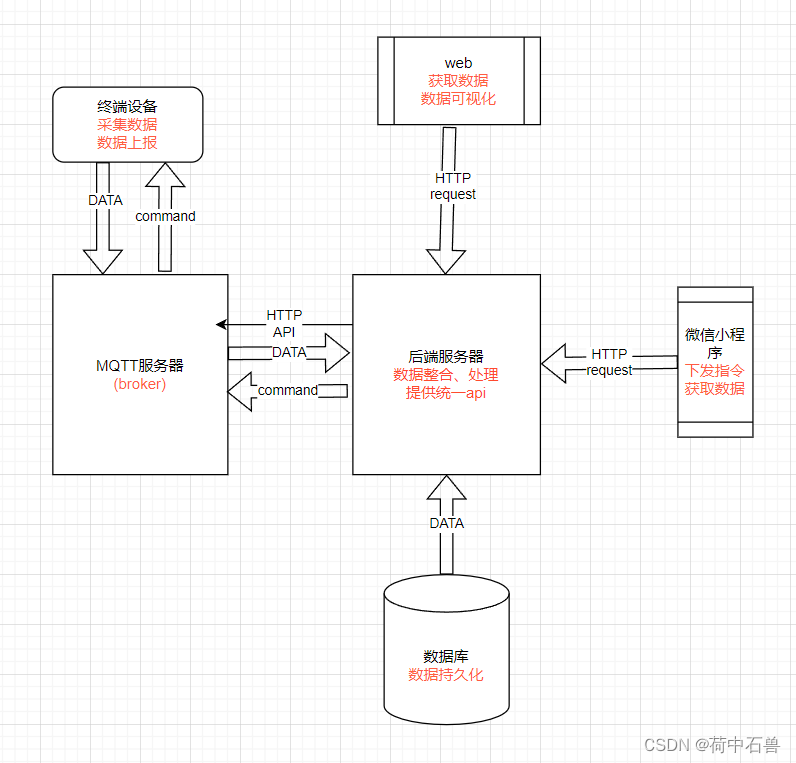
MQTT协议
在web开发中,我们常见的是 HTTP/HTTPS 协议,这是一种短连接,即在请求和响应完成之后会关闭连接。这种连接有一个弊端,那就是只能由客户端主动联系服务端,而不能由服务端主动联系客户端。但是一定存在客户端与服务端需要长时间互相交换数据的场景。在早期,人们使用 轮询/长轮询 ,后来出现了webSocket协议,这是一种很接近MQTT的协议,一旦建立连接,双方就可以长时间进行双工通讯。后来就出现了在物联网领域应用极其广泛的MQTT协议,相比于WebSocket,MQTT更复杂,但更能更加强大。很多时候两种协议甚至可以混用。
MQTT采用 订阅/发布 的模式。MQTT的客户端既可以订阅消息,又可以发布消息,而MQTT的服务器 被称为broker,负责接受客户端发布的消息,并将其发送给订阅了该主题(topic)的客户端,从而实现客户端之间的交互。
关于MQTT的协议,可以访问 太极创客的官方网站了解更多,这里笔者不再赘述
零基础入门学用物联网 – MQTT基础篇 – 目录 – 太极创客 (taichi-maker.com)
项目实现
连接协议
本项目使用MQTT协议进行数据上传和下发,使用HTTP协议进行数据交互
Broker
关于MQTT服务器,我选用了 EMQX开源版
sudo emqx start
在命令提示符中启动服务
关于emqx的使用,官方文档写的很清楚,这里不再赘述。emqx提供了丰富的api,可以通过http请求实现一些列功能。
由于这里使用的是emqx开源版,所以服务器本事并不提供数据持久化等一系列高级功能。但是其中有些功能可以使用其他方法实现。
emqx官方文档: EMQX 文档
后端服务器
后端服务器这里使用的是 nodejs+express.js+mqtt.js
笔者写过的几个项目,后端使用的都是nodejs,因为nodejs简单易用,性能尚可,有非常丰富的第三方工具包,非常适合小型项目
也因为笔者不会用java写后台
作用
后端服务器在本项目中主要起到一下作用:
- 向web端以及小程序端提供api
- 通过MQTT协议订阅设备发布的收集到的信息,并将其持久化
- 通过MQTT协议向设备下发命令
- 实现不同的api功能,如命令下发
- 代理emqx提供的api,向web端以及微信小程序端提供统一的api
代码实现
const mqtt = require('mqtt')
const express = require('express')
const mysqlPool = require('./utils/mysql/index')
const config = require('./public/config/index')
const { createProxyMiddleware } = require('http-proxy-middleware');
const cors = require('cors')


const mqttClient = mqtt.connect(config.mqttConfig.brokerUrl, config.mqttConfig.options)
const app = express()
app.listen(80)
const baseUrl = 'http://192.168.31.108:8081'

mqttClient.on('connect', ()=> {
    mqttClient.subscribe('data/temperature_data', {qos: 1}, (err) => {
        if (!err) {
            console.log('subscribe successful')
        }
    })
})

mqttClient.on('message', (topic, message)=> {
    if (topic.startsWith('data/')) {

        let tableName = topic.split('/')[1]
        let data = JSON.parse(message.toString())
        // 测试
        data.upload_time = new Date()
        mysqlPool.getConnection((err, connection) => {
            if (err) throw err

            connection.query(`insert into ${tableName} set ?`, [data], (error, result)=> {
                connection.release()
                if (error) throw error

                console.log(result)
            })
        })
    }
})

app.use(cors())


//下发指令
app.get('/api/command', ( req, res)=> {
    mqttClient.publish('command/'+req.query.topic, req.query.msg)
    res.send('get')
    return 0
})

//获取数据
app.get('/api/data/:dataType', (req, res)=> {
    mysqlPool.getConnection( (err, connection)=> {
        if (err) throw err

        let tableName = (req.params.dataType + '_data' )
        let count = req.query.count * 1
        connection.query(`select * from ${tableName} order by upload_time desc limit ?`, [count], (error, result)=> {
            connection.release()

            if (error) throw error

            console.log(result)
            res.json(result)
            return 0
        })
    })

})


// 代理emqx提供的api
app.use('/api/v4', createProxyMiddleware({
    target: 'http://192.168.31.108:8081',
    changeOrigin: true
}));
备注
在构思后端代码时,主要有以下几个考虑
- 与小程序端采用那种方法连接,二者之间的连接要实现什么功能
笔者这里实现指令下发是通过后端进行了中转,而不是直接使用mqtt协议与设备连接,直接下发指令。这样做主要是有
几点考虑:
一是微信小程序端作为用户直接操作的平台,使用多种协议与多个服务器连接,可能会造成服务不稳定,因为如果微信
小程序想获取数据,就必须使用http请求,从后端服务器处获取。
二是作为一个开发人员,笔者个人觉得这种写法不太规范,算是一点小强迫症
- 为什么要对emqx提供的api使用代理
一是笔者在直接请求时遇到的跨域问题,暂时无法解决,二是,又回到上面那个问题的原因,笔者觉得如果一个客服端
中出现两个baseURL会让代码看起来非常奇怪。所以就是用了代理向小程序端提供统一的api。同时笔者之前只是听说过
代理,但是自己并没有实际使用过,所以笔者也想使用一些新的技术。
采集终端
采集终端使用esp32开发板,外接DHT11温湿度传感器。实现mqtt连接使用了 PubSubClient工具包
作用
- 负责通过DHT11模块采集环境中的温湿度数据
- 向后端服务器上报采集的数据
- 试验性质控制一个LED灯珠
代码实现
#include <WiFi.h>
#include <PubSubClient.h>
#include <Arduino.h>
#include <Ticker.h>
#include <DFRobot_DHT11.h>

#define clientId "esp32"         // id
#define userName "device"    // username
#define mqtt_password "esp32wroom" // password
#define BUILTIN_LED 13
#define DHT_PIN 17

void connectWifi();
void connectMQTTServer();
void subscribeTopic();
void publishTopic(String topic, String msg);
void receiveCallback(char *topic, byte *payload, unsigned int length);
void tickerContent();
String getDHTData();

const char *ssid = "Redmi_91AE";
const char *password = "****";
const char *mqttServer = "192.168.31.108";
// const char *mqttServer = "183.230.40.39"; // oneNet
// const char *mqttServer = "mqtt.heclouds.com"; // oneNet
// const uint16_t port = 6002;
const uint16_t port = 1883;
int count = 0;

WiFiClient wifiClient;
PubSubClient mqttClient(wifiClient);
Ticker ticker;
DFRobot_DHT11 dht;

void setup()
{
  Serial.begin(115200);
  pinMode(13, OUTPUT);
  WiFi.mode(WIFI_STA);
  connectWifi();
  mqttClient.setServer(mqttServer, port);
  mqttClient.setCallback(receiveCallback);
  connectMQTTServer();
  ticker.attach(1, tickerContent);
}

void loop()
{
  if (mqttClient.connected())
  {                    // 如果开发板成功连接服务器
    mqttClient.loop(); // 保持客户端心跳
  }
  else
  {                      // 如果开发板未能成功连接服务器
    connectMQTTServer(); // 则尝试连接服务器
  }
  if (count >=60 )
  {
    count = 0;
    // publishTopic();
    publishTopic("data/temperature_data", getDHTData());
    // Serial.println(getDHTData());
  }
}

// 连接mqtt服务器
void connectMQTTServer()
{
  if (WiFi.isConnected())
  {
    if (mqttClient.connect(clientId, userName, mqtt_password))
    {
      Serial.println("MQTT Server Connected.");
      Serial.println("Server Address: ");
      Serial.println(mqttServer);
      Serial.println("ClientId:");
      Serial.println(clientId);
      subscribeTopic();
    }
    else
    {
      Serial.print("MQTT Server Connect Failed. Client State:");
      Serial.println(mqttClient.state());
      delay(3000);
    }
  }
  else
  {
    connectWifi();
  }
}

// 连接wifi
void connectWifi()
{

  WiFi.begin(ssid, password);

  while (WiFi.status() != WL_CONNECTED)
  {
    delay(1000);
    Serial.print(".");
  }
  Serial.println("");
  Serial.println("WiFi Connected!");
  Serial.println("");
}

// 订阅 topic
void subscribeTopic()
{
  String topic = "command/LED_Switch";
  if (mqttClient.subscribe(topic.c_str()))
  {
    Serial.println("Subscrib Topic:");
    Serial.println(topic);
  }
  else
  {
    Serial.print("Subscribe Fail...");
  }
}

// 发布数据
void publishTopic(String topic, String msg)
{
  if (mqttClient.publish(topic.c_str(), msg.c_str()))
  {
    Serial.println("Publish Topic:");
    Serial.println(topic);
    Serial.println("Publish message:");
    Serial.println(msg);
  }
  else
  {
    Serial.println("Message Publish Failed.");
  }
}

// 收到消息后的回调函数
void receiveCallback(char *topic, byte *payload, unsigned int length)
{
  Serial.print("Message Received [");
  Serial.print(topic);
  Serial.print("] ");
  for (int i = 0; i < length; i++)
  {
    Serial.print((char)payload[i]);
  }
  Serial.println("");
  Serial.print("Message Length(Bytes) ");
  Serial.println(length);

  if (strcmp(topic, "command/LED_Switch") == 0)
  {
    if ((char)payload[0] == '1')
    {                                  // 如果收到的信息以“1”为开始
      digitalWrite(BUILTIN_LED, HIGH); // 则点亮LED。
      Serial.println("LED ON");
    }
    else
    {
      digitalWrite(BUILTIN_LED, LOW); // 否则熄灭LED。
      Serial.println("LED OFF");
    }
  }
  else
  {
    Serial.println("else");
    // 默认指令 topic
  }
}

void tickerContent()
{
  count++;
}

String getDHTData()
{
  dht.read(DHT_PIN);
  return " { "temperature" : " + String(dht.temperature) + ", "humidity": " + String(dht.humidity) + "}";
}
备注
-
代码实现使用了
- PubSubClient
- DFRobot_DHT11
以上两个第三方工具包,以及arduino和esp32提供 部分功能
-
本代码编写参考了太极创客的部分文章
1-9 自我测试 – 太极创客 (taichi-maker.com)
微信小程序
作用
微信小程序端主要实现一下几点作用:
- 部分数据显示
- 命令下发终端
代码实现
这里只展示 index.js 中的内容
import request from "../../utils/request";

Page({

  /**
   * 页面的初始数据
   */
  data: {
    temperature: 0,
    humidity: 0,
    uploadDate: '',
    uploadTime: '',
    interval: null
  },
  handleChange: function(e) {
    let msg
    e.detail.value?
        msg = '1' :
        msg = '0'

    this.switchLED(msg)
  },
  switchLED: async function (status) {
    await this.giveCommand('LED_Switch', status)
  },
  giveCommand: async function (topic, msg) {
    let result = await request('/api/command', {topic, msg})
    console.log('give command successfully')
  },
  getData: async function (dataType) {
    let result = await request('/api/data/' + dataType, {count: 1})
    let tempDate = result.data[0].upload_time
    let date = new Date(tempDate)
    let time = {
      month: date.getMonth() < 10 ?
          '0' + String(date.getMonth()) :
          date.getMonth(),
      day: date.getDate() < 10 ?
          '0' + String(date.getDate()) :
          date.getDate(),
      hours: date.getHours() < 10 ?
          '0' + String(date.getHours()) :
          date.getHours(),
      seconds: date.getSeconds() < 10 ?
          '0' + String(date.getSeconds()) :
          date.getSeconds(),
      minutes: date.getMinutes() < 10 ?
          '0' + String(date.getMinutes()) :
          date.getMinutes(),
    }
    let uploadDate = date.getFullYear()+'-'+time.month+'-'+time.day
    let uploadTime = time.hours+':'+time.minutes+':'+time.seconds
    this.setData({
      temperature: result.data[0].temperature,
      humidity: result.data[0].humidity,
      uploadDate,
      uploadTime
    })
  },
  /**
   * 生命周期函数--监听页面加载
   */
  onLoad: async function (options) {
    await this.getData('temperature')
    await this.switchLED('0')
  },

  /**
   * 生命周期函数--监听页面显示
   */
  onShow: async function() {
    this.data.interval = setInterval(()=> {this.getData('temperature')}, 60000)
  },

  /**
   * 生命周期函数--监听页面隐藏
   */
  onHide() {
    clearInterval(this.data.interval)
  }
})
备注
-
前文中,笔者介绍道,没有使用小程序端直接连接终端设备,是因为规范问题
-
其实这里还有一个原因,就是遇到了一些技术上的问题。就是微信小程序使用npm包的问题。 一开始笔者也想直接连接,毕竟简单方便,相较于http请求,在笔者看来,mqtt连接似乎更容易 一些,但是当笔者使用npm安装了mqtt.js工具包,并引用时报了错误。后来去网上搜搜查查,说 是要打开一个使用npm包的选项,这个选项在较新的微信开发者工具中已经取消了。在新版本 中,要打开 工具->构建npm 这个选项。 上述一些操作,在各大搜索引擎中都能搜到相关博客,这里笔者就不放链接了。 但是,在进行了一系列操作之后还是不行,后来又查资料发现,引用的包必须遵守微信小程序的 规范。后来又找到了一种方法,是直接把全部的代码放进单独的一个js文件中,然后在引用。在 一番操作之后连接成功了,但是最终笔者也没有采用这种方法 -
最后一种方法见:微信小程序mqtt实现 - 简书 (jianshu.com)
-
-
本项目中,为什么只进行了温湿度数据的收集,以及LED灯珠的控制
-
因为本项目笔者把它定性为,物联网平台,所以接入设备只是试验性质的,只要证明平台可用即可。
-
web端
作用
web端在本系统中承担的作用主要是:
- 数据可视化展示
- 未来可能会继续完善,加入接入终端设备管理功能
代码实现
因为本项目是带有实验性质的,所以很多方便笔者尽量采用了简化方法,而只保留的骨干,故本工程只有一个html文件及css文件,本章节只展示 index.html
<!DOCTYPE html>
<html lang="en">
<head>
    <meta charset="UTF-8">
    <title>Title</title>
    <script src="https://cdn.bootcdn.net/ajax/libs/vue/2.6.9/vue.min.js"></script>
    <script src="https://cdn.bootcdn.net/ajax/libs/axios/0.27.2/axios.min.js"></script>
    <script src="https://cdn.bootcdn.net/ajax/libs/echarts/5.3.3/echarts.min.js"></script>
    <link rel="stylesheet" type="text/css" href="index.css"></link>
</head>
<body>
    <div id="main">
        <div id="main-box">
            <div id="header">
                <div id="device-status">
                    <div id="device-status-title">在线设备</div>
                    <div id="device-status-box">
                        <span id="countText">在线数量:</span>
                        <span id="count">{{onlineCount}}</span>
                        <div class="device-button" v-for="(item,index) in onlineDevice" key="index">
                            {{item}}
                        </div>
                    </div>
                </div>
            </div>
            <div id="counter">
                <div id="charts" style="width: 90%;height:30em;"></div>
            </div>
        </div>
    </div>
    <script>
        let app = new Vue({
            el: '#main',
            data: {
                baseURL: 'http://192.168.31.47:80',
                message: 'hello',
                onlineCount: 0,
                onlineDevice: [],
                chart: null,
                chartOption: {
                    legend: {
                        data: ['温度', '湿度']
                    },
                    grid: {
                        left: '3%',
                        right: '4%',
                        bottom: '3%',
                        containLabel: true
                    },
                    tooltip: {
                        show: true,
                        trigger: 'axis'
                    },
                    xAxis: {
                        // type: 'category',
                        type: 'time'
                    },
                    yAxis: [
                        {
                            name: '温度',
                            type: 'value',
                            alignTicks: true,
                            axisLabel: {
                                show: true,
                                margin: 10,
                                textStyle: {
                                    fontSize: 14
                                },
                                formatter: '{value} ℃',
                                fontStyle: 'italic',
                                fontWeight: 'bold'
                            }
                        },
                        {
                            name: '湿度',
                            type: 'value',
                            alignTicks: true,
                            axisLabel: {
                                show: true,
                                margin: 10,
                                textStyle: {
                                    fontSize: 14
                                },
                                formatter: '{value} %',
                                fontStyle: 'italic',
                                fontWeight: 'bold'
                            }
                        }
                    ],
                    series: [
                        {
                            name: '温度',
                            type: 'line',
                            stack: 'wend',
                            yAxisIndex: 0,
                            smooth: true
                        },
                        {
                            name: '湿度',
                            type: 'line',
                            stack: 'shid',
                            yAxisIndex: 1,
                            smooth: true
                        }
                    ],
                    dataZoom: [
                        {
                            id: 'dataZoomX',
                            type: 'inside',
                            xAxisIndex: [0],
                            // type: 'slider',
                            filterMode: 'filter',
                            start: 95,
                            end: 100
                        },
                        {
                            type: 'slider',
                            start: 80,
                            end: 100
                        },
                    ]
                }
            },
            methods: {
                handledGetDeviceStatus: async function () {
                    let response = await fetch(this.baseURL+'/api/v4/clients', {
                        headers: {
                            authorization: 'Basic YWRtaW46cHVibGlj'
                        }
                    })
                    if (response.ok) {
                        let json = await response.json()
                        this.getDeviceStatus(json)
                    }
                },
                getDeviceStatus: function (devices) {
                    if (devices.meta.count === 0) {
                        this.onlineCount = 0
                    } else {
                        this.onlineCount = 0
                        for (let device of devices.data) {
                            if (device.username === 'device') {
                                this.onlineDevice[this.onlineCount] = device.clientid
                                this.onlineCount ++
                            }
                        }
                    }
                },
                initChart: function () {
                    this.chart = echarts.init(document.getElementById('charts'))
                    this.chart.setOption(this.chartOption)
                },
                handleGetData: async function () {
                    let response = await fetch(this.baseURL+'/api/data/temperature?count=3600')
                    if (response.ok) {
                        let result = await response.json()
                        this.handleGetChartData(result)
                    }
                },
                handleGetChartData: function (chartData) {
                    let temData = chartData.map((item=> [item.upload_time,item.temperature]))
                    let humiData = chartData.map((item=> [item.upload_time,item.humidity]))

                    this.chartOption.series = [
                        {
                            name: '温度',
                            type: 'line',
                            stack: 'wend',
                            data: temData,
                            yAxisIndex: 0,
                            smooth: true
                        },
                        {
                            name: '湿度',
                            type: 'line',
                            stack: 'shid',
                            data: humiData,
                            yAxisIndex: 1,
                            smooth: true
                        }
                    ]

                    this.chart.setOption(this.chartOption)
                }
            },
            beforeMount: function () {
            },
            mounted: function () {
                this.handledGetDeviceStatus()
                this.initChart()
                this.handleGetData()
            }
        })
    </script>
</body>
</html>
本工简单引用了 vue以及echarts组件,旨在快速创建一个相对完善且美观的页面。
备注
web端作为数据可视化展示,是物联网平台不能缺少的一部分,但是目前也只完成了可视化展示,其他的数据管理功能,例如查询、更改、导出等都没有完成,后续可能会对其进行完善。
如果过于深入的介绍web端的技术实现,就有些偏离本文档的初衷了,故在此不过多赘述。
后记
笔者初步完成本项目用时并不长,但了解了很多以前没有接触过的技术。也对以前所学有所巩固,加深理解。
笔者一路下来,也接触不少不错的网站,
- 物联网相关:
- 太极创客 – Arduino, ESP8266物联网的应用、开发和学习资料 (taichi-maker.com)
- Arduino Reference - Arduino Reference
- finedayforu的博客_CSDN博客-熊爸的学习时间领域博主
- js相关:
- 现代 JavaScript 教程
- w3school 在线教程
- npm (npmjs.com)
最后
以上就是魔幻夏天最近收集整理的关于搭建一个物联网平台搭建一个简单的物联网平台的全部内容,更多相关搭建一个物联网平台搭建一个简单内容请搜索靠谱客的其他文章。


发表评论 取消回复