前言:随着用户体验的不断的加深,良好的UI视觉效果也必不可少,以前方方正正的对话框样式在APP已不复存在,取而代之的是带有圆角效果的Dialog,之前设置对画框的圆角效果都是通过drawable/shape属性来完成,随着Google API的不断更新,API 21(Android 5.0)添加了新的控件CardView,这使得圆角的实现更加方便快捷。
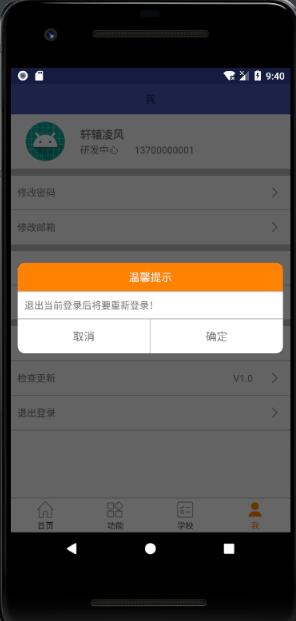
效果图:
导入CardView依赖(API 21新控件)
implementation 'com.android.support:cardview-v7:26.1.0'
1.布局引用
<android.support.v7.widget.CardView
  xmlns:android="http://schemas.android.com/apk/res/android"
  xmlns:app="http://schemas.android.com/apk/res-auto"
  android:layout_width="match_parent"
  android:layout_height="wrap_content"
  app:cardCornerRadius="@dimen/dp_10">

  <LinearLayout
    android:layout_width="match_parent"
    android:layout_height="wrap_content"
    android:orientation="vertical">
    <TextView
      android:id="@+id/tv_title"
      android:layout_width="match_parent"
      android:layout_height="wrap_content"
      android:background="@color/colorTabClick"
      android:gravity="center"
      android:padding="@dimen/dp_10"
      android:text="温馨提示:确定修改维护详情信息?"
      android:textColor="@color/bg_mainWhite"
      android:textSize="@dimen/dp_16" />

    <View
      android:layout_width="match_parent"
      android:layout_height="1dp"
      android:background="@color/bg_line" />

    <TextView
      android:id="@+id/tv_des"
      android:layout_width="match_parent"
      android:layout_height="wrap_content"
      android:padding="@dimen/dp_10"
      android:gravity="top"
      />

    <View
      android:layout_width="match_parent"
      android:layout_height="1dp"
      android:background="@color/bg_line" />

    <LinearLayout
      android:layout_width="match_parent"
      android:layout_height="50dp"
      android:orientation="horizontal">

      <TextView
        android:id="@+id/tv_cancel"
        android:layout_width="0dp"
        android:layout_height="match_parent"
        android:layout_weight="1.0"
        android:gravity="center"
        android:text="取消"
        android:textSize="@dimen/dp_16" />

      <View
        android:layout_width="1dp"
        android:layout_height="match_parent"
        android:background="@color/bg_line" />

      <TextView
        android:id="@+id/tv_confirm"
        android:layout_width="0dp"
        android:layout_height="match_parent"
        android:layout_weight="1.0"
        android:gravity="center"
        android:text="确定"
        android:textSize="@dimen/dp_16" />
    </LinearLayout>
  </LinearLayout>

</android.support.v7.widget.CardView>
1.cardCornerRadius属性:设置圆角的弧度大小,这里设置的为10dp
2.CardView还有padding、cardUseCompatPadding(内边距)、background等属性
3.CardView继承自FrameLayout,使用时可以重新嵌套布局
2.代码实现
/**
 * 展示对话框
 */
private void showDialog(String title) {
  //初始化布局文件
  View dialogView = View.inflate(mContext, R.layout.dialog_layout_test, null);
  //标题
  TextView tvTitle = (TextView) dialogView.findViewById(R.id.tv_title);
  //确定按钮
  TextView tvConfirm = (TextView) dialogView.findViewById(R.id.tv_confirm);
  //取消按钮
  TextView tvCancel = (TextView) dialogView.findViewById(R.id.tv_cancel);
  //描述信息
  TextView tvDes= (TextView) dialogView.findViewById(R.id.tv_des);
  //设置标题及描述信息
  tvTitle.setText(title);
  tvDes.setText("退出当前登录后将要重新登录!");
  //确定和取消按钮监听事件
  tvConfirm.setOnClickListener(new View.OnClickListener() {
    @Override
    public void onClick(View view) {
      Intent intent = new Intent(mContext,LoginActivity.class);
      startActivity(intent);
      UIUtil.toast("退出成功,请重新登录");
      getActivity().finish();
      mDialog.dismiss();
    }
  });
  tvCancel.setOnClickListener(new View.OnClickListener() {
    @Override
    public void onClick(View view) {
      mDialog.dismiss();
    }
  });
  mMessageBuilder = new AlertDialog.Builder(mContext);
  mDialog = mMessageBuilder.create();
  //设置背景色为透明,解决设置圆角后有白色直角的问题
  Window window=mDialog.getWindow();
  window.setBackgroundDrawable(new ColorDrawable(Color.TRANSPARENT));
  mDialog.setView(dialogView);
  mDialog.setCanceledOnTouchOutside(false);//点击屏幕不消失
  mDialog.show();
  //设置参数必须在show之后,不然没有效果
  WindowManager.LayoutParams params = mDialog.getWindow().getAttributes();
  mDialog.getWindow().setAttributes(params);
}
使用的是V7包的AlertDialog实现的,当然也可以使用Dialog实现。
总结:CardView实现对话框的圆角效果更加的方便,不用编写shape属性,当标题栏需要背景色时,也无需考虑设置标题栏的shape(不使用CardView时,如果不使用shape设置背景色,会导致左上和右上不会变成圆角)。
以上就是本文的全部内容,希望对大家的学习有所帮助,也希望大家多多支持靠谱客。
最后
以上就是勤奋奇异果最近收集整理的关于Android使用CardView实现圆角对话框的全部内容,更多相关Android使用CardView实现圆角对话框内容请搜索靠谱客的其他文章。
本图文内容来源于网友提供,作为学习参考使用,或来自网络收集整理,版权属于原作者所有。


发表评论 取消回复