Order注解启动顺序
order的规则
- order的值越小,优先级越高
- order如果不标注数字,默认最低优先级,因为其默认值是int最大值
- 该注解等同于实现Ordered接口getOrder方法,并返回数字。
@Retention(RetentionPolicy.RUNTIME)
@Target({ElementType.TYPE, ElementType.METHOD, ElementType.FIELD})
@Documented
public @interface Order {
 /**
  * The order value.
  * <p>Default is {@link Ordered#LOWEST_PRECEDENCE}.
  * @see Ordered#getOrder()
  */
 int value() default Ordered.LOWEST_PRECEDENCE;
}
int LOWEST_PRECEDENCE = Integer.MAX_VALUE;
@Aspect
@Component
public class DataSourceAspect implements Ordered {
    @Override
    public int getOrder() {
        return 1;
    }
}
见下
OrderRunner1.java
@Component
@Order(1)
public class OrderRunner1 implements CommandLineRunner {
    @Override
    public void run(String... args) throws Exception {
        System.out.println("The OrderRunner1 start to initialize ...");
    }
}
OrderRunner2.java
@Component
@Order(2)
public class OrderRunner2 implements CommandLineRunner {

    @Override
    public void run(String... args) throws Exception {
        System.out.println("The OrderRunner2 start to initialize ...");
    }
}
Runner.java
@Component
public class Runner implements CommandLineRunner {
    @Override
    public void run(String... args) throws Exception {
        System.out.println("The Runner start to initialize ...");
    }
}
@SpringBootApplication
public class CommandLineRunnerApplication {

 public static void main(String[] args) {
  System.out.println("The service to start.");
  SpringApplication.run(CommandLineRunnerApplication.class, args);
  System.out.println("The service has started.");
 }
}
它们的启动日志
The service to start.
...
...
The OrderRunner1 start to initialize ...
The OrderRunner2 start to initialize ...
The Runner start to initialize ...
The service has started.
@Order注解提供消费顺序
Order注解可以做到集合bean依赖注入的时候,定义集合内部Bean的加载顺序,因此在需要有序消费bean的时候,不需要再次排序,直接定义好Order注解得value值就好。
但是这个order值并不影响bean本身实例化的顺序,因为实例化的顺序取决于依赖关系。
@org.springframework.core.annotation.Order
@RestController
@RequestMapping(value = "/pc/api/v1/monitor")
@RequiredArgsConstructor
public class AfterRepairConsumer {
    private final List<RepairCreatePostConsumer> postConsumers;
    @GetMapping(value = "/create")
    public ResponseData create() {
        final String repairId = "1";

        if (CollectionUtils.isNotEmpty(postConsumers)) {
            postConsumers.forEach(e -> e.postHandler(repairId));
        }
        return new ResponseData<>("success");
    }
}

public interface RepairCreatePostConsumer {
    /**
     * 创建报修单后做什么
     *
     * @param repairId 报修单ID
     */
    void postHandler(String repairId);
}

import org.springframework.core.annotation.Order;
@Service
@RequiredArgsConstructor
@Order(value = 3)
public class SendEmail implements RepairCreatePostConsumer {
    @Override
    public void postHandler(String repairId) {
        System.out.println("为报修单" + repairId + "发送邮件");
    }
}

import org.springframework.core.annotation.Order;
@Service
@RequiredArgsConstructor
@Order(value = 2)
public class SendInvoice implements RepairCreatePostConsumer {
    @Override
    public void postHandler(String repairId) {
        System.out.println("为报修单" + repairId + "发送发票");
    }
}

import org.springframework.core.annotation.Order;
@Service
@RequiredArgsConstructor
@Order(value = 1)
public class SendMessage implements RepairCreatePostConsumer {
    @Override
    public void postHandler(String repairId) {
        System.out.println("为报修单" + repairId + "发送消息");
    }
}
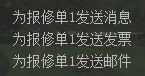
运行结果:
以上为个人经验,希望能给大家一个参考,也希望大家多多支持靠谱客。
最后
以上就是时尚蛋挞最近收集整理的关于SpringBoot之Order注解启动顺序说明的全部内容,更多相关SpringBoot之Order注解启动顺序说明内容请搜索靠谱客的其他文章。
本图文内容来源于网友提供,作为学习参考使用,或来自网络收集整理,版权属于原作者所有。


发表评论 取消回复