本篇文章给大家带来了关于mysql的相关知识,其中主要整理了约束与多表查询的相关问题,约束是作用于表中字段上的规则,用于限制存储在表中的数据,下面一起来看一下,希望对大家有帮助。

推荐学习:mysql视频教程
1.约束
概述
概念:约束是作用于表中字段上的规则,用于限制存储在表中的数据。
目的:保证数据库中数据的正确、有效性和完整性。

约束演示
上面我们介绍了数据库中常见的约束,以及约束涉及到的关键字,那这些约束我们到底如何在创建表、
修改表的时候来指定呢,接下来我们就通过一个案例,来演示一下。
案例需求: 根据需求,完成表结构的创建。需求如下:

对应的建表语句为:
CREATE TABLE tb_user
(
    id     int AUTO_INCREMENT PRIMARY KEY COMMENT 'ID唯一标识',
    name   varchar(10) NOT NULL UNIQUE COMMENT '姓名',
    age     tinyint unsigned  COMMENT '年龄',
    status char(1) default '1' COMMENT '状态',
    gender char(1) COMMENT '性别'
);登录后复制
如果你的Mysql是8版本之后 age可以这样创建
age int check (age > 0 && age <= 120) COMMENT '年龄' ,
登录后复制在为字段添加约束时,我们只需要在字段之后加上约束的关键字即可,需要关注其语法。我们执行上面的SQL把表结构创建完成,然后接下来,就可以通过一组数据进行测试,从而验证一下,约束是否可以生效。
insert into tb_user(name, age, status, gender)
values ('Tom1', 19, '1', '男'),
       ('Tom2', 25, '0', '男');
insert into tb_user(name, age, status, gender)
values ('Tom3', 19, '1', '男');
insert into tb_user(name, age, status, gender)
values (null, 19, '1', '男');
insert into tb_user(name, age, status, gender)
values ('Tom3', 19, '1', '男');
insert into tb_user(name, age, status, gender)
values ('Tom4', 80, '1', '男');
insert into tb_user(name, age, status, gender)
values ('Tom5', -1, '1', '男');
insert into tb_user(name, age, status, gender)
values ('Tom5', 121, '1', '男');
insert into tb_user(name, age, gender)
values ('Tom5', 120, '男');登录后复制

可见 对于我们设置name的约束: 非空 且唯一 生效。
上面,我们是通过编写SQL语句的形式来完成约束的指定,那加入我们是通过图形化界面来创建表结构时,又该如何来指定约束呢? 只需要在创建表的时候,根据我们的需要选择对应的约束即可。

外键约束
介绍
外键:用来让两张表的数据之间建立连接,从而保证数据的一致性和完整性。
我们来看一个例子:

左侧的emp表是员工表,里面存储员工的基本信息,包含员工的ID、姓名、年龄、职位、薪资、入职日 期、上级主管ID、部门ID,在员工的信息中存储的是部门的ID dept_id,而这个部门的ID是关联的部门表dept的主键id,那emp表的dept_id就是外键,关联的是另一张表的主键。
没有数据库外键关联的情况下,能够保证一致性和完整性呢,我们来测试一下。
准备数据
create table dept
(
id int auto_increment comment 'ID' primary key,
name varchar(50) not null comment '部门名称'
) comment '部门表';
INSERT INTO dept (id, name)
VALUES (1, '研发部'),
(2, '市场部'),
(3, '财务部'),
(4, '销售部'),
(5, '总经办');
create table emp
(
id int auto_increment comment 'ID' primary key,
name varchar(50) not null comment '姓名',
age int comment '年龄',
job varchar(20) comment '职位',
salary int comment '薪资',
entrydate date comment '入职时间',
managerid int comment '直属领导ID',
dept_id int comment '部门ID'
) comment '员工表';
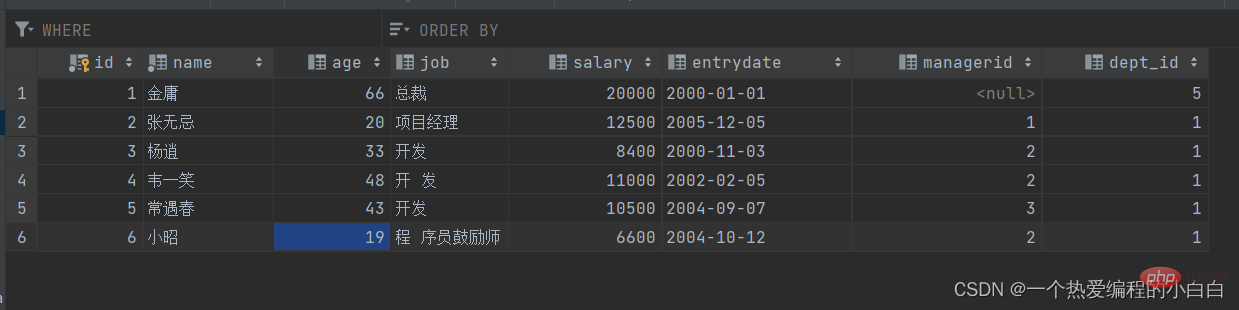
INSERT INTO emp (id, name, age, job, salary, entrydate, managerid, dept_id)
VALUES (1, '金庸', 66, '总裁', 20000, '2000-01-01', null, 5),
(2, '张无忌', 20, '项目经理', 12500, '2005-12-05', 1, 1),
(3, '杨逍', 33, '开发', 8400, '2000-11-03', 2, 1),
(4, '韦一笑', 48, '开 发', 11000, '2002-02-05', 2, 1),
(5, '常遇春', 43, '开发', 10500, '2004-09-07', 3, 1),
(6, '小昭', 19, '程 序员鼓励师', 6600, '2004-10-12', 2, 1);登录后复制
接下来,我们可以做一个测试,删除id为1的部门信息。

结果,我们看到删除成功,而删除成功之后,部门表不存在id为1的部门,而在emp表中还有很多的员工,关联的为id为1的部门,此时就出现了数据的不完整性。 而要想解决这个问题就得通过数据库的外键约束。
语法
1). 添加外键
CREATE TABLE 表名
(
    字段名 数据类型, ... [
    CONSTRAINT] [
    外键名称]
    FOREIGN
    KEY
(
    外键字段名
) REFERENCES 主表
(
    主表列名
) );登录后复制
ALTER TABLE 表名
ADD CONSTRAINT 外键名称 FOREIGN KEY (外键字段名) REFERENCES 主表 (主表列名);登录后复制案例:
为emp表的dept_id字段添加外键约束,关联dept表的主键id。
alter table emp
    add constraint fk_emp_dept_id foreign key (dept_id) references dept (id);登录后复制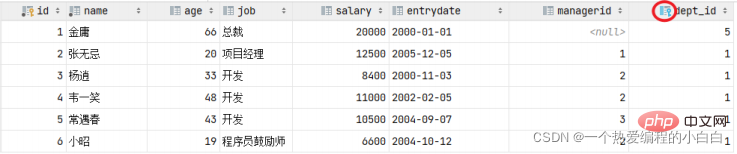
添加了外键约束之后,我们再到dept表(父表)删除id为1的记录,然后看一下会发生什么现象。 此时
将会报错,不能删除或更新父表记录,因为存在外键约束。

2). 删除外键
ALTER TABLE 表名 DROP FOREIGN KEY 外键名称;
登录后复制案例:
删除emp表的外键fk_emp_dept_id
alter table emp drop foreign key fk_emp_dept_id; 1
登录后复制删除/更新行为
添加了外键之后,再删除父表数据时产生的约束行为,我们就称为删除/更新行为。具体的删除/更新行为有以下几种:
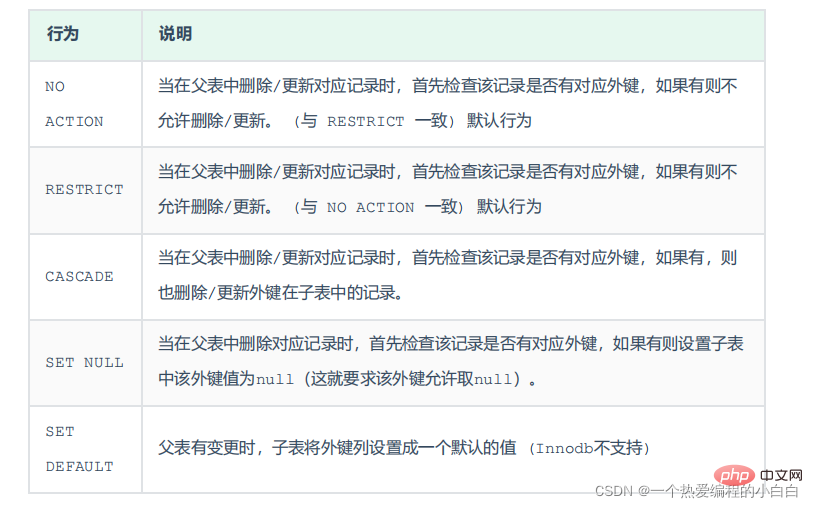
具体语法为:
ALTER TABLE 表名
    ADD CONSTRAINT 外键名称 FOREIGN KEY (外键字段) REFERENCES 主表名 (主表字段名) ON UPDATE CASCADE ON DELETE CASCADE;登录后复制
演示如下:
由于NO ACTION 是默认行为,我们前面语法演示的时候,已经测试过了,就不再演示了,这里我们再
演示其他的两种行为:CASCADE、SET NULL。
1). CASCADE
alter table emp
    add constraint fk_emp_dept_id foreign key (dept_id) references dept (id) on update cascade on delete cascade;登录后复制
A. 修改父表id为1的记录,将id修改为6

我们发现,原来在子表中dept_id值为1的记录,现在也变为6了,这就是cascade级联的效果
B. 删除父表id为6的记录

我们发现,父表的数据删除成功了,但是子表中关联的记录也被级联删除了。
2). SET NULL
在进行测试之前,我们先需要删除上面建立的外键 fk_emp_dept_id。然后再通过数据脚本,将 emp、dept表的数据恢复了。
alter table emp
    add constraint fk_emp_dept_id
        foreign key (dept_id) references dept (id) on update set null on delete set null;登录后复制
接下来,我们删除id为1的数据,看看会发生什么样的现象。

我们发现父表的记录是可以正常的删除的,父表的数据删除之后,再打开子表 emp,我们发现子表emp 的dept_id字段,原来dept_id为1的数据,现在都被置为NULL了

这就是SET NULL这种删除/更新行为的效果。
2.多表查询
我们之前在讲解SQL语句的时候,讲解了DQL语句,也就是数据查询语句,但是之前讲解的查询都是单表查询,而本章节我们要学习的则是多表查询操作,主要从以下几个方面进行讲解。
多表关系
项目开发中,在进行数据库表结构设计时,会根据业务需求及业务模块之间的关系,分析并设计表结 构,由于业务之间相互关联,所以各个表结构之间也存在着各种联系,基本上分为三种:
一对多(多对一) 多对多 一对一
1.一对多
案例: 部门 与 员工的关系
关系: 一个部门对应多个员工,一个员工对应一个部门
实现: 在多的一方建立外键,指向一的一方的主键

2.多对多
案例: 学生 与 课程的关系
关系: 一个学生可以选修多门课程,一门课程也可以供多个学生选择
实现: 建立第三张中间表,中间表至少包含两个外键,分别关联两方主键

对应的SQL脚本:
create table student
(
    id   int auto_increment primary key comment '主键ID',
    name varchar(10) comment '姓名',
    no   varchar(10) comment '学号'
) comment '学生表';
insert into student
values (null, '黛绮丝', '2000100101'),
       (null, '谢逊', '2000100102'),
       (null, '殷天正', '2000100103'),
       (null, '韦一笑', '2000100104');
create table course
(
    id   int auto_increment primary key comment '主键ID',
    name varchar(10) comment '课程名称'
) comment '课程表';
insert into course
values (null, 'Java'),
       (null, 'PHP'),
       (null, 'MySQL'),
       (null, 'Hadoop');
create table student_course
(
    id        int auto_increment comment '主键' primary key,
    studentid int not null comment '学生ID',
    courseid  int not null comment '课程ID',
    constraint fk_courseid foreign key (courseid) references course (id),
    constraint fk_studentid foreign key (studentid) references student (id)
) comment '学生课程中间表';
insert into student_course
values (null, 1, 1),
       (null, 1, 2),
       (null, 1, 3),
       (null, 2, 2),
       (null, 2, 3),
(null, 3, 4);登录后复制3.一对一
案例: 用户与 用户详情的关系
关系: 一对一关系,多用于单表拆分,将一张表的基础字段放在一张表中,其他详情字段放在另一张表中,以提升操作效率
实现: 在任意一方加入外键,关联另外一方的主键,并且设置外键为唯一的(UNIQUE)
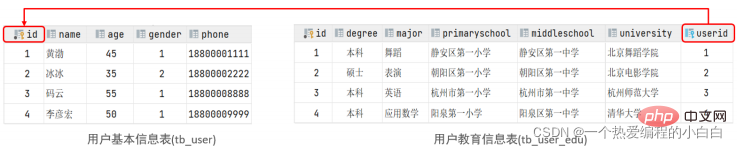
对应的SQL脚本:
create table tb_user
(
    id     int auto_increment primary key comment '主键ID',
    name   varchar(10) comment '姓名',
    age    int comment '年龄',
    gender char(1) comment '1: 男 , 2: 女',
    phone  char(11) comment '手机号'
) comment '用户基本信息表';
create table tb_user_edu
(
    id            int auto_increment primary key comment '主键ID',
    degree        varchar(20) comment '学历',
    major         varchar(50) comment '专业',
    primaryschool varchar(50) comment '小学',
    middleschool  varchar(50) comment '中学',
    university    varchar(50) comment '大学',
    userid        int unique comment '用户ID',
    constraint fk_userid foreign key (userid) references tb_user (id)
) comment '用户教育信息表';
insert into tb_user(id, name, age, gender, phone)
values (null, '黄渤', 45, '1', '18800001111'),
       (null, '冰冰', 35, '2', '18800002222'),
       (null, '码云', 55, '1', '18800008888'),
       (null, '李彦宏', 50, '1', '18800009999');
insert into tb_user_edu(id, degree, major, primaryschool, middleschool, university, userid)
values (null, '本科', '舞蹈', '静安区第一小学', '静安区第一中学', '北京舞蹈学院', 1),
       (null, '硕士', '表演', '朝阳区第一小学', '朝阳区第一中学', '北京电影学院', 2),
       (null, '本科', '英语', '杭州市第一小学', '杭州市第一中学', '杭州师范大学', 3),
       (null, '本科', '应用数学', '阳泉第一小学', '阳泉区第一中学', '清华大学', 4);登录后复制
3.多表查询概述
1.数据准备
1). 删除之前 emp, dept表的测试数据
2). 执行如下脚本,创建emp表与dept表并插入测试数据
-- 创建dept表,并插入数据
create table dept
(
    id   int auto_increment comment 'ID' primary key,
    name varchar(50) not null comment '部门名称'
) comment '部门表';
INSERT INTO dept (id, name)
VALUES (1, '研发部'),
       (2, '市场部'),
       (3, '财务部'),
       (4, '销售部'),
       (5, '总经办'),
       (6, '人事部');
-- 创建emp表,并插入数据
create table emp
(
    id        int auto_increment comment 'ID' primary key,
    name      varchar(50) not null comment '姓名',
    age       int comment '年龄',
    job       varchar(20) comment '职位',
    salary    int comment '薪资',
    entrydate date comment '入职时间',
    managerid int comment '直属领导ID',
    dept_id   int comment '部门ID'
) comment '员工表';
-- 添加外键
alter table emp
    add constraint fk_emp_dept_id foreign key (dept_id) references dept (id);
INSERT INTO emp (id, name, age, job, salary, entrydate, managerid, dept_id)
VALUES (1, '金庸', 66, '总裁', 20000, '2000-01-01', null, 5),
       (2, '张无忌', 20, '项目经理', 12500, '2005-12-05', 1, 1),
       (3, '杨逍', 33, '开发', 8400, '2000-11-03', 2, 1),
       (4, '韦一笑', 48, '开发', 11000, '2002-02-05', 2, 1),
       (5, '常遇春', 43, '开发', 10500, '2004-09-07', 3, 1),
       (6, '小昭', 19, '程序员鼓励师', 6600, '2004-10-12', 2, 1),
       (7, '灭绝', 60, '财务总监', 8500, '2002-09-12', 1, 3),
       (8, '周芷若', 19, '会计', 48000, '2006-06-02', 7, 3),
       (9, '丁敏君', 23, '出纳', 5250, '2009-05-13', 7, 3),
       (10, '赵敏', 20, '市场部总监', 12500, '2004-10-12', 1, 2),
       (11, '鹿杖客', 56, '职员', 3750, '2006-10-03', 10, 2),
       (12, '鹤笔翁', 19, '职员', 3750, '2007-05-09', 10, 2),
       (13, '方东白', 19, '职员', 5500, '2009-02-12', 10, 2),
       (14, '张三丰', 88, '销售总监', 14000, '2004-10-12', 1, 4),
       (15, '俞莲舟', 38, '销售', 4600, '2004-10-12', 14, 4),
       (16, '宋远桥', 40, '销售', 4600, '2004-10-12', 14, 4),
       (17, '陈友谅', 42, null, 2000, '2011-10-12', 1, null)登录后复制
dept表共6条记录,emp表共17条记录。
2.概述
多表查询就是指从多张表中查询数据。
笛卡尔积: 笛卡尔乘积是指在数学中,两个集合A集合 和 B集合的所有组合情况。

而在多表查询中,我们是需要消除无效的笛卡尔积的,只保留两张表关联部分的数据。


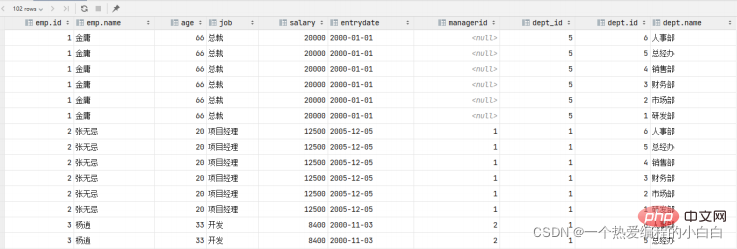
select * from emp , dept where emp.dept_id = dept.id;
登录后复制
4.分类
连接查询
1.内连接
内连接的语法分为两种: 隐式内连接、显式内连接。先来学习一下具体的语法结构。
1). 隐式内连接
SELECT 字段列表 FROM 表1 , 表2 WHERE 条件 ... ;
登录后复制2). 显式内连接
SELECT 字段列表 FROM 表1 [ INNER ] JOIN 表2 ON 连接条件 ... ;
登录后复制select emp.name, dept.name
from emp,
dept
where emp.dept_id = dept.id;
-- 为每一张表起别名,简化SQL编写
select e.name,d.name from emp e , dept d where e.dept_id = d.id;登录后复制select e.name, d.name
from emp e
inner join dept d on e.dept_id = d.id;
-- 为每一张表起别名,简化SQL编写
select e.name, d.name from emp e join dept d on e.dept_id = d.id;登录后复制2.外连接
1). 左外连接
SELECT 字段列表 FROM 表1 LEFT [ OUTER ] JOIN 表2 ON 条件 ... ;
登录后复制2). 右外连接
SELECT 字段列表 FROM 表1 RIGHT [ OUTER ] JOIN 表2 ON 条件 ... ;
登录后复制select e.*, d.name
from emp e
left outer join dept d on e.dept_id = d.id;
select e.*, d.name
from emp e
left join dept d on e.dept_id = d.id;登录后复制 
select d.*, e.*
from emp e
         right outer join dept d on e.dept_id = d.id;
select d.*, e.*
from dept d
         left outer join emp e on e.dept_id = d.id;登录后复制
3.自连接
1.自连接查询
案例:
A. 查询员工 及其 所属领导的名字
表结构: emp
select a.name , b.name from emp a , emp b where a.managerid = b.id;
登录后复制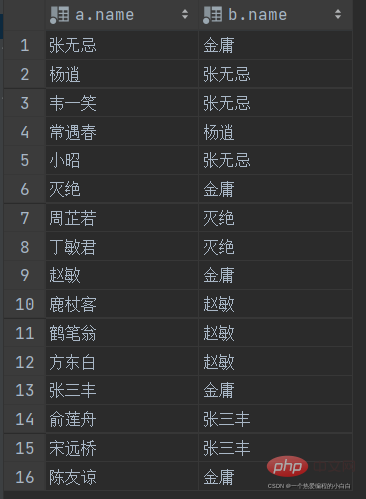
select a.name '员工', b.name '领导'
from emp a
left join emp b on a.managerid = b.id;登录后复制2.联合查询
对于union查询,就是把多次查询的结果合并起来,形成一个新的查询结果集。
SELECT 字段列表
FROM 表A... UNION [ ALL ]
SELECT 字段列表
FROM 表B....;
登录后复制select *
from emp
where salary < 5000
union all
select *
from emp
where age > 50;
登录后复制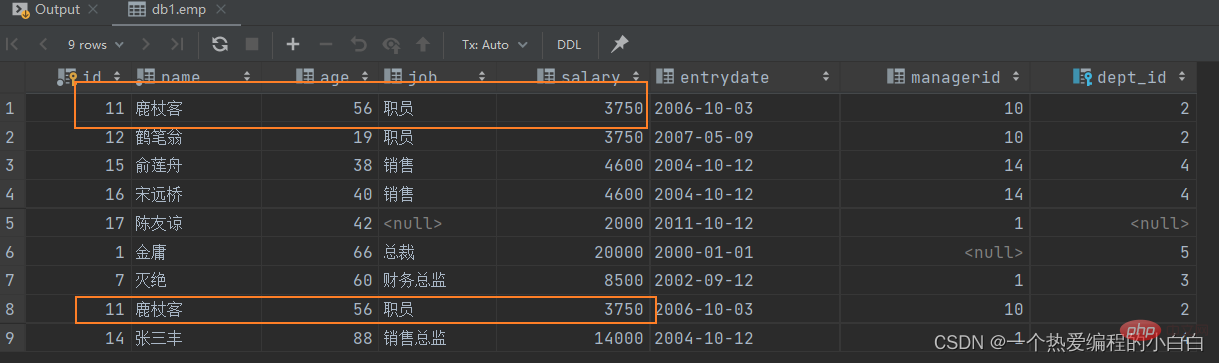
select *
from emp
where salary < 5000
union
select *
from emp
where age > 50;
登录后复制
union 联合查询,会对查询出来的结果进行去重处理。
注意:
如果多条查询语句查询出来的结果,字段数量不一致,在进行union/union all联合查询时,将会报
错。如:

4.子查询
1.概述
1). 概念
SQL语句中嵌套SELECT语句,称为嵌套查询,又称子查询。
SELECT * FROM t1 WHERE column1 = ( SELECT column1 FROM t2 );
登录后复制2). 分类
2.标量子查询
案例:
A. 查询 "销售部" 的所有员工信息
完成这个需求时,我们可以将需求分解为两步:
查询 "销售部" 部门ID
select id from dept where name = '销售部';
登录后复制根据 "销售部" 部门ID, 查询员工信息
select * from emp where dept_id = (select id from dept where name = '销售部');
登录后复制
B. 查询在 "方东白" 入职之后的员工信息
完成这个需求时,我们可以将需求分解为两步:
查询 方东白 的入职日期
select entrydate from emp where name = '方东白';
登录后复制
查询指定入职日期之后入职的员工信息
select * from emp where entrydate > (select entrydate from emp where name = '方东白');
登录后复制
3.列子查询

案例:
A. 查询 "销售部" 和 "市场部" 的所有员工信息
分解为以下两步:
查询 "销售部" 和 "市场部" 的部门ID
select id from dept where name = '销售部' or name = '市场部';
登录后复制
根据部门ID, 查询员工信息
select *
from emp
where dept_id in (select id from dept where name = '销售部' or name = '市场部');
登录后复制
B. 查询比 财务部 所有人工资都高的员工信息
分解为以下两步:
查询所有 财务部 人员工资
select salary from emp where dept_id = (select id from dept where name = '财务部');
登录后复制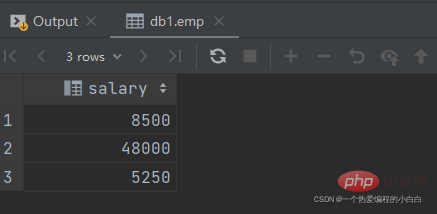
比 财务部 所有人工资都高的员工信息
select *
from emp
where salary > all (select salary from emp where dept_id = (select id from dept where name = '财务部'));
登录后复制C. 查询比研发部其中任意一人工资高的员工信息
分解为以下两步:
查询研发部所有人工资
select salary from emp where dept_id = (select id from dept where name = '研发部');
登录后复制比研部其中任意一人工资高的员工信息
select *
from emp
where salary > any (select salary from emp where dept_id = (select id from dept where name = '研发部'));
登录后复制4.行子查询
案例:
A. 查询与 "张无忌" 的薪资及直属领导相同的员工信息 ;
这个需求同样可以拆解为两步进行:
查询 "张无忌" 的薪资及直属领导
select salary, managerid from emp where name = '张无忌';
登录后复制查询与 "张无忌" 的薪资及直属领导相同的员工信息 ;
select *
from emp
where (salary, managerid) = (select salary, managerid from emp where name = '张无忌');
登录后复制
5.表子查询
案例:
A. 查询与 "鹿杖客" , "宋远桥" 的职位和薪资相同的员工信息
分解为两步执行:
查询 "鹿杖客" , "宋远桥" 的职位和薪资
select job, salary from emp where name = '鹿杖客' or name = '宋远桥';
登录后复制查询与 "鹿杖客" , "宋远桥" 的职位和薪资相同的员工信息
select *
from emp
where (job, salary) in (select job, salary from emp where name = '鹿杖客' or name = '宋远桥');
登录后复制B. 查询入职日期是 "2006-01-01" 之后的员工信息 , 及其部门信息
分解为两步执行:
入职日期是 "2006-01-01" 之后的员工信息
select * from emp where entrydate > '2006-01-01';
登录后复制.查询这部分员工, 对应的部门信息;
select e.*, d.*
from (select * from emp where entrydate > '2006-01-01') e
         left join dept d on e.dept_id = d.id;登录后复制
推荐学习:mysql视频教程
以上就是MySQL约束与多表查询基础详解的详细内容,更多请关注靠谱客其它相关文章!

最后
以上就是感动舞蹈最近收集整理的关于MySQL约束与多表查询基础详解的全部内容,更多相关MySQL约束与多表查询基础详解内容请搜索靠谱客的其他文章。


发表评论 取消回复