本文实例讲述了Thinkphp5+plupload实现支持实时预览的图片上传功能。分享给大家供大家参考,具体如下:
今天和大家分享一个国外的图片上传插件,这个插件支持分片上传大文件。其中著名的七牛云平台的jssdk就使用了puupload插件,可见这个插件还是相当牛叉的。
这个插件不仅仅支持图片上传,还支持大多数文件的上传,例如视频文件,音频文件,word文件等等,而且大文件都采用分片上传的机制。
Plupload有以下功能和特点:
1、拥有多种上传方式:HTML5、flash、silverlight以及传统的<input type=”file” />。Plupload会自动侦测当前的环境,选择最合适的上传方式,并且会优先使用HTML5的方式。所以你完全不用去操心当前的浏览器支持哪些上传方式,Plupload会自动为你选择最合适的方式。
2、支持以拖拽的方式来选取要上传的文件
3、支持在前端压缩图片,即在图片文件还未上传之前就对它进行压缩
4、可以直接读取原生的文件数据,这样的好处就是例如可以在图片文件还未上传之前就能把它显示在页面上预览
5、支持把大文件切割成小片进行上传,因为有些浏览器对很大的文件比如几G的一些文件无法上传。
下面就介绍一个tp5整合plupload图片上传插件的小案例,希望给大家带来一点小帮助。
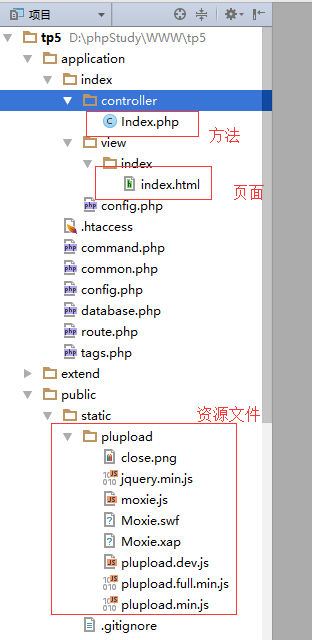
一、案例目录结构
二、Index.php控制器方法
<?php
namespace appindexcontroller;
use thinkController;
use thinkDb;
class Index extends Controller{
  public function index(){
    $rootUrl = $this->request->root(true); //ROOT域名
    $rootUrl = explode('index.php',$rootUrl)[0];
    //模板资源变量分配
    foreach (config('TMPL_PARSE_STRING') as $key => $value) {
      $this->view->assign('_'.$key,$rootUrl.$value);
    }
    return $this->fetch();
  }
  //图片上传方法
  public function upload_images(){
    if($this->request->isPost()){
      //接收参数
      $images = $this->request->file('file');
      //计算md5和sha1散列值,TODO::作用避免文件重复上传
      $md5 = $images->hash('md5');
      $sha1= $images->hash('sha1');
      //判断图片文件是否已经上传
      $img = Db::name('picture')->where(['md5'=>$md5,'sha1'=>$sha1])->find();//我这里是将图片存入数据库,防止重复上传
      if(!empty($img)){
        return json(['status'=>1,'msg'=>'上传成功','data'=>['img_id'=>$img['id'],'img_url'=>$this->request->root(true).'/'.$img['path']]]);
      }else{
        // 移动到框架应用根目录/public/uploads/picture/目录下
        $imgPath = 'public' . DS . 'uploads' . DS . 'picture';
        $info = $images->move(ROOT_PATH . $imgPath);
        $path = 'public/uploads/picture/'.date('Ymd',time()).'/'.$info->getFilename();
        $data = [
          'path' => $path ,
          'md5' => $md5 ,
          'sha1' => $sha1 ,
          'status' => 1 ,
          'create_time' => time() ,
        ];
        if($img_id=Db::name('picture')->insertGetId($data)){
          return json(['status'=>1,'msg'=>'上传成功','data'=>['img_id'=>$img_id,'img_url'=>$this->request->root(true).'/'.$path]]);
        }else{
          return json(['status'=>0,'msg'=>'写入数据库失败']);
        }
      }
    }else{
      return ['status'=>0,'msg'=>'非法请求!'];
    }
  }
}
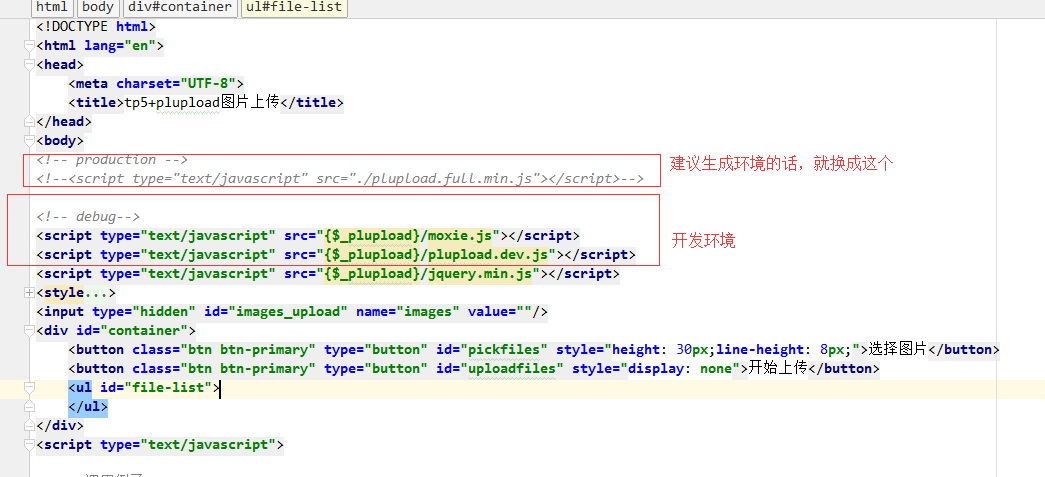
三、index.html页面
<!DOCTYPE html>
<html lang="en">
<head>
  <meta charset="UTF-8">
  <title>tp5+plupload图片上传</title>
</head>
<body>
<!-- production -->
<!--<script type="text/javascript" src="./plupload.full.min.js"></script>-->
<!-- debug-->
<script type="text/javascript" src="{$_plupload}/moxie.js"></script>
<script type="text/javascript" src="{$_plupload}/plupload.dev.js"></script>
<script type="text/javascript" src="{$_plupload}/jquery.min.js"></script>
<style>
  ul{
    list-style:none;
  }
  #file-list {overflow: hidden;padding-left: initial;}
  #file-list li {
    width:160px;
    float: left;
    height:200px;
    position: relative;
    height: inherit;
    margin-bottom: inherit;
  }
  #file-list li a {
    width:150px;
    height:150px;
    text-align: center;
    display: flex;
    align-items: center;
    justify-content: center;
    margin:0 auto;
    border:1px solid #ccc;
    padding: 5px 5px 5px 5px;
  }
  .close{
    background-image: url("{$_plupload}/close.png");
    width: 30px;
    height: 30px;
    background-size: contain;
    position: absolute;
    right: 2%;
    top: 0;
  }
  #file-list li a img {max-width:100%;max-height: 100%;}
  .progress{
    position: absolute;
    background-color: rgba(4, 4, 4, 0.53);
    color: #fff;
    padding: 3px 3px 3px 3px;
    border-radius: 10%;
  }
</style>
<input type="hidden" id="images_upload" name="images" value=""/>
<div id="container">
  <button class="btn btn-primary" type="button" id="pickfiles" style="height: 30px;line-height: 8px;">选择图片</button>
  <button class="btn btn-primary" type="button" id="uploadfiles" style="display: none">开始上传</button>
  <ul id="file-list">
  </ul>
</div>
<script type="text/javascript">
  //调用例子
  var uploader = new plupload.Uploader({
    runtimes : 'html5,flash,silverlight,html4',//上传方式顺序优先级
    browse_button : 'pickfiles',//选择图片按钮id
    container: document.getElementById('container'),//容器
    url : "{:url('Index/upload_images')}",//服务器接口地址
    flash_swf_url : "{$_plupload}/Moxie.swf",
    silverlight_xap_url : "{$_plupload}/Moxie.xap",
    multi_selection: true,//false为单图上传,true为多图上传
    filters : {
      max_file_size : '100mb',//限制文件上传大小
      mime_types: [
        {title : "Image files", extensions : "jpg,gif,png"},//限制文件上传格式
      ]
    },
    init: {
      //init事件发生后触发
      PostInit: function() {
        //document.getElementById('filelist').innerHTML = '';
        document.getElementById('uploadfiles').onclick = function() {
          uploader.start();
          return false;
        };
      },
      FilesAdded: function(up, files) {//文件选择之后的触发的方法
        var len = len = files.length;
        for(var i = 0; i<len; i++){
          var file_name = files[i].name; //文件名
          var file_size = files[i].size;//文件大小
          //构造html来更新UI
          //var html = '<li id="file-' + files[i].id +'"><p class="file-name">' + file_name + '(' + plupload.formatSize(file_size) + ')' + '</p><p class="progress"></p></li>';
          var html = '<li id="file-' + files[i].id +'"><span class="close"></span></li>';
          $(html).appendTo('#file-list');
          !function(i){
            previewImage(files[i],function(imgsrc){
              $('#file-'+files[i].id).append('<a><img src="'+ imgsrc +'" /><span class="progress">12</span></a>');
            })
          }(i);
          $("#uploadfiles").trigger('click');
        }
        /*plupload.each(files, function(file) {
         document.getElementById('filelist').innerHTML += '<div id="' + file.id + '">' + file.name + ' (' + plupload.formatSize(file.size) + ') <b></b></div>';
         });*/
      },
      UploadProgress: function(up, file) {//上传过程中调用的方法
        //document.getElementById(file.id).getElementsByTagName('b')[0].innerHTML = '<span>' + file.percent + "%</span>";
        $('#file-'+file.id +" .progress").html(file.percent + "%");
      },
      FileUploaded : function (up,file,res) {//文件上传完成后
        console.log(res.response);
        var data = JSON.parse(res.response).data;
        $('#file-'+file.id).children('.close').attr('img_id',data.img_id);
        var img = $("#images_upload");
        var str = img.val();
        if(str == ''){
          str = data.img_id;
        }else{
          str += ','+data.img_id;
        }
        img.val(str);
      },
      Error: function(up, err) {
        //document.getElementById('console').appendChild(document.createTextNode("nError #" + err.code + ": " + err.message));
      }
    }
  });
  //plupload中为我们提供了mOxie对象
  //有关mOxie的介绍和说明请看:https://github.com/moxiecode/moxie/wiki/API
  //file为plupload事件监听函数参数中的file对象,callback为预览图片准备完成的回调函数
  function previewImage(file,callback){
    if(!file || !/image//.test(file.type)) return; //确保文件是图片
    if(file.type=='image/gif'){ //gif使用FileReader进行预览,因为mOxie.Image只支持jpg和png
      var gif = new moxie.file.FileReader();
      gif.onload = function(){
        callback(gif.result);
        gif.destroy();
        gif = null;
      };
      gif.readAsDataURL(file.getSource());
    }else{
      var image = new moxie.image.Image();
      image.onload = function() {
        image.downsize( 150, 150 );//先压缩一下要预览的图片,宽300,高300
        var imgsrc = image.type=='image/jpeg' ? image.getAsDataURL('image/jpeg',80) : image.getAsDataURL(); //得到图片src,实质为一个base64编码的数据
        callback && callback(imgsrc); //callback传入的参数为预览图片的url
        image.destroy();
        image = null;
      };
      image.load( file.getSource() );
    }
  }
  uploader.init();
  //移除图片
  $("#file-list").on('click',".close",function(){
    var img_id = $(this).attr("img_id");
    var img = $("#images_upload");
    var items=img.val().split(",");
    var index = items.indexOf(img_id);
    items.splice(index,1);//删除元素
    img.val(items.join(','));
    $(this).parent().remove();
  });
</script>
</body>
</html>
如果想研究插件源码的朋友,可以看这个文件,其中大部分都已经注释了。

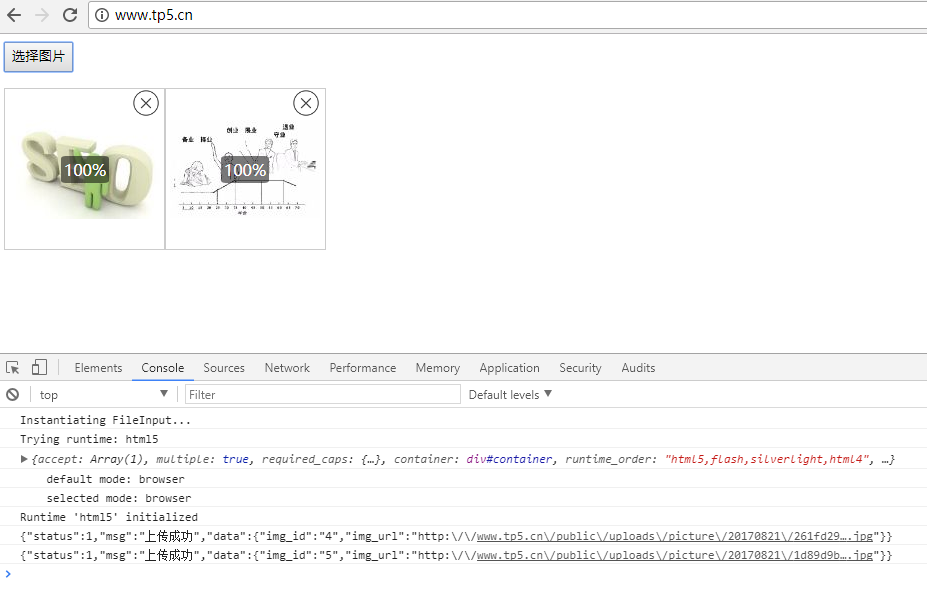
最终效果就是这样了。
如果对tp5不太熟悉的朋友,建议直接配置虚拟域名,将项目目录绑定到/tp5/public/目录。
案例源码:https://github.com/BlueSimle/thinkphp5-plupload (如果对你有帮助,请给个star哦。如果有什么疑问,请留言)
更多关于thinkPHP相关内容感兴趣的读者可查看本站专题:《ThinkPHP入门教程》、《thinkPHP模板操作技巧总结》、《ThinkPHP常用方法总结》、《codeigniter入门教程》、《CI(CodeIgniter)框架进阶教程》、《Zend FrameWork框架入门教程》及《PHP模板技术总结》。
希望本文所述对大家基于ThinkPHP框架的PHP程序设计有所帮助。
最后
以上就是无心期待最近收集整理的关于Thinkphp5+plupload实现的图片上传功能示例【支持实时预览】的全部内容,更多相关Thinkphp5+plupload实现内容请搜索靠谱客的其他文章。


发表评论 取消回复