当我们在电脑上安装了新系统后,最重要的一件事就是让其可以连接到互联网。在Windows 7中,网络的连接变得更加容易、更易于操作,它将几乎所有与网络相关的向导和控制程序聚合在“网络和共享中心”中,通过可视化的视图和单站式命令,我们便可以轻松连接到网络。下面我们就来看看如何在Windows7在使用有线和无线网络连接互联网。
1, Windows 7系统如何创建无线网络连接?

打开开始菜单,点击“控制面板”。
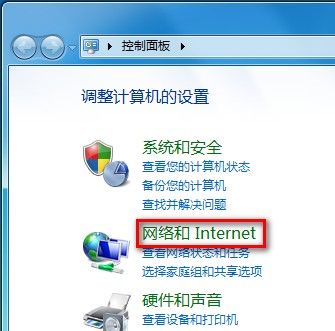
点击“网络和Internet”。点击“网络和共享中心”。

点击“设置新的连接或网络”。

选择“连接到Internet",点击“下一步”。

单击“无线”。

桌面右下角出现搜索到的无线网络,选择要连接的无线网络点击“连接”。

如果无线网络有密码,则输入密码后连接即可。

注:无线网络可以直接点击电脑右下角的无线网络标识进行连接。
2,Windows 7系统如何创建宽带连接?
点击“设置新的连接或网络”。

选择“连接到Internet”,点击“下一步”。

单击“宽带(PPPoE)”。

在之后出现的界面,输入相关ISP提供的信息后点击“连接”即可。

最后
以上就是无聊百合最近收集整理的关于Win7系统如何创建无线网络连接及宽带连接的全部内容,更多相关Win7系统如何创建无线网络连接及宽带连接内容请搜索靠谱客的其他文章。
本图文内容来源于网友提供,作为学习参考使用,或来自网络收集整理,版权属于原作者所有。


发表评论 取消回复