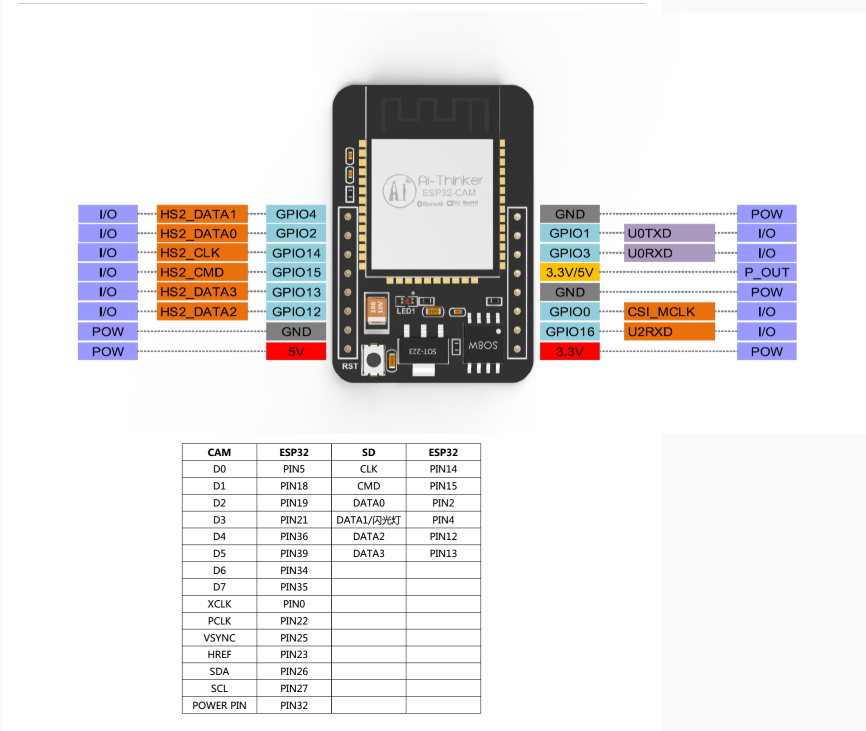
一、准备硬件
-
安信可的ESP32-CAM模块
https://docs.ai-thinker.com/esp32-cam -
引脚图

二、SDK配置
- 拉取SDK https://github.com/espressif/esp-who,直接拉取最新的,用idf4.4版本
git clone --recursive https://github.com/espressif/esp-who.git - 拉取4.4的SDK,可以看我博客 https://blog.csdn.net/xuan530482366/article/details/123172550
这里需要注意一下,拉取SDK后,要用脚本来获取工具链和设置全局,工具链版本不合适会出现编译错误
-
选择开发板(或者按照github的readme指引设置引脚)
→ Component config → ESP-WHO Configuration → Camera Configuration → Select Camera Pinout
我这里选择安信可的 -
idf.py build咯…
三、程序
- 我这里使用的demo是
esp-whoexampleshuman_face_detectionterminalmainapp_main.cpp,这个demo在检测了一次人脸输出后,会出现重启现象,在自己新建一个任务后,不再重启了,具体原因我没有继续研究了 - 注意这里用到c++的文件,对于一些强制转换格式,会出现一些错误,因为我用到gpio,这里需要用它定义的type,或者强制转换一下
例如:
(gpio_num_t)GPIO_OUTPUT_IO_0
io_conf.pull_up_en = GPIO_PULLUP_ENABLE; - 注意点:
gpio4是闪光灯,上电后闪烁一下,然后检测到了之后gpio2拉低
我这里将result的信号量传进去了,然后一直等待,平时这里每一帧数据在detect后,会拿到一个结果。这里必须加vTaskDelay,否则会卡死
四、小技巧
- 对于注册
register_human_face_detection里面的参数,可以直接在github上面搜当前repository就行 - 对于其他的,例如上面提到的必须强制转换,也可以将错误放上去搜一下,就知道在哪个文件了
五、源码
#include "who_camera.h"
#include "who_human_face_detection.hpp"
#include "esp_log.h"
#include "driver/gpio.h"
#define GPIO_OUTPUT_IO_0    2
#define GPIO_OUTPUT_IO_1    4
#define GPIO_OUTPUT_PIN_SEL  ((1ULL<<GPIO_OUTPUT_IO_0) | (1ULL<<GPIO_OUTPUT_IO_1))

static QueueHandle_t xQueueAIFrame = NULL;
static QueueHandle_t xQueueResult = NULL;

uint8_t is_detected = false;
static void result_handler(void *arg)
{

    while (true)
    {
        xQueueReceive(xQueueResult, &(is_detected), portMAX_DELAY);
		ESP_LOGI("DETECTED", "is_detected: %d", is_detected);
		if(is_detected)
		{
			gpio_set_level((gpio_num_t)GPIO_OUTPUT_IO_0,0);

		}
		else
		{
			gpio_set_level((gpio_num_t)GPIO_OUTPUT_IO_0,1);
			gpio_set_level((gpio_num_t)GPIO_OUTPUT_IO_1,0);
		}
		vTaskDelay(10/portTICK_PERIOD_MS);
    }
}

extern "C" void app_main()
{
    xQueueAIFrame = xQueueCreate(2, sizeof(camera_fb_t *));
	xQueueResult = xQueueCreate(10, sizeof(is_detected ));

    register_camera(PIXFORMAT_RGB565, FRAMESIZE_QVGA, 2, xQueueAIFrame);
    register_human_face_detection(xQueueAIFrame, NULL, xQueueResult, NULL, true);


    gpio_config_t io_conf;
    //disable interrupt
    io_conf.intr_type = GPIO_INTR_DISABLE;
    //set as output mode
    io_conf.mode = GPIO_MODE_OUTPUT;
    //bit mask of the pins that you want to set,e.g.GPIO18/19
    io_conf.pin_bit_mask = GPIO_OUTPUT_PIN_SEL;
    //disable pull-down mode
    io_conf.pull_down_en = GPIO_PULLDOWN_DISABLE;
    //disable pull-up mode
    io_conf.pull_up_en = GPIO_PULLUP_ENABLE;
    //configure GPIO with the given settings
    gpio_config(&io_conf);

	gpio_set_level((gpio_num_t)GPIO_OUTPUT_IO_1,1);
	vTaskDelay(500/portTICK_PERIOD_MS);
	gpio_set_level((gpio_num_t)GPIO_OUTPUT_IO_1,0);
	xTaskCreatePinnedToCore(result_handler, "result", 4 * 1024, NULL, 6, NULL, 0);
}
最后
以上就是酷酷音响最近收集整理的关于ESP32-WHO人脸检测的全部内容,更多相关ESP32-WHO人脸检测内容请搜索靠谱客的其他文章。
本图文内容来源于网友提供,作为学习参考使用,或来自网络收集整理,版权属于原作者所有。


发表评论 取消回复