全连接层的基本使用
"""
    全连接层 -- 简单使用
"""
import tensorflow as tf

# 输入维度[4, 784]
x = tf.random.normal((4, 784))

# 网络结构 [?, 512] 输入维度确定?
net = tf.keras.layers.Dense(units=512)
out = net(x)

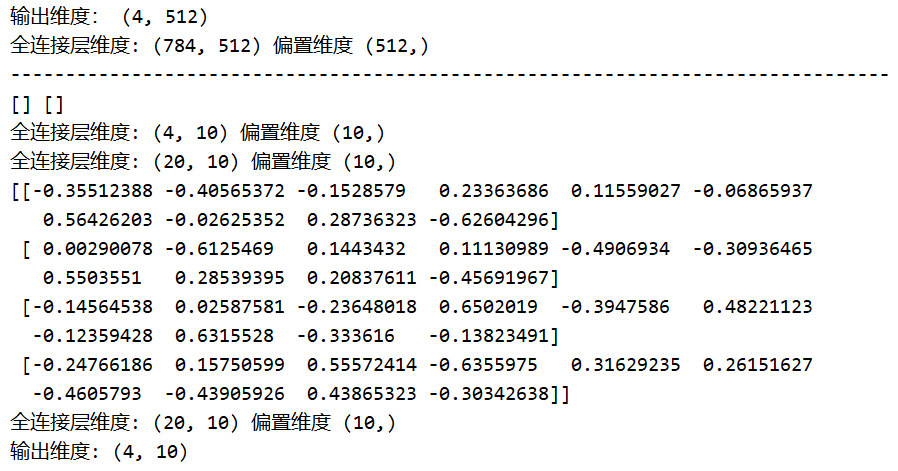
print("输出维度:", out.shape)
# 根据矩阵相乘规则 推断出 [784, 512]
print("全连接层维度:", net.kernel.shape, "偏置维度", net.bias.shape)


print("--" * 40)
# W和B的创建
net = tf.keras.layers.Dense(10)
# 在没有build之前调用失败
# print("全连接层维度:", net.kernel.shape, "偏置维度", net.bias.shape)
print(net.get_weights(), net.weights)

# 创建权重与偏置 [None, 4] * [?, 10]  ==> 4
net.build(input_shape=(None, 4))
print("全连接层维度:", net.kernel.shape, "偏置维度", net.bias.shape)

# 重新创建 全连接层 [None, 20] * [?, 10] ==> 20
net.build(input_shape=(None, 20))
print("全连接层维度:", net.kernel.shape, "偏置维度", net.bias.shape)

# 重复创建 [2, 4] * [?, 10] ==> 4
net.build(input_shape=(2, 4))
print(net.kernel.numpy())

# 输入维度不一致情况
net.build(input_shape=[None, 20])
print("全连接层维度:", net.kernel.shape, "偏置维度", net.bias.shape)

# 输入维度不匹配
# x = tf.random.normal([4, 12])
x = tf.random.normal([4, 20])
out = net(x)
print("输出维度:", out.shape)

使用函数创建全连接网络
"""
    sequnential
    连续创建模型
"""
import tensorflow as tf

# 输入数据
x = tf.random.normal([2, 3])

# [2*3] ==> [3*2] ==> [2*2] ==>[2*2]
# 组建网络
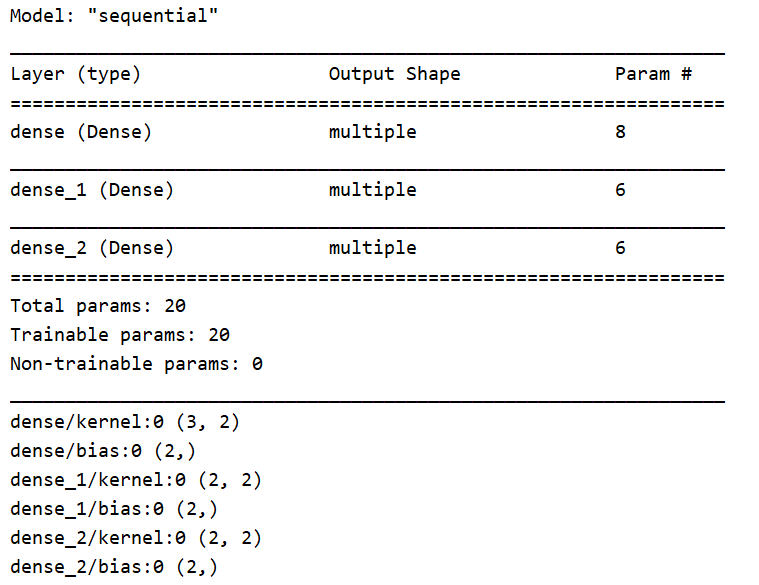
model = tf.keras.Sequential([
    tf.keras.layers.Dense(2, activation="relu"),
    tf.keras.layers.Dense(2, activation="relu"),
    tf.keras.layers.Dense(2)  # 输出层
])

# 初始化网络参数
model.build(input_shape=[None, 3])

# 显示模型结构
model.summary()

# 打印可训练变量
for p in model.trainable_variables:
    print(p.name, p.shape)

最后
以上就是务实网络最近收集整理的关于Tensorflow2.0 全连接层全连接层的基本使用使用函数创建全连接网络的全部内容,更多相关Tensorflow2.0内容请搜索靠谱客的其他文章。
本图文内容来源于网友提供,作为学习参考使用,或来自网络收集整理,版权属于原作者所有。


发表评论 取消回复