论文名:D-Unet: A Dual-encoder U-Net for Image SplicingForgery Detection and Localization
arxiv 2020
复现时间 2021/4/24 使用pytorch
这个论文的创新性不高,希望诸君绕过。论文甚至是把图片给写错了。实在是过分。
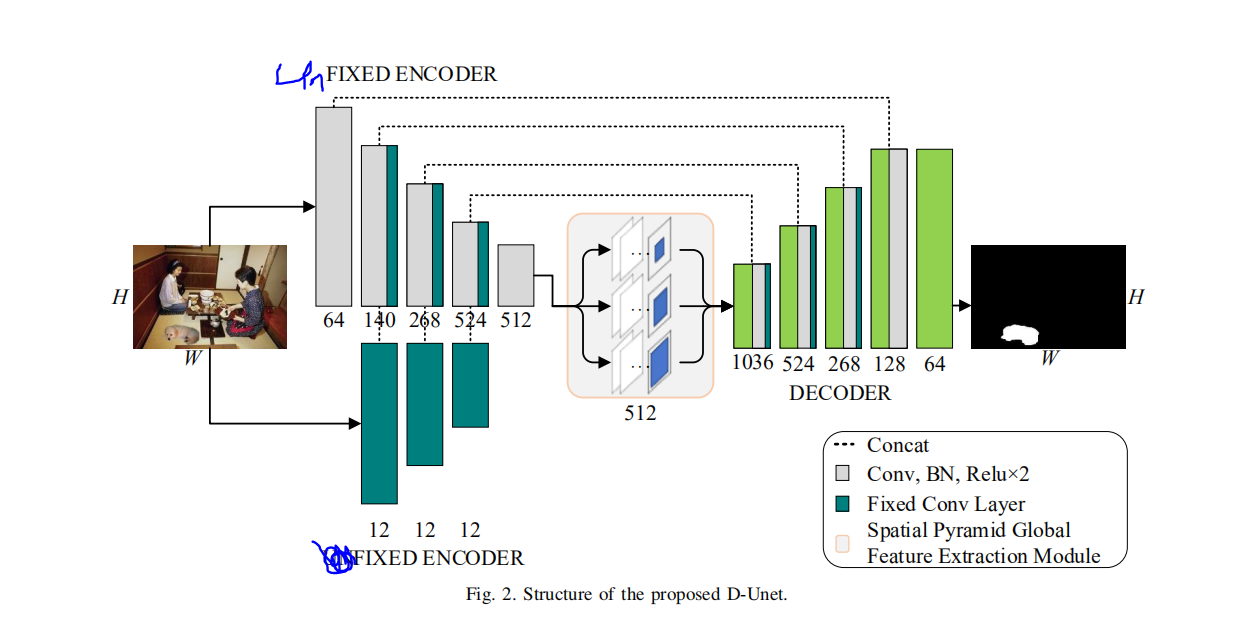
关于人工特征融入深度网络的思考。
使用某种图像库可以很轻易 的得到人工特征。
但是这个东西是用CPU计算的,而pytorch是拿GPU跑的。
在实现上不是很难,就是注意CPU和Conda。
但是把这玩意从CPU,GPU里面复制来,复制去 的。个人认为电脑会’累‘的,电脑肯定会累的,会跑的很慢。
下面是用这种很笨的方法实现的3重Harr小波。没有效率的方法。
#xioabo.py

#!/usr/bin/env python
# -*- coding:utf-8 -*-
import numpy as np
import pywt
import cv2
import matplotlib.pyplot as plt
import torch


def xiaob(img):
    img=img.reshape(img.shape[1], img.shape[2],img.shape[3])
    img = img.permute(1, 2, 0)
    img=img.cpu().numpy()  # 把数据集中的tensor转numpy
    # print(type(img2))
    # img3 = cv2.resize(img2, (448, 448))
    b, g, r = cv2.split(img)
    x = (b, g, r)
    count = 1
    for img in x:
        # plt.figure('二维小波一级变换')
        coeffs = pywt.dwt2(img, 'haar')
        cA, (cH, cV, cD) = coeffs

        # 将各个子图进行拼接,最后得到一张图
        '''AH = np.concatenate([cA, cH], axis=1)
        VD = np.concatenate([cV, cD], axis=1)
        img = np.concatenate([AH, VD], axis=0)'''
        # 显示为灰度图
        ''' plt.imshow(img, 'gray')
        plt.title('result')
        plt.show()'''
        cA = torch.from_numpy(cA)
        cH = torch.from_numpy(cH)
        cV = torch.from_numpy(cV)
        cD = torch.from_numpy(cD)
        cA = cA.resize(1, cA.shape[0], cA.shape[1])
        cH = cH.resize(1, cH.shape[0], cH.shape[1])
        cV = cV.resize(1, cV.shape[0], cV.shape[1])
        cD = cD.resize(1, cD.shape[0], cD.shape[1])

        if count == 1:
            # y1 = (cV, cA, cH, cD)
            # cv2.imshow("y1", cD)
            outputs1 = torch.cat((cV, cA, cH, cD), dim=0)
            k=cA
            # print(outputs1.shape)
        if count == 2:
            # y2 = (cV, cA, cH, cD)
            outputs2 = torch.cat((cV, cA, cH, cD), dim=0)
            k = torch.cat((k, cA), dim=0)
        if count == 3:
            # y3 = (cV, cA, cH, cD)
            outputs3 = torch.cat((cV, cA, cH, cD), dim=0)
            k = torch.cat((k, cA), dim=0)
        count += 1
    out = (outputs1, outputs2, outputs3)
    outputs = torch.cat(out, dim=0)
    outputs=outputs.resize(1,outputs.shape[0], outputs.shape[1], outputs.shape[2])
    k=k.resize(1,k.shape[0], k.shape[1], k.shape[2])
    return (k.cuda(),outputs.cuda())  # 12层特征

# 将多通道图像变为单通道图像
# img = cv2.cvtColor(img, cv2.COLOR_BGR2GRAY).astype(np.float32)
# img = cv2.imread("C:/Users/brighten/Desktop/1.jpg")
#img = torch.rand(size=(3,224, 224))
#img=img.permute(1, 2, 0)
# print(img.shape)
# print(img)
'''k,y = xiaob(img)
print(k.shape)
print(y.shape)

k,y = xiaob(k)
print(k.shape)
print(y.shape)'''


# cv2.waitKey(0)
'''
(180, 130, 3)
torch.Size([4, 90, 65])
torch.Size([12, 90, 65])

输入rgb 图像,(w,h,3)
输出 tensor张量  (12,w/2,h/2)
这两个表示图层的方式不一样


改后。
输入张量

意思是把输入的张量按照numpy 的方式放置维度信息
输出张量


大小同上
'''
最后
以上就是还单身康乃馨最近收集整理的关于D-net论文复现部分内容 --关于人工特征融入深度网络的思考。的全部内容,更多相关D-net论文复现部分内容内容请搜索靠谱客的其他文章。
本图文内容来源于网友提供,作为学习参考使用,或来自网络收集整理,版权属于原作者所有。


发表评论 取消回复