安装 Elasticsearch6.6.x
1 安装jdk1.8 配置环境变量
2 下载安装es
// 下载es到指定文件夹
wget https://www.elastic.co/downloads/past-releases/elasticsearch-6-6-1
// 解压
unzip elasticsearch-6-6-1.zip
// 进入文件夹
cd elasticsearch-6-6-1
// 创建ES用户和组(创建elsearch用户组及elsearch用户),因为使用root用户执行ES程序,将会出现错误;所以这里需要创建单独的用户去执行ES 文件;
groupadd elsearch
useradd elsearch -g elsearch
// 该命令是更改该文件夹下所属的用户组的权限
chown -R elsearch:elsearch elasticsearch-6.6.1
// 创建ES数据文件和日志文件,直接在root用户根目录一下创建就可以了
mkdir /data
// 给elsearch用户设置data文件夹权限
chown -R elsearch:elsearch /data/
// 切换用户
su - elsearch
//在data创建es/data文件夹
mkdir -p es/data
//在data创建es/logs文件夹
mkdir -p es/logs
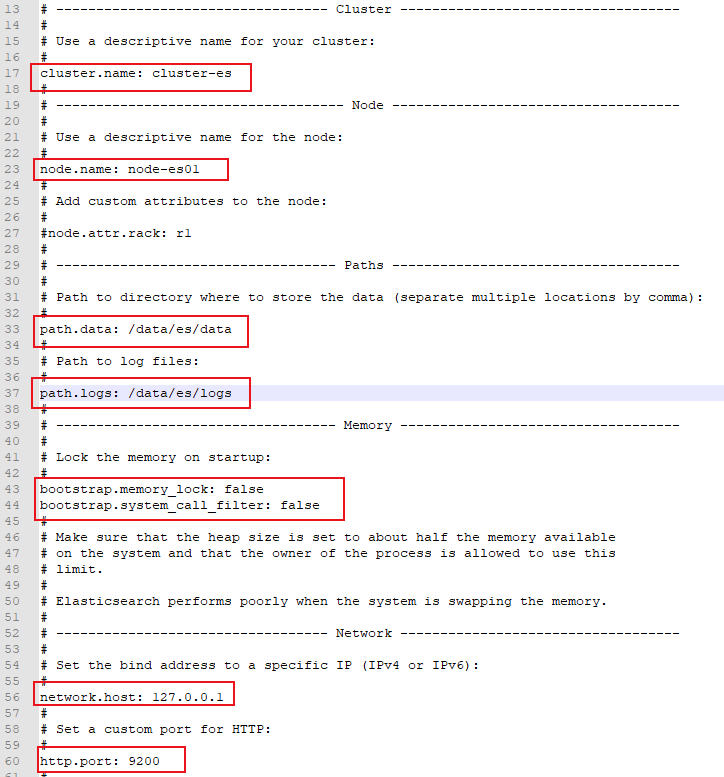
3修改ES配置文件
修改 config文件夹下的elasticsearch.yml文件

4. 执行
进入到elasticsearch-6-6-1/bin 目录下执行 ./elasticsearch 命令就可以了,执行 ./elasticesrarch -d 是后台运行
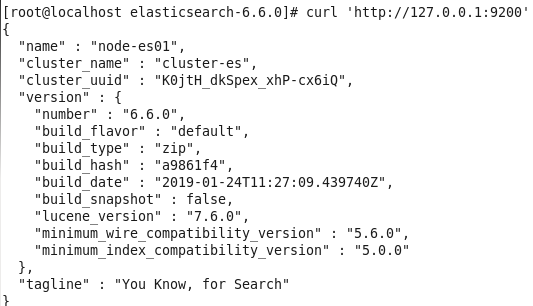
5 查看
curl 'http://127.0.0.1:9200/'

安装head插件
	// 下载head安装包,下载地址:
	wget https://github.com/mobz/elasticsearch-head/archive/master.zip
	// 解压
	unzip elasticsearch-head-master.zip
	// 执行head  插件,需要node.js 的支持,安装一node.js
	curl -sL https://rpm.nodesource.com/setup_8.x | bash -
	yum install -y nodejs
	/ /执行完成后,可以使用命令 node -v 验证是否安装成功,同时npm 也安装成功了;执行命令 npm -v 也是可以验证的。
	node -v
	npm -v
	// 安装grunt ,由于head 插件的执行文件是有grunt 命令来执行的,所以这个命令必须安装
	npm install grunt --save-dev
	npm install
修改配置文件
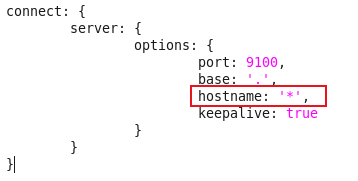
cd 进入elasticsearch-head-master 文件夹下,执行命令vim Gruntfile.js文件:增加hostname属性,设置为*;如图:

启动服务
grunt server
出现以下提示,为Gruntfile.js引用的,缺少以下包
Local Npm module “grunt-contrib-clean” not found. Is it installed?
Local Npm module “grunt-contrib-concat” not found. Is it installed?
Local Npm module “grunt-contrib-watch” not found. Is it installed?
Local Npm module “grunt-contrib-connect” not found. Is it installed?
Local Npm module “grunt-contrib-copy” not found. Is it installed?
Local Npm module “grunt-contrib-jasmine” not found. Is it installed?
Warning: Task “connect:server” not found. Use --force to continue.
Aborted due to warnings.
//安装命令
npm install grunt-contrib-clean --registry=https://registry.npm.taobao.org
npm install grunt-contrib-concat --registry=https://registry.npm.taobao.org
npm install grunt-contrib-watch --registry=https://registry.npm.taobao.org
npm install grunt-contrib-connect --registry=https://registry.npm.taobao.org
npm install grunt-contrib-copy --registry=https://registry.npm.taobao.org
npm install grunt-contrib-jasmine --registry=https://registry.npm.taobao.org
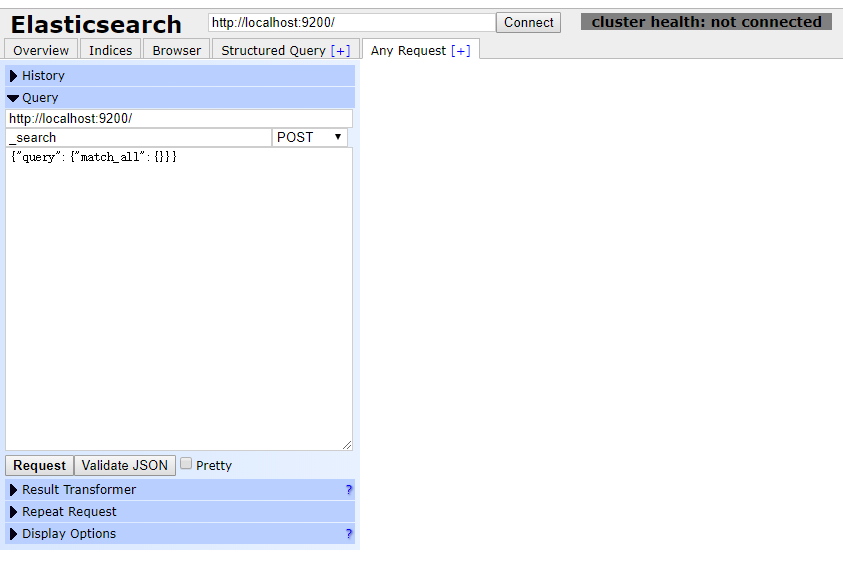
查看 http://127.0.0.1:9100/

由于cluster health: not connected,
解决方案是修改 cd 命令进入到elasticsearch-6.61 /config 文件中 vi elasticsearch.yml
文件末尾添加 :
    http.cors.enabled: true
    http.cors.allow-origin: "*"
    http.cors.allow-headers: Authorization,X-Requested-With,Content-Length,Content-Type
重启./elasticsearch
Linux下 自动启动tomcat服务操作指引
1.修改脚本文件 /etc/rc.d/rc.local
2.添加如下内容:
  export JAVA_HOME=/***/jdk1.8.0_65   (echo $JAVA_HOME 此命令可以找到jdk安装目录)
  /***/tomcat包名/bin/startup.sh start  (tomcat 目录下的 启动命令)
3.将rc.local修改为可执行
	chmod 777 /etc/rc.d/rc.local
最后
以上就是聪明便当最近收集整理的关于linux 安装Elasticsearch6.6.x 以及 head插件的全部内容,更多相关linux内容请搜索靠谱客的其他文章。
![谷歌Elasticsear-head插件请求报错 Content-Type header [application/x-www-form-urlencoded] is not supported](https://www.shuijiaxian.com/files_image/reation/bcimg13.png)


![es-head chrome插件请求报错 Content-Type header [application/x-www-form-urlencoded] is not supported](https://www.shuijiaxian.com/files_image/reation/bcimg5.png)

发表评论 取消回复