我是靠谱客的博主 文静戒指,这篇文章主要介绍SpringMVC-快速入门(6.4)- SpringMVC的拦截器(Interceptor)和过滤器(Filter)应用概述多个过滤器与拦截器的代码执行顺序,现在分享给大家,希望可以做个参考。
概述
本章将近一步介绍SpringMVC的拦截器(Interceptor)和过滤器(Filter)的应用场景。因个人时间有限,先贴个引用文章
基于SpringMVC的拦截器(Interceptor)和过滤器(Filter)的区别与联系
过滤器(Filter)和拦截器(Interceptor)之间的最大区别就是,过滤器可以包装 Request 和 Response,而拦截器并不能。
多个过滤器与拦截器的代码执行顺序
1.1、定义两个过滤器
public class TestFilter1 extends OncePerRequestFilter {

	protected void doFilterInternal(HttpServletRequest request, HttpServletResponse response, FilterChain filterChain)
			throws ServletException, IOException {
		//在DispatcherServlet之前执行
		System.out.println("############TestFilter1 doFilterInternal executed############");

		filterChain.doFilter(request, response);

		//在视图页面返回给客户端之前执行,但是执行顺序在Interceptor之后
		System.out.println("############TestFilter1 doFilter after############");
}

public class TestFilter2 extends OncePerRequestFilter {

	protected void doFilterInternal(HttpServletRequest request, HttpServletResponse response, FilterChain filterChain)
			throws ServletException, IOException {
		System.out.println("############TestFilter2 doFilterInternal executed############");
		filterChain.doFilter(request, response);
		System.out.println("############TestFilter2 doFilter after############");
	}
}
1.2、web.xml中注册这两个过滤器
<!-- 自定义过滤器:testFilter1 -->
 	<filter>
		<filter-name>testFilter1</filter-name>
		<filter-class>cn.zifangsky.filter.TestFilter1</filter-class>
	</filter>
	<filter-mapping>
		<filter-name>testFilter1</filter-name>
		<url-pattern>/*</url-pattern>
	</filter-mapping>
	<!-- 自定义过滤器:testFilter2 -->
 	<filter>
		<filter-name>testFilter2</filter-name>
		<filter-class>cn.zifangsky.filter.TestFilter2</filter-class>
	</filter>
	<filter-mapping>
		<filter-name>testFilter2</filter-name>
		<url-pattern>/*</url-pattern>
	</filter-mapping>
2.1、定义两个拦截器
public class BaseInterceptor implements HandlerInterceptor{

	/**
	 * 在DispatcherServlet之前执行
	 * */
	public boolean preHandle(HttpServletRequest arg0, HttpServletResponse arg1, Object arg2) throws Exception {
		System.out.println("************BaseInterceptor preHandle executed**********");
		return true;
	}

	/**
	 * 在controller执行之后的DispatcherServlet之后执行
	 * */
	public void postHandle(HttpServletRequest arg0, HttpServletResponse arg1, Object arg2, ModelAndView arg3)
			throws Exception {
		System.out.println("************BaseInterceptor postHandle executed**********");
	}

	/**
	 * 在页面渲染完成返回给客户端之前执行
	 * */
	public void afterCompletion(HttpServletRequest arg0, HttpServletResponse arg1, Object arg2, Exception arg3)
			throws Exception {
		System.out.println("************BaseInterceptor afterCompletion executed**********");
	}
}

public class TestInterceptor implements HandlerInterceptor {

	public boolean preHandle(HttpServletRequest arg0, HttpServletResponse arg1, Object arg2) throws Exception {
		System.out.println("************TestInterceptor preHandle executed**********");
		return true;
	}

	public void postHandle(HttpServletRequest arg0, HttpServletResponse arg1, Object arg2, ModelAndView arg3)
			throws Exception {
		System.out.println("************TestInterceptor postHandle executed**********");
	}

	public void afterCompletion(HttpServletRequest arg0, HttpServletResponse arg1, Object arg2, Exception arg3)
			throws Exception {
		System.out.println("************TestInterceptor afterCompletion executed**********");
	}
}
2.2、springmvc-servlet.xml中注册这两个拦截器
    <!-- 拦截器 -->
 	<mvc:interceptors>
		<!-- 对所有请求都拦截,公共拦截器可以有多个 -->
		<bean name="baseInterceptor" class="com.ymqx.interceptor.BaseInterceptor" />

		<mvc:interceptor>
			<!-- 对/test.html进行拦截 -->
			<mvc:mapping path="/test.html"/>
			<!-- 特定请求的拦截器只能有一个 -->
			<bean class="com.ymqx.interceptor.TestInterceptor" />
		</mvc:interceptor>
	</mvc:interceptors>
3、新增一个测试使用的Controller
@Controller
@RequestMapping("/interceptor")
public class InterceptorController {
    @RequestMapping("/action1")
    public void action1(@RequestBody Product product){
        System.out.println("Product:" + product);
    }
}
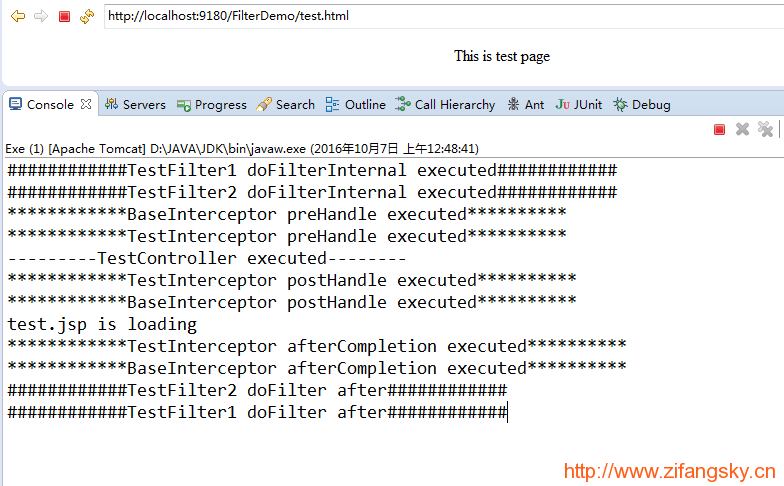
运行结果:
- 过滤器的运行是依赖于servlet容器的,跟springmvc等框架并没有关系。
- 多个过滤器的执行顺序跟web.xml文件中定义的先后关系有关。
- 多个拦截器的执行顺序跟在SpringMVC的配置文件中定义的先后顺序有关。
- 先执行过滤器,再执行拦截器,且均遵循“先进后出”。
最后
以上就是文静戒指最近收集整理的关于SpringMVC-快速入门(6.4)- SpringMVC的拦截器(Interceptor)和过滤器(Filter)应用概述多个过滤器与拦截器的代码执行顺序的全部内容,更多相关SpringMVC-快速入门(6.4)-内容请搜索靠谱客的其他文章。
本图文内容来源于网友提供,作为学习参考使用,或来自网络收集整理,版权属于原作者所有。


发表评论 取消回复