文件结构
data 					# 待打包的文件夹
├── DEBIAN				# 这里放着各种安装包的描述、配置文件,还有安装前后执行的脚本等
│   ├── control
│   ├── copyright
│   └── postinst
├── opt					# 安装目录下的相对内容
├── etc					# 安装目录下的相对内容
└── usr					# 安装目录下的相对内容
打包
在data的上一级目录执行
dpkg-deb -Z xz -z 9 --build ./data test.deb
这个命令会在当前目录生成一个 test.deb就是打包好的安装包
多线程打包
在上述命令上多添加一个参数:--compress-program=pixz
dpkg-deb --compress-program=pixz -Z xz -z 9 --build ./data test.deb
- pixz是一个多线程xz压缩工具, 需要提前安装
sudo apt-get install pixz
dpkg-deb
当然,默认的dpkg-deb是没有上面那个参数的,这个dpkg-deb是我修改源码后重新编译的版本。如果你也有多线程打包的需求,可以使用这样两个方案:
- 下载使用我的dpkg-deb:https://download.csdn.net/download/Three_dog/12027997
- 下载dpkg源码,修改代码内容。编译生成dpkg-deb使用。
方案二中,如何下载编译dpkg请参见:https://blog.csdn.net/Three_dog/article/details/103418141
下载后修改的内容不多,我懒得一个一个文件改动写那么详细了,这里直接贴个diff,有需要的小伙伴对照着看下应该知道该改哪里。
diff --git a/dpkg-deb/build.c b/dpkg-deb/build.c
index 3317b51..0fc7e96 100644
--- a/dpkg-deb/build.c
+++ b/dpkg-deb/build.c
@@ -582,6 +582,7 @@ do_build(const char *const *argv)
     control_compress_params.type = COMPRESSOR_TYPE_GZIP;
     control_compress_params.strategy = COMPRESSOR_STRATEGY_NONE;
     control_compress_params.level = -1;
+    control_compress_params.program = NULL;
     if (!compressor_check_params(&control_compress_params, &err))
       internerr("invalid control member compressor params: %s", err.str);
   }
diff --git a/dpkg-deb/main.c b/dpkg-deb/main.c
index 3420e44..4405a24 100644
--- a/dpkg-deb/main.c
+++ b/dpkg-deb/main.c
@@ -112,6 +112,8 @@ usage(const struct cmdinfo *cip, const char *value)
 "  -S<strategy>                     Set the compression strategy when building.n"
 "                                     Allowed values: none; extreme (xz);n"
 "                                     filtered, huffman, rle, fixed (gzip).n"
+"      --compress-program=<PROG>    Use PROG for compression instead of builtinn"
+"                                   implementation. (must accept level: -0..-9)n"
 "n"));

   printf(_(
@@ -200,6 +202,14 @@ set_compress_type(const struct cmdinfo *cip, const char *value)
     badusage(_("obsolete compression type '%s'; use xz or gzip instead"), value);
 }

+static void
+set_compress_program(const struct cmdinfo *cip, const char *value)
+{
+  free(compress_params.program);
+  compress_params.program = m_strdup(value);
+}
+
+
 static const struct cmdinfo cmdinfos[]= {
   ACTION("build",         'b', 0, do_build),
   ACTION("contents",      'c', 0, do_contents),
@@ -223,6 +233,7 @@ static const struct cmdinfo cmdinfos[]= {
   { NULL,            'z', 1, NULL,           NULL,         set_compress_level },
   { NULL,            'Z', 1, NULL,           NULL,         set_compress_type  },
   { NULL,            'S', 1, NULL,           NULL,         set_compress_strategy },
+  { "compress-program", 0, 1, NULL,          NULL,         set_compress_program },
   { "showformat",    0,   1, NULL,           &showformat,  NULL             },
   { "help",          '?', 0, NULL,           NULL,         usage            },
   { "version",       0,   0, NULL,           NULL,         printversion     },
diff --git a/lib/dpkg/compress.c b/lib/dpkg/compress.c
index 44075cd..7a76a87 100644
--- a/lib/dpkg/compress.c
+++ b/lib/dpkg/compress.c
@@ -20,6 +20,10 @@
  * along with this program.  If not, see <https://www.gnu.org/licenses/>.
  */

+
+
+
+
 #include <config.h>
 #include <compat.h>

@@ -882,6 +886,21 @@ compress_filter(struct compress_params *params, int fd_in, int fd_out,
 {
 	va_list args;
 	struct varbuf desc = VARBUF_INIT;
+	if (params->program) {
+		struct command cmd;
+		char level[] = "-0";
+
+		command_init(&cmd, params->program, "compress program");
+		command_add_arg(&cmd, params->program);
+
+		level[1] += params->level;
+		command_add_arg(&cmd, level);
+
+		m_dup2(fd_in, STDIN_FILENO);
+		m_dup2(fd_out, STDOUT_FILENO);
+		command_exec(&cmd);
+	}
+

 	va_start(args, desc_fmt);
 	varbuf_vprintf(&desc, desc_fmt, args);
diff --git a/lib/dpkg/compress.h b/lib/dpkg/compress.h
index 08aaf25..a629501 100644
--- a/lib/dpkg/compress.h
+++ b/lib/dpkg/compress.h
@@ -57,6 +57,7 @@ enum compressor_strategy {
 struct compress_params {
 	enum compressor_type type;
 	enum compressor_strategy strategy;
+	char * program ;
 	int level;
 };
实现原理
打包dpkg-deb的时候,压缩过程它使用的是内置的算法,这个算法是单线程的,无法发挥多核CPU的优势。
而这个改动,给dpkg-deb加了一个参数。这个参数可以指定一个应用程序,在打包进行到压缩步骤的时候,调用这个指定的程序进行压缩。当然,这个程序打包的类型,必须和-Z指定的类型一致。
我这里使用的是压缩率最高的xz格式,这里指定的外部程序叫做pixz, 这个程序默认会使用最大线程数进行全量压缩,通过这种办法曲线救国,实现了dpkg-deb的多线程打包。
一些多线程的压缩工具pigz/pbzip2/pxz/pixz等等都可以在这里使用以提高效率。
参考链接
这个方案当然也不是我拍脑袋想出来的,还是下载了一个外国人针对旧版本的diff,对着现在的代码改的,他原文也提到了这种方案最好打打平时的构建包和测试包,如果发布的话,最好还是老老实实用原版的dpkg-deb。
链接1:https://askubuntu.com/questions/841784/any-way-to-multithread-dpkg-deb
链接2:https://bugs.debian.org/cgi-bin/bugreport.cgi?bug=501456#27
有能力的小伙伴可以看看这俩链接,着实给我打开了新世界的大门。
另外,网上说的什么fpm debuild dpkg-buildpackage 说这个支持多线程打包, 然而这些全都是对dpkg-deb和rpm的封装,最后还是调用这些工具实现。多线程仅仅在编译阶段是多线程,对于打包可以说卵用没有。
rpm
deb的这个方案大概折腾了一礼拜。而rpm的方案,折腾了两个礼拜结论是不可行。。。。
rpm的代码耦合性比较大,没有办法指定第三方的压缩工具压缩,底层依赖的cpio的算法进行压缩,外部工具插不上手。
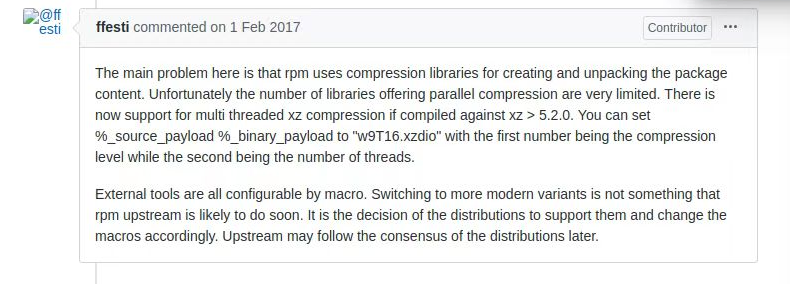
虽然官方在后续版本,也说实现了多线程打包的功能:https://github.com/rpm-software-management/rpm/issues/211
在4.14版本之后的代码里应该就已经带上了,ubuntu源里默认安装的是4.12版本。我下载了最新的源码编译安装后仍然不可行。
最终在github上也得到了rpm项目维护者的确认,这个暂时。。。无法实现。
https://github.com/rpm-software-management/rpm/issues/970
更新一下rpm的解决方案,当时得出无法实现的结论后,同事的大佬找到了另一个issuse,让我看看这个人说的方法能搞不:https://github.com/rpm-software-management/rpm/issues/113。

我看了一下,还真能。大概意思就是,如果你的本机xz版本是5.2以上的话,可以在执行rpmbuild命令时指定binary_payload为w9T12.xzdio这样的方式,这样它就会使用新版xz的多线程压缩进行打包。
所以首先:编译安装新版xz,ubuntu16.04自带的是5.1版本的。
wget https://tukaani.org/xz/xz-5.2.4.tar.gz
tar zxvf xz-5.2.4.tar.gz
cd xz-5.2.4
./autogen.sh
./configure
make
sudo make install
报错我没记录,大家遇到啥自行解决一下,都不复杂。
但是替换了xz之后并没有生效,还需要把rpm重新编译一下。编译的时候,必须指定链接新的liblzma.so的库,这样打包出来的rpm才能多线程压缩。修改rpm源码里的autogen.sh成这样:
#!/bin/sh

export CPPFLAGS="/usr/local/lib/liblzma.so"
export CFLAGS="-I/usr/include/lua5.2 -I/usr/include/nspr -I/usr/include/nss /usr/local/lib/liblzma.so"
export LDFLAGS="-llua5.2"
export LUA_LIBS="-I/usr/lib64"
export LUA_CFLAGS="-I/usr/bin"


autoreconf -i

sed -i "s/sysconfdir='${prefix}/etc'/sysconfdir='/etc'/g" ./configure  # 自动生成的configure文件中,sysconfdir的路径指定的是{$prefix}/etc,打包的时候会有问题,应该改为/etc

case "$1" in
  "--noconfigure")
    exit 0;
    ;;
  "--rpmconfigure")
    shift
    eval "`rpm --eval %configure`" "$@"
    ;;
  *)
    ./configure "$@" --prefix="/usr"
    ;;
esac
编译安装后,现在的rpmbuild就支持多线程压缩了。编译命令要记得指定w9T12.xzdio,w后面是压缩等级,0到9,9最高,T后面是最大线程数,最好和CPU线程数一致,xz是压缩类型,这里必须是xz,lzdio也就是lzma还是只能单线程。
我在实践过程中仍然有小问题:
- 在我使用w9T12的时候,CPU最高占用只有600%,也就是用了6个线程。可我的CPU最高支持12个。
一开始我以为是它获取CPU核数错了,但是后来发现不是。当我使用w6T12的时候,CPU占用可以达到1200%,w7T12最高1000%,w8T12最高800% 。
经过调查发现这个限制是因为xz,在xz多线程压缩的时候,会预先给文件进行分块,分成几部分,每一部分一个线程,而压缩等级为9的时候,我的原文件只被分成了6个部分,因此最多只有6个线程同时工作。
xz的文件分块,和源文件的大小以及压缩等级有关,最终在我的环境下只分成了6各部分。尝试分析了xz代码的这部分逻辑,但是对我而言实在是有点复杂,看了一圈不觉明历,所以暂时也不会改这个地方。
最终虽然rpm的多线程打包方案不算是一个很完美的解决,但是至少会比以前快出来不少。
最后
以上就是冷傲冷风最近收集整理的关于Linux下如何多线程打包文件结构打包多线程打包dpkg-deb实现原理参考链接rpm的全部内容,更多相关Linux下如何多线程打包文件结构打包多线程打包dpkg-deb实现原理参考链接rpm内容请搜索靠谱客的其他文章。


发表评论 取消回复