1、常见概念
1.1、索引
索引是具有相同结构的文档集合,有点儿类似关系型数据库中表的概念。
1.2、映射
映射像关系数据库中的表结构,每一个索引都有一个映射,它定义了索引中的每一个字段类型,以及一个索引范围内的设置。索引映射可以提前设定,也可以在第一次存储文档的时候自动识别。
1.3、过滤器
Elasticsearch中的所有的查询都会触发相关度得分的计算。对于那些我们不需要相关度得分的场景下,Elasticsearch以过滤器的形式提供了另一种查询功能。过滤器在概念上类似于查询,但是它们有非常快的执行速度,这种快的执行速度主要有以下两个原因
- 过滤器不会计算相关度的得分,所以它们在计算上更快一些
- 过滤器可以被缓存到内存中,这使得在重复的搜索查询上,其要比相应的查询快出许多
1.4、路由
一个索引(Index)的数据会被分为多片,每片都在一个shard中。所以说,一个document,只能存在于一个shard中。 当客户端创建document的时候,es此时就需要决定,这个document是放在这个index的哪个shard上。 这个过程,就称之为document routing,数据路由。当ES散列文档的ID时 就会发生文档的路由,来决定文档应该索引到哪个分片中,这可以由你指定也可以让ES生成。
路由也可以不使用文档的ID,而是定制的数值进行散列。通过指定URL中的routing查询参数,系统将使用这个进行散列,而不是ID。
1.5、索引分析(analysis)
1.6、索引模板
索引模板就是创建好一个索引参数设置(settings)和映射(mapping)的模板,在创建新索引的时候指定模板名称就可以使用模板定义好的参数设置和映射。
2、常见操作
2.1、创建索引
PUT /index_test
{
  "settings":{
    "index":{
      "number_of_shards": "2",
      "number_of_replicas": "0"
    }
  }
}
创建索引的方式如上所示,其中index_test表示索引的名称,而number_of_shards和number_of_replicas参数分别表示分片和副本的数量,在默认的情况下分片的数量是5个,副本的数量是1个。而“index”这个关键字可以省略,即number_of_shards和number_of_replicas参数直接配置到"settings"下。
执行上述命令,返回值如下:
{
  "acknowledged" : true,
  "shards_acknowledged" : true,
  "index" : "index_test"
}
2.2、查看索引
获取索引可以指定索引名称,别名或者通配符(其中使用_all或*号获取全部索引)来实现。
- 查看全部索引
GET /*
#或
GET /_all
结果如下:
2. 查看指定索引
GET /index_test
结果如下:
{
  "index_test" : {
    "aliases" : { },
    "mappings" : { },
    "settings" : {
      "index" : {
        "creation_date" : "1614074249458",
        "number_of_shards" : "2",
        "number_of_replicas" : "1",
        "uuid" : "RMIZAZ3dQyyWJbc-5bJDFw",
        "version" : {
          "created" : "7040299"
        },
        "provided_name" : "index_test"
      }
    }
  }
}
- 查看索引指定的属性
如下,只返回settings属性。(同时查询多个属性,验证失败,需要查询原因)
GET /index_test/_settings
结果如下:
{
  "index_test" : {
    "settings" : {
      "index" : {
        "creation_date" : "1614074249458",
        "number_of_shards" : "2",
        "number_of_replicas" : "1",
        "uuid" : "RMIZAZ3dQyyWJbc-5bJDFw",
        "version" : {
          "created" : "7040299"
        },
        "provided_name" : "index_test"
      }
    }
  }
}
2.3、打开或关闭索引
打开/关闭索引接口允许关闭一个打开的索引或者打开一个已经关闭的索引。关闭的索引只能显示索引元数据信息,不能够进行读写操作。其中,关闭的索引会继续占用磁盘空间而不能使用。
#关闭索引
POST /index_test/_close

#打开索引
POST /index_test/_open
结果:
#关闭索引
{
  "acknowledged" : true,
  "shards_acknowledged" : true,
  "indices" : {
    "index_test" : {
      "closed" : true
    }
  }
}

#打开索引
{
  "acknowledged" : true,
  "shards_acknowledged" : true
}
关闭或打开索引,其中索引名称可以使用通配符,同时关闭或打开多个索引,甚至可以使用_all或*打开或关闭所有的索引。如下所示:
#命令
POST /index_*/_close

#输出结果如下:
{
  "acknowledged" : true,
  "shards_acknowledged" : true,
  "indices" : {
    "index_str" : {
      "closed" : true
    },
    "index_test" : {
      "closed" : true
    }
  }
}
1>、设置config/elasticsearch.yml属性action.destructive_requires_name为true,禁止使用通配符或者_all标识索引。
2>、禁止使用关闭索引功能,可以设置settingscluster.indices.close.enable为false,默认是true。
2.4、删除索引
删除索引需要指定索引名称,别名或者通配符。删除索引可以使用逗号分隔符,或者使用_all或*号删除全部索引。
注意:_all或*删除全部索引时要谨慎操作。为了防止误删除,可以设置elasticsearch.yml属性action.destructive_requires_name为true,禁止使用通配符或_all删除索引,必须使用名称或别名才能删除该索引。
#命令:
DELETE /index_str

#输出结果:
{
  "acknowledged" : true
}
2.5、添加索引映射
索引映射可以提前设定,也可以在第一次存储文档的时候自动识别。
创建索引时,创建索引映射,如下所示:
#创建索引的同时,创建索引映射
PUT /index_test2
{
  "mappings":{
    "properties":{
      "name":{"type":"text"}
    }
  }
}

#输出结果
{
  "acknowledged" : true,
  "shards_acknowledged" : true,
  "index" : "index_test2"
}
向已经存在的索引添加映射,其中index_test2表示索引名称,而properties中包含的是文档中需要添加的属性名称,type表示字段的类型。
#命令:
PUT /index_test2/_mappings
{
   "properties":{
      "last-name":{"type":"text"}
    }
}

#输出结果:
{
  "acknowledged" : true
}
从Elasticsearch7开始,不再支持type类型。
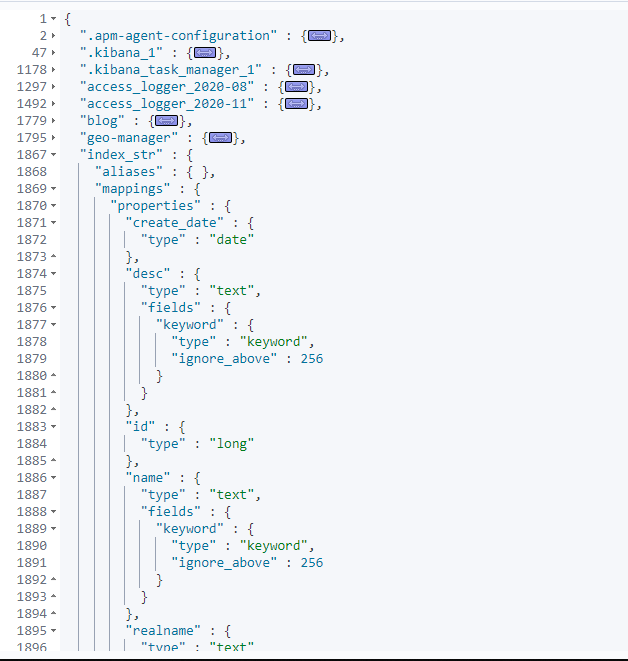
2.6、获取索引映射
#命令
GET /index_test2/_mapping

#输出结果:
{
  "index_test2" : {
    "mappings" : {
      "properties" : {
        "first-name" : {
          "type" : "text"
        },
        "last-name" : {
          "type" : "text"
        },
        "name" : {
          "type" : "text"
        }
      }
    }
  }
}
2.7、创建索引别名
Elasticsearch可以对一个或者多个索引指定别名,通过别名可以查询到一个或者多个索引的内容。在内部,Elasticsearch会自动把别名映射到相应的索引上。还可以对别名编写过滤器或者路由(搜索路由或者索引路由),在系统中别名不能重复,也不能和索引名重复。其实Elasticsearch的别名机制有点像数据库中的视图。
创建索引别名
#添加索引别名
PUT /_alias
{
  "actions":[
    { "add":{"index":"index_test2","alias":"index_alias"}}
  ]
}
#输出结果
{
  "acknowledged" : true
}
创建索引别名的时候,可以为一个别名关联多个索引,方式如下:
#方法一
PUT /_alias
{
  "actions":[
    { "add":{"index":"index_test2","alias":"index_alias"}},
    { "add":{"index":"index_test","alias":"index_alias"}}
  ]
}

#方法二
PUT /_alias
{
  "actions":[
     { "add":{"index":["index_test","index_test2"], "alias":"index_alias"}}
  ]
}

#方法三,通配符
PUT /_alias
{
  "actions":[
    { "add":{"index":"index_*","alias":"index_alias"}}
  ]
}
通配符指定的索引只是在当前生效,后面添加的索引不会被自动添加到别名上。对某一别名做索引的时候,如果该别名关联多个索引会报错。
创建带过滤器的索引别名
#命令:
PUT /_alias
{
  "actions":[
    { "add":{
      "index":["index_test","index_test2"],
      "alias":"index_alias",
      "filter":{
        "term": {
          "name": "zhangsan"
        }
      }
    }}
  ]
}
创建带过路由的索引别名
路由又分为搜索路由和索引路由。routing配置表示search_routing和index_routing一样,都使用routing对应的值。搜索路由可以指定多个值,索引路由只能指定一个值。
如果使用路由别名操作的同时还有路由参数,则结果是别名路由和路由的交集。
PUT /_alias
{
  "actions":[
    { "add":{
      "index":["index_test","index_test2"],
      "alias":"index_alias2",
      //#路由,表示search_routing和index_routing都使用routing的值。
      //"routing":"1"
      //#搜索路由
      "search_routing":"1,2",
      //#查询路由
      "index_routing":"2"
    }}
  ]
}
通过参数添加别名
也可以对别名编写过滤器或者路由(搜索路由或者索引路由)。
PUT /index*/_alias/index_alias3
{
  "routing":"1"
}
其中,index*表示索引,可以使用单个索引、多个索引、匹配符、_all等;index_alias3表示别名名称;routing表示路由。
创建索引是创建别名
PUT /index_test3
{
  "aliases": {
    "alias_test1": {}
  }
}
2.8、查询索引别名
基本语法:/{index}/_alias/{alias},其中index可以是索引名称(可以多个,逗号分隔),也可以带通配符或_all;而alias表示查询别名的名称,也可以使用通配符等。示例如下:
#命令
GET /index_*/_alias/index_*

#结果
{
  "index_test" : {
    "aliases" : {
      "index_alias" : { },
      "index_alias3" : {
        "index_routing" : "1",
        "search_routing" : "1"
      }
    }
  },
  "index_test2" : {
    "aliases" : {
      "index_alias" : {
        "filter" : {
          "term" : {
            "name" : "zhangsan"
          }
        }
      },
      "index_alias2" : {
        "index_routing" : "2",
        "search_routing" : "1,2"
      },
      "index_alias3" : {
        "index_routing" : "1",
        "search_routing" : "1"
      }
    }
  }
}
ignore_unavailable参数,主要表示是否忽略不存在的索引别名,如果设置为true,将会忽略,否则会返回404异常。
#命令
GET /index_test2/_alias/index_alias4?ignore_unavailable=false

#ignore_unavailable=false时
{
  "error" : "alias [index_alias4] missing",
  "status" : 404
}

#ignore_unavailable=true时,不返回任何东西
2.9、删除别名
基本语法:/{index}/_alias/{name},其中index表示索引的名称,name表示别名的名称,都可以使用匹配符、_all等。
DELETE /index_test2/_alias/*
2.10、更新索引的分词器
创建索引之后,有些配置还可以重新进行设置和管理,比如索引的副本数量、索引的分词等。我们这里演示一下,如果为创建好的索引,添加新的分词器。添加分析器之前必须先关闭索引,添加之后再打开索引。示例如下:
#关闭索引
POST /index_test2/_close

#配置索引的分词器
PUT /index_test2/_settings
{
  "analysis":{
    "analyzer":{
      "myanlyzer":{
        "type":"custom",
        "tokenizer":"whitespace"
      }
    }
  }
}

#启动索引
POST /index_test2/_open
2.11、获取所有配置
索引中有很多的配置信息,可以通过如下命令获取配置参数的信息:
基本语法:/{index}/_settings,示例如下:
#命令:
GET /index_test2/_settings/

#输出结果:
{
  "index_test2" : {
    "settings" : {
      "index" : {
        "number_of_shards" : "1",
        "provided_name" : "index_test2",
        "creation_date" : "1614176048309",
        "analysis" : {
          "analyzer" : {
            "myanlyzer" : {
              "type" : "custom",
              "tokenizer" : "whitespace"
            }
          }
        },
        "number_of_replicas" : "1",
        "uuid" : "xP79wHLeQb6hh_NWRXR5Gg",
        "version" : {
          "created" : "7040299"
        }
      }
    }
  }
}
2.12、创建索引模板
索引模板主要是为了方便创建索引而存在的。其中,temp_1表示模板的名称,index_patterns的值表示适用的索引,其他参数就是模板中定义的索引参数。
index_patterns在早期的版本中是用template表示。
#创建索引模板
PUT /_template/temp_1
{
  "index_patterns":"index_test*",
  "settings":{
    "number_of_shards": "2",
    "number_of_replicas": "0"
  },
  "mappings":{
    "properties":{
      "name":{"type":"text"}
    }
  }
}
2.13、查询索引模板
基本语法:GET /_template/{name},其中,name表示要查询的模板名称,可以是模板名称(多个名称逗号分隔)、匹配符。
注意:name不支持_all,查询全部模板,直接GET /_template/即可。
#命令:
GET /_template/temp_1

#结果:
{
  "temp_1" : {
    "order" : 0,
    "index_patterns" : [
      "index_test*"
    ],
    "settings" : {
      "index" : {
        "number_of_shards" : "2",
        "number_of_replicas" : "0"
      }
    },
    "mappings" : {
      "properties" : {
        "name" : {
          "type" : "text"
        }
      }
    },
    "aliases" : { }
  }
}
2.14、使用索引模板
使用索引模板,就是正常的创建索引即可,如果所有名称匹配index_patterns的值,那么创建的索引就会使用改模板来创建索引。如果匹配了多个索引模板,会合并匹配,如果配置重复,这时应该设置order属性,order是从0开始的数字,先匹配order数字小的,再匹配数字大的,如果有相同的属性配置,后匹配的会覆盖之前的配置。
3、索引监控
在Elasticsearch中,系统提供了接口来监控索引的状态,包括索引的统计信息、碎片信息、恢复的状态和分片的信息,利用这些接口可以随时监控系统索引的状态。
3.1、索引统计
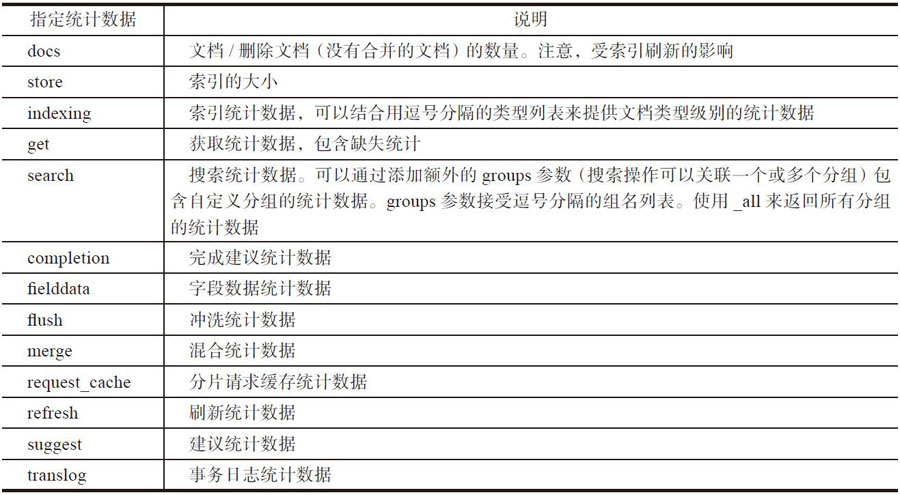
索引统计接口提供索引中不同内容的统计数据(其中的大多数统计数据也可以从节点级别范围取得)。
基本语法:GET /{index}/_stats/{name}。其中index,表示索引名称,可以是索引名称(多个逗号隔开)、匹配符、_all或者省略,_all或省略,表示获取所有聚合以及索引的统计数据;name,表示需要返回的特定统计数据,省略的话,返回全部的统计信息。
可统计的数据项:
示例:
#命令:
GET /index_test2/_stats

#部分输出结果如下:
{
  "_shards" : {
    "total" : 2,
    "successful" : 1,
    "failed" : 0
  },
  "_all" : {
    "primaries" : {
      "docs" : {
        "count" : 0,
        "deleted" : 0
      },
      "store" : {
        "size_in_bytes" : 283
      },
      "indexing" : {
        "index_total" : 0,
        "index_time_in_millis" : 0,
        "index_current" : 0,
        "index_failed" : 0,
        "delete_total" : 0,
        "delete_time_in_millis" : 0,
        "delete_current" : 0,
        "noop_update_total" : 0,
        "is_throttled" : false,
        "throttle_time_in_millis" : 0
      },
      "get" : {
        "total" : 0,
	//省略……
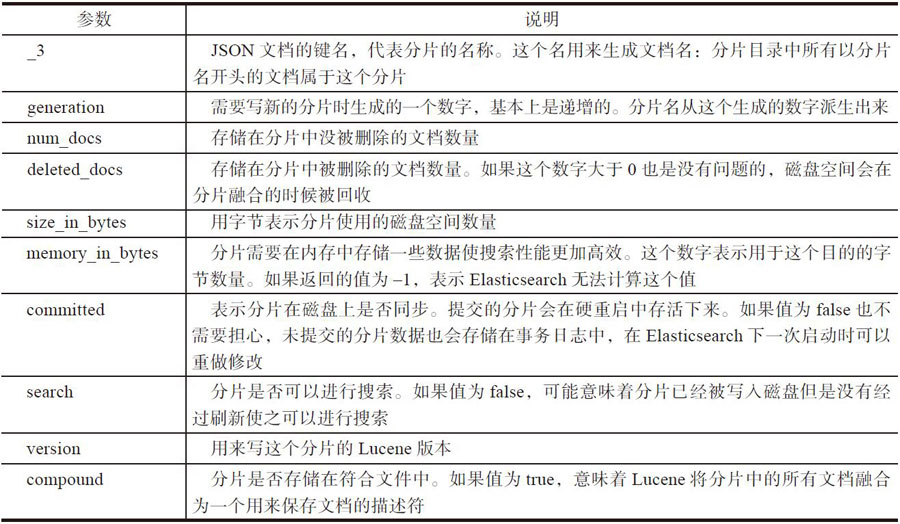
3.2、索引分片
提供Lucene索引所在的分片信息。可以用来提供分片和索引的更多统计信息,可能是优化信息,删除的“垃圾”数据等等。
语法:/{index}/_segments,其中index,表示索引名称,可以是索引名称(多个逗号隔开)、匹配符、_all或者省略,_all或省略,表示获取所有索引的分片信息。
#命令:
GET /index_test2/_segments

#结果:
{
  "_shards" : {
    "total" : 2,
    "successful" : 1,
    "failed" : 0
  },
  "indices" : {
    "index_test2" : {
      "shards" : {
        "0" : [
          {
            "routing" : {
              "state" : "STARTED",
              "primary" : true,
              "node" : "BKHDs8AyQHiX6WIw1wlwgg"
            },
            "num_committed_segments" : 0,
            "num_search_segments" : 0,
            "segments" : { }
          }
        ]
      }
    }
  }
}
上述返回结果的参数含义如下:
最后
以上就是务实画笔最近收集整理的关于Elasticsearch学习笔记:基本概念的全部内容,更多相关Elasticsearch学习笔记内容请搜索靠谱客的其他文章。


发表评论 取消回复