本实验内容基于Pytorch 1.5
1 导入包和版本查询
# -*- coding:utf-8 -*-
import torch
import torch.nn as nn
import torchvision
if __name__=="__main__":
print(torch.__version__) # torch 版本号
print(torch.version.cuda)# torch cuda 版本号
print(torch.backends.cudnn.version())# cudnn 版本号
print(torch.cuda.get_device_name())# GPU型号

2 可复现性
可复现性主要是为了让训练好的模型可以在不同的设备上得到与原实验一致的结果,但是由于实验中GPU和CPU的不同,一般来说完全的复现是不存在的,我们可以从代码层面通过随机种子保证模型一些随机取值的一致性,一定程度上缓解不可复现性。【注意】其实程序语言中的随机数都是伪随机数,不同的种子,对应不同的随机序列,同一个种子的随机序列是一致的。
import torch
import torch.nn as nn
import torchvision
import numpy as np
# 设置随机种子
np.random.seed(0)
torch.manual_seed(0)# 为 CPU 设置种子用于生成随机数,以使得结果是确定的
torch.cuda.manual_seed_all(0)# 为 GPU 设置种子用于生成随机数,以使得结果是确定的
#将这个 flag 置为True的话,每次返回的卷积算法将是确定的,即默认算法。如果配合上设置 Torch 的随机种子为固定值的话,应该可以保证每次运行网络的时候相同输入的输出是固定的
torch.backends.cudnn.deterministic = True
#1 如果网络的输入数据维度或类型上变化不大,设置
torch.backends.cudnn.benchmark = true
可以增加运行效率;
#2 如果网络的输入数据在每次 iteration 都变化的话,会导致 cnDNN 每次都会去寻找一遍最优配置,这样反而会降低运行效率。
torch.backends.cudnn.benchmark = False
3 显卡设置
一般深度学习需要用到显卡,那么模型跑在呢张显卡上时可以设置的,当然如果只有一张显卡,就可以直接采用默认配置。如果有多张显卡,可以考虑进行显卡的选择。
1 只有一张显卡
device=torch.device('cuda' if torch.cuda.is_available() else 'cpu')

2 多张显卡,可以手动选择
import os
# GPU号默认是从0开始,按照顺序,优先使用0号设备,然后使用1号设备
os.environ['CUDA_VISIBLE_DEVICES'] = '0,1'
也可以在程序运行时设置可选的GPU
CUDA_VISIBLE_DEVICES=0,1 python train.py
4 避免显存爆掉
1 训练过程中,可能出现 Out of memory 异常,这个处理方式有两个:
1 使用
#释放缓存分配器当前持有的且未占用的缓存显存,以便这些显存可以被其他GPU应用程序中使用,
#并且通过 nvidia-smi命令可见。注意使用此命令不会释放tensors占用的显存。
#对于不用的数据变量,Pytorch 可以自动进行回收从而释放相应的显存。
torch.cuda.empty_cache()
2 使用
nvidia-smi --gpu-reset -i [gpu_id]
比如
#注意这个命令适用于多个GPU的情况,如果是只有一个GPU,那么会出现以下的情况

nvidia-smi --gpu-reset -i 0

2 避免测试时间显存爆掉
验证模型时不需要求导,即不需要梯度计算,关闭autograd,可以提高速度,节约内存。如果不关闭可能会爆显存。
with torch.no_grad():
# 使用model进行预测的代码
pass
5 张量处理
张量其实理解起来也不难,就可以把它看作是一个高维的矩阵(>=3),是现代机器学习的基础。它的核心是一个数据容器,多数情况下,它包含数字,比如RGB图像,时间序列等,有时候它也包含字符串,但这种情况比较少。因此把它想象成一个数字的水桶。
Pytorch 有9种CPU张量和9种GPU张量,如下图所示:

张量命名
张量命名是一个非常有用的方法,这样可以方便地使用维度的名字来做索引或其他操作,大大提高了可读性、易用性,防止出错。
	#****** torch 1.3之前 需要注释说明 *******
# Tensor[N,C,H,W]
images=torch.randn(32,3,10,10)
print(images.sum(dim=1).size())
print(images.select(dim=1,index=0).size())
#****** torch1.3之后 可以直接对纬度进行命名 *******
NCHW=['N','C','H','W']
images=torch.randn(32,3,10,10,names=NCHW)
print(images.sum('C').size())
images.select('C', index=0)
# 也可以这么设置
tensor = torch.rand(3,4,1,2,names=('C', 'N', 'H', 'W'))
# 使用align_to可以对维度方便地排序
tensor = tensor.align_to('N', 'C', 'H', 'W')
print(tensor.size())
print(tensor.type())
print(tensor.dim())

数据类型
在Pytorch中,FloatTensor远远快于DoubleTensor,所以一般可以将FloatTensor设置为默认数据类型,当然近年来有些工作也有基于半精度的类型HalfTensor进行运算的,速度更快,但是计算准确度可能不是很准。
	#不设置 默认为 FloatTEnsor
torch.set_default_tensor_type(torch.DoubleTensor)
tensor = torch.rand(3,4,1,2,names=('C', 'N', 'H', 'W'))
tensor = tensor.align_to('N', 'C', 'H', 'W')
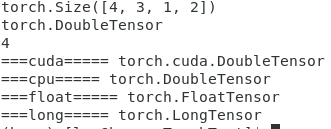
print(tensor.size())
print(tensor.type())
print(tensor.dim())
print("===cuda=====",tensor.cuda().type())# 转为 GPU DoubleTensor
print("===cpu=====",tensor.cpu().type())
print("===float=====",tensor.float().type())
print("===long=====",tensor.long().type())

torch.Tensor与np.ndarray转换,这个经常用于输出具体的结果的时候,常将张量转为np.ndarry的形式进行输出,反之是为了进行 tensor 运算
1 除了CharTensor,其他所有CPU上的张量都支持转换为numpy格式然后再转换回来。
ndarray = tensor.cpu().numpy()
tensor = torch.from_numpy(ndarray).float()
tensor = torch.from_numpy(ndarray.copy()).float() # If ndarray has negative stride.
2 在GPU中,想要把Tensor的值读取出来,可以这么做【参考进入】
print('1111',loss)# GPU 下的Tensor格式带有梯度函数
print('2222',loss.data)#tensor且GPU
print('3333',loss.cpu())# tensor且CPU且有梯度函数
print('4444',loss.cpu().data)#tensor且CPU
# print('5555',loss.cpu().data[0])#报错 IndexError: invalid index of a 0-dim tensor. Use tensor.item() to convert a 0-dim tensor to a Python number
# print('6666',loss.cpu().numpy())#报错 RuntimeError: Can't call numpy() on Variable that requires grad. Use var.detach().numpy() instead.
print('7777',loss.cpu().detach().numpy())
print('8888',loss.cpu().data.numpy())
print('9999',loss.cpu().item())
print('aaaa',loss.item())#后四者一样,都是把数值取出来

Torch.tensor与PIL.Image转换,这个常用于图像数据的处理,两者的互相转换,如下所示
# pytorch中的张量默认采用[N, C, H, W]的顺序,并且数据范围在[0,1],需要进行转置和规范化
# torch.Tensor -> PIL.Image
image = PIL.Image.fromarray(torch.clamp(tensor*255, min=0, max=255).byte().permute(1,2,0).cpu().numpy())
image = torchvision.transforms.functional.to_pil_image(tensor)
# Equivalently way
# PIL.Image -> torch.Tensor
path = r'./figure.jpg'
tensor = torch.from_numpy(np.asarray(PIL.Image.open(path))).permute(2,0,1).float() / 255
tensor = torchvision.transforms.functional.to_tensor(PIL.Image.open(path)) # Equivalently way
np.ndarray与PIL.Image的转换
image = PIL.Image.fromarray(ndarray.astype(np.uint8))
ndarray = np.asarray(PIL.Image.open(path))
张量形变
view()和reshape()都进行改变形状
view 函数只能用于 contiguous 后的 tensor 上,也就是只能用于内存中连续存储的 tensor。如果对 tensor 调用过 transpose, permute 等操作的话会使该 tensor 在内存中变得不再连续,此时就不能再调用 view 函数。因此,需要先使用 contiguous 来返回一个 contiguous copy。
reshape 则不需要依赖目标 tensor 是否在内存中是连续的。但是reshape()则没那么可控,他的执行结果可能是源数据的一个copy,也可能不是。
#在将卷积层输入全连接层的情况下通常需要对张量做形变处理,
# 相比torch.view,torch.reshape可以自动处理输入张量不连续的情况。
# 但必须保证变形前后数量的一致
tensor = torch.rand(2,3,4)
shape = (6, 4)
tensor = torch.reshape(tensor, shape)
tensor= tensor.view(6,-1) #和上面一样
# 如果tensor 经过了转换
tensor=torch.transpose(tensor,1,0)
print(tensor.size())
tensor = torch.reshape(tensor, shape)# 可运行通过
tensor= tensor.view(6,-1) # 不能通过会有异常:view size is not compatible with input tensor's size ...
squeeze会自动过滤所有维数为1的列和unsqueeze用来扩展纬度,新的维数为1
## squeeze(del) 和 unsqueeze(add)
t=torch.randn(3,4)
ptf_tensor(t)
t2=t.unsqueeze(dim=0)
ptf_tensor(t2,tag='t add dim=0')
t3=t.unsqueeze(dim=1)
ptf_tensor(t3,tag='t add dim=1')
t4=t3.squeeze(dim=1)
ptf_tensor(t4,tag='t del dim=1')
打乱特定维数的像素
	tensor = torch.rand(3,3,3)
print(tensor)
tensor = tensor[torch.randperm(tensor.size(0))]
print(tensor)

张量复制
张量复制有以下的方式【参照进入】:
 clone()函数可以返回一个完全相同的tensor,新的tensor开辟新的内存,但是仍然留在计算图中。
detach()函数可以返回一个完全相同的tensor,新的tensor开辟与旧的tensor共享内存,新的tensor会脱离计算图,不会牵扯梯度计算。此外,一些原地操作(in-place, such as resize_ / resize_as_ / set_ / transpose_) 在两者任意一个执行都会引发错误。
下面代码:
clone()之后的tensor requires_grad=True,detach()之后的tensor 的 requires_grad=False,但是由于原tensor的requires_grad=True,其clone后仍在计算图中,所以梯度并不会流向clone()之后的tensor,
x= torch.tensor([1., 2., 3.], requires_grad=True)
clone_x = x.clone()
detach_x = x.detach()
clone_detach_x = x.clone().detach()
f = torch.nn.Linear(3, 1)
y = f(x)
y.backward()
print(x.grad)
print(clone_x.requires_grad)
print(clone_x.grad)
print(detach_x.requires_grad)
print(clone_detach_x.requires_grad)
结果:
tensor([-0.0043,
0.3097, -0.4752])
True
None
False
False
将原始tensor设为requires_grad=False,clone()后的梯度设为.requires_grad_(),clone()后的tensor参与计算图的运算,则梯度穿向clone()后的tensor。
x= torch.tensor([1., 2., 3.], requires_grad=False)
clone_x = x.clone().requires_grad_()
detach_x = x.detach()
clone_detach_x = x.detach().clone()
f = torch.nn.Linear(3, 1)
y = f(clone_x)
y.backward()
print(x.grad)
print(clone_x.grad)
print(detach_x.requires_grad)
print(clone_detach_x.requires_grad)
结果
None
tensor([-0.0043,
0.3097, -0.4752])
False
False
detach()后的tensor由于与原始tensor共享内存,所以原始tensor在计算图中数值反向传播更新之后,detach()的tensor值也发生了改变。
x = torch.tensor([1., 2., 3.], requires_grad=True)
f = torch.nn.Linear(3, 1)
w = f.weight.detach()
print(f.weight)
print(w)
y = f(x)
y.backward()
optimizer = torch.optim.SGD(f.parameters(), 0.1)
optimizer.step()
print(f.weight)
print(w)
结果:
Parameter containing:
tensor([[-0.0043,
0.3097, -0.4752]], requires_grad=True)
tensor([[-0.0043,
0.3097, -0.4752]])
Parameter containing:
tensor([[-0.1043,
0.1097, -0.7752]], requires_grad=True)
tensor([[-0.1043,
0.1097, -0.7752]])
张量拼接
torch.cat和torch.stack的区别在于torch.cat沿着给定的维度拼接,
而torch.stack会新增一维。例如当参数是2个10x5的张量,torch.cat的结果是20x5的张量,
而torch.stack的结果是2x10x5的张量。
	tensor=torch.randn(2,3)
t_cat=torch.cat((tensor,tensor),dim=0)
t_stack=torch.stack((tensor,tensor),dim=0)
print(t_cat.size())
print(t_stack.size())
print(t_cat)
print(t_stack)

One-hot 编码
	tensor = torch.tensor([0, 2, 1, 3])
N = tensor.size(0)
num_classes = 4
one_hot = torch.zeros(N, num_classes).long()
one_hot.scatter_(dim=1, index=torch.unsqueeze(tensor, dim=1), src=torch.ones(N,
num_classes).long())
print(one_hot)

或者
def one_hot(label):
"""
将一维列表转换为独热编码
"""
label = label.resize_(batch_size, 1)
m_zeros = torch.zeros(batch_size, class_num)
# 从 value 中取值,然后根据 dim 和 index 给相应位置赋值
onehot = m_zeros.scatter_(1, label, 1)
# (dim,index,value)
return onehot.numpy()
# Tensor -> Numpy
if __name__=="__main__":
class_num = 4
batch_size = 4
label = torch.LongTensor(batch_size).random_() % class_num
# 对随机数取余
print(one_hot(label))

非0元素
tensor=torch.randn(3,3)
torch.nonzero(tensor)
# index of non-zero elements
torch.nonzero(tensor==0)
# index of zero elements
torch.nonzero(tensor).size(0)
# number of non-zero elements
torch.nonzero(tensor == 0).size(0)
# number of zero elements

判断两个张量相等
两者都可以用
torch.allclose(tensor1, tensor2)
# float tensor 在一定的误差允许内,判断相等
torch.equal(tensor1, tensor2)
# int tensor 绝对的相等
张量的扩展
# Expand tensor of shape 64*512 to shape 64*512*7*7.
tensor = torch.rand(64,512)
torch.reshape(tensor, (64, 512, 1, 1)).expand(64, 512, 7, 7)
矩阵乘法
# Matrix multiplcation: (m*n) * (n*p) * -> (m*p).
result = torch.mm(tensor1, tensor2)
# Batch matrix multiplication: (b*m*n) * (b*n*p) -> (b*m*p)
result = torch.bmm(tensor1, tensor2)
# Element-wise multiplication.
result = tensor1 * tensor2
计算两组数据之间的两两欧式距离
利用broadcast机制
tensor=torch.randn(1,3)
tensor_1=torch.randn(3,1)
print(tensor)
print(tensor_1)
print(tensor[:,None,:].size())
print(tensor[:,None,:])
print(tensor[:,None,:] + tensor_1)
print((tensor[:,None,:] + tensor_1)**2)
print(torch.sum((tensor[:,None,:] + tensor_1)**2, dim=2))# 按照第三维进行加和输出,将维数减少1
# 广播求值
dist = torch.sqrt(torch.sum((tensor[:,None,:] + tensor_1)**2, dim=2))
print(dist)
print(dist.size())

更多对于模型的内容,可以参考链接1和链接2
最后
以上就是悦耳小懒虫最近收集整理的关于Pytorch常用代码段集锦的全部内容,更多相关Pytorch常用代码段集锦内容请搜索靠谱客的其他文章。


发表评论 取消回复