文章目录
- 自定义控件封装
- Qt中的鼠标事件
- 定时器
- 利用事件
- 定时器类QTimer
- 事件分发器
- 事件过滤器
自定义控件封装
在项目文件中添加新文件 -> Qt设计师界面类 -> 选择界面模板(一般使用Widget) -> 起类名(SmallWidget)
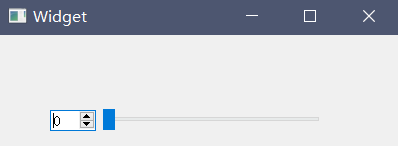
在smallwidget.ui文件中拖拽需要组合的控件,并控制大小
在widget.ui中拖拽一个Widget,到主界面后右键选择 -> 提升为…
输入提升的类名称(注意大小写一致) 全局包含(方便下次使用) 添加 提升
即可在主窗口中显示自定义的控件了。

//smallwidget.cpp
//QSpinBox移动 QSlider跟着移动

    void(QSpinBox:: * spSignal)(int) = &QSpinBox::valueChanged;
    connect(ui->spinBox,spSignal,ui->horizontalSlider,&QSlider::setValue);

    //QSlider滑动 QSpinBocx数字跟着改变
    connect(ui->horizontalSlider,&QSlider::valueChanged,ui->spinBox,&QSpinBox::setValue);
在smallwidget.cpp中完成自定义控件的信号和槽的设置
添加自定义控件的接口
//smallwidget.h
#ifndef SMALLWIDGET_H
#define SMALLWIDGET_H

#include <QWidget>

namespace Ui {
class SmallWidget;
}

class SmallWidget : public QWidget
{
    Q_OBJECT

public:
    explicit SmallWidget(QWidget *parent = 0);
    ~SmallWidget();

    //设置数字
    void setNum(int num);
    //获取数字
    int getNum();

private:
    Ui::SmallWidget *ui;
};

#endif // SMALLWIDGET_H
在smallwidget.cpp中实现接口函数
//smallwidget.cpp
//设置数字
void SmallWidget::setNum(int num)
{
    ui->SpinBox->setValue(num);

}
//获取数字
int SmallWidget::getNum()
{
    return ui->spinBox->value();
}
在widget.cpp中调用接口函数
//widget.cpp
#include "widget.h"
#include "ui_widget.h"

#include <QDebug>

Widget::Widget(QWidget *parent) :
    QWidget(parent),
    ui(new Ui::Widget)
{
    ui->setupUi(this);

    //点击获取 获取控件当前的值
    connect(ui->btn_get,&QPushButton::clicked,[=](){
        qDebug() << ui->widget->getNum();
    });

    //设置到一半
    connect(ui->btn_set,&QPushButton::clicked,[=](){
        ui->widget->setNum(50);
    });

}

Widget::~Widget()
{
    delete ui;
}
Qt中的鼠标事件
添加新的c++ class 文件,Class name : myLabel -> Base class :QLabel
新建文件后,修改mylabel.h中的基类和头文件名
并新加鼠标事件至头文件
//mylabel.h
#ifndef MYLABEL_H
#define MYLABEL_H

#include <QLabel> //修改QWidget->QLabel

class myLabel : public QLabel //修改QWidget -> QLabel
{
    Q_OBJECT
public:
    explicit myLabel(QWidget *parent = 0);

    //鼠标进入事件
    void enterEvent(QEvent *event);

    //鼠标离开事件
    void leaveEvent(QEvent *event);

    //鼠标按下
    virtual void mousePressEvent(QMouseEvent *ev);

    //鼠标释放
    virtual void mouseReleaseEvent(QMouseEvent *ev);

    //鼠标移动
    virtual void mouseMoveEvent(QMouseEvent *ev);

signals:

public slots:
};

#endif // MYLABEL_H
在mylabel.cpp文件中实现鼠标进入事件内容,修改父类名称
//mylabel.cpp
#include "mylabel.h"
#include <QDebug>
#include <QMouseEvent>

myLabel::myLabel(QWidget *parent) : QLabel(parent)
{

}

//鼠标进入事件
void myLabel::enterEvent(QEvent *event)
{
    //qDebug() << "鼠标进入了";
}

//鼠标离开事件
void myLabel::leaveEvent(QEvent *event)
{
    //qDebug() << "鼠标离开了";
}

//鼠标按下
void myLabel::mousePressEvent(QMouseEvent *ev)
{
    QString str = QString("鼠标按下了 x = %1   y = %2 globalx = %3 globaly = %4").arg(ev->x()).arg(ev->y()).arg(ev->globalX()).arg(ev->globalY());
    qDebug() << str;
}

//鼠标释放
void myLabel::mouseReleaseEvent(QMouseEvent *ev)
{
    qDebug() << "鼠标释放了";
}

//鼠标移动
void myLabel::mouseMoveEvent(QMouseEvent *ev)
{
    QString str = QString("鼠标移动了 x = %1   y = %2 globalx = %3 globaly = %4").arg(ev->x()).arg(ev->y()).arg(ev->globalX()).arg(ev->globalY());
    qDebug() << str;
}
在widget.ui文件中将新添加的label标签提升为myLabel,这样就能使用我们写好的Label标签了
QString 的格式用%1 %2等等,后接.arg(参数值)带入字符串中
鼠标左键按下时才显示信息(注意移动时的判断)
#include "mylabel.h"
#include <QDebug>
#include <QMouseEvent>

myLabel::myLabel(QWidget *parent) : QLabel(parent)
{

}

//鼠标进入事件
void myLabel::enterEvent(QEvent *event)
{
    //qDebug() << "鼠标进入了";
}

//鼠标离开事件
void myLabel::leaveEvent(QEvent *event)
{
    //qDebug() << "鼠标离开了";
}

//鼠标按下
void myLabel::mousePressEvent(QMouseEvent *ev)
{
    //当鼠标左键按下时  提示信息
    if(ev->button() == Qt::LeftButton)
    {
        QString str = QString("鼠标按下了 x = %1   y = %2 globalx = %3 globaly = %4").arg(ev->x()).arg(ev->y()).arg(ev->globalX()).arg(ev->globalY());
        qDebug() << str;
    }
}

//鼠标释放
void myLabel::mouseReleaseEvent(QMouseEvent *ev)
{
    //当鼠标左键按下时  提示信息
    if(ev->button() == Qt::LeftButton)
    {
        QString str = QString("鼠标释放了 x = %1   y = %2 globalx = %3 globaly = %4").arg(ev->x()).arg(ev->y()).arg(ev->globalX()).arg(ev->globalY());
        qDebug() << str;
    }
}

//鼠标移动
void myLabel::mouseMoveEvent(QMouseEvent *ev)
{
    //当鼠标左键按下时  提示信息
    if(ev->buttons() & Qt::LeftButton)
    {
        QString str = QString("鼠标移动了 x = %1   y = %2 globalx = %3 globaly = %4").arg(ev->x()).arg(ev->y()).arg(ev->globalX()).arg(ev->globalY());
        qDebug() << str;
    }
}
不需要按下就可以打印移动信息
#include "mylabel.h"
#include <QDebug>
#include <QMouseEvent>

myLabel::myLabel(QWidget *parent) : QLabel(parent)
{
    //设置鼠标追踪状态
    setMouseTracking(true);
}

//鼠标移动
void myLabel::mouseMoveEvent(QMouseEvent *ev)
{
        QString str = QString("鼠标移动了 x = %1   y = %2 globalx = %3 globaly = %4").arg(ev->x()).arg(ev->y()).arg(ev->globalX()).arg(ev->globalY());
        qDebug() << str;
}
定时器
利用事件
void timerEvent(QTimerEvent *ev)
新加一个标签label_2
//widget.h
#ifndef WIDGET_H
#define WIDGET_H

#include <QWidget>

namespace Ui {
class Widget;
}

class Widget : public QWidget
{
    Q_OBJECT

public:
    explicit Widget(QWidget *parent = 0);
    ~Widget();

    //重写定时器的事件
    void timerEvent(QTimerEvent *event);

private:
    Ui::Widget *ui;
};

#endif // WIDGET_H
//wigdet.cpp
#include "widget.h"
#include "ui_widget.h"

Widget::Widget(QWidget *parent) :
    QWidget(parent),
    ui(new Ui::Widget)
{
    ui->setupUi(this);

    //启动定时器
    startTimer(1000); //参数1 间隔 单位 毫秒
}

Widget::~Widget()
{
    delete ui;
}

void Widget::timerEvent(QTimerEvent *event)
{
    static int num = 1; //静态变量
    ui->label_2->setText(QString::number(num++));
}
多个定时器使用时使用timeId来确定使用的是哪个定时器
//widget.h
#ifndef WIDGET_H
#define WIDGET_H

#include <QWidget>

namespace Ui {
class Widget;
}

class Widget : public QWidget
{
    Q_OBJECT

public:
    explicit Widget(QWidget *parent = 0);
    ~Widget();

    //重写定时器的事件
    void timerEvent(QTimerEvent *event);

    int id1; //定时器1唯一标识
    int id2; //定时器2唯一标识

private:
    Ui::Widget *ui;
};

#endif // WIDGET_H
//widget.cpp
#include "widget.h"
#include "ui_widget.h"

Widget::Widget(QWidget *parent) :
    QWidget(parent),
    ui(new Ui::Widget)
{
    ui->setupUi(this);

    //启动定时器
    id1 = startTimer(1000); //参数1 间隔 单位 毫秒

    id2 = startTimer(2000);
}

Widget::~Widget()
{
    delete ui;
}

void Widget::timerEvent(QTimerEvent *event)
{
    if(event->timerId() == id1)
    {
        //label2 每隔1秒+1
        static int num = 1;
        ui->label_2->setText(QString::number(num++));
    }
    if(event->timerId() == id2)
    {
        //label3 每隔2秒+1
        static int num2 = 1;
        ui->label_3->setText(QString::number(num2++));
    }
}
定时器类QTimer
//widget.cpp
#include <QTimer>

Widget::Widget(QWidget *parent) :
    QWidget(parent),
    ui(new Ui::Widget)
{
    ui->setupUi(this);
	//定时器第二种方式
    QTimer *timer = new QTimer(this);
    //启动定时器
    timer->start(500);

    connect(timer,&QTimer::timeout,[=](){
        //label4 每隔0.5秒+1
        static int num3 = 1;
        ui->label_4->setText(QString::number(num3++));
    });

    //点击暂停按钮 实现停止定时器
    connect(ui->btn,&QPushButton::clicked,[=](){
        timer->stop();
    });
}
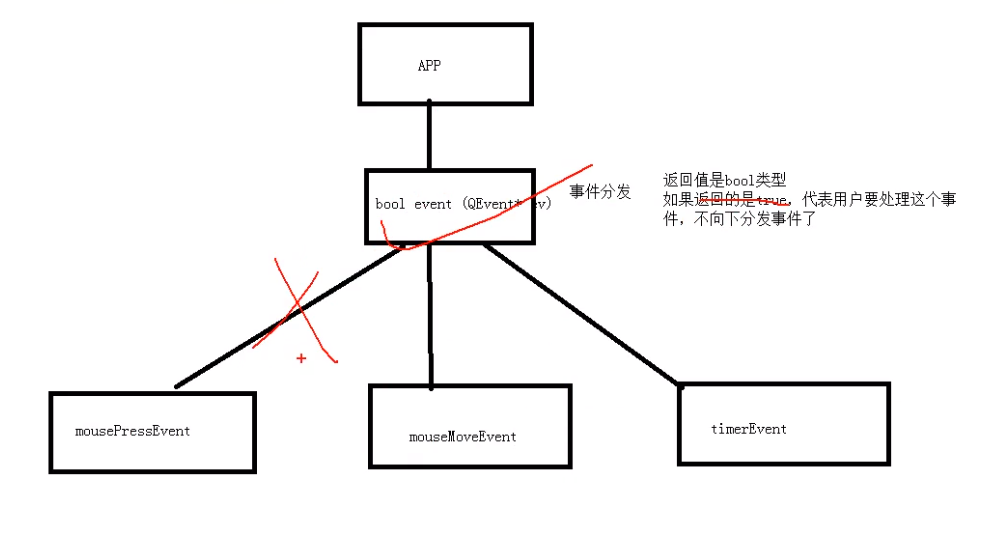
事件分发器

//mylabel.h	中声明函数
	//通过event事件分发器 拦截 鼠标按下事件
    bool event(QEvent *e);
//mylabel.cpp 中实现函数
bool myLabel::event(QEvent *e)
{
    //如果是鼠标按下,在event事件分发中做拦截操作
    if(e->type() == QEvent::MouseButtonPress)
    {
        //静态类型转换
        QMouseEvent * ev = static_cast<QMouseEvent *>(e);
        QString str = QString("Event函数中:鼠标按下了 x = %1   y = %2 globalx = %3 globaly = %4").arg(ev->x()).arg(ev->y()).arg(ev->globalX()).arg(ev->globalY());
        qDebug() << str;

        return true;//true代表用户自己处理这个事件,不向下分发
    }

    //其他事件 交给父类处理 默认处理
    return QLabel::event(e);
}
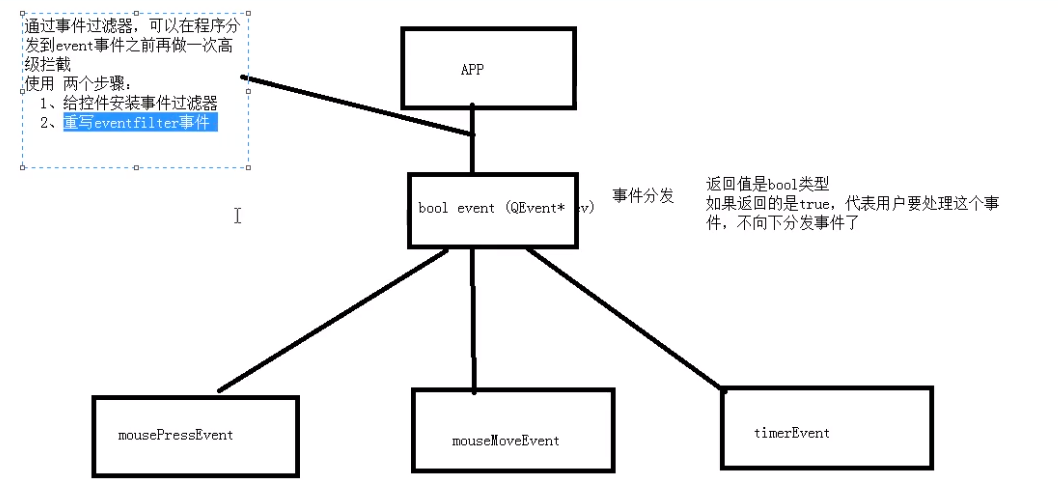
事件过滤器

//widget.h
	//重写事件过滤器的事件
    bool eventFilter(QObject *watched, QEvent *event);
//widget.cpp
#include "widget.h"
#include "ui_widget.h"

#include <QTimer>
#include <QMouseEvent>
#include <QDebug>

Widget::Widget(QWidget *parent) :
    QWidget(parent),
    ui(new Ui::Widget)
{
    ui->setupUi(this);
	//给label1 安装事件过滤器
    //步骤1 安装事件过滤器
    ui->label->installEventFilter(this);
}

//步骤2 重写 eventfilter事件
bool Widget::eventFilter(QObject *obj, QEvent *e)
{
    if(obj == ui->label)
    {
        if(e->type() == QEvent::MouseButtonPress)
        {
            QMouseEvent * ev = static_cast<QMouseEvent *>(e);
            QString str = QString("事件过滤器中:鼠标按下了 x = %1   y = %2 globalx = %3 globaly = %4").arg(ev->x()).arg(ev->y()).arg(ev->globalX()).arg(ev->globalY());
            qDebug() << str;

            return true;//true代表用户自己处理这个事件,不向下分发
        }
    }

    //其他默认处理
    return QWidget::eventFilter(obj,e);
}
Widget::~Widget()
{
    delete ui;
}
最后
以上就是要减肥荔枝最近收集整理的关于【QT从零开始系列07】自定义控件封装和事件自定义控件封装Qt中的鼠标事件定时器事件分发器事件过滤器的全部内容,更多相关【QT从零开始系列07】自定义控件封装和事件自定义控件封装Qt中内容请搜索靠谱客的其他文章。


发表评论 取消回复