本章我们讲解MV的选择事件,方法是我们构造一个树状结构,并在标题栏显示我们所选的树状结构的内容和层次。
选择事件也是通过mode实现的,然而他是独立的mode,叫做:QItemSelectionModel,默认每个view都有这样一个mode,可以通过view的selectionModel()获取!selectionModel的selectionChange()信号就是我们要获取的信号!
mainwindows.cpp
#include <QtWidgets/QMainWindow>

QT_BEGIN_NAMESPACE // QT_BEGIN_NAMESPACE / QT_END_NAMESPACE are not needed in Qt user code
class QTreeView; //forward declarations
class QStandardItemModel;
class QItemSelection;
QT_END_NAMESPACE


class MainWindow : public QMainWindow
{
    Q_OBJECT
private:
    QTreeView *treeView;
    QStandardItemModel *standardModel;
private slots:
    void selectionChangedSlot(const QItemSelection & newSelection, const QItemSelection & oldSelection);
public:
    MainWindow(QWidget *parent = 0);
};
selectionChangedSlot()槽函数用来接收selectionChange()信号。
mainwindows.cpp
#include <QTreeView>
#include <QStandardItemModel>
#include <QItemSelectionModel>
#include "mainwindow.h"
MainWindow::MainWindow(QWidget *parent)
: QMainWindow(parent)
{
treeView = new QTreeView(this);
setCentralWidget(treeView);
standardModel = new QStandardItemModel ;
QStandardItem *rootNode = standardModel->invisibleRootItem();
//defining a couple of items
QStandardItem *americaItem = new QStandardItem("America");
QStandardItem *mexicoItem = new QStandardItem("Canada");
QStandardItem *usaItem = new QStandardItem("USA");
QStandardItem *bostonItem = new QStandardItem("Boston");
QStandardItem *europeItem = new QStandardItem("Europe");
QStandardItem *italyItem = new QStandardItem("Italy");
QStandardItem *romeItem = new QStandardItem("Rome");
QStandardItem *veronaItem = new QStandardItem("Verona");
//building up the hierarchy
rootNode-> appendRow(americaItem);
rootNode-> appendRow(europeItem);
americaItem-> appendRow(mexicoItem);
americaItem-> appendRow(usaItem);
usaItem-> appendRow(bostonItem);
europeItem-> appendRow(italyItem);
italyItem-> appendRow(romeItem);
italyItem-> appendRow(veronaItem);
//register the model
treeView->setModel(standardModel);
treeView->expandAll();
//selection changes shall trigger a slot
QItemSelectionModel *selectionModel= treeView->selectionModel();
connect(selectionModel, SIGNAL(selectionChanged (const QItemSelection &, const QItemSelection &)),
this, SLOT(selectionChangedSlot(const QItemSelection &, const QItemSelection &)));
}
//! [quoting modelview_a]
//------------------------------------------------------------------------------------
//! [quoting modelview_b]
void MainWindow::selectionChangedSlot(const QItemSelection & /*newSelection*/, const QItemSelection & /*oldSelection*/)
{
//get the text of the selected item
const QModelIndex index = treeView->selectionModel()->currentIndex();
QString selectedText = index.data(Qt::DisplayRole).toString();
//find out the hierarchy level of the selected item
int hierarchyLevel=1;
QModelIndex seekRoot = index;
while(seekRoot.parent() != QModelIndex())
{
seekRoot = seekRoot.parent();
hierarchyLevel++;
}
QString showString = QString("%1, Level %2").arg(selectedText)
.arg(hierarchyLevel);
setWindowTitle(showString);
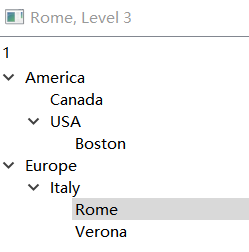
}构造函数用标准控件构造一棵树,并连接信号和槽,每当我们鼠标进行选择就会触发槽函数。槽函数中取得当前节点的文本信息,并通过QModelIndex的parent()来查询index的层次,现在在标题栏!
运行效果如下:
最后
以上就是风中雪碧最近收集整理的关于Qt mode/view全解七的全部内容,更多相关Qt内容请搜索靠谱客的其他文章。
本图文内容来源于网友提供,作为学习参考使用,或来自网络收集整理,版权属于原作者所有。


发表评论 取消回复