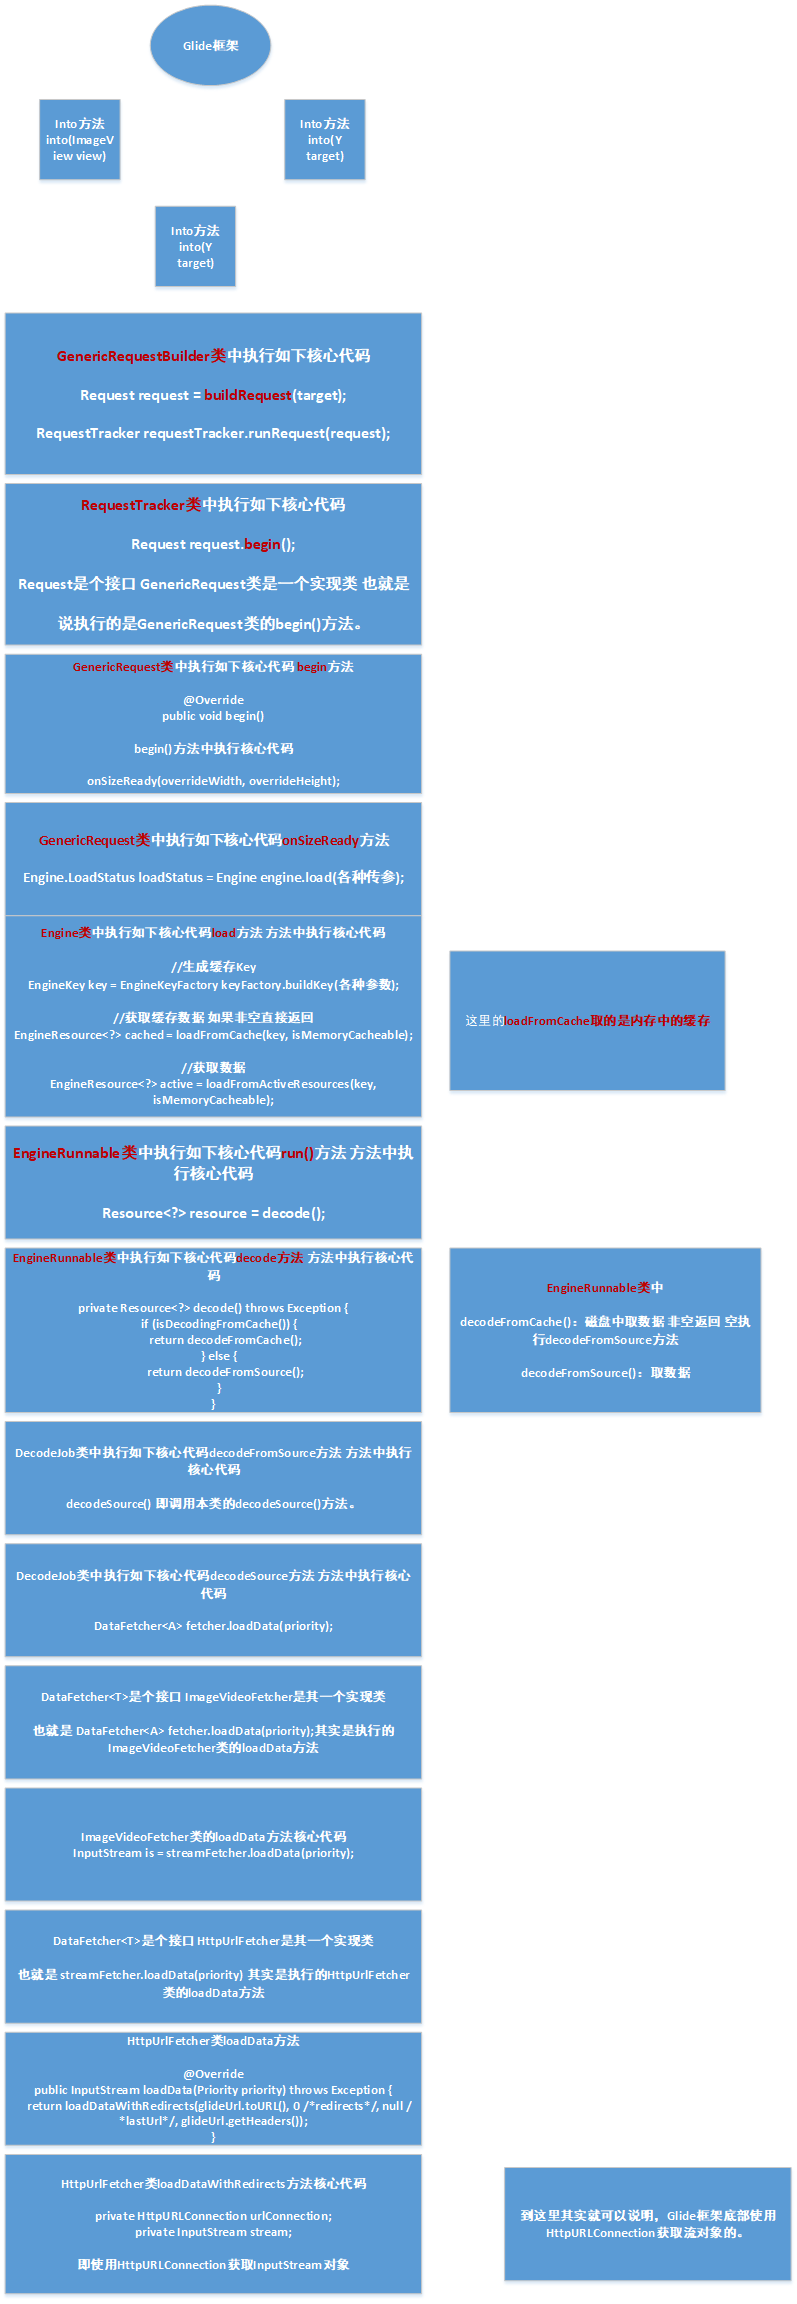
本章节从源码层面讲述Glide(3.7.0)的一些用法。
首先使用Glide最常用的使用是
Glide.with(this).load(url).into(imageView);下面我们依次看一下with方法+load方法+into方法。
with方法源码
首先,Glide框架with方法有五个重载的方法。
1.传参Context
public static RequestManager with(Context context) {
    RequestManagerRetriever retriever = RequestManagerRetriever.get();
    return retriever.get(context);
}
内部获取RequestManager对象
public RequestManager get(Context context) {
    if (context == null) {
        throw new IllegalArgumentException("You cannot start a load on a null Context");
    } else if (Util.isOnMainThread() && !(context instanceof Application)) {
        if (context instanceof FragmentActivity) {
            return get((FragmentActivity) context);
        } else if (context instanceof Activity) {
            return get((Activity) context);
        } else if (context instanceof ContextWrapper) {
            return get(((ContextWrapper) context).getBaseContext());
        }
    }

    return getApplicationManager(context);
}
也就是说,传参Context时
<1> 参数Context为空 抛出异常。
<2> 主线程操作&传参Context不是Application 分别获取Context类型,比如Activity或者Fragment。
<3> 子线程获取或者传参Context是Application 通过Application获取RequestManager对象。
小结1
传参Context时,如果是子线程中操作或者参数Context是Application 则通过Application获取RequestManager对象。也就是说 这种情况下 Glide的生命周期和应用程序的生命周期是同步的,如果应用程序关闭的话,Glide的加载也会同时终止。
2.传参Activity
public static RequestManager with(Activity activity) {
    RequestManagerRetriever retriever = RequestManagerRetriever.get();
    return retriever.get(activity);
}
内部获取RequestManager对象
@TargetApi(Build.VERSION_CODES.HONEYCOMB)
public RequestManager get(Activity activity) {
    if (Util.isOnBackgroundThread() || Build.VERSION.SDK_INT < Build.VERSION_CODES.HONEYCOMB) {
        return get(activity.getApplicationContext());
    } else {
        assertNotDestroyed(activity);
        android.app.FragmentManager fm = activity.getFragmentManager();
        return fragmentGet(activity, fm);
    }
}
也就是说,传参Activity时
<1> 子线程中操作或者系统版本小于11(Android 3.0) 通过Application获取RequestManager对象。
<2> 主线程中操作并且Android版本在3.0以上 首先校验当前Activity的状态。
@TargetApi(Build.VERSION_CODES.JELLY_BEAN_MR1)
private static void assertNotDestroyed(Activity activity) {
    if (Build.VERSION.SDK_INT >= Build.VERSION_CODES.JELLY_BEAN_MR1 && activity.isDestroyed()) {
        throw new IllegalArgumentException("You cannot start a load for a destroyed activity");
    }
}
Activity处于Destory时,抛出You cannot start a load for a destroyed activity异常。
然后创建一个临时的Fragment。返回RequestManager对象。那么这里为什么要添加一个隐藏的Fragment呢?因为Glide需要知道加载的生命周期。
小结2
传参Activity时,如果在子线程中操作或者Android版本小于3.0(现在可以忽略)。则使用Application获取RequestManager对象。其他情况使用Activity获取RequestManager对象。注意此时需要判断Activity的状态。
3.传参FragmentActivity
public static RequestManager with(FragmentActivity activity) {
    RequestManagerRetriever retriever = RequestManagerRetriever.get();
    return retriever.get(activity);
}
内部获取RequestManager对象
public RequestManager get(FragmentActivity activity) {
    if (Util.isOnBackgroundThread()) {
        return get(activity.getApplicationContext());
    } else {
        assertNotDestroyed(activity);
        FragmentManager fm = activity.getSupportFragmentManager();
        return supportFragmentGet(activity, fm);
    }
}
和传参Activity一致,这里不再赘述。
4.传参android.app.Fragment
@TargetApi(Build.VERSION_CODES.HONEYCOMB)
public static RequestManager with(android.app.Fragment fragment) {
    RequestManagerRetriever retriever = RequestManagerRetriever.get();
    return retriever.get(fragment);
}
内部获取RequestManager对象
@TargetApi(Build.VERSION_CODES.JELLY_BEAN_MR1)
public RequestManager get(android.app.Fragment fragment) {
    if (fragment.getActivity() == null) {
        throw new IllegalArgumentException("You cannot start a load on a fragment before it is attached");
    }
    if (Util.isOnBackgroundThread() || Build.VERSION.SDK_INT < Build.VERSION_CODES.JELLY_BEAN_MR1) {
        return get(fragment.getActivity().getApplicationContext());
    } else {
        android.app.FragmentManager fm = fragment.getChildFragmentManager();
        return fragmentGet(fragment.getActivity(), fm);
    }
}
也就是说,传参android.app.Fragment时
<1> 如果当前Fragment的宿主Activity为空 抛出异常。
<2> 如果子线程操作或者Android版本小于3.0(现在可以忽略)。通过Application获取RequestManager对象。
<3> 否则 获取getChildFragmentManager 然后获取RequestManager对象。
小结3
传参android.app.Fragment时,如果在子线程中操作或者Android版本小于3.0(现在可以忽略)。则使用Application获取RequestManager对象。其他情况通过获取getChildFragmentManager获取RequestManager对象。
5.传参Fragment
public static RequestManager with(Fragment fragment) {
    RequestManagerRetriever retriever = RequestManagerRetriever.get();
    return retriever.get(fragment);
}
内部获取RequestManager对象
public RequestManager get(Fragment fragment) {
    if (fragment.getActivity() == null) {
        throw new IllegalArgumentException("You cannot start a load on a fragment before it is attached");
    }
    if (Util.isOnBackgroundThread()) {
        return get(fragment.getActivity().getApplicationContext());
    } else {
        FragmentManager fm = fragment.getChildFragmentManager();
        return supportFragmentGet(fragment.getActivity(), fm);
    }
}
和传参android.app.Fragment一致,这里不再赘述。
五个重载方法仅仅是参数不同,都是获取RequestManagerRetriever对象,然后通过入参传参的参数通过RequestManagerRetriever对象获取RequestManager对象。
总结
通过with方法源码可知。
<1> 子线程中操作Glide。无论传参是什么类型,都会通过Application获取RequestManager对象。此时Glide的生命周期和应用程序的生命周期是同步的,如果应用程序关闭的话,Glide的加载也会同时终止。
<2> 主线程中操作Glide。传参不同会有不同的获取RequestManager对象的方式。
<3> 使用Glide时,最好不要在子线程中操作,因为它的生命周期会和Application一样。这样有可能造成Activity不能被回收。比如Into方法拿到了ImageView的引用等等。
<4> 使用Glide时,传参非Application时,尤其是Activity时,最好判断一下Activity的状态。
<5> 这里说的子线程操作Glide。仅仅指 使用with方法获取RequestManager对象。比如
RequestManager requestManager = Glide.with(this);而不是说操作整个的流程。比如
Glide.with(this).load(url).into(imageView);因为into方法 加载图片到View时,会校验线程的。如果不是主线程会抛出异常。这个下面会讲解的。这里举例说明
代码
public class GlideActivity extends AppCompatActivity {

    @Override
    protected void onCreate(Bundle savedInstanceState) {
        super.onCreate(savedInstanceState);
        setContentView(R.layout.activity_glide);

        ImageView imageView = findViewById(R.id.activity_glide_imageview);
        String url = "";

        new Thread(new Runnable() {
            @Override
            public void run() {
                Glide.with(GlideActivity.this).load(url).into(imageView);
            }
        }).start();
    }
}
报错
E/AndroidRuntime: FATAL EXCEPTION: Thread-6
    Process: com.wjn.networkdemo, PID: 12291
    java.lang.IllegalArgumentException: You must call this method on the main thread
        at com.bumptech.glide.util.Util.assertMainThread(Util.java:135)
        at com.bumptech.glide.GenericRequestBuilder.into(GenericRequestBuilder.java:676)
        at com.bumptech.glide.DrawableRequestBuilder.into(DrawableRequestBuilder.java:448)
        at com.wjn.networkdemo.glide.GlideActivity$1.run(GlideActivity.java:24)
        at java.lang.Thread.run(Thread.java:764)
其中 You must call this method on the main thread 错误异常就是into方法中报出的。
<6> with方法返回RequestManager对象。此方法可以在子线程中执行。
load方法源码
load方法也有很多重载的方法,对应显示什么方式的图片
1.显示网络图片
public DrawableTypeRequest<String> load(String string) {
    return (DrawableTypeRequest<String>) fromString().load(string);
}
2.显示Uri图片(相机相册)
public DrawableTypeRequest<Uri> load(Uri uri) {
    return (DrawableTypeRequest<Uri>) fromUri().load(uri);
}
3.显示File图片
public DrawableTypeRequest<File> load(File file) {
    return (DrawableTypeRequest<File>) fromFile().load(file);
}
4.显示Integer图片(项目中的map或者drawable)
public DrawableTypeRequest<Integer> load(Integer resourceId) {
    return (DrawableTypeRequest<Integer>) fromResource().load(resourceId);
}
5.显示URL图片(其他应用提供的)
@Deprecated
public DrawableTypeRequest<URL> load(URL url) {
    return (DrawableTypeRequest<URL>) fromUrl().load(url);
}
6.显示byte[](Base64)图片
public DrawableTypeRequest<byte[]> load(byte[] model) {
    return (DrawableTypeRequest<byte[]>) fromBytes().load(model);
}
这里我们分析源码只分析加载网络图片的load方法。
return (DrawableTypeRequest<String>) fromString().load(string);fromString()方法源码
public DrawableTypeRequest<String> fromString() {
    return loadGeneric(String.class);
}
loadGeneric()方法源码
private <T> DrawableTypeRequest<T> loadGeneric(Class<T> modelClass) {


}
load()方法源码
public DrawableRequestBuilder<ModelType> load(ModelType model) {
    super.load(model);
    return this;
}
也就是说load()方法,最终返回DrawableRequestBuilder对象。因为最后还要执行into()方法,所以load()方法源码我们先讲到这里。
into方法源码
into方法有两个重载的方法,对应显示图片在什么控件上
1.显示在ImageView上
public Target<TranscodeType> into(ImageView view) {

}
2.显示在自定义的View上
public <Y extends Target<TranscodeType>> Y into(Y target) {

}
显示在ImageView上就不多说了,下面看一下怎么显示在自定义的View上。
其实,这两个重载的into方法。Glide内部是有内部调用的,即into ImageView类型时,其实内部会生成一个Target对象。然后调用into Target类型的方法。
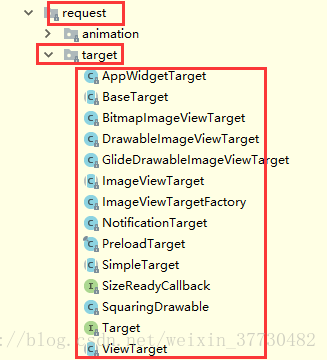
Glide的所有Target

这其中ViewTarget的功能更加广泛。我们可以使用它在任意的View上显示加载的图片。
自定义ViewTarget
public class MyLayout extends RelativeLayout {

    private ViewTarget<MyLayout, GlideDrawable> mViewTarget;

    public MyLayout(Context context) {
        super(context);
        initViewTarget();
    }

    public MyLayout(Context context, AttributeSet attrs) {
        super(context, attrs);
        initViewTarget();
    }

    /**
     * 初始化ViewTarget
     */

    private void initViewTarget() {
        mViewTarget = new ViewTarget<MyLayout, GlideDrawable>(this) {
            @Override
            public void onResourceReady(GlideDrawable resource, GlideAnimation glideAnimation) {
                MyLayout myLayout = getView();
                myLayout.setBackground(resource);
            }
        };
    }

    /**
     * 外界使用提供获取ViewTarget对象的方法
     */

    public ViewTarget<MyLayout, GlideDrawable> getTarget() {
        return mViewTarget;
    }
}
使用
public class GlideActivity extends AppCompatActivity {

    @Override
    protected void onCreate(Bundle savedInstanceState) {
        super.onCreate(savedInstanceState);
        setContentView(R.layout.activity_glide);

        MyLayout myLayout = findViewById(R.id.activity_glide_layout);
        String url = "";
        Glide.with(this).load(url).into(myLayout.getTarget());
    }
}
布局
<androidx.constraintlayout.widget.ConstraintLayout xmlns:android="http://schemas.android.com/apk/res/android"
    xmlns:tools="http://schemas.android.com/tools"
    android:layout_width="match_parent"
    android:layout_height="match_parent"
    tools:context=".glide.GlideActivity">

    <com.wjn.networkdemo.glide.MyLayout
        android:id="@+id/activity_glide_layout"
        android:layout_width="match_parent"
        android:layout_height="400dp"
        tools:ignore="MissingConstraints">

    </com.wjn.networkdemo.glide.MyLayout>

</androidx.constraintlayout.widget.ConstraintLayout>
现在我们使用into()方法传入ImageView的方法,为入口。开始源码讲解。
@Override
public Target<GlideDrawable> into(ImageView view) {
    return super.into(view);
}
内部调用GenericRequestBuilder类的into方法。
public Target<TranscodeType> into(ImageView view) {
    Util.assertMainThread();
    if (view == null) {
        throw new IllegalArgumentException("You must pass in a non null View");
    }

    if (!isTransformationSet && view.getScaleType() != null) {
        switch (view.getScaleType()) {
            case CENTER_CROP:
                applyCenterCrop();
                break;
            case FIT_CENTER:
            case FIT_START:
            case FIT_END:
                applyFitCenter();
                break;
            //$CASES-OMITTED$
            default:
                // Do nothing.
        }
    }

    return into(glide.buildImageViewTarget(view, transcodeClass));
}
小结1
通过GenericRequestBuilder类的into方法。可知
<1> into()方法只能在主线程中执行。否则会抛出异常You must call this method on the main thread。
<2> Glide会默认操作ImageView的ScaleType属性,这个要注意,否则可能会出现显示问题。比如图片没有全部覆盖ImageView的情况。
<3> 最后调用本类的into(Y target)方法。也就是说传入ImageView时,最后也会生成一个Target类型的对象,然后调用into(Y target)方法。
into(Y target)方法源码
public <Y extends Target<TranscodeType>> Y into(Y target) {
    Util.assertMainThread();
    if (target == null) {
        throw new IllegalArgumentException("You must pass in a non null Target");
    }
    if (!isModelSet) {
        throw new IllegalArgumentException("You must first set a model (try #load())");
    }

    Request previous = target.getRequest();

    if (previous != null) {
        previous.clear();
        requestTracker.removeRequest(previous);
        previous.recycle();
    }

    Request request = buildRequest(target);
    target.setRequest(request);
    lifecycle.addListener(target);
    requestTracker.runRequest(request);

    return target;
}
该方法中,代码虽然不多但是核心的代码其实是Request。Request组件其实在Glide框架中挺重要的。
首先,根据传入的target对象,获取当前target对象的Request对象,如果Request对象不为空。则清除缓存。然后重新buildRequest。
那么buildRequest()方法是如何构建Request对象的呢?
//此方法 主要获取Glide的优先级 默认NORMAL
private Request buildRequest(Target<TranscodeType> target) {
    if (priority == null) {
        priority = Priority.NORMAL;
    }
    return buildRequestRecursive(target, null);
}


//具体获取Request对象的方法
private Request buildRequestRecursive(Target<TranscodeType> target, ThumbnailRequestCoordinator parentCoordinator) {
    if (thumbnailRequestBuilder != null) {
        if (isThumbnailBuilt) {
            throw new IllegalStateException("You cannot use a request as both the main request and a thumbnail, "
                    + "consider using clone() on the request(s) passed to thumbnail()");
        }
        // Recursive case: contains a potentially recursive thumbnail request builder.
        if (thumbnailRequestBuilder.animationFactory.equals(NoAnimation.getFactory())) {
            thumbnailRequestBuilder.animationFactory = animationFactory;
        }

        if (thumbnailRequestBuilder.priority == null) {
            thumbnailRequestBuilder.priority = getThumbnailPriority();
        }

        if (Util.isValidDimensions(overrideWidth, overrideHeight)
                && !Util.isValidDimensions(thumbnailRequestBuilder.overrideWidth,
                        thumbnailRequestBuilder.overrideHeight)) {
          thumbnailRequestBuilder.override(overrideWidth, overrideHeight);
        }

        ThumbnailRequestCoordinator coordinator = new ThumbnailRequestCoordinator(parentCoordinator);
        Request fullRequest = obtainRequest(target, sizeMultiplier, priority, coordinator);
        // Guard against infinite recursion.
        isThumbnailBuilt = true;
        // Recursively generate thumbnail requests.
        Request thumbRequest = thumbnailRequestBuilder.buildRequestRecursive(target, coordinator);
        isThumbnailBuilt = false;
        coordinator.setRequests(fullRequest, thumbRequest);
        return coordinator;
    } else if (thumbSizeMultiplier != null) {
        // Base case: thumbnail multiplier generates a thumbnail request, but cannot recurse.
        ThumbnailRequestCoordinator coordinator = new ThumbnailRequestCoordinator(parentCoordinator);
        Request fullRequest = obtainRequest(target, sizeMultiplier, priority, coordinator);
        Request thumbnailRequest = obtainRequest(target, thumbSizeMultiplier, getThumbnailPriority(), coordinator);
        coordinator.setRequests(fullRequest, thumbnailRequest);
        return coordinator;
    } else {
        // Base case: no thumbnail.
        return obtainRequest(target, sizeMultiplier, priority, parentCoordinator);
    }
}


private Request obtainRequest(Target<TranscodeType> target, float sizeMultiplier, Priority priority,
        RequestCoordinator requestCoordinator) {
    return GenericRequest.obtain(
            loadProvider,
            model,
            signature,
            context,
            priority,
            target,
            sizeMultiplier,
            placeholderDrawable,
            placeholderId,
            errorPlaceholder,
            errorId,
            fallbackDrawable,
            fallbackResource,
            requestListener,
            requestCoordinator,
            glide.getEngine(),
            transformation,
            transcodeClass,
            isCacheable,
            animationFactory,
            overrideWidth,
            overrideHeight,
            diskCacheStrategy);
}
小结2
buildRequest()方法主要操作Glide的优先级,然后调用本类的buildRequestRecursive()方法。在buildRequestRecursive方法中核心代码是通过obtainRequest()方法来获取一个Request对象。而obtainRequest()方法中又去调用了GenericRequest的obtain()方法。注意这个obtain()方法需要传入非常多的参数,比如 placeholderId(占位图片)errorPlaceholder(出错图片)等等。
到这里我们就结束了buildRequest()方法是如何构建Request对象的问题,
下面接着into(Y target)方法继续讲解
requestTracker.runRequest(request);public void runRequest(Request request) {
requests.add(request);
if (!isPaused) {
request.begin();
} else {
pendingRequests.add(request);
}
}<1> 如果Glide处于暂停状态 则add Request 。
<2> 否则执行Request的begin()方法。
因为Request是一个接口,GenericRequest类是一个实现类。所以我们看一下GenericRequest类的begin()方法。
GenericRequest类的begin()方法源码
@Override
public void begin() {
    startTime = LogTime.getLogTime();

    //model等于nul(model就是我们传过来的图片路径合成的对象) 则执行onException(null);方法
    if (model == null) {
        onException(null);
        return;
    }


    //如果使用override()方法设置了图片的宽高,则重写操作大小。
    status = Status.WAITING_FOR_SIZE;
    if (Util.isValidDimensions(overrideWidth, overrideHeight)) {
        onSizeReady(overrideWidth, overrideHeight);
    } else {
        target.getSize(this);
    }


    //开始加载图片 先显示Loading的展位图
    if (!isComplete() && !isFailed() && canNotifyStatusChanged()) {
        target.onLoadStarted(getPlaceholderDrawable());
    }
    if (Log.isLoggable(TAG, Log.VERBOSE)) {
        logV("finished run method in " + LogTime.getElapsedMillis(startTime));
    }
}
@Override
public void onException(Exception e) {
    if (Log.isLoggable(TAG, Log.DEBUG)) {
        Log.d(TAG, "load failed", e);
    }

    status = Status.FAILED;
    //TODO: what if this is a thumbnail request?
    if (requestListener == null || !requestListener.onException(e, model, target, isFirstReadyResource())) {
        setErrorPlaceholder(e);
    }
}
也就是,如果图片路径为空,则先显示错误的图片占位,如果没有设置,再显示加载中的图片占位。
onSizeReady方法源码
@Override
public void onSizeReady(int width, int height) {
    if (Log.isLoggable(TAG, Log.VERBOSE)) {
        logV("Got onSizeReady in " + LogTime.getElapsedMillis(startTime));
    }
    if (status != Status.WAITING_FOR_SIZE) {
        return;
    }
    status = Status.RUNNING;

    width = Math.round(sizeMultiplier * width);
    height = Math.round(sizeMultiplier * height);

    ModelLoader<A, T> modelLoader = loadProvider.getModelLoader();
    final DataFetcher<T> dataFetcher = modelLoader.getResourceFetcher(model, width, height);

    if (dataFetcher == null) {
        onException(new Exception("Failed to load model: '" + model + "'"));
        return;
    }
    ResourceTranscoder<Z, R> transcoder = loadProvider.getTranscoder();
    if (Log.isLoggable(TAG, Log.VERBOSE)) {
        logV("finished setup for calling load in " + LogTime.getElapsedMillis(startTime));
    }
    loadedFromMemoryCache = true;
    loadStatus = engine.load(signature, width, height, dataFetcher, loadProvider, transformation, transcoder,
            priority, isMemoryCacheable, diskCacheStrategy, this);
    loadedFromMemoryCache = resource != null;
    if (Log.isLoggable(TAG, Log.VERBOSE)) {
        logV("finished onSizeReady in " + LogTime.getElapsedMillis(startTime));
    }
}
核心代码
private Engine engine;


loadStatus = engine.load(signature, width, height, dataFetcher, loadProvider, transformation, transcoder,priority, isMemoryCacheable, diskCacheStrategy, this);
也就是调用Engine类的load方法。
 public <T, Z, R> LoadStatus load(Key signature, int width, int height, DataFetcher<T> fetcher,
            DataLoadProvider<T, Z> loadProvider, Transformation<Z> transformation, ResourceTranscoder<Z, R> transcoder,
            Priority priority, boolean isMemoryCacheable, DiskCacheStrategy diskCacheStrategy, ResourceCallback cb) {


   EngineRunnable runnable = new EngineRunnable(engineJob, decodeJob, priority);


}
然后 从Engine类的load方法到EngineRunnable类的run方法
@Override
public void run() {
    if (isCancelled) {
        return;
    }

    Exception exception = null;
    Resource<?> resource = null;
    try {
        resource = decode();
    } catch (Exception e) {
        if (Log.isLoggable(TAG, Log.VERBOSE)) {
            Log.v(TAG, "Exception decoding", e);
        }
        exception = e;
    }

    if (isCancelled) {
        if (resource != null) {
            resource.recycle();
        }
        return;
    }

    if (resource == null) {
        onLoadFailed(exception);
    } else {
        onLoadComplete(resource);
    }
}
然后到EngineRunnable类的decode()方法
private Resource<?> decode() throws Exception {
    if (isDecodingFromCache()) {
        return decodeFromCache();
    } else {
        return decodeFromSource();
    }
}
这可以看出 有两个方法,一个是取缓存中的数据,一个是取数据。取缓存的方法下一章节讲解,现在看取数据的decodeFromSource();方法
private Resource<?> decodeFromSource() throws Exception {
    return decodeJob.decodeFromSource();
}
然后从EngineRunnable类的decodeFromSource()方法再到DecodeJob类的decodeFromSource()方法。
public Resource<Z> decodeFromSource() throws Exception {
    Resource<T> decoded = decodeSource();
    return transformEncodeAndTranscode(decoded);
}
然后DecodeJob类的decodeFromSource()方法到DecodeJob类的decodeSource()方法。
private Resource<T> decodeSource() throws Exception {
    Resource<T> decoded = null;
    try {
        long startTime = LogTime.getLogTime();
        final A data = fetcher.loadData(priority);
        if (Log.isLoggable(TAG, Log.VERBOSE)) {
            logWithTimeAndKey("Fetched data", startTime);
        }
        if (isCancelled) {
            return null;
        }
        decoded = decodeFromSourceData(data);
    } finally {
        fetcher.cleanup();
    }
    return decoded;
}
核心代码
final A data = fetcher.loadData(priority);到ImageVideoModelLoader类的loadData方法。
@Override
public ImageVideoWrapper loadData(Priority priority) throws Exception {
    InputStream is = null;
    if (streamFetcher != null) {
        try {
            is = streamFetcher.loadData(priority);
        } catch (Exception e) {
            if (Log.isLoggable(TAG, Log.VERBOSE)) {
                Log.v(TAG, "Exception fetching input stream, trying ParcelFileDescriptor", e);
            }
            if (fileDescriptorFetcher == null) {
                throw e;
            }
        }
     }
    ParcelFileDescriptor fileDescriptor = null;
    if (fileDescriptorFetcher != null) {
        try {
            fileDescriptor = fileDescriptorFetcher.loadData(priority);
        } catch (Exception e) {
            if (Log.isLoggable(TAG, Log.VERBOSE)) {
                Log.v(TAG, "Exception fetching ParcelFileDescriptor", e);
            }
            if (is == null) {
                throw e;
            }
         }
     }
     return new ImageVideoWrapper(is, fileDescriptor);
}
核心代码
is = streamFetcher.loadData(priority);
到HttpUrlFetcher类的loadData()方法
private HttpURLConnection urlConnection;
private InputStream stream;


@Override
public InputStream loadData(Priority priority) throws Exception {
    return loadDataWithRedirects(glideUrl.toURL(), 0 /*redirects*/, null /*lastUrl*/, glideUrl.getHeaders());
}


private InputStream loadDataWithRedirects(URL url, int redirects, URL lastUrl, Map<String, String> headers)
        throws IOException {
    if (redirects >= MAXIMUM_REDIRECTS) {
        throw new IOException("Too many (> " + MAXIMUM_REDIRECTS + ") redirects!");
    } else {
        // Comparing the URLs using .equals performs additional network I/O and is generally broken.
        // See http://michaelscharf.blogspot.com/2006/11/javaneturlequals-and-hashcode-make.html.
        try {
            if (lastUrl != null && url.toURI().equals(lastUrl.toURI())) {
                throw new IOException("In re-direct loop");
            }
        } catch (URISyntaxException e) {
            // Do nothing, this is best effort.
        }
    }
    urlConnection = connectionFactory.build(url);
     for (Map.Entry<String, String> headerEntry : headers.entrySet()) {
      urlConnection.addRequestProperty(headerEntry.getKey(), headerEntry.getValue());
    }
    urlConnection.setConnectTimeout(2500);
    urlConnection.setReadTimeout(2500);
    urlConnection.setUseCaches(false);
    urlConnection.setDoInput(true);

    // Connect explicitly to avoid errors in decoders if connection fails.
    urlConnection.connect();
    if (isCancelled) {
        return null;
    }
    final int statusCode = urlConnection.getResponseCode();
    if (statusCode / 100 == 2) {
        return getStreamForSuccessfulRequest(urlConnection);
    } else if (statusCode / 100 == 3) {
        String redirectUrlString = urlConnection.getHeaderField("Location");
        if (TextUtils.isEmpty(redirectUrlString)) {
            throw new IOException("Received empty or null redirect url");
        }
        URL redirectUrl = new URL(url, redirectUrlString);
        return loadDataWithRedirects(redirectUrl, redirects + 1, url, headers);
    } else {
        if (statusCode == -1) {
            throw new IOException("Unable to retrieve response code from HttpUrlConnection.");
        }
        throw new IOException("Request failed " + statusCode + ": " + urlConnection.getResponseMessage());
    }
}
到这里其实就告一段落了,因为已经通过HttpURLConnection获取到了图片流了,剩余的就是将图片流转换成Bitmap了。
总结
1.Glide框架的with方法返回RequestManager对象。可以在子线程操作,也可以在主线程操作。可以传入Context对象,也可以传入Activity对象或者Fragment对象。在线程操作时,无论with()方法参数传入什么都使用Application对象返回RequestManager对象。Glide的生命周期和Application一样。主线程中操作时,根据with()方法参数决定Glide的生命周期,比如传入Activity,那么Glide的生命周期就是Activity的生命周期,传入Application,那么Glide的生命周期就是Application的生命周期。
2.Glide框架的load方法返回DrawableTypeRequest对象,有多个重载方法。可以加载不同类型的图片,比如网络图片,比如本地图片,比如File图片。
3.Glide框架的into方法返回Target对象。内部源码众多,有多个重载方法。一个传入ImageView对象,一个传入Target对象。内部都是转换成Target对象。大体的流程是。

首先获取Request对象。经过一系列的操作到ImageVideoModelLoader类的loadData方法。最后到HttpUrlFetcher类的loadData方法。然后在该类中通过HttpURLConnection对象获取InputStream对象。最终转换成Bitmap对象。显示在View上。
最后
以上就是深情水壶最近收集整理的关于Glide源码详解(基于3.X版本)的全部内容,更多相关Glide源码详解(基于3内容请搜索靠谱客的其他文章。


发表评论 取消回复