本篇做Glide流程分析笔记,以打通主要流程为主。
从Glide基本使用入手:
Glide.with(this).load(INTERNET_PIC_URL_1).into(imageView);一、.with的处理
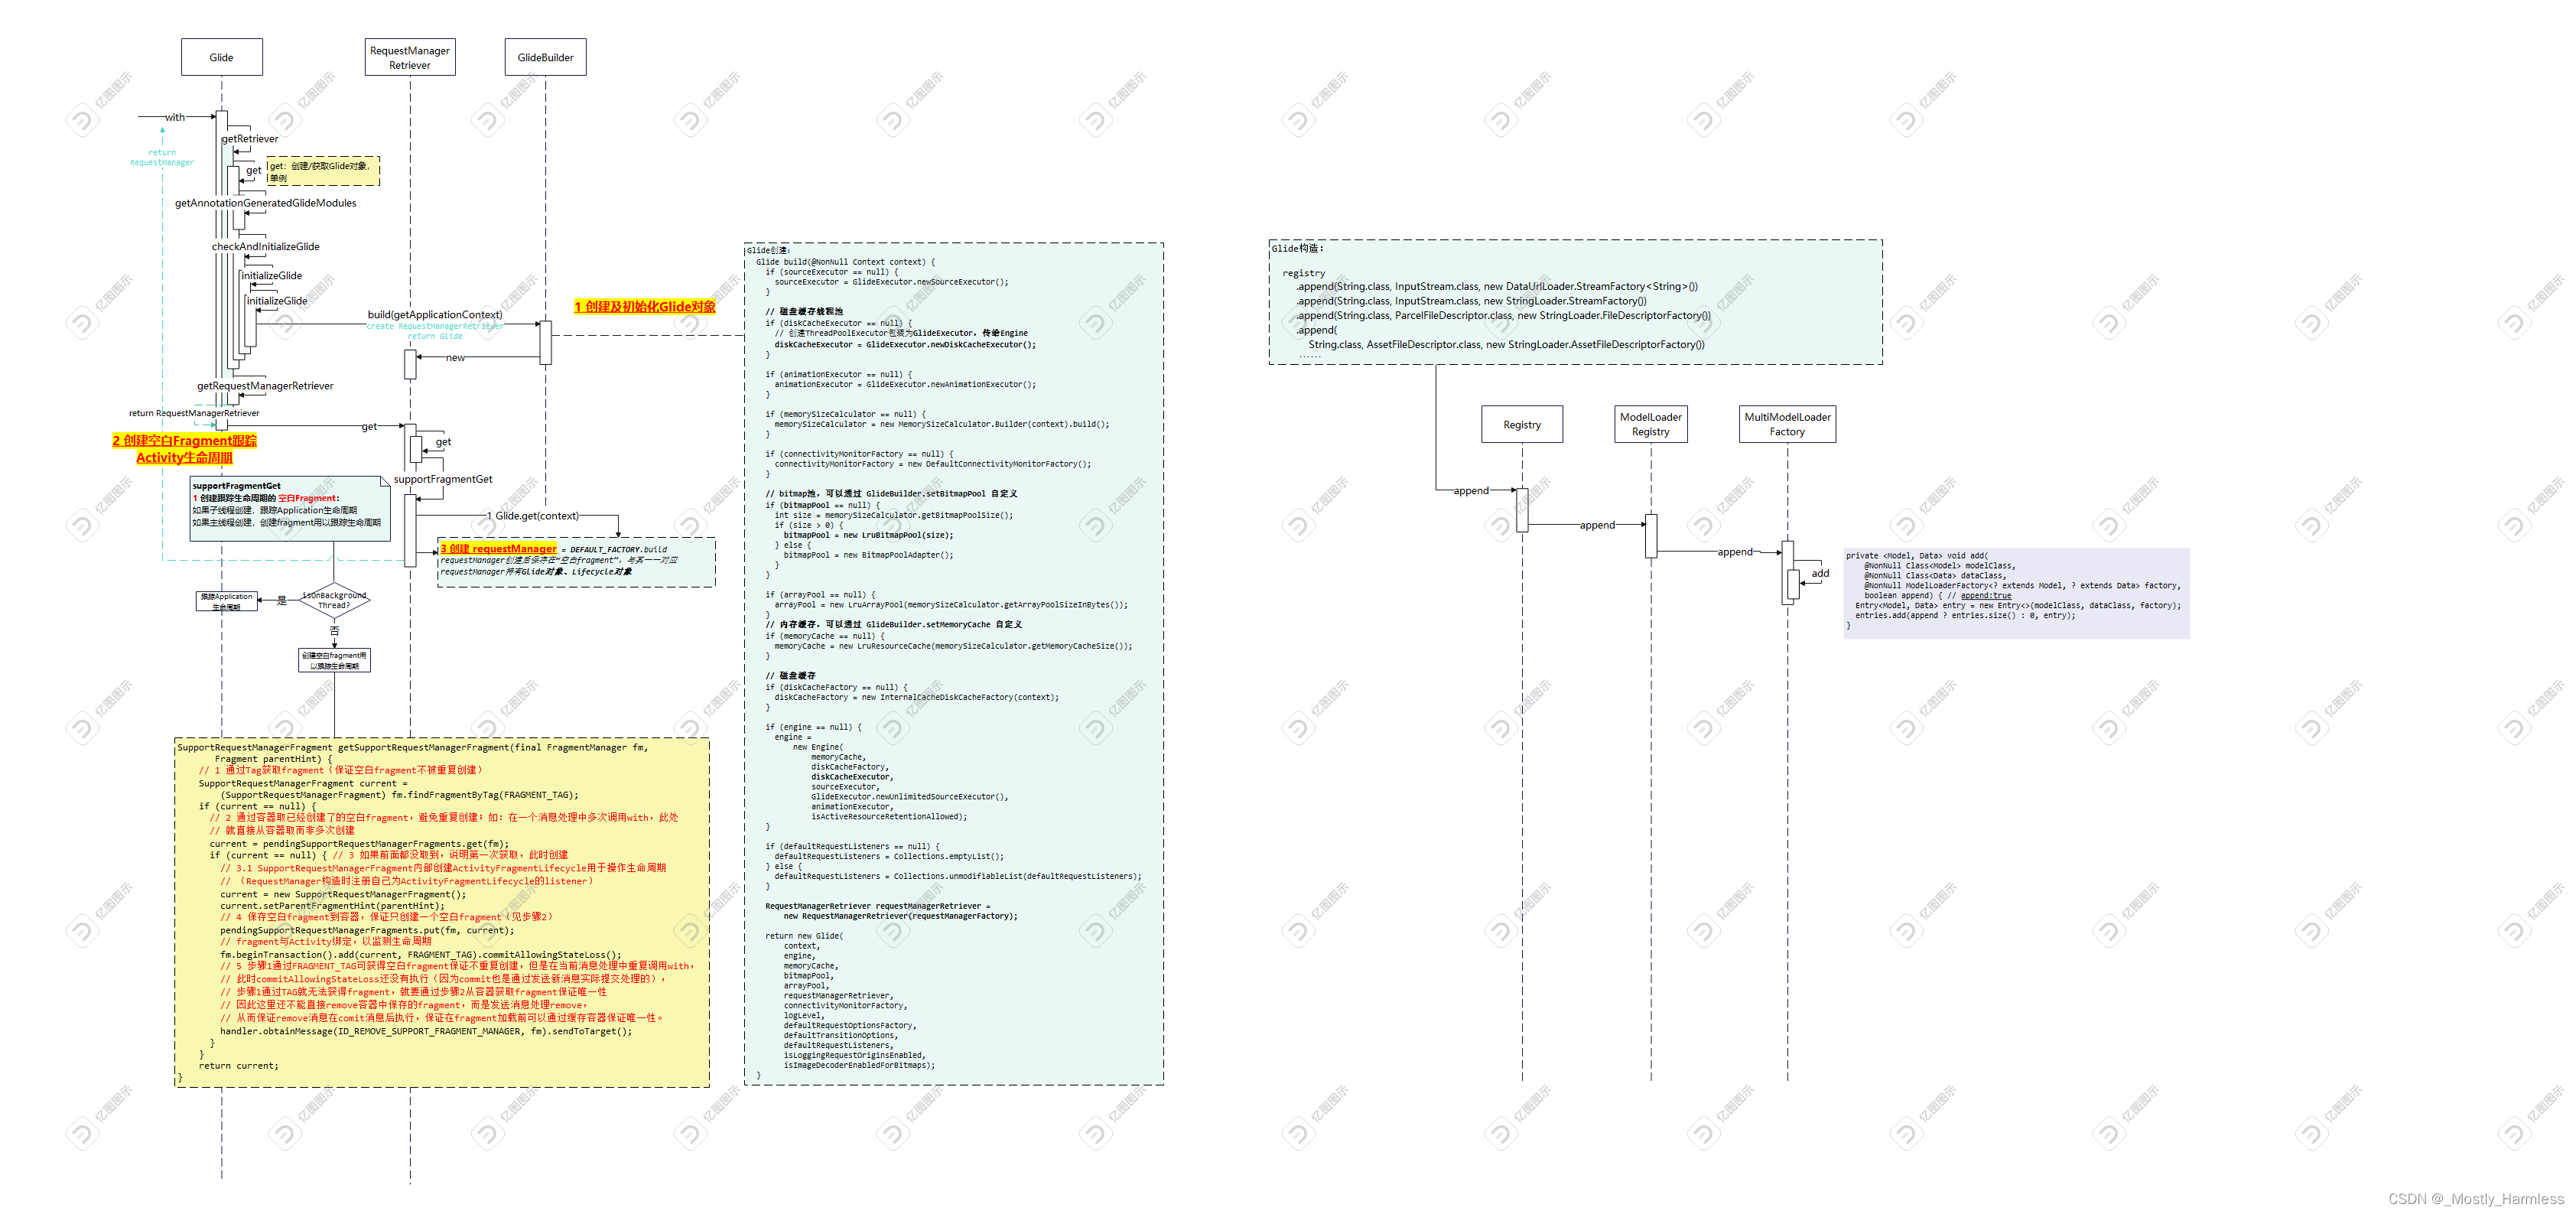
1 初始化Glide对象
1.1 初始化BitmapPool对象池、内存缓存、磁盘缓存、Engine处理引擎等并交给Glide。
@NonNull
Glide build(@NonNull Context context) {
if (sourceExecutor == null) {
  sourceExecutor = GlideExecutor.newSourceExecutor();
}
// 磁盘缓存处理器
if (diskCacheExecutor == null) {
  diskCacheExecutor = GlideExecutor.newDiskCacheExecutor();
}

if (animationExecutor == null) {
  animationExecutor = GlideExecutor.newAnimationExecutor();
}

if (memorySizeCalculator == null) {
  memorySizeCalculator = new MemorySizeCalculator.Builder(context).build();
}

if (connectivityMonitorFactory == null) {
  connectivityMonitorFactory = new DefaultConnectivityMonitorFactory();
}
// 对象池,bitmap复用
if (bitmapPool == null) {
  int size = memorySizeCalculator.getBitmapPoolSize();
  if (size > 0) {
    bitmapPool = new LruBitmapPool(size);
  } else {
    bitmapPool = new BitmapPoolAdapter();
  }
}

if (arrayPool == null) {
  arrayPool = new LruArrayPool(memorySizeCalculator.getArrayPoolSizeInBytes());
}
// 内存缓存
if (memoryCache == null) {
  memoryCache = new LruResourceCache(memorySizeCalculator.getMemoryCacheSize());
}
// 磁盘缓存
if (diskCacheFactory == null) {
  diskCacheFactory = new InternalCacheDiskCacheFactory(context);
}

if (engine == null) {
  // 任务处理引擎,负责调度获取图片的任务,包括对缓存的调度等。
  engine =
      new Engine(
          memoryCache,
          diskCacheFactory,
          diskCacheExecutor,
          sourceExecutor,
          GlideExecutor.newUnlimitedSourceExecutor(),
          animationExecutor,
          isActiveResourceRetentionAllowed);
}

if (defaultRequestListeners == null) {
  defaultRequestListeners = Collections.emptyList();
} else {
  defaultRequestListeners = Collections.unmodifiableList(defaultRequestListeners);
}

RequestManagerRetriever requestManagerRetriever =
    new RequestManagerRetriever(requestManagerFactory);
// 创建 Glide 对象
return new Glide(
    context,
    engine,
    memoryCache,
    bitmapPool,
    arrayPool,
    requestManagerRetriever,
    connectivityMonitorFactory,
    logLevel,
    defaultRequestOptionsFactory,
    defaultTransitionOptions,
    defaultRequestListeners,
    isLoggingRequestOriginsEnabled,
    isImageDecoderEnabledForBitmaps);
}
1.2 注册组件,它的用途是根据使用者传入的资源类型规定对应的处理用的ModelLoader。
例如:
.append(GlideUrl.class, InputStream.class, new HttpGlideUrlLoader.Factory())
GlideUrl.class 是使用者.load传入的类型
InputStream.class 需要返回的结果类型
如果符合1、2参数,则对应使用 HttpGlideUrlLoader 处理请求数据。
参数1:使用者load传入的资源地址类型;
参数2:需要返回的结果类型;
参数3:对应做处理的Loader的工厂,用以创建工作Loader。
registry
    .append(int.class, InputStream.class, resourceLoaderStreamFactory)
    .append(int.class, ParcelFileDescriptor.class, resourceLoaderFileDescriptorFactory)
    .append(Integer.class, InputStream.class, resourceLoaderStreamFactory)
    .append(Integer.class, ParcelFileDescriptor.class, resourceLoaderFileDescriptorFactory)
    .append(Integer.class, Uri.class, resourceLoaderUriFactory)
    .append(int.class, AssetFileDescriptor.class, resourceLoaderAssetFileDescriptorFactory)
    .append(Integer.class, AssetFileDescriptor.class, resourceLoaderAssetFileDescriptorFactory)
    .append(int.class, Uri.class, resourceLoaderUriFactory)
    .append(String.class, InputStream.class, new DataUrlLoader.StreamFactory<String>())
    .append(Uri.class, InputStream.class, new DataUrlLoader.StreamFactory<Uri>())
    .append(String.class, InputStream.class, new StringLoader.StreamFactory())
    .append(String.class, ParcelFileDescriptor.class, new StringLoader.FileDescriptorFactory())
    .append(
        String.class, AssetFileDescriptor.class, new StringLoader.AssetFileDescriptorFactory())
    .append(Uri.class, InputStream.class, new HttpUriLoader.Factory())
    .append(Uri.class, InputStream.class, new AssetUriLoader.StreamFactory(context.getAssets()))
    .append(
        Uri.class,
        ParcelFileDescriptor.class,
        new AssetUriLoader.FileDescriptorFactory(context.getAssets()))
    .append(Uri.class, InputStream.class, new MediaStoreImageThumbLoader.Factory(context))
    .append(Uri.class, InputStream.class, new MediaStoreVideoThumbLoader.Factory(context));
...
1.3 创建ImageViewTargetFactory,用于后续创建ImageViewTarget。ImageViewTarget持有添加需要加载图片的目标控件,就是最终给控件设置资源的处理类。在后面.into讲解。
ImageViewTargetFactory imageViewTargetFactory = new ImageViewTargetFactory();
glideContext =
    new GlideContext(
        context,
        arrayPool,
        registry,
        imageViewTargetFactory,
        defaultRequestOptionsFactory,
        defaultTransitionOptions,
        defaultRequestListeners,
        engine,
        isLoggingRequestOriginsEnabled,
        logLevel);
2 创建RequestManagerRetriever,生成空白Fragment用以跟踪Activity生命周期。
SupportRequestManagerFragment getSupportRequestManagerFragment(final FragmentManager fm,
       Fragment parentHint) {
    // 1 通过Tag获取fragment(保证空白fragment不被重复创建)
    SupportRequestManagerFragment current =
        (SupportRequestManagerFragment) fm.findFragmentByTag(FRAGMENT_TAG);
    if (current == null) {
      // 2 通过容器取已经创建了的空白fragment,避免重复创建;如:在一个消息处理中多次调用with,此处
      // 就直接从容器取而非多次创建
      current = pendingSupportRequestManagerFragments.get(fm);
      if (current == null) { // 3 如果前面都没取到,说明第一次获取,此时创建
        // 3.1 SupportRequestManagerFragment内部创建ActivityFragmentLifecycle用于操作生命周期
        // (RequestManager构造时注册自己为ActivityFragmentLifecycle的listener)
        current = new SupportRequestManagerFragment();
        current.setParentFragmentHint(parentHint);
        // 4 保存空白fragment到容器,保证只创建一个空白fragment(见步骤2)
        pendingSupportRequestManagerFragments.put(fm, current);
        // fragment与Activity绑定,以监测生命周期
        fm.beginTransaction().add(current, FRAGMENT_TAG).commitAllowingStateLoss();
        // 5 步骤1通过FRAGMENT_TAG可获得空白fragment保证不重复创建,但是在当前消息处理中重复调用with,
        // 此时commitAllowingStateLoss还没有执行(因为commit也是通过发送新消息实际提交处理的),
        // 步骤1通过TAG就无法获得fragment,就要通过步骤2从容器获取fragment保证唯一性
        // 因此这里还不能直接remove容器中保存的fragment,而是发送消息处理remove,
        // 从而保证remove消息在comit消息后执行,保证在fragment加载前可以通过缓存容器保证唯一性。
        handler.obtainMessage(ID_REMOVE_SUPPORT_FRAGMENT_MANAGER, fm).sendToTarget();
      }
    }
    return current;
}
此段代码是生成fragment并加载的过程,通过fragment TAG和缓存容器避免多次调用造成多次创建fragment。具体如何保证的,节选代码里注释已经写清楚了。
Fragment中ActivityFragmentLifecycle是用来监听生命周期的,具体如何发挥作用,在本文后边“四 Glide如何感知生命周期变化的” 有图解。
3 创建RequestManager,给生命周期fragment持有。
RequestManager是一个LifecycleListener,它在构造时把自己注册给Lifecycle从而达到感知生命周期的目的。
RequestManager内持有TargetTracker/RequestTracker用来管理target/request的生命周期。
public final class TargetTracker implements LifecycleListener {
  private final Set<Target<?>> targets =
      Collections.newSetFromMap(new WeakHashMap<Target<?>, Boolean>());
  // 注册
  public void track(@NonNull Target<?> target) {
    targets.add(target);
  }

  public void untrack(@NonNull Target<?> target) {
    targets.remove(target);
  }

  @Override
  public void onStart() {
    for (Target<?> target : Util.getSnapshot(targets)) {
      target.onStart();
    }
  }

  @Override
  public void onStop() {
    for (Target<?> target : Util.getSnapshot(targets)) {
      target.onStop();
    }
  }

  @Override
  public void onDestroy() {
    for (Target<?> target : Util.getSnapshot(targets)) {
      target.onDestroy();
    }
  }

  @NonNull
  public List<Target<?>> getAll() {
    return Util.getSnapshot(targets);
  }

  public void clear() {
    targets.clear();
  }
}
public class RequestTracker {
private static final String TAG = "RequestTracker";
private final Set<Request> requests =
Collections.newSetFromMap(new WeakHashMap<Request, Boolean>());
@SuppressWarnings("MismatchedQueryAndUpdateOfCollection")
private final List<Request> pendingRequests = new ArrayList<>();
private boolean isPaused;
/** Starts tracking the given request. */
public void runRequest(@NonNull Request request) {
requests.add(request);
if (!isPaused) {
request.begin();
} else {
request.clear();
if (Log.isLoggable(TAG, Log.VERBOSE)) {
Log.v(TAG, "Paused, delaying request");
}
pendingRequests.add(request);
}
}
// 注册
@VisibleForTesting
void addRequest(Request request) {
requests.add(request);
}
...Glide如何通过fragment生命周期控制操作的呢?
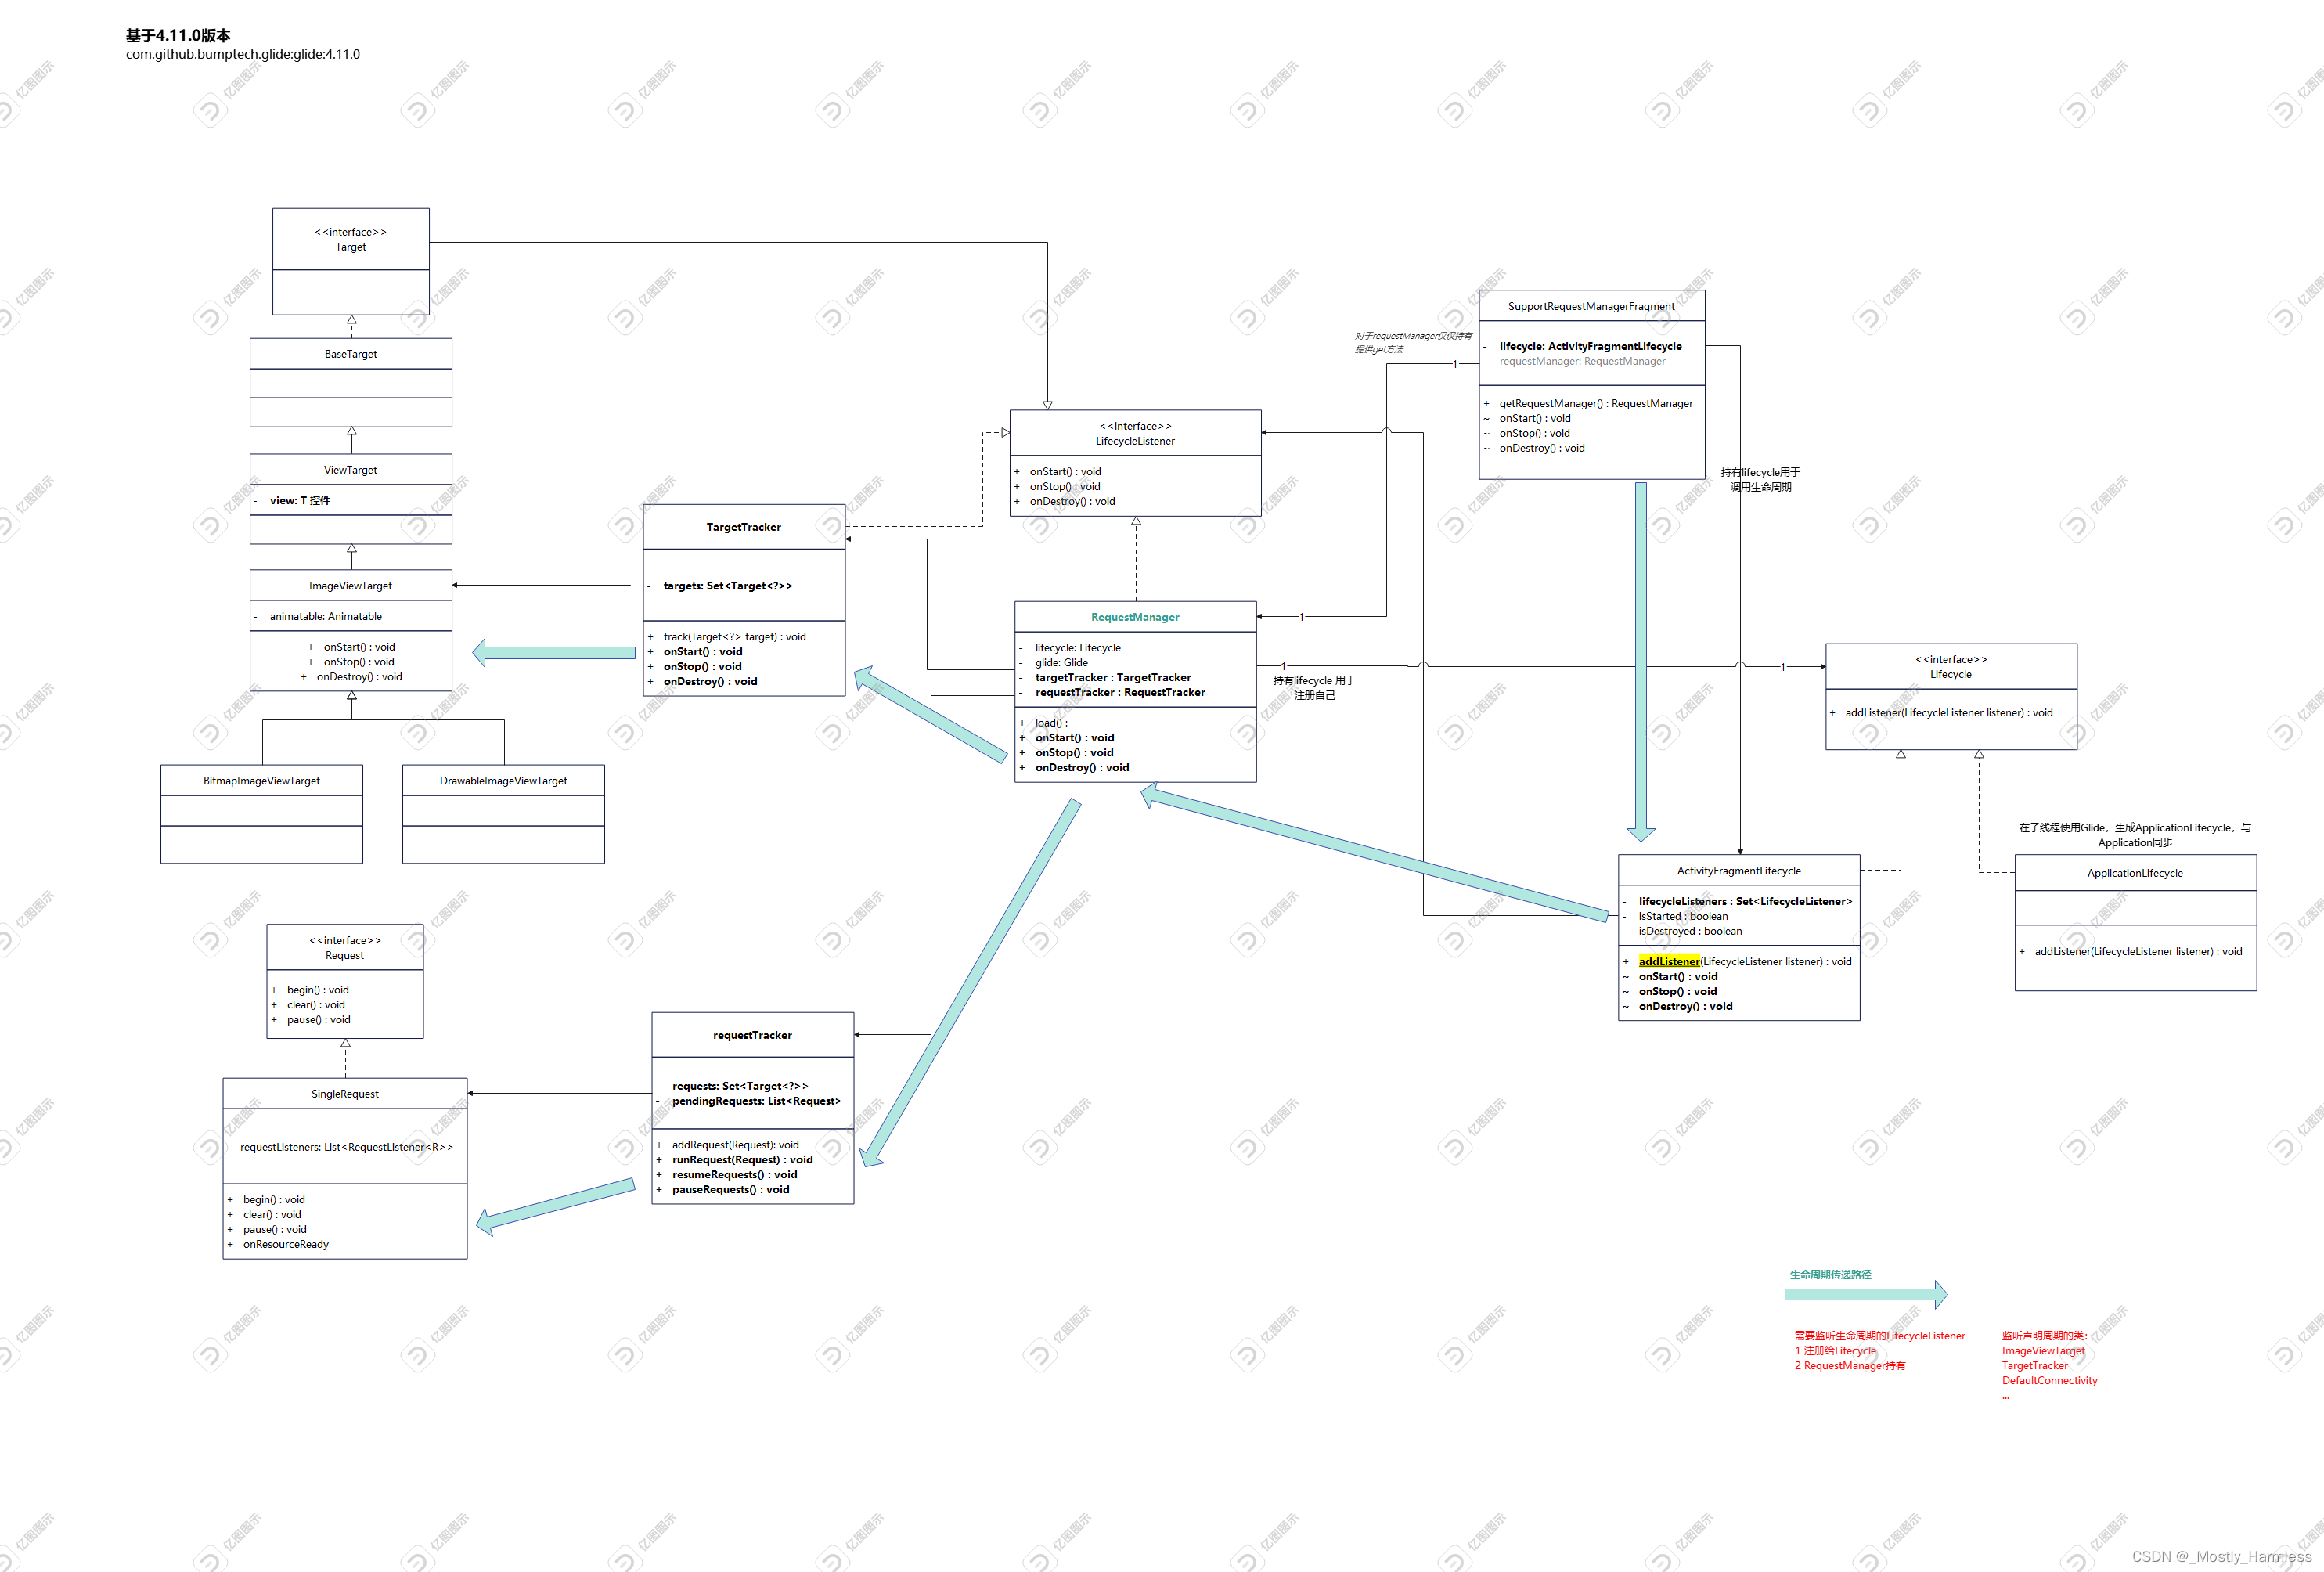
SupportRequestManagerFragment被加载到Activity,它持有ActivityFragmentLifecycle,通过这个Lifecycle通知监听者生命周期的变化。
RequestManager是一个Lifecycle,它在构造时注册自己监听ActivityFragmentLifecycle。RequestManager持有一个TargetTracker和RequestTracker,分别跟踪处理Target和Request,Target和Request注册后就可以依赖RequestManager感知生命周期变化了。
with处理流程图:
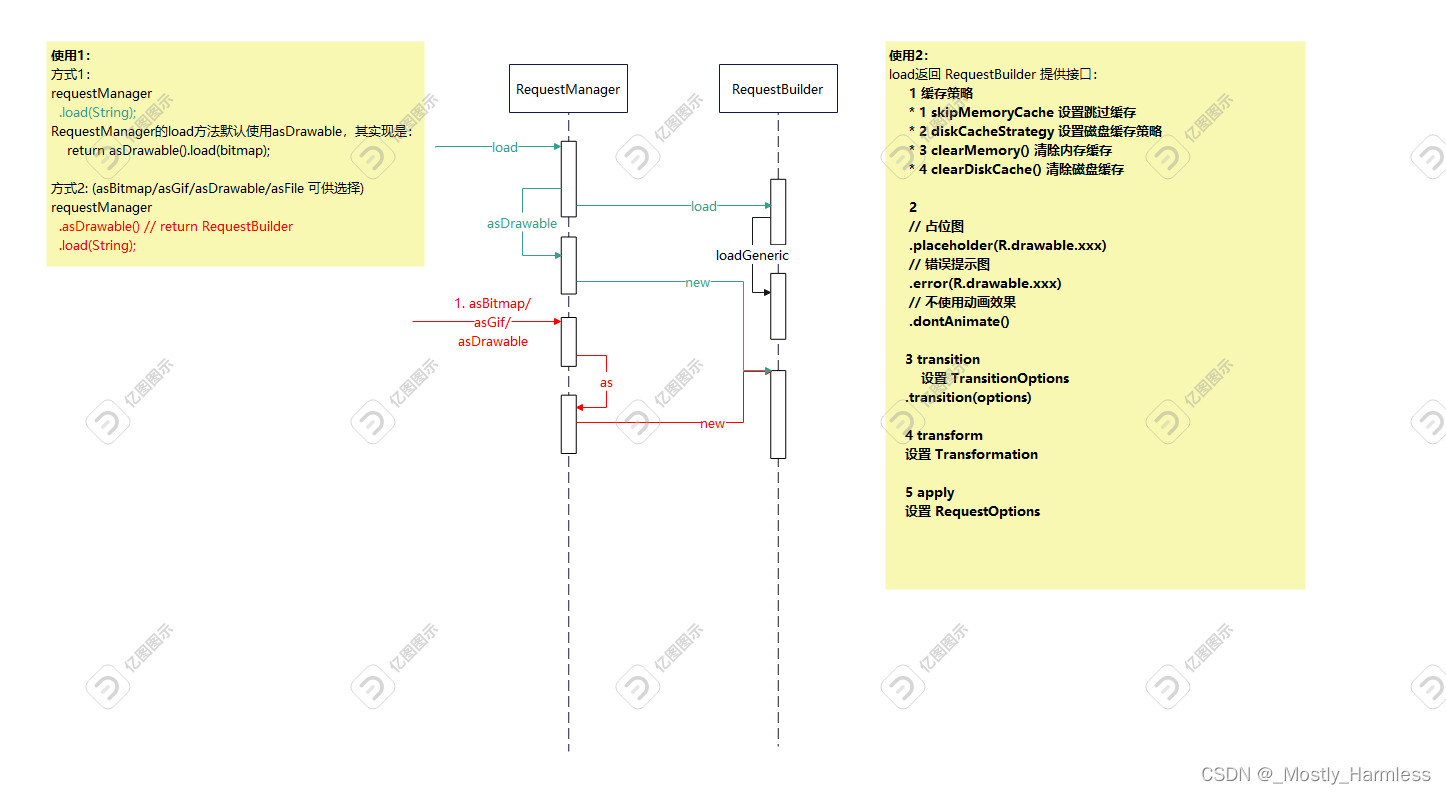
二、load处理流程
1 加载资源来源,通过load传入数据来源:可传入网络URL地址、本地地址等;设置类型:asBitmap/asGif/asDrawable/asFile
2 load返回RequestBuilder,提供了一些接口方便使用者自定义:
缓存策略设置:
* 1 skipMemoryCache 设置跳过缓存
* 2 diskCacheStrategy 设置磁盘缓存策略
* 3 clearMemory() 清除内存缓存
* 4 clearDiskCache() 清除磁盘缓存
2 风格设置:
.placeholder(R.drawable.xxx) 设置占位图
.error(R.drawable.xxx) 设置错误提示图
.dontAnimate() 设置不使用动画效果
3 自定义定制图片风格
.transition(TransitionOptions) 使用者可以通过自定义TransitionOptions对图片风格进行加工。
三、into处理流程
前面是对Glide的初始化准备工作,这里才是触发Glide真正工作的地方。
1.1 into传入了目标控件,根据传入的目标ImageView的ScaleType获取Glide的压缩策略requestOptions,Glide有一套自己的压缩策略,会在其他文章另外讲解。
1.2 创建一个ViewTarget,持有目标控件,负责最终对控件加载资源等操作。
public ViewTarget<ImageView, TranscodeType> into(@NonNull ImageView view) {
Util.assertMainThread();
Preconditions.checkNotNull(view);

BaseRequestOptions<?> requestOptions = this;
if (!requestOptions.isTransformationSet()
    && requestOptions.isTransformationAllowed()
    && view.getScaleType() != null) {
  // Clone in this method so that if we use this RequestBuilder to load into a View and then
  // into a different target, we don't retain the transformation applied based on the previous
  // View's scale type.
  // 1.1 根据ScaleType获取Glide自己的压缩策略
  switch (view.getScaleType()) {
    case CENTER_CROP:
      requestOptions = requestOptions.clone().optionalCenterCrop();
      break;
    case CENTER_INSIDE:
      requestOptions = requestOptions.clone().optionalCenterInside();
      break;
    case FIT_CENTER:
    case FIT_START:
    case FIT_END:
      requestOptions = requestOptions.clone().optionalFitCenter();
      break;
    case FIT_XY:
      requestOptions = requestOptions.clone().optionalCenterInside();
      break;
    case CENTER:
    case MATRIX:
    default:
      // Do nothing.
  }
}

return into(
    // 1.2 创建ViewTarget,用以处理最终加载图片到目标控件上。
    glideContext.buildImageViewTarget(view, transcodeClass),
    /*targetListener=*/ null,
    requestOptions,
    Executors.mainThreadExecutor());
}
2 创建Request,注册Target和Request给requestManager管理。
private <Y extends Target<TranscodeType>> Y into(
  @NonNull Y target,
  @Nullable RequestListener<TranscodeType> targetListener,
  BaseRequestOptions<?> options,
  Executor callbackExecutor) {
Preconditions.checkNotNull(target);
if (!isModelSet) {
  throw new IllegalArgumentException("You must call #load() before calling #into()");
}
// 创建Requst
Request request = buildRequest(target, targetListener, options, callbackExecutor);

Request previous = target.getRequest();
if (request.isEquivalentTo(previous)
    && !isSkipMemoryCacheWithCompletePreviousRequest(options, previous)) {
  if (!Preconditions.checkNotNull(previous).isRunning()) {
    previous.begin();
  }
  return target;
}

requestManager.clear(target);
// request交给ImageViewTarget
target.setRequest(request);
// target交给targetTracker,request交给requestTracker
requestManager.track(target, request);

return target;
}
3 Engine.load启动图片加载,Engine是所有任务的整体调度引擎。
public <R> LoadStatus load(
  GlideContext glideContext,
  Object model,
  Key signature,
  int width,
  int height,
  Class<?> resourceClass,
  Class<R> transcodeClass,
  Priority priority,
  DiskCacheStrategy diskCacheStrategy,
  Map<Class<?>, Transformation<?>> transformations,
  boolean isTransformationRequired,
  boolean isScaleOnlyOrNoTransform,
  Options options,
  boolean isMemoryCacheable,
  boolean useUnlimitedSourceExecutorPool,
  boolean useAnimationPool,
  boolean onlyRetrieveFromCache,
  ResourceCallback cb,
  Executor callbackExecutor) {
long startTime = VERBOSE_IS_LOGGABLE ? LogTime.getLogTime() : 0;

EngineKey key =
	keyFactory.buildKey(
		model,
		signature,
		width,
		height,
		transformations,
		resourceClass,
		transcodeClass,
		options);

EngineResource<?> memoryResource;
synchronized (this) {
  // 3.1 查找缓存
  memoryResource = loadFromMemory(key, isMemoryCacheable, startTime);
  if (memoryResource == null) {
    // 3.2 缓存未命中,继续后续策略
	return waitForExistingOrStartNewJob(
		glideContext,
		model,
		signature,
		width,
		height,
		resourceClass,
		transcodeClass,
		priority,
		diskCacheStrategy,
		transformations,
		isTransformationRequired,
		isScaleOnlyOrNoTransform,
		options,
		isMemoryCacheable,
		useUnlimitedSourceExecutorPool,
		useAnimationPool,
		onlyRetrieveFromCache,
		cb,
		callbackExecutor,
		key,
		startTime);
  }
}
// 查询缓存命中
cb.onResourceReady(memoryResource, DataSource.MEMORY_CACHE);
return null;
}
3.1 查询memory缓存:先查询活动缓存,命中直接返回结果,否则查询内存缓存。
private EngineResource<?> loadFromMemory(
  EngineKey key, boolean isMemoryCacheable, long startTime) {
if (!isMemoryCacheable) {
  return null;
}
// 活动缓存
EngineResource<?> active = loadFromActiveResources(key);
if (active != null) {
  if (VERBOSE_IS_LOGGABLE) {
    logWithTimeAndKey("Loaded resource from active resources", startTime, key);
  }
  // 命中直接返回
  return active;
}
// 内存缓存
EngineResource<?> cached = loadFromCache(key);
if (cached != null) {
  if (VERBOSE_IS_LOGGABLE) {
    logWithTimeAndKey("Loaded resource from cache", startTime, key);
  }
  // 命中直接返回
  return cached;
}

return null;
}
如果内存缓存命中,则调用Request onResourceReady通知资源就绪,Request会使用ViewTarget给控件加载内容。
如果没有命中则继续后续策略,查找磁盘缓存(如果没有被使用者禁用)
3.2 磁盘缓存
private <R> LoadStatus waitForExistingOrStartNewJob(
  GlideContext glideContext,
  Object model,
  Key signature,
  int width,
  int height,
  Class<?> resourceClass,
  Class<R> transcodeClass,
  Priority priority,
  DiskCacheStrategy diskCacheStrategy,
  Map<Class<?>, Transformation<?>> transformations,
  boolean isTransformationRequired,
  boolean isScaleOnlyOrNoTransform,
  Options options,
  boolean isMemoryCacheable,
  boolean useUnlimitedSourceExecutorPool,
  boolean useAnimationPool,
  boolean onlyRetrieveFromCache,
  ResourceCallback cb,
  Executor callbackExecutor,
  EngineKey key,
  long startTime) {

EngineJob<?> current = jobs.get(key, onlyRetrieveFromCache);
if (current != null) {
  current.addCallback(cb, callbackExecutor);
  if (VERBOSE_IS_LOGGABLE) {
    logWithTimeAndKey("Added to existing load", startTime, key);
  }
  return new LoadStatus(cb, current);
}

EngineJob<R> engineJob =
    engineJobFactory.build(
        key,
        isMemoryCacheable,
        useUnlimitedSourceExecutorPool,
        useAnimationPool,
        onlyRetrieveFromCache);

DecodeJob<R> decodeJob =
    decodeJobFactory.build(
        glideContext,
        model,
        key,
        signature,
        width,
        height,
        resourceClass,
        transcodeClass,
        priority,
        diskCacheStrategy,
        transformations,
        isTransformationRequired,
        isScaleOnlyOrNoTransform,
        onlyRetrieveFromCache,
        options,
        engineJob);

jobs.put(key, engineJob);

engineJob.addCallback(cb, callbackExecutor);
// 启动任务 decodeJob
engineJob.start(decodeJob);

if (VERBOSE_IS_LOGGABLE) {
  logWithTimeAndKey("Started new load", startTime, key);
}
return new LoadStatus(cb, engineJob);
}
3.2.1 启动decodeJob
public synchronized void start(DecodeJob<R> decodeJob) {
  this.decodeJob = decodeJob;
  GlideExecutor executor =
      decodeJob.willDecodeFromCache() ? diskCacheExecutor : getActiveSourceExecutor();
  executor.execute(decodeJob);
}
boolean willDecodeFromCache() {
Stage firstStage = getNextStage(Stage.INITIALIZE);
return firstStage == Stage.RESOURCE_CACHE || firstStage == Stage.DATA_CACHE;
}private Stage getNextStage(Stage current) {
switch (current) {
case INITIALIZE:
return diskCacheStrategy.decodeCachedResource()
? Stage.RESOURCE_CACHE
: getNextStage(Stage.RESOURCE_CACHE);
case RESOURCE_CACHE:
return diskCacheStrategy.decodeCachedData()
? Stage.DATA_CACHE
: getNextStage(Stage.DATA_CACHE);
case DATA_CACHE:
return onlyRetrieveFromCache ? Stage.FINISHED : Stage.SOURCE;
case SOURCE:
case FINISHED:
return Stage.FINISHED;
default:
throw new IllegalArgumentException("Unrecognized stage: " + current);
}
}可以看到willDecodeFromCache通过getNextStage获取firstStage,判断当前firstStage是RESOURCE_CACHE / DATA_CACHE则使用diskCacheExecutor。
通过getNextStage可以看出,Stage取决于diskCacheStrategy的decodeCachedResource decodeCachedData这两个方法。
DiskCacheStrategy提供了5个实现,策略详情如下:
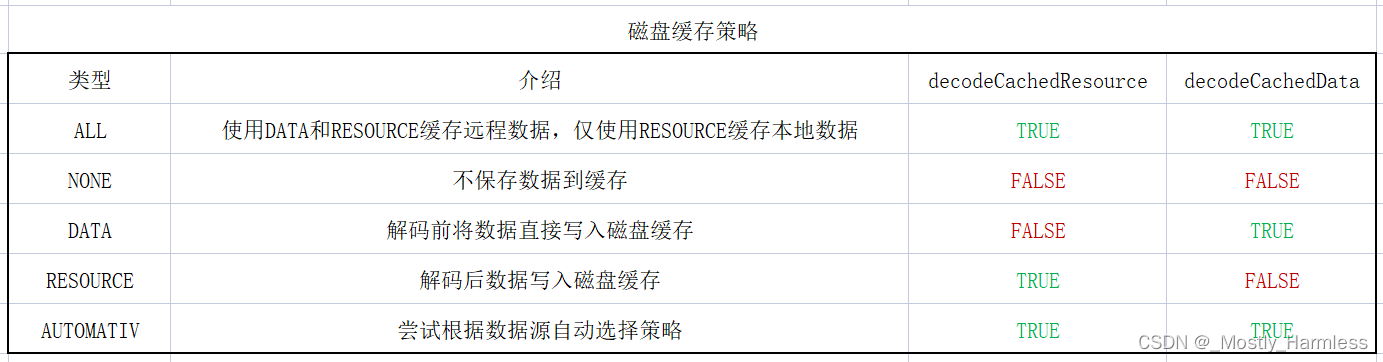
使用者如果没有设置,默认使用的是AUTOMATIV,则可以看出willDecodeFromCache返回true,选用diskCacheExecutor execute(decodeJob); 执行decodeJob。
private void runWrapped() {
    // 初始状态是INITIALIZE
    switch (runReason) {
      case INITIALIZE:
        // 1 取策略
        stage = getNextStage(Stage.INITIALIZE);
        // 2 取策略对应处理器
        currentGenerator = getNextGenerator();
        // 3 执行
        runGenerators();
        break;
      case SWITCH_TO_SOURCE_SERVICE:
        runGenerators();
        break;
      case DECODE_DATA:
        decodeFromRetrievedData();
        break;
      default:
        throw new IllegalStateException("Unrecognized run reason: " + runReason);
    }
}
decodeJob任务run->runWrapped,这里使用的状态模式做处理,根据当前状态取对应策略做处理。
runReason初始状态是INITIALIZE,
1> 执行getNextStage(Stage.INITIALIZE);取策略状态,参考前面的getNextStage分析,使用默认策略是AUTOMATIV调用getNextStage返回stage = Stage.RESOURCE_CACHE,
2> getNextGenerator根据RESOURCE_CACHE生成ResourceCacheGenerator,currentGenerator = new ResourceCacheGenerator
private DataFetcherGenerator getNextGenerator() {
	switch (stage) {
      // stage == RESOURCE_CACHE
	  case RESOURCE_CACHE:
		return new ResourceCacheGenerator(decodeHelper, this);
	  case DATA_CACHE:
		return new DataCacheGenerator(decodeHelper, this);
	  case SOURCE:
		return new SourceGenerator(decodeHelper, this);
	  case FINISHED:
		return null;
	  default:
		throw new IllegalStateException("Unrecognized stage: " + stage);
	}
}
3> runGenerators执行策略,这里循环遍历执行策略,未命中就找下一策略继续执行,命中即跳出。
  private void runGenerators() {
    currentThread = Thread.currentThread();
    startFetchTime = LogTime.getLogTime();
    boolean isStarted = false;
    // currentGenerator.startNext执行,若执行不命中返回false进入循环体,获取下一个策略继续执行
    // 这里的逻辑就是遍历执行所有的策略。
    while (!isCancelled
        && currentGenerator != null
        && !(isStarted = currentGenerator.startNext())) {
      stage = getNextStage(stage);
      currentGenerator = getNextGenerator();

      if (stage == Stage.SOURCE) {
        reschedule();
        return;
      }
    }
    // 走到这里stage是FINISHED表示遍历了所有策略均未命中,失败。
    if ((stage == Stage.FINISHED || isCancelled) && !isStarted) {
      notifyFailed();
    }
  }
循环遍历会依次获取如下三个Generator执行startNext:
ResourceCacheGenerator 解码后的缓存
DataCacheGenerator 源数据缓存
SourceGenerator 从数据源重新获取
我们假设缓存均为命中(缓存策略另起文章,本文为打通整体流程)会一直执行到SourceGenerator的startNext。
4 从数据源获取数据:
SourceGenerator startNext其实就是要从实际数据源获取数据。它是怎么做的呢?在前面讲解with初始化Glide时讲到Glide通过Registry保存了许多如下的数据源地址和ModelLoader的对应关系,这里就是通过使用者传入的数据源类型根据Registry保存的关系生成ModelLoader做处理的。
.append(GlideUrl.class, InputStream.class, new HttpGlideUrlLoader.Factory()).append的数据最终是以Entry数据结构存储在MultiModelLoaderFactory:
  private <Model, Data> void add(
      @NonNull Class<Model> modelClass,
      @NonNull Class<Data> dataClass,
      @NonNull ModelLoaderFactory<? extends Model, ? extends Data> factory,
      boolean append) {
    Entry<Model, Data> entry = new Entry<>(modelClass, dataClass, factory);
    entries.add(append ? entries.size() : 0, entry);
  }
获取数据的操作者DataLoader,是通过Registry获取与使用者传入的数据源的地址类型匹配的ModelLoadFactory,由factory生成对应的ModelLoad,ModelLoad再生成自己的DataLoader。DataLoader其中包含真正做事的fetcher,最终通过fetcher获取数据:
  public boolean startNext() {
    if (dataToCache != null) {
      Object data = dataToCache;
      dataToCache = null;
      cacheData(data);
    }

    if (sourceCacheGenerator != null && sourceCacheGenerator.startNext()) {
      return true;
    }
    sourceCacheGenerator = null;

    loadData = null;
    boolean started = false;
    while (!started && hasNextModelLoader()) {
      // 1 取LoadData
      loadData = helper.getLoadData().get(loadDataListIndex++);
      if (loadData != null
          && (helper.getDiskCacheStrategy().isDataCacheable(loadData.fetcher.getDataSource())
              || helper.hasLoadPath(loadData.fetcher.getDataClass()))) {
        started = true;
        // 2 已经生成并获取到了LoadData,开始使用LoadData实际获取数据
        startNextLoad(loadData);
      }
    }
    return started;
  }
1 尝试获取LoadData,LoadData是获取源数据的实际操作者,其中包含Fetcher用于实际操作。
  List<LoadData<?>> getLoadData() {
    if (!isLoadDataSet) {
      isLoadDataSet = true;
      loadData.clear();
      // 1.1 通过mode类型获取到对应的所有的ModelLoader
      List<ModelLoader<Object, ?>> modelLoaders = glideContext.getRegistry().getModelLoaders(model);
      for (int i = 0, size = modelLoaders.size(); i < size; i++) {
        ModelLoader<Object, ?> modelLoader = modelLoaders.get(i);
        // 1.2 通过ModelLoader生成LoadData
        LoadData<?> current = modelLoader.buildLoadData(model, width, height, options);
        if (current != null) {
          loadData.add(current);
        }
      }
    }
    return loadData;
  }
1.1 通过model类型获取ModelLoader,ModelLoader可以创建自己的LoadData。
  public <A> List<ModelLoader<A, ?>> getModelLoaders(@NonNull A model) {
    List<ModelLoader<A, ?>> modelLoaders = getModelLoadersForClass(getClass(model));
    if (modelLoaders.isEmpty()) {
      throw new NoModelLoaderAvailableException(model);
    }
    int size = modelLoaders.size();
    boolean isEmpty = true;
    List<ModelLoader<A, ?>> filteredLoaders = Collections.emptyList();
    //noinspection ForLoopReplaceableByForEach to improve perf
    for (int i = 0; i < size; i++) {
      ModelLoader<A, ?> loader = modelLoaders.get(i);
      if (loader.handles(model)) {
        if (isEmpty) {
          filteredLoaders = new ArrayList<>(size - i);
          isEmpty = false;
        }
        filteredLoaders.add(loader);
      }
    }
    if (filteredLoaders.isEmpty()) {
      throw new NoModelLoaderAvailableException(model, modelLoaders);
    }
    return filteredLoaders;
  }

  @NonNull
  private synchronized <A> List<ModelLoader<A, ?>> getModelLoadersForClass(
      @NonNull Class<A> modelClass) {
    List<ModelLoader<A, ?>> loaders = cache.get(modelClass);
    if (loaders == null) {
      // 根据modelClass从Entrys取loaders
      loaders = Collections.unmodifiableList(multiModelLoaderFactory.build(modelClass));
      cache.put(modelClass, loaders);
    }
    return loaders;
  }
遍历所有Entry,找到匹配的Factory创建出对应的ModelLoader实例。
  synchronized <Model> List<ModelLoader<Model, ?>> build(@NonNull Class<Model> modelClass) {
    try {
      List<ModelLoader<Model, ?>> loaders = new ArrayList<>();
      // 遍历所有Entrys
      for (Entry<?, ?> entry : entries) {
        // Avoid stack overflow recursively creating model loaders by only creating loaders in
        // recursive requests if they haven't been created earlier in the chain. For example:
        // A Uri loader may translate to another model, which in turn may translate back to a Uri.
        // The original Uri loader won't be provided to the intermediate model loader, although
        // other Uri loaders will be.
        if (alreadyUsedEntries.contains(entry)) {
          continue;
        }
        if (entry.handles(modelClass)) {
          alreadyUsedEntries.add(entry);
          // build去创建Loader,因为Entry里方的是工厂,这里是通过工厂创建实际对象。
          loaders.add(this.<Model, Object>build(entry));
          alreadyUsedEntries.remove(entry);
        }
      }
      return loaders;
    } catch (Throwable t) {
      alreadyUsedEntries.clear();
      throw t;
    }
  }
1.2 通过ModelLoader生成LoadData(以HttpGlideUrlLoader为例)
  @Override
  public LoadData<InputStream> buildLoadData(
      @NonNull GlideUrl model, int width, int height, @NonNull Options options) {
    // GlideUrls memoize parsed URLs so caching them saves a few object instantiations and time
    // spent parsing urls.
    GlideUrl url = model;
    if (modelCache != null) {
      url = modelCache.get(model, 0, 0);
      if (url == null) {
        modelCache.put(model, 0, 0, model);
        url = model;
      }
    }
    int timeout = options.get(TIMEOUT);
    // 生成LoadData和HttpUrlFetcher
    return new LoadData<>(url, new HttpUrlFetcher(url, timeout));
  }
2 LoadData已经生成,fetcher.loadData开始实际工作并传入回调用以感知运行结果:
  private void startNextLoad(final LoadData<?> toStart) {
    // 实际是调用fetcher
    loadData.fetcher.loadData(
        helper.getPriority(),
        new DataCallback<Object>() {
          @Override
          public void onDataReady(@Nullable Object data) {
            if (isCurrentRequest(toStart)) {
              onDataReadyInternal(toStart, data);
            }
          }

          @Override
          public void onLoadFailed(@NonNull Exception e) {
            if (isCurrentRequest(toStart)) {
              onLoadFailedInternal(toStart, e);
            }
          }
        });
  }
做完事情后回调DataCallback的onDataReady通知完成。
  public void loadData(
      @NonNull Priority priority, @NonNull DataCallback<? super InputStream> callback) {
    long startTime = LogTime.getLogTime();
    try {
      // Doing...
      InputStream result = loadDataWithRedirects(glideUrl.toURL(), 0, null, glideUrl.getHeaders());
      // 成功,回调通知
      callback.onDataReady(result);
    } catch (IOException e) {
      if (Log.isLoggable(TAG, Log.DEBUG)) {
        Log.d(TAG, "Failed to load data for url", e);
      }
      callback.onLoadFailed(e);
    } finally {
      if (Log.isLoggable(TAG, Log.VERBOSE)) {
        Log.v(TAG, "Finished http url fetcher fetch in " + LogTime.getElapsedMillis(startTime));
      }
    }
  }
整体流程如图:

这里以请求网络资源为例,则会调用到HttpUrlFetcher请求网络,成功后回调传回结果。
回调EncodeJob onResourceDecoded,放入本地磁盘缓存。
Engine接收到EngineJobe完成的回调,会把结果放入活动缓存。
这里开始切换回主线程,开始着手把图片加载到控件了。EngineJobe回调SingleRequest onResourceReady,SingleRequest 持有着ImageViewTarget,这就把资源加载到控件了。
.into完整流程图:
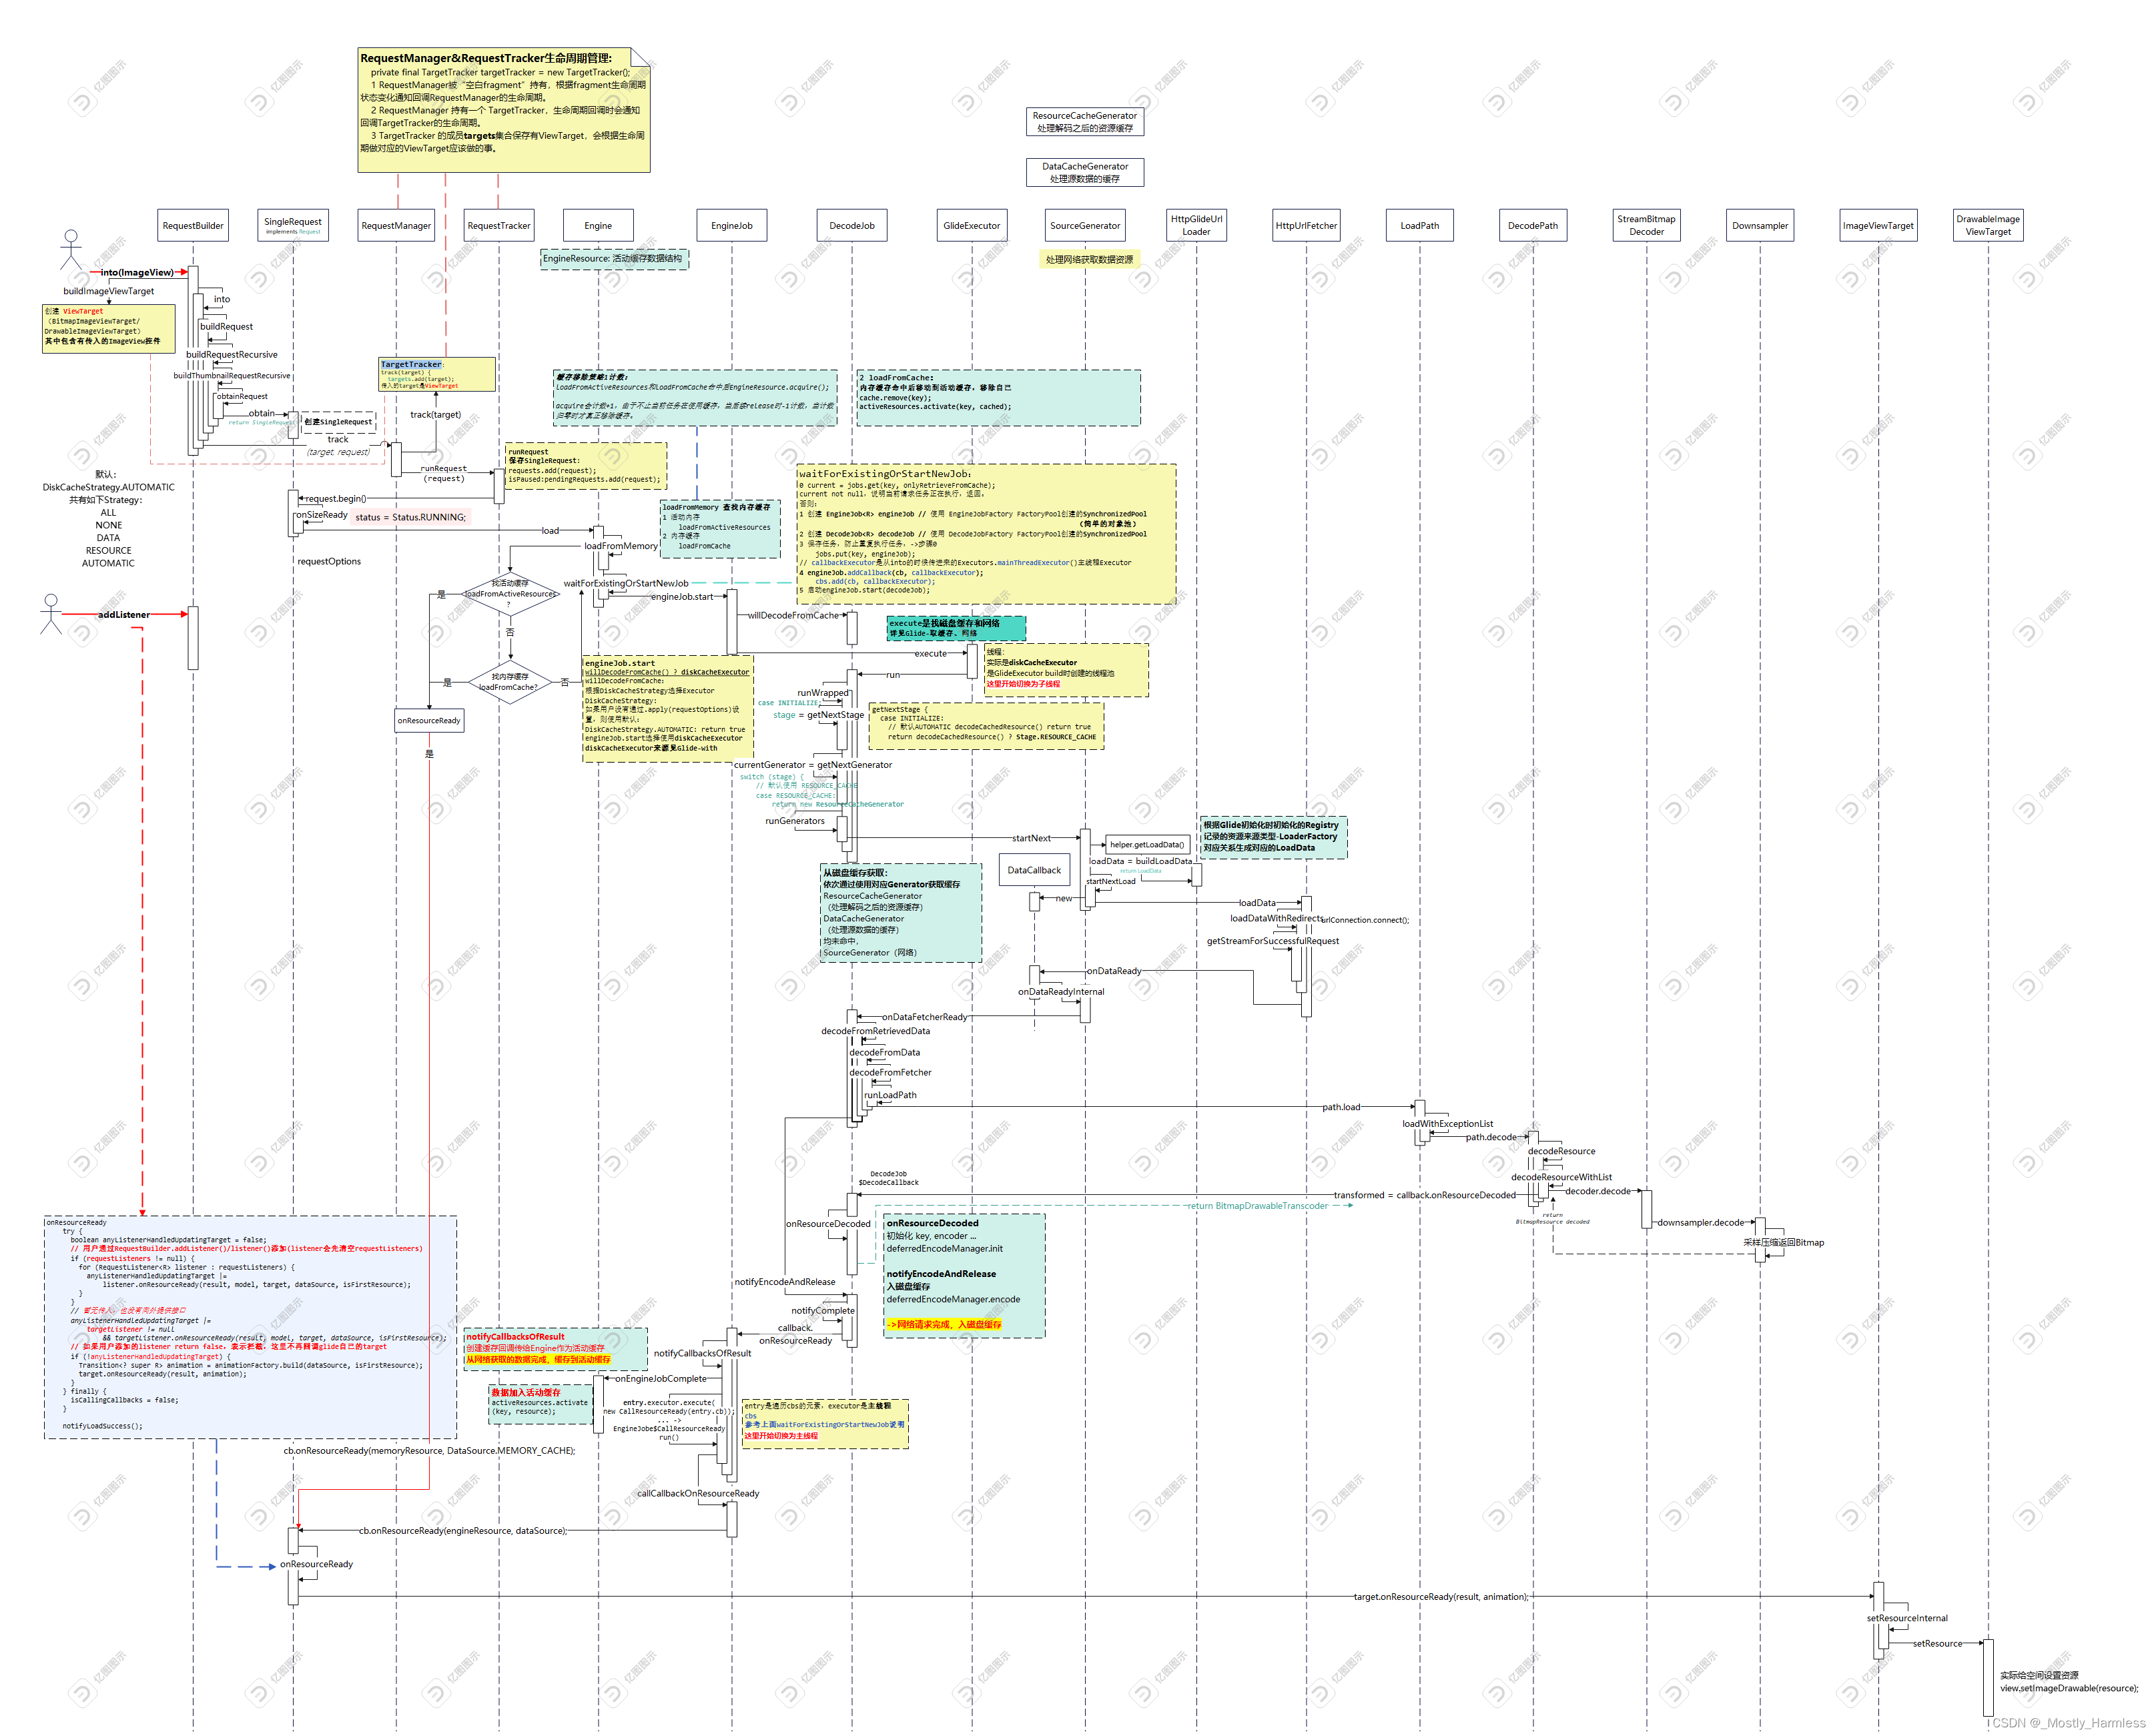
总体来讲:
使用者调用.with,传入数据来源,这里主要是对Glide做初始化准备工作,主要包括监控生命周期的空白Fragment的创建;
.load主要提供了各种个性化配置;
.into传入目标控件,是glide真正启动的入口,这里开始实际请求数据加载到控件,其中包含了数据缓存、对象复用、图片压缩等。
最后
以上就是耍酷溪流最近收集整理的关于【笔记】开源框架 - Glide(三):代码流程分析的全部内容,更多相关【笔记】开源框架内容请搜索靠谱客的其他文章。


发表评论 取消回复