书接上文,
Glide4.0源码全解析(二),load()背后的故事
接下来直接看.into(),注释中会详细讲解
代码精简过,按照点用顺序依次排列,方便大家阅读。
public class RequestBuilder<TranscodeType> implements Cloneable {
	  ...
	  ...省略
	  ...

  /**
    * 对当前的ImageView加载资源,取消该View已加载过的资源,并释放资源。
    * @param view 此视图将取消先前加载并加载新资源的视图。
    * @return 一个可以使Glide加载资源并通知相关生命周期事件的接口。(后面详细介绍Target)
    */
  public Target<TranscodeType> into(ImageView view) {
   /**
     * 保证当前在主线程(更新视图需要在主线程,这个应该不用多说吧)
     */
    Util.assertMainThread();

   /**
     * 保证view不为null
     * 如果为努力了,会抛NullPointerException
     */
    Preconditions.checkNotNull(view);

   /**
     * requestOptions相关设置
     * RequestOptions :提供Glide自定义加载选项
     * 暂时略过,后面章节详细讲解
     */
    if (!requestOptions.isTransformationSet()
        && requestOptions.isTransformationAllowed()
        && view.getScaleType() != null) {
      if (requestOptions.isLocked()) {
        requestOptions = requestOptions.clone();
      }
      switch (view.getScaleType()) {
        case CENTER_CROP:
          requestOptions.optionalCenterCrop();
          break;
        case CENTER_INSIDE:
          requestOptions.optionalCenterInside();
          break;
        case FIT_CENTER:
        case FIT_START:
        case FIT_END:
          requestOptions.optionalFitCenter();
          break;
        case FIT_XY:
          requestOptions.optionalCenterInside();
          break;
        case CENTER:
        case MATRIX:
        default:
          // Do nothing.
      }
    }

    return into(context.buildImageViewTarget(view, transcodeClass));
  }
	  ...
	  ...省略
	  ...

  /**
   * 将资源加载到传入的target
   *
   * @param target 将资源记载到target
   * @return 传入的target.
   * (后面我们会去详细看一下target)
   */
  public <Y extends Target<TranscodeType>> Y into(@NonNull Y target) {
    Util.assertMainThread(); //判断是否是主线程
    Preconditions.checkNotNull(target);  //判断传入的target是否为空
    /**
     * 这里在上一篇讲过,在调用 .load() 之后isModelSet会被设为true
     * 这里是为了保证记载的资源不会为空,上面的方法是是为了保证被加载的view不会为空
     */
    if (!isModelSet) {
      throw new IllegalArgumentException("You must call #load() before calling #into()");
    }

    /**
     * 锁定requestOptions,防止被再次修改,如果此时修改会抛出异常
     * 为了防止加载资源的统统是还在修改图片的自定义属性
     */
    requestOptions.lock();
    /**
     * 这个方法很重要哦,⚠️ 先记住,后面讲解哦 !!!
     * 因为在这里创建了request
     */
    Request request = buildRequest(target);

    Request previous = target.getRequest();
    /**
     * 这里修复了一个bug,详见 https://github.com/bumptech/glide/issues/2270
     */
    if (request.isEquivalentTo(previous)
      && (Preconditions.checkNotNull(previous).isComplete()
         || Preconditions.checkNotNull(previous).isRunning())) {
      request.recycle();
      /**
       * 防止请求被中断
       */
      if (!Preconditions.checkNotNull(previous).isRunning()) {
        previous.begin();
      }
      return target;
    }

    requestManager.clear(target);
    target.setRequest(request);
    /**
     * 这个方法很重要哦,⚠️ 先记住,后面讲解哦 !!!
     * 因为在这里执行了request
     */
    requestManager.track(target, request);

   /**
     * 返回一个target
     * 该target就是传入的target
     */
    return target;
  }
	  ...
	  ...省略
	  ...
}
看到这我们会发现我们传入的view绑定带target,经过一系列操作之后,会把我们当初传入的target又还给我们。
那么首先来看一下view如何绑定带target?
###view如何绑定带target?
先看代码,精简过的,
按照调用顺序展示:
public class RequestBuilder<TranscodeType> implements Cloneable {
  ...

  public Target<TranscodeType> into(ImageView view) {
    ...

    return into(context.buildImageViewTarget(view, transcodeClass));

    ...
  }

  ...
}


public class GlideContext extends ContextWrapper {
  ...

  public <X> Target<X> buildImageViewTarget(ImageView imageView, Class<X> transcodeClass) {
    return imageViewTargetFactory.buildTarget(imageView, transcodeClass);
  }

  ...
}

/**
 * 负责给传入的子类产生正确的类型的工厂
 */
public class ImageViewTargetFactory {

  @SuppressWarnings("unchecked")
  public <Z> Target<Z> buildTarget(ImageView view, Class<Z> clazz) {
    if (Bitmap.class.equals(clazz)) {
      return (Target<Z>) new BitmapImageViewTarget(view);
    } else if (Drawable.class.isAssignableFrom(clazz)) {
      DrawableImageViewTarget drawableImageViewTarget = new DrawableImageViewTarget(view);
      return (Target<Z>) new DrawableImageViewTarget(view);
    } else {
      throw new IllegalArgumentException(
          "Unhandled class: " + clazz + ", try .as*(Class).transcode(ResourceTranscoder)");
    }
  }
}
这里会将传入的view和传入的clazz绑定
分为BitmapImageViewTarget 和 DrawableImageViewTarget
默认都是DrawableImageViewTarget(在上一篇讲过)
相关链接:Glide4.0源码全解析(二),load()背后的故事
相关关键截图:

如果你在开始使用 GlideApp.with(this).asBitmap()
那就会是绑定DrawableImageViewTarget
那么到这里已经知道如何给view绑定target了,那么你会想费这么大劲绑定个target干嘛呢?
接下来慢慢解读:
###为什么绑定target?
我们看一下API:
Interface Target API
官方声明:可以加载资源并通知相关生命周期事件的接口。

我们从下面的方法中就可以看出来主要负责生命周期和资源加载:
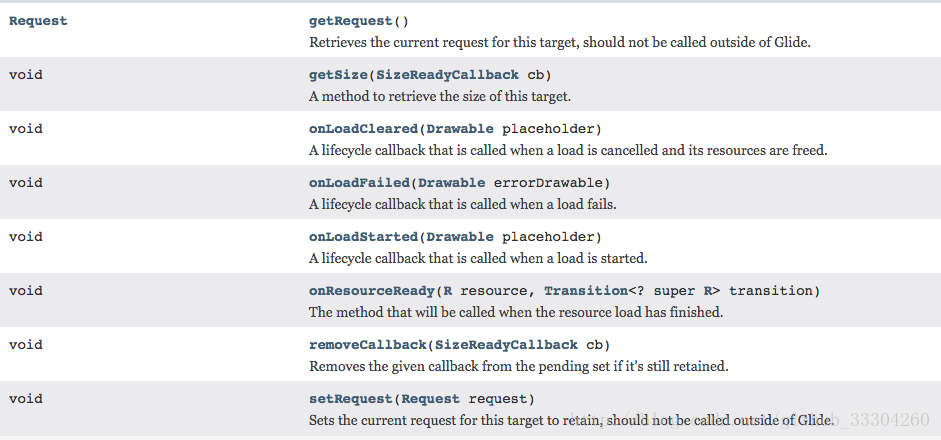
到这里知道了target的作用,我们接着该去看看如何加载的了。
###如何创建请求的Request对象?
要想知道答案请往下看:
- Request request = buildRequest(target);该方法上面提到过,本文第一段代码中第88行提到,让大家注意过,下面从这里入手

- 该方法的重要性?因为这里为我们创建了一个Request对象,Request是用来发出加载图片请求的,它是Glide中非常关键的一个组件。
根据点用关系我们顺序往下看:
public <Y extends Target<TranscodeType>> Y into(@NonNull Y target) {
  Request request = buildRequest(target);
}
private Request buildRequest(Target<TranscodeType> target) {
    return buildRequestRecursive(target, null, transitionOptions, requestOptions.getPriority(),
        requestOptions.getOverrideWidth(), requestOptions.getOverrideHeight());
  }
  private Request buildRequestRecursive(Target<TranscodeType> target,
      @Nullable ThumbnailRequestCoordinator parentCoordinator,
      TransitionOptions<?, ? super TranscodeType> transitionOptions,
      Priority priority, int overrideWidth, int overrideHeight) {
    if (thumbnailBuilder != null) {
      // Recursive case: contains a potentially recursive thumbnail request builder.
      if (isThumbnailBuilt) {
        throw new IllegalStateException("You cannot use a request as both the main request and a "
            + "thumbnail, consider using clone() on the request(s) passed to thumbnail()");
      }

      TransitionOptions<?, ? super TranscodeType> thumbTransitionOptions =
          thumbnailBuilder.transitionOptions;

      // Apply our transition by default to thumbnail requests but avoid overriding custom options
      // that may have been applied on the thumbnail request explicitly.
      if (thumbnailBuilder.isDefaultTransitionOptionsSet) {
        thumbTransitionOptions = transitionOptions;
      }

      Priority thumbPriority = thumbnailBuilder.requestOptions.isPrioritySet()
          ? thumbnailBuilder.requestOptions.getPriority() : getThumbnailPriority(priority);

      int thumbOverrideWidth = thumbnailBuilder.requestOptions.getOverrideWidth();
      int thumbOverrideHeight = thumbnailBuilder.requestOptions.getOverrideHeight();
      if (Util.isValidDimensions(overrideWidth, overrideHeight)
          && !thumbnailBuilder.requestOptions.isValidOverride()) {
        thumbOverrideWidth = requestOptions.getOverrideWidth();
        thumbOverrideHeight = requestOptions.getOverrideHeight();
      }

      ThumbnailRequestCoordinator coordinator = new ThumbnailRequestCoordinator(parentCoordinator);
      Request fullRequest = obtainRequest(target, requestOptions, coordinator,
          transitionOptions, priority, overrideWidth, overrideHeight);
      isThumbnailBuilt = true;
      // Recursively generate thumbnail requests.
      Request thumbRequest = thumbnailBuilder.buildRequestRecursive(target, coordinator,
          thumbTransitionOptions, thumbPriority, thumbOverrideWidth, thumbOverrideHeight);
      isThumbnailBuilt = false;
      coordinator.setRequests(fullRequest, thumbRequest);
      return coordinator;
    } else if (thumbSizeMultiplier != null) {
      // Base case: thumbnail multiplier generates a thumbnail request, but cannot recurse.
      ThumbnailRequestCoordinator coordinator = new ThumbnailRequestCoordinator(parentCoordinator);
      Request fullRequest = obtainRequest(target, requestOptions, coordinator, transitionOptions,
          priority, overrideWidth, overrideHeight);
      RequestOptions thumbnailOptions = requestOptions.clone()
          .sizeMultiplier(thumbSizeMultiplier);

      Request thumbnailRequest = obtainRequest(target, thumbnailOptions, coordinator,
          transitionOptions, getThumbnailPriority(priority), overrideWidth, overrideHeight);

      coordinator.setRequests(fullRequest, thumbnailRequest);
      return coordinator;
    } else {
      // Base case: no thumbnail.
      return obtainRequest(target, requestOptions, parentCoordinator, transitionOptions, priority,
          overrideWidth, overrideHeight);
    }
  }
从上面代码中可以看到buildRequest()实际调用的是buildRequestRecursive()方法。
buildRequestRecursive()方法看过去发现好多代码,不过90%都是在处理缩略图,所以我们抓住主线来看,从上面的代码中可以看到第33,45,50,57行都调用了obtainRequest来得到一个request对象。那么我们来看看obtainRequest方法。
private Request obtainRequest(Target<TranscodeType> target,
      RequestOptions requestOptions, RequestCoordinator requestCoordinator,
      TransitionOptions<?, ? super TranscodeType> transitionOptions, Priority priority,
      int overrideWidth, int overrideHeight) {
    requestOptions.lock();

    return SingleRequest.obtain(
        context,
        model,
        transcodeClass,
        requestOptions,
        overrideWidth,
        overrideHeight,
        priority,
        target,
        requestListener,
        requestCoordinator,
        context.getEngine(),
        transitionOptions.getTransitionFactory());
  }
obtainRequest()方法中又去调用了SingleRequest的obtain()方法。注意这个obtain()方法需要传入非常多的参数,如果经常使用Glide4.0的同学应该非常熟悉这些参数:
1.GlideContext glideContext : 全局上下文
2.Object model :加载的资源类型
3.Class transcodeClass :转换的类型
4.RequestOptions requestOptions:设置选项(包括:skipMemoryCache,errorDrawable,placeholder,timeoutOf,encodeFormatOf等等)就不一一列举,后续会给大家详细介绍,这个应该是Glide4.0大家用的最多的方法。
5.int overrideWidth:目标宽度在所需资源的像素点。
6.int overrideHeight:目标高度在所需资源的像素点。
7. Priority priority:加载的优先级(IMMEDIATE,HIGH,NORMAL,LOW)
8.Target target:上面刚讲过,绑定的target
9.RequestListener requestListener:请求加载时候的监听器
10.RequestCoordinator requestCoordinator:请求协调器(用来协调具有相同Target的协调器)
11.Engine engine:负责启动负载和管理活动和缓存资源。
12.TransitionFactory<? super R> animationFactory:一个工厂类,可以根据请求的状态产生不同的转换。
看下obtain()中拿到这么多参数做了什么?
public static <R> SingleRequest<R> obtain(
      GlideContext glideContext,
      Object model,
      Class<R> transcodeClass,
      RequestOptions requestOptions,
      int overrideWidth,
      int overrideHeight,
      Priority priority,
      Target<R> target,
      RequestListener<R> requestListener,
      RequestCoordinator requestCoordinator,
      Engine engine,
      TransitionFactory<? super R> animationFactory) {
    @SuppressWarnings("unchecked") SingleRequest<R> request =
        (SingleRequest<R>) POOL.acquire();
    if (request == null) {
      request = new SingleRequest<>();
    }
    request.init(
        glideContext,
        model,
        transcodeClass,
        requestOptions,
        overrideWidth,
        overrideHeight,
        priority,
        target,
        requestListener,
        requestCoordinator,
        engine,
        animationFactory);
    return request;
  }
obtain中我们可以看到去做了初始化操作,然后把得到的request返回给了我们。
  private void init(
      GlideContext glideContext,
      Object model,
      Class<R> transcodeClass,
      RequestOptions requestOptions,
      int overrideWidth,
      int overrideHeight,
      Priority priority,
      Target<R> target,
      RequestListener<R> requestListener,
      RequestCoordinator requestCoordinator,
      Engine engine,
      TransitionFactory<? super R> animationFactory) {
    this.glideContext = glideContext;
    this.model = model;
    this.transcodeClass = transcodeClass;
    this.requestOptions = requestOptions;
    this.overrideWidth = overrideWidth;
    this.overrideHeight = overrideHeight;
    this.priority = priority;
    this.target = target;
    this.requestListener = requestListener;
    this.requestCoordinator = requestCoordinator;
    this.engine = engine;
    this.animationFactory = animationFactory;
    status = Status.PENDING;
  }
SingleRequest里我们目前看了obtain()和 init()方法,其他方法暂时不展开讲解了,用到再详细讲解,很多方法顾名思义,详见API:
SingleRequest API
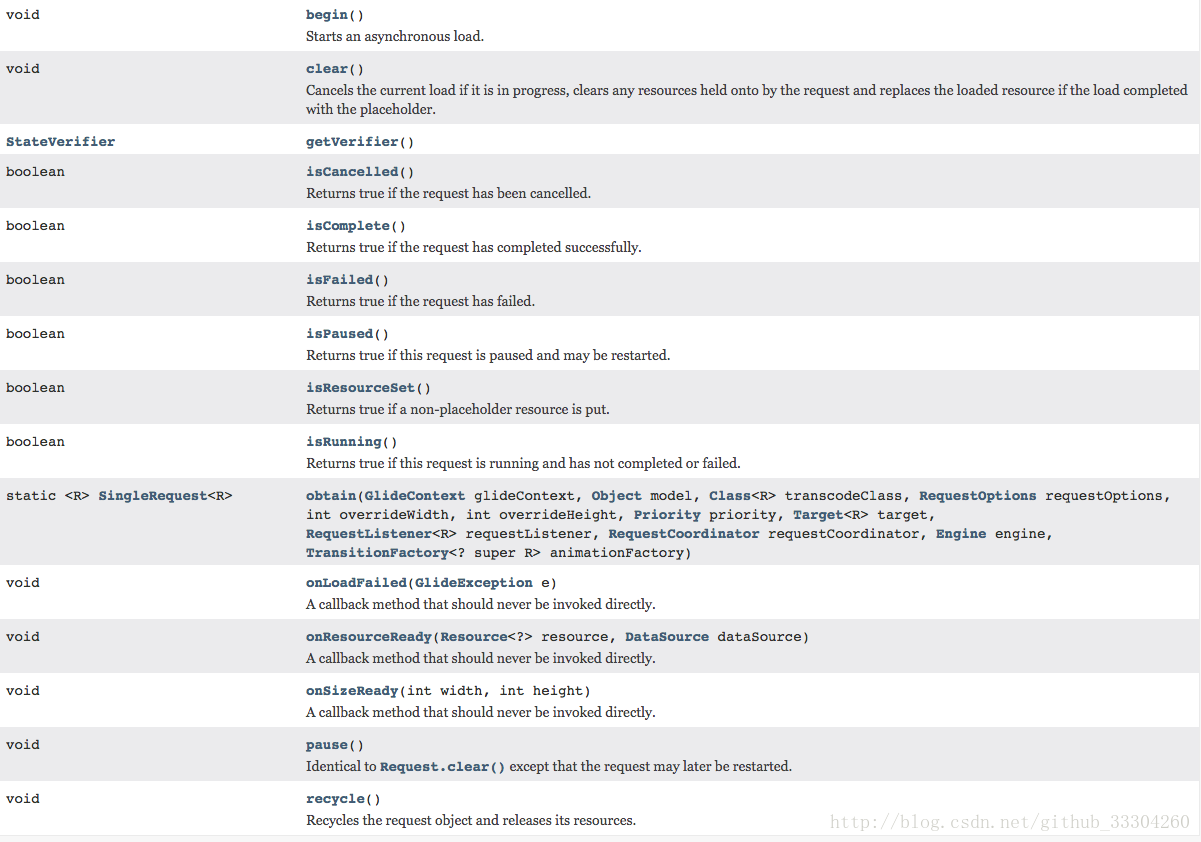
那么到这里我们拿到了初始化好的SingleRequest对象。
既然已经得到SingleRequest对象,接下来是不应该来执行这个request了?
那么接下来我们带着问题去看一下本文第一段代码中第114行提到,让大家注意过,下面从这里入手,因为这里是执行erquest的方法。

###如何执行request?
  void track(Target<?> target, Request request) {
    targetTracker.track(target);
    requestTracker.runRequest(request);
  }
requestManager.track(target, request);实际调用的是requestTracker.runRequest(request);去正真执行request。
  /**
   * Starts tracking the given request.
   */
  public void runRequest(Request request) {
    requests.add(request);
    if (!isPaused) {
      request.begin();
    } else {
      pendingRequests.add(request);
    }
  }
这里有一个简单的逻辑判断,就是先判断Glide当前是不是处理暂停状态,如果不是暂停状态就调用Request的begin()方法来执行Request,否则的话就先将Request添加到待执行队列里面,等暂停状态解除了之后再执行。
主要看一下begin():
  @Override
  public void begin() {
    stateVerifier.throwIfRecycled();
    startTime = LogTime.getLogTime();
    if (model == null) {
      if (Util.isValidDimensions(overrideWidth, overrideHeight)) {
        width = overrideWidth;
        height = overrideHeight;
      }
      // Only log at more verbose log levels if the user has set a fallback drawable, because
      // fallback Drawables indicate the user expects null models occasionally.
      int logLevel = getFallbackDrawable() == null ? Log.WARN : Log.DEBUG;
      onLoadFailed(new GlideException("Received null model"), logLevel);
      return;
    }

    if (status == Status.RUNNING) {
      throw new IllegalArgumentException("Cannot restart a running request");
    }

    // If we're restarted after we're complete (usually via something like a notifyDataSetChanged
    // that starts an identical request into the same Target or View), we can simply use the
    // resource and size we retrieved the last time around and skip obtaining a new size, starting a
    // new load etc. This does mean that users who want to restart a load because they expect that
    // the view size has changed will need to explicitly clear the View or Target before starting
    // the new load.
    if (status == Status.COMPLETE) {
      onResourceReady(resource, DataSource.MEMORY_CACHE);
      return;
    }

    // Restarts for requests that are neither complete nor running can be treated as new requests
    // and can run again from the beginning.

    status = Status.WAITING_FOR_SIZE;
    if (Util.isValidDimensions(overrideWidth, overrideHeight)) {
      onSizeReady(overrideWidth, overrideHeight);
    } else {
      target.getSize(this);
    }

    if ((status == Status.RUNNING || status == Status.WAITING_FOR_SIZE)
        && canNotifyStatusChanged()) {
      target.onLoadStarted(getPlaceholderDrawable());
    }
    if (Log.isLoggable(TAG, Log.VERBOSE)) {
      logV("finished run method in " + LogTime.getElapsedMillis(startTime));
    }
  }
这里我们来注意到个细节,如果model等于null,model也就是我们在load()方法中传入传入的资源,这时候会调用onLoadFailed()
  private void onLoadFailed(GlideException e, int maxLogLevel) {
    stateVerifier.throwIfRecycled();
    int logLevel = glideContext.getLogLevel();
    if (logLevel <= maxLogLevel) {
      Log.w(GLIDE_TAG, "Load failed for " + model + " with size [" + width + "x" + height + "]", e);
      if (logLevel <= Log.INFO) {
        e.logRootCauses(GLIDE_TAG);
      }
    }

    loadStatus = null;
    status = Status.FAILED;
    //TODO: what if this is a thumbnail request?
    if (requestListener == null
        || !requestListener.onLoadFailed(e, model, target, isFirstReadyResource())) {
      setErrorPlaceholder();
    }
  }
首先将status = Status.FAILED;
然后去setErrorPlaceholder();
private void setErrorPlaceholder() {
    if (!canNotifyStatusChanged()) {
      return;
    }

    Drawable error = null;
    if (model == null) {
      error = getFallbackDrawable();
    }
    // Either the model isn't null, or there was no fallback drawable set.
    if (error == null) {
      error = getErrorDrawable();
    }
    // The model isn't null, no fallback drawable was set or no error drawable was set.
    if (error == null) {
      error = getPlaceholderDrawable();
    }
    target.onLoadFailed(error);
  }
个方法中会先去获取一个error的占位图,如果获取不到的话会再去获取一个loading占位图,然后调用target.onLoadFailed(error)方法并将占位图传入。那么onLoadFailed()方法中做了什么呢?我们看一下:
  /**
   *
   *
   * @param errorDrawable {@inheritDoc}
   */
  @Override
  public void onLoadFailed(@Nullable Drawable errorDrawable) {
    super.onLoadFailed(errorDrawable);
    setResourceInternal(null);
    setDrawable(errorDrawable);
  }
setResourceInternal(null);将资源和动画都设置为null。
private void setResourceInternal(@Nullable Z resource) {
    maybeUpdateAnimatable(resource);
    setResource(resource);
  }
setDrawable(errorDrawable);将error或loading占位图加载到view中,如果都没有那就是空的喽。
我们再回到begin()第37和39行。

这里会判断Util.isValidDimensions(overrideWidth, overrideHeight)
这里就有故事了,如果你在使用时候调用了override() API为图片指定了一个固定的宽高,就会按照你给定的去加载;第二种情况是没有给定的情况,那么target.getSize()方法的内部会根据ImageView的layout_width和layout_height值做一系列的计算,来算出图片应该的宽高,具体计算就不在这里分析了。
但是不管怎样,最后都会调用onSizeReady()。
那么接下来看一下onSizeReady():
####onSizeReady()做了什么?
@Override
  public void onSizeReady(int width, int height) {
    /**
     * 如果对象可回收(即当前在对象池中),则抛出一个异常。
     */
    stateVerifier.throwIfRecycled();
    if (Log.isLoggable(TAG, Log.VERBOSE)) {
      logV("Got onSizeReady in " + LogTime.getElapsedMillis(startTime));
    }
    /**
     * 如果Status为WAITING_FOR_SIZE说明没有设置大小或者没有获取到计算后的大小
     */
    if (status != Status.WAITING_FOR_SIZE) {
      return;
    }
    status = Status.RUNNING;

    /**
     * 一个乘数适用于在加载资源之前,目标的大小。
     * 用于加载缩略图或尝试避免加载巨大资源特别是在屏幕过于密集的设备上
     *
     *  默认为1
     *  float sizeMultiplier = 1f;
     */
    float sizeMultiplier = requestOptions.getSizeMultiplier();

    /**
     * 根据上面的乘数计算需要加载的资源宽高
     */
    this.width = maybeApplySizeMultiplier(width, sizeMultiplier);
    this.height = maybeApplySizeMultiplier(height, sizeMultiplier);

    if (Log.isLoggable(TAG, Log.VERBOSE)) {
      logV("finished setup for calling load in " + LogTime.getElapsedMillis(startTime));
    }

    /**
     * 好熟悉的参数,基本都是equestOptions的属性
     * 都是经常用到的参数,就不详细说明了
     * 剩下的是事情在engine.load()里,接下来我们去看一下
     */
    loadStatus = engine.load(
        glideContext,
        model,
        requestOptions.getSignature(),
        this.width,
        this.height,
        requestOptions.getResourceClass(),
        transcodeClass,
        priority,
        requestOptions.getDiskCacheStrategy(),
        requestOptions.getTransformations(),
        requestOptions.isTransformationRequired(),
        requestOptions.isScaleOnlyOrNoTransform(),
        requestOptions.getOptions(),
        requestOptions.isMemoryCacheable(),
        requestOptions.getUseUnlimitedSourceGeneratorsPool(),
        requestOptions.getOnlyRetrieveFromCache(),
        this);
    if (Log.isLoggable(TAG, Log.VERBOSE)) {
      logV("finished onSizeReady in " + LogTime.getElapsedMillis(startTime));
    }
  }
####engine.load()做了什么?
/**
 * 所有的请求流程都如下:
 * 1.检查内存缓存并提供缓存的资源
 * 2.检查当前使用的资源,并返回当前的活跃资源
 * 3.检查当前的加载进度,并将cb添加到正在进行的加载进度中
 * 4.开始一个新的加载
 */
public <R> LoadStatus load(
      GlideContext glideContext,
      Object model,
      Key signature,
      int width,
      int height,
      Class<?> resourceClass,
      Class<R> transcodeClass,
      Priority priority,
      DiskCacheStrategy diskCacheStrategy,
      Map<Class<?>, Transformation<?>> transformations,
      boolean isTransformationRequired,
      boolean isScaleOnlyOrNoTransform,
      Options options,
      boolean isMemoryCacheable,
      boolean useUnlimitedSourceExecutorPool,
      boolean onlyRetrieveFromCache,
      ResourceCallback cb) {
    Util.assertMainThread();
    long startTime = LogTime.getLogTime();

    EngineKey key = keyFactory.buildKey(model, signature, width, height, transformations,
        resourceClass, transcodeClass, options);

   /**
 	* 1.检查内存缓存并提供缓存的资源
	*/
    EngineResource<?> cached = loadFromCache(key, isMemoryCacheable);
    if (cached != null) {
      cb.onResourceReady(cached, DataSource.MEMORY_CACHE);
      if (Log.isLoggable(TAG, Log.VERBOSE)) {
        logWithTimeAndKey("Loaded resource from cache", startTime, key);
      }
      return null;
    }

   /**
 	* 2.检查当前使用的资源,并返回当前的活跃资源
	*/
    EngineResource<?> active = loadFromActiveResources(key, isMemoryCacheable);
    if (active != null) {
      cb.onResourceReady(active, DataSource.MEMORY_CACHE);
      if (Log.isLoggable(TAG, Log.VERBOSE)) {
        logWithTimeAndKey("Loaded resource from active resources", startTime, key);
      }
      return null;
    }

   /**
 	*  3.检查当前的加载进度,并将cb添加到正在进行的加载进度中
	*/
    EngineJob<?> current = jobs.get(key);
    if (current != null) {
      current.addCallback(cb);
      if (Log.isLoggable(TAG, Log.VERBOSE)) {
        logWithTimeAndKey("Added to existing load", startTime, key);
      }
      return new LoadStatus(cb, current);
    }

    EngineJob<R> engineJob = engineJobFactory.build(key, isMemoryCacheable,
        useUnlimitedSourceExecutorPool);
    DecodeJob<R> decodeJob = decodeJobFactory.build(
        glideContext,
        model,
        key,
        signature,
        width,
        height,
        resourceClass,
        transcodeClass,
        priority,
        diskCacheStrategy,
        transformations,
        isTransformationRequired,
        isScaleOnlyOrNoTransform,
        onlyRetrieveFromCache,
        options,
        engineJob);
    jobs.put(key, engineJob);
    engineJob.addCallback(cb);
    engineJob.start(decodeJob);

    if (Log.isLoggable(TAG, Log.VERBOSE)) {
      logWithTimeAndKey("Started new load", startTime, key);
    }

   /**
 	*   4.开始一个新的加载
	*/
    return new LoadStatus(cb, engineJob);
  }
从上面的代码我们可以看出来该方法负责管理活动和缓存资源。
active的资源是指那些已经被提供给至少一个请求并且还没有被释放的资源。一旦资源的所有使用者都释放了该资源,资源就会去缓存。如果资源从缓存返回到新的使用者,它将重新添加到active资源中。如果资源被从缓存中清除,那么它的资源就会被回收再利用,如果可能的话,资源就会被丢弃。
基本流程理解了之后,我们看一下里面的重点:
第68行:
这里构建了一个EngineJob,它的主要作用就是用来开启线程的,为后面的异步加载图片做准备。
EngineJob<R> engineJob = engineJobFactory.build(key, isMemoryCacheable,
        useUnlimitedSourceExecutorPool);
第70行:
创建了一个DecodeJob对象,从名字上来看,它好像是用来对图片进行解码的,但实际上它的任务十分繁重,待会我们就知道了。
DecodeJob<R> decodeJob = decodeJobFactory.build()
第89行:
EngineJob的start()方法来运行DecodeJob对象。
engineJob.start(decodeJob);
那么我们重点看一下engineJob.start(decodeJob);到底如何运行DecodeJob对象?
###如何执行 DecodeJob对象?
  public void start(DecodeJob<R> decodeJob) {
    this.decodeJob = decodeJob;
    GlideExecutor executor = decodeJob.willDecodeFromCache()
        ? diskCacheExecutor
        : getActiveSourceExecutor();
    executor.execute(decodeJob);
  }
这里代码并不多,我们能看到GlideExecutor对象分为两种情况,一个是从缓存中执行得到***CacheExecutor***[磁盘缓存执行器不允许在线程上进行网络操作。],一种是从数据中执行得到***SourceExecutor***[源执行器允许在线程上进行网络操作。]。
不管是最终是哪一个executor,都会调用executor.execute(decodeJob);方法来执行decodeJob。
那么进去看一下:
@Override
  public void execute(Runnable command) {
    if (executeSynchronously) {
      command.run();
    } else {
      super.execute(command);
    }
  }
execute中正式的开启了线程池进行加载资源。由此我们也正式的由主线程转到了子线程中。
这里我们已经到子线程执行DecodeJob喽!!
那我们来看一下run(),这是真正执行的地方哦!!!!:
  @Override
  public void run() {
    // This should be much more fine grained, but since Java's thread pool implementation silently
    // swallows all otherwise fatal exceptions, this will at least make it obvious to developers
    // that something is failing.
    TraceCompat.beginSection("DecodeJob#run");
    try {
      if (isCancelled) {
        notifyFailed();
        return;
      }
      runWrapped();
    } catch (RuntimeException e) {
      if (Log.isLoggable(TAG, Log.DEBUG)) {
        Log.d(TAG, "DecodeJob threw unexpectedly"
            + ", isCancelled: " + isCancelled
            + ", stage: " + stage, e);
      }
      // When we're encoding we've already notified our callback and it isn't safe to do so again.
      if (stage != Stage.ENCODE) {
        notifyFailed();
      }
      if (!isCancelled) {
        throw e;
      }
    } finally {
      if (currentFetcher != null) {
        currentFetcher.cleanup();
      }
      TraceCompat.endSection();
    }
  }
上面的run()方法主要调用runWrapped()方法
  private void runWrapped() {
     switch (runReason) {
      case INITIALIZE:
        stage = getNextStage(Stage.INITIALIZE);
        currentGenerator = getNextGenerator();
        runGenerators();
        break;
      case SWITCH_TO_SOURCE_SERVICE:
        runGenerators();
        break;
      case DECODE_DATA:
        decodeFromRetrievedData();
        break;
      default:
        throw new IllegalStateException("Unrecognized run reason: " + runReason);
    }
  }
1.
case INITIALIZE:和case SWITCH_TO_SOURCE_SERVICE:最终都是执行runGenerators();
其实认真思考也回明白,初始化第一次加载没有缓存,当然是走数据源喽!!!
2.如果是
case DECODE_DATA:那么那么会执行decodeFromRetrievedData();
那么接下来我们先来看一下runGenerators();方法
  private void runGenerators() {
    currentThread = Thread.currentThread();
    startFetchTime = LogTime.getLogTime();
    boolean isStarted = false;
    while (!isCancelled && currentGenerator != null
        && !(isStarted = currentGenerator.startNext())) {
      stage = getNextStage(stage);
      currentGenerator = getNextGenerator();

      if (stage == Stage.SOURCE) {
        reschedule();
        return;
      }
    }
    // We've run out of stages and generators, give up.
    if ((stage == Stage.FINISHED || isCancelled) && !isStarted) {
      notifyFailed();
    }

    // Otherwise a generator started a new load and we expect to be called back in
    // onDataFetcherReady.
  }
重点在第6行:currentGenerator.startNext()
一起往下看:
  @Override
  public boolean startNext() {
    if (dataToCache != null) {
      Object data = dataToCache;
      dataToCache = null;
      cacheData(data);
    }

    if (sourceCacheGenerator != null && sourceCacheGenerator.startNext()) {
      return true;
    }
    sourceCacheGenerator = null;

    loadData = null;
    boolean started = false;
    while (!started && hasNextModelLoader()) {
      loadData = helper.getLoadData().get(loadDataListIndex++);
      if (loadData != null
          && (helper.getDiskCacheStrategy().isDataCacheable(loadData.fetcher.getDataSource())
          || helper.hasLoadPath(loadData.fetcher.getDataClass()))) {
        started = true;
        loadData.fetcher.loadData(helper.getPriority(), this);
      }
    }
    return started;
  }
我们看下第9行的 sourceCacheGenerator.startNext()
  @Override
  public boolean startNext() {
    while (modelLoaders == null || !hasNextModelLoader()) {
      sourceIdIndex++;
      if (sourceIdIndex >= cacheKeys.size()) {
        return false;
      }

      Key sourceId = cacheKeys.get(sourceIdIndex);
      Key originalKey = new DataCacheKey(sourceId, helper.getSignature());
      cacheFile = helper.getDiskCache().get(originalKey);
      if (cacheFile != null) {
        this.sourceKey = sourceId;
        modelLoaders = helper.getModelLoaders(cacheFile);
        modelLoaderIndex = 0;
      }
    }

    loadData = null;
    boolean started = false;
    while (!started && hasNextModelLoader()) {
      ModelLoader<File, ?> modelLoader = modelLoaders.get(modelLoaderIndex++);
      loadData =
          modelLoader.buildLoadData(cacheFile, helper.getWidth(), helper.getHeight(),
              helper.getOptions());
      if (loadData != null && helper.hasLoadPath(loadData.fetcher.getDataClass())) {
        started = true;
        loadData.fetcher.loadData(helper.getPriority(), this);
      }
    }
    return started;
  }
我们看下10-14行:
首先通过cacheFile = helper.getDiskCache().get(originalKey);获取缓存文件,如果不为空,则modelLoaders = helper.getModelLoaders(cacheFile); 通过DecodeHelper来获得List中的ModelLoader。
这个modelLoaders非常重要,先看一下是怎么来的?
  List<ModelLoader<File, ?>> getModelLoaders(File file)
      throws Registry.NoModelLoaderAvailableException {
    return glideContext.getRegistry().getModelLoaders(file);
  }
通过glideContext.getRegistry().getModelLoaders(file)来获取,那么分解来看。
先看一下glideContext.getRegistry()返回的是Registry对象,Registry是在Glide的构造方法中创建的,而且注册添加了很多解析器,这里额外说一下:
//=Registry知识点补充=start>
	registry = new Registry();
    registry.register(new DefaultImageHeaderParser());

    Downsampler downsampler = new Downsampler(registry.getImageHeaderParsers(),
        resources.getDisplayMetrics(), bitmapPool, arrayPool);
    ByteBufferGifDecoder byteBufferGifDecoder =
        new ByteBufferGifDecoder(context, registry.getImageHeaderParsers(), bitmapPool, arrayPool);

    registry.register(ByteBuffer.class, new ByteBufferEncoder())
        .register(InputStream.class, new StreamEncoder(arrayPool))
        /* Bitmaps */
        .append(ByteBuffer.class, Bitmap.class,
            new ByteBufferBitmapDecoder(downsampler))
        .append(InputStream.class, Bitmap.class,
            new StreamBitmapDecoder(downsampler, arrayPool))
        .append(ParcelFileDescriptor.class, Bitmap.class, new VideoBitmapDecoder(bitmapPool))
        .register(Bitmap.class, new BitmapEncoder())
        /* GlideBitmapDrawables */
        .append(ByteBuffer.class, BitmapDrawable.class,
            new BitmapDrawableDecoder<>(resources, bitmapPool,
                new ByteBufferBitmapDecoder(downsampler)))
        .append(InputStream.class, BitmapDrawable.class,
            new BitmapDrawableDecoder<>(resources, bitmapPool,
                new StreamBitmapDecoder(downsampler, arrayPool)))
        .append(ParcelFileDescriptor.class, BitmapDrawable.class,
            new BitmapDrawableDecoder<>(resources, bitmapPool, new VideoBitmapDecoder(bitmapPool)))
        .register(BitmapDrawable.class, new BitmapDrawableEncoder(bitmapPool, new BitmapEncoder()))
        /* GIFs */
        .prepend(InputStream.class, GifDrawable.class,
            new StreamGifDecoder(registry.getImageHeaderParsers(), byteBufferGifDecoder, arrayPool))
        .prepend(ByteBuffer.class, GifDrawable.class, byteBufferGifDecoder)
        .register(GifDrawable.class, new GifDrawableEncoder())
        /* GIF Frames */
        .append(GifDecoder.class, GifDecoder.class, new UnitModelLoader.Factory<GifDecoder>())
        .append(GifDecoder.class, Bitmap.class, new GifFrameResourceDecoder(bitmapPool))
        /* Files */
        .register(new ByteBufferRewinder.Factory())
        .append(File.class, ByteBuffer.class, new ByteBufferFileLoader.Factory())
        .append(File.class, InputStream.class, new FileLoader.StreamFactory())
        .append(File.class, File.class, new FileDecoder())
        .append(File.class, ParcelFileDescriptor.class, new FileLoader.FileDescriptorFactory())
        .append(File.class, File.class, new UnitModelLoader.Factory<File>())
        /* Models */
        .register(new InputStreamRewinder.Factory(arrayPool))
        .append(int.class, InputStream.class, new ResourceLoader.StreamFactory(resources))
        .append(
                int.class,
                ParcelFileDescriptor.class,
                new ResourceLoader.FileDescriptorFactory(resources))
        .append(Integer.class, InputStream.class, new ResourceLoader.StreamFactory(resources))
        .append(
                Integer.class,
                ParcelFileDescriptor.class,
                new ResourceLoader.FileDescriptorFactory(resources))
        .append(String.class, InputStream.class, new DataUrlLoader.StreamFactory())
        .append(String.class, InputStream.class, new StringLoader.StreamFactory())
        .append(String.class, ParcelFileDescriptor.class, new StringLoader.FileDescriptorFactory())
        .append(Uri.class, InputStream.class, new HttpUriLoader.Factory())
        .append(Uri.class, InputStream.class, new AssetUriLoader.StreamFactory(context.getAssets()))
        .append(
                Uri.class,
                ParcelFileDescriptor.class,
                new AssetUriLoader.FileDescriptorFactory(context.getAssets()))
        .append(Uri.class, InputStream.class, new MediaStoreImageThumbLoader.Factory(context))
        .append(Uri.class, InputStream.class, new MediaStoreVideoThumbLoader.Factory(context))
        .append(
            Uri.class,
             InputStream.class,
             new UriLoader.StreamFactory(context.getContentResolver()))
        .append(Uri.class, ParcelFileDescriptor.class,
             new UriLoader.FileDescriptorFactory(context.getContentResolver()))
        .append(Uri.class, InputStream.class, new UrlUriLoader.StreamFactory())
        .append(URL.class, InputStream.class, new UrlLoader.StreamFactory())
        .append(Uri.class, File.class, new MediaStoreFileLoader.Factory(context))
        .append(GlideUrl.class, InputStream.class, new HttpGlideUrlLoader.Factory())
        .append(byte[].class, ByteBuffer.class, new ByteArrayLoader.ByteBufferFactory())
        .append(byte[].class, InputStream.class, new ByteArrayLoader.StreamFactory())
        /* Transcoders */
        .register(Bitmap.class, BitmapDrawable.class,
            new BitmapDrawableTranscoder(resources, bitmapPool))
        .register(Bitmap.class, byte[].class, new BitmapBytesTranscoder())
        .register(GifDrawable.class, byte[].class, new GifDrawableBytesTranscoder());
我们来看一下.append(Uri.class, InputStream.class, new HttpUriLoader.Factory()) 其他的基本都一样。
  public <Model, Data> Registry append(Class<Model> modelClass, Class<Data> dataClass,
      ModelLoaderFactory<Model, Data> factory) {
    modelLoaderRegistry.append(modelClass, dataClass, factory);
    return this;
  }
再往下:
  public synchronized <Model, Data> void append(Class<Model> modelClass, Class<Data> dataClass,
      ModelLoaderFactory<Model, Data> factory) {
    multiModelLoaderFactory.append(modelClass, dataClass, factory);
    cache.clear();
  }
再往下:
  synchronized <Model, Data> void append(Class<Model> modelClass, Class<Data> dataClass,
      ModelLoaderFactory<Model, Data> factory) {
    add(modelClass, dataClass, factory, true /*append*/);
  }
再往下:
  private <Model, Data> void add(Class<Model> modelClass, Class<Data> dataClass,
      ModelLoaderFactory<Model, Data> factory, boolean append) {
    Entry<Model, Data> entry = new Entry<>(modelClass, dataClass, factory);
    entries.add(append ? entries.size() : 0, entry);
  }
再往下:
    public Entry(Class<Model> modelClass, Class<Data> dataClass,
        ModelLoaderFactory<Model, Data> factory) {
      this.modelClass = modelClass;
      this.dataClass = dataClass;
      this.factory = factory;
    }
通过上面五个方法的层层深入,我们应该能看出来:
创建了一个Entry对象,把我们的modelClass,dataClass和factory对象关联起来,然后存放到entries的list集合中,这个Entry对象的理解关系到我们后面对整个网络加载的流程。
知识点补充到这里,主要是让大家理解这个Registry对象。
//=Registry知识点补充=end>
我们回过头接着看glideContext.getRegistry().getModelLoaders(file);中的getModelLoaders(file):
  public <Model> List<ModelLoader<Model, ?>> getModelLoaders(Model model) {
    List<ModelLoader<Model, ?>> result = modelLoaderRegistry.getModelLoaders(model);
    if (result.isEmpty()) {
      throw new NoModelLoaderAvailableException(model);
    }
    return result;
  }
上面代码可以看出,从modelLoaderRegistry中获取:
那接着看modelLoaderRegistry.getModelLoaders(model);
  public synchronized <A> List<ModelLoader<A, ?>> getModelLoaders(A model) {
    List<ModelLoader<A, ?>> modelLoaders = getModelLoadersForClass(getClass(model));
    int size = modelLoaders.size();
    List<ModelLoader<A, ?>> filteredLoaders = new ArrayList<>(size);
    for (int i = 0; i < size; i++) {
      ModelLoader<A, ?> loader = modelLoaders.get(i);
      if (loader.handles(model)) {
        filteredLoaders.add(loader);
      }
    }
    return filteredLoaders;
  }
通过第二行可以看出,getModelLoadersForClass(getClass(model))方法获取modelLoaders集合,
那么来看一下getModelLoadersForClass(getClass(model)):
  private <A> List<ModelLoader<A, ?>> getModelLoadersForClass(Class<A> modelClass) {
    List<ModelLoader<A, ?>> loaders = cache.get(modelClass);
    if (loaders == null) {
      loaders = Collections.unmodifiableList(multiModelLoaderFactory.build(modelClass));
      cache.put(modelClass, loaders);
    }
    return loaders;
  }
首先从cache缓存中获取,如果为空,将会从multiModelLoaderFactory工厂中获取,在继续跟进multiModelLoaderFactory的build方法看看:
  synchronized <Model> List<ModelLoader<Model, ?>> build(Class<Model> modelClass) {
    try {
      List<ModelLoader<Model, ?>> loaders = new ArrayList<>();
      for (Entry<?, ?> entry : entries) {
        // Avoid stack overflow recursively creating model loaders by only creating loaders in
        // recursive requests if they haven't been created earlier in the chain. For example:
        // A Uri loader may translate to another model, which in turn may translate back to a Uri.
        // The original Uri loader won't be provided to the intermediate model loader, although
        // other Uri loaders will be.
        if (alreadyUsedEntries.contains(entry)) {
          continue;
        }
        if (entry.handles(modelClass)) {
          alreadyUsedEntries.add(entry);
          loaders.add(this.<Model, Object>build(entry));
          alreadyUsedEntries.remove(entry);
        }
      }
      return loaders;
    } catch (Throwable t) {
      alreadyUsedEntries.clear();
      throw t;
    }
  }
从第4行for (Entry<?, ?> entry : entries) {可以看出:从entries集合中分别的遍历出entry对象。
然后通过13行的entry.handles(modelClass来进行匹配是否符合
来看handles()方法:
    public boolean handles(Class<?> modelClass, Class<?> dataClass) {
      return handles(modelClass) && this.dataClass.isAssignableFrom(dataClass);
    }
分别执行了handles(modelClass)和this.dataClass.isAssignableFrom(dataClass);
其实就是分别执行了
this.modelClass.isAssignableFrom(modelClass);
和
this.dataClass.isAssignableFrom(dataClass);
this.dataClass和this.modelClass就是上面我们补充的知识点,是在Glide创建Registry对象时append(modleClass,dataClass,factory),modelClass就是我们传入的e.g. URL, file path,dataClass就是e.g. {@link java.io.InputStream。
然后调用,isAssignableFrom方法进行匹配,我们知道entries包含很多的解析器,所以在这一步将会排除掉不匹配的解析器,然后调用调用build方法来创建一个模型加载器:
  private <Model, Data> ModelLoader<Model, Data> build(Entry<?, ?> entry) {
    return (ModelLoader<Model, Data>) Preconditions.checkNotNull(entry.factory.build(this));
  }

  /**
   * 为这种模型类型构建一个具体的模型加载器。
   *
   * @param multiFactory A map of classes to factories that can be used to construct additional
   *                     {@link ModelLoader}s that this factory's {@link ModelLoader} may depend on
   * @return A new {@link ModelLoader}
   */
  ModelLoader<T, Y> build(MultiModelLoaderFactory multiFactory);

  /**
   * A lifecycle method that will be called when this factory is about to replaced.
   */
  void teardown();
我们来看一下第二行的entry.factory.build(this):
我们举个例子,如果用.append(Uri.class, InputStream.class, new HttpUriLoader.Factory()),那么此时的entry.factory就是HttpUriLoader.Factory.
同理,其他的也如此,就不一一列举了。
接下以HttpUriLoader举例讲解,来看一下HttpUriLoader类
可以先看一下API:
Class HttpUriLoader API
Class HttpUriLoader.Factory API
public class HttpUriLoader implements ModelLoader<Uri, InputStream> {
  private static final Set<String> SCHEMES =
      Collections.unmodifiableSet(new HashSet<>(Arrays.asList("http", "https")));

  private final ModelLoader<GlideUrl, InputStream> urlLoader;

  public HttpUriLoader(ModelLoader<GlideUrl, InputStream> urlLoader) {
    this.urlLoader = urlLoader;
  }

  @Override
  public LoadData<InputStream> buildLoadData(Uri model, int width, int height, Options options) {
    return urlLoader.buildLoadData(new GlideUrl(model.toString()), width, height, options);
  }

  @Override
  public boolean handles(Uri model) {
    return SCHEMES.contains(model.getScheme());
  }

  /**
   * Factory for loading {@link InputStream}s from http/https {@link Uri}s.
   */
  public static class Factory implements ModelLoaderFactory<Uri, InputStream> {

    @Override
    public ModelLoader<Uri, InputStream> build(MultiModelLoaderFactory multiFactory) {
      return new HttpUriLoader(multiFactory.build(GlideUrl.class, InputStream.class));
    }

    @Override
    public void teardown() {
      // Do nothing.
    }
  }
}
上面说到会加载一个具体的模型加载器,这里所谓的具体的模型加载器就是第28行代码,return new HttpUriLoader(multiFactory.build(GlideUrl.class, InputStream.class));
接下来去看一下:
public HttpUriLoader(ModelLoader<GlideUrl, InputStream> urlLoader) {
    this.urlLoader = urlLoader;
  }
是不是有点惊喜
⚠️***特大喜讯:!!!!!!!!!!!!!!!!!***
我们看了这么久终于找到了真正的加载器。
当然并不是只有一个,可能有多个,因为在Registry注册了多个可以解析Uri.class的解析器。
好,既然我们找到了真正的加载器,那么就去看看哪里在使用它?
###哪里是用了真正的加载器?
我们一步一步退回去:
先回到ModelLoaderRegistry类中的getModelLoaders方法中:

我们又回到了startNext()方法,说明这里是使用真正的加载器的地方。
private <A> List<ModelLoader<A, ?>> getModelLoadersForClass(Class<A> modelClass) {
    List<ModelLoader<A, ?>> loaders = cache.get(modelClass);
    if (loaders == null) {
      loaders = Collections.unmodifiableList(multiModelLoaderFactory.build(modelClass));
      cache.put(modelClass, loaders);
    }
    return loaders;
  }
从getModelLoadersForClass方法中,我们获取到了所有解析我们请求modle的所有解析器,通过for循环遍历出所有的解析器,存放到loaders集合中并返回,一直返回到DecodeHelper类中的getModelLoaders方法中。
final class DecodeHelper<Transcode> {
  ...
  List<ModelLoader<File, ?>> getModelLoaders(File file)
      throws Registry.NoModelLoaderAvailableException {
    return glideContext.getRegistry().getModelLoaders(file);
  }
  ...
}
我们看到该方法返回List<ModelLoader<File, ?>>集合,那么看下调用他的地方,有两个地方调用,之前讲过,这里还是分析
class ResourceCacheGenerator{
	@Override
  public boolean startNext() {
    List<Key> sourceIds = helper.getCacheKeys();
    if (sourceIds.isEmpty()) {
      return false;
    }
    List<Class<?>> resourceClasses = helper.getRegisteredResourceClasses();
    while (modelLoaders == null || !hasNextModelLoader()) {
      resourceClassIndex++;
      if (resourceClassIndex >= resourceClasses.size()) {
        sourceIdIndex++;
        if (sourceIdIndex >= sourceIds.size()) {
          return false;
        }
        resourceClassIndex = 0;
      }

      Key sourceId = sourceIds.get(sourceIdIndex);
      Class<?> resourceClass = resourceClasses.get(resourceClassIndex);
      Transformation<?> transformation = helper.getTransformation(resourceClass);

      currentKey = new ResourceCacheKey(sourceId, helper.getSignature(), helper.getWidth(),
          helper.getHeight(), transformation, resourceClass, helper.getOptions());
      cacheFile = helper.getDiskCache().get(currentKey);
      if (cacheFile != null) {
        this.sourceKey = sourceId;
        modelLoaders = helper.getModelLoaders(cacheFile);
        modelLoaderIndex = 0;
      }
    }

    loadData = null;
    boolean started = false;
    while (!started && hasNextModelLoader()) {
      ModelLoader<File, ?> modelLoader = modelLoaders.get(modelLoaderIndex++);
      loadData =
          modelLoader.buildLoadData(cacheFile, helper.getWidth(), helper.getHeight(),
              helper.getOptions());
      if (loadData != null && helper.hasLoadPath(loadData.fetcher.getDataClass())) {
        started = true;
        loadData.fetcher.loadData(helper.getPriority(), this);
      }
    }

    return started;
  }
}
那么我们从代码中第28行可以知道,我们获取了真正加载器的集合,接下来我们关心的就是如何使用了?
我们从第35-42行可以看出,这里是在遍历每一个loader,并且去加载数据。
那么我们看下如何加载数据的?
###真正的加载器如何加载数据:
从上面第38行可以看出来,通过loadData = modelLoader.buildLoadData(cacheFile, helper.getWidth(), helper.getHeight(),helper.getOptions());方法可以获得loadData,
这里我们看下buildLoadData注释:
  /**
   *返回一个ModelLoader。LoadData包含一个DataFetcher,它需要解码这个模型所表示的资源,
   *以及一组密钥,这些键识别DataFetcher加载的数据,以及一个可选的可加载等价数据的备用键列
   *表。如果资源已经被缓存,DataFetcher将不会被使用。
   */
@Nullable
LoadData<Data> buildLoadData(Model model, int width, int height, Options options);
到这里我们知道通过真正的类加载器,会给我们加载数据所需的loadData对象。
这里我们拿到了loadData,那么接下来我们就去看一下loadData如何加载数据?
###loadData如何加载数据?
我们看下上面代码第42行,loadData.fetcher.loadData(helper.getPriority(), this);,我们这里依然以
.append(Uri.class, InputStream.class, new HttpUriLoader.Factory())
为例,那么这里的loadData.fetcher就是HttpUrlFetcher对象。
那么我们来看下一啊HttpUrlFetcher:
Class HttpUrlFetcher API
public class HttpUrlFetcher implements DataFetcher<InputStream> {
  private static final String TAG = "HttpUrlFetcher";
  private static final int MAXIMUM_REDIRECTS = 5;
  // Visible for testing.
  static final HttpUrlConnectionFactory DEFAULT_CONNECTION_FACTORY =
      new DefaultHttpUrlConnectionFactory();

  private final GlideUrl glideUrl;
  private final int timeout;
  private final HttpUrlConnectionFactory connectionFactory;

  private HttpURLConnection urlConnection;
  private InputStream stream;
  private volatile boolean isCancelled;

  public HttpUrlFetcher(GlideUrl glideUrl, int timeout) {
    this(glideUrl, timeout, DEFAULT_CONNECTION_FACTORY);
  }

  // Visible for testing.
  HttpUrlFetcher(GlideUrl glideUrl, int timeout, HttpUrlConnectionFactory connectionFactory) {
    this.glideUrl = glideUrl;
    this.timeout = timeout;
    this.connectionFactory = connectionFactory;
  }

  @Override
  public void loadData(Priority priority, DataCallback<? super InputStream> callback) {
    long startTime = LogTime.getLogTime();
    final InputStream result;
    try {
      result = loadDataWithRedirects(glideUrl.toURL(), 0 /*redirects*/, null /*lastUrl*/,
          glideUrl.getHeaders());
    } catch (IOException e) {
      if (Log.isLoggable(TAG, Log.DEBUG)) {
        Log.d(TAG, "Failed to load data for url", e);
      }
      callback.onLoadFailed(e);
      return;
    }

    if (Log.isLoggable(TAG, Log.VERBOSE)) {
      Log.v(TAG, "Finished http url fetcher fetch in " + LogTime.getElapsedMillis(startTime)
          + " ms and loaded " + result);
    }
    callback.onDataReady(result);
  }

  private InputStream loadDataWithRedirects(URL url, int redirects, URL lastUrl,
      Map<String, String> headers) throws IOException {
    if (redirects >= MAXIMUM_REDIRECTS) {
      throw new HttpException("Too many (> " + MAXIMUM_REDIRECTS + ") redirects!");
    } else {
      // Comparing the URLs using .equals performs additional network I/O and is generally broken.
      // See http://michaelscharf.blogspot.com/2006/11/javaneturlequals-and-hashcode-make.html.
      try {
        if (lastUrl != null && url.toURI().equals(lastUrl.toURI())) {
          throw new HttpException("In re-direct loop");

        }
      } catch (URISyntaxException e) {
        // Do nothing, this is best effort.
      }
    }

    urlConnection = connectionFactory.build(url);
    for (Map.Entry<String, String> headerEntry : headers.entrySet()) {
      urlConnection.addRequestProperty(headerEntry.getKey(), headerEntry.getValue());
    }
    urlConnection.setConnectTimeout(timeout);
    urlConnection.setReadTimeout(timeout);
    urlConnection.setUseCaches(false);
    urlConnection.setDoInput(true);

    // Stop the urlConnection instance of HttpUrlConnection from following redirects so that
    // redirects will be handled by recursive calls to this method, loadDataWithRedirects.
    urlConnection.setInstanceFollowRedirects(false);

    // Connect explicitly to avoid errors in decoders if connection fails.
    urlConnection.connect();
    if (isCancelled) {
      return null;
    }
    final int statusCode = urlConnection.getResponseCode();
    if (statusCode / 100 == 2) {
      return getStreamForSuccessfulRequest(urlConnection);
    } else if (statusCode / 100 == 3) {
      String redirectUrlString = urlConnection.getHeaderField("Location");
      if (TextUtils.isEmpty(redirectUrlString)) {
        throw new HttpException("Received empty or null redirect url");
      }
      URL redirectUrl = new URL(url, redirectUrlString);
      return loadDataWithRedirects(redirectUrl, redirects + 1, url, headers);
    } else if (statusCode == -1) {
      throw new HttpException(statusCode);
    } else {
      throw new HttpException(urlConnection.getResponseMessage(), statusCode);
    }
  }

  private InputStream getStreamForSuccessfulRequest(HttpURLConnection urlConnection)
      throws IOException {
    if (TextUtils.isEmpty(urlConnection.getContentEncoding())) {
      int contentLength = urlConnection.getContentLength();
      stream = ContentLengthInputStream.obtain(urlConnection.getInputStream(), contentLength);
    } else {
      if (Log.isLoggable(TAG, Log.DEBUG)) {
        Log.d(TAG, "Got non empty content encoding: " + urlConnection.getContentEncoding());
      }
      stream = urlConnection.getInputStream();
    }
    return stream;
  }

  @Override
  public void cleanup() {
    if (stream != null) {
      try {
        stream.close();
      } catch (IOException e) {
        // Ignore
      }
    }
    if (urlConnection != null) {
      urlConnection.disconnect();
    }
  }

  @Override
  public void cancel() {
    // TODO: we should consider disconnecting the url connection here, but we can't do so
    // directly because cancel is often called on the main thread.
    isCancelled = true;
  }

  @NonNull
  @Override
  public Class<InputStream> getDataClass() {
    return InputStream.class;
  }

  @NonNull
  @Override
  public DataSource getDataSource() {
    return DataSource.REMOTE;
  }

  interface HttpUrlConnectionFactory {
    HttpURLConnection build(URL url) throws IOException;
  }

  private static class DefaultHttpUrlConnectionFactory implements HttpUrlConnectionFactory {

    @Synthetic
    DefaultHttpUrlConnectionFactory() { }

    @Override
    public HttpURLConnection build(URL url) throws IOException {
      return (HttpURLConnection) url.openConnection();
    }
  }
}
看下28-47的loadData()方法,可以看出来,主要是在32行的loadDataWithRedirects,去加载。
接着来看一下49-99行的loadDataWithRedirects()方法:
这些代码非常简单,就是通过connectionFactory对象调的build方法时,返回一个HttpURLConnection对象,用于网络请求。建立连接,过去返回状态码,判断,然后通过getStreamForSuccessfulRequest方法返回一个InputStream输入流。
这里就不多说具体的了,我们拿到了InputStream输入流,回到loadData()方法:
  @Override
  public void loadData(Priority priority, DataCallback<? super InputStream> callback) {
    long startTime = LogTime.getLogTime();
    final InputStream result;
    try {
      result = loadDataWithRedirects(glideUrl.toURL(), 0 /*redirects*/, null /*lastUrl*/,
          glideUrl.getHeaders());
    } catch (IOException e) {
      if (Log.isLoggable(TAG, Log.DEBUG)) {
        Log.d(TAG, "Failed to load data for url", e);
      }
      callback.onLoadFailed(e);
      return;
    }

    if (Log.isLoggable(TAG, Log.VERBOSE)) {
      Log.v(TAG, "Finished http url fetcher fetch in " + LogTime.getElapsedMillis(startTime)
          + " ms and loaded " + result);
    }
    callback.onDataReady(result);
  }
从第20行callback.onDataReady(result);可以看出,我们将输入流回调给了onDataReady。
是不有点蒙,我们仔细看一下,
class ResourceCacheGenerator{
  ...
  @Override
  public boolean startNext() {
    ...
    loadData.fetcher.loadData(helper.getPriority(), this);
    ...
  }

  ...
  @Override
 public void onDataReady(Object data) {
   cb.onDataFetcherReady(sourceKey, data, loadData.fetcher, DataSource.RESOURCE_DISK_CACHE,
       currentKey);
 }
  ...
}
上一步传入的this,也就是ResourceCacheGenerator,那么再看一下这里的cb是通过构造器传入的:
  public ResourceCacheGenerator(DecodeHelper<?> helper, FetcherReadyCallback cb) {
    this.helper = helper;
    this.cb = cb;
  }
接着往上层找:
class DecodeJob<R>{
   ...
   ...
  private DataFetcherGenerator getNextGenerator() {
    switch (stage) {
      case RESOURCE_CACHE:
        return new ResourceCacheGenerator(decodeHelper, this);
      case DATA_CACHE:
        return new DataCacheGenerator(decodeHelper, this);
      case SOURCE:
        return new SourceGenerator(decodeHelper, this);
      case FINISHED:
        return null;
      default:
        throw new IllegalStateException("Unrecognized stage: " + stage);
    }
  }
  ...
  ...
    @Override
  public void onDataFetcherReady(Key sourceKey, Object data, DataFetcher<?> fetcher,
      DataSource dataSource, Key attemptedKey) {
    this.currentSourceKey = sourceKey;
    this.currentData = data;
    this.currentFetcher = fetcher;
    this.currentDataSource = dataSource;
    this.currentAttemptingKey = attemptedKey;
    if (Thread.currentThread() != currentThread) {
      runReason = RunReason.DECODE_DATA;
      callback.reschedule(this);
    } else {
      TraceCompat.beginSection("DecodeJob.decodeFromRetrievedData");
      try {
        decodeFromRetrievedData();
      } finally {
        TraceCompat.endSection();
      }
    }
  }
  ...
  ...
}
原来是在类DecodeJob的onDataFetcherReady中去使用这个数据的。
那么我们就要看看这个onDataFetcherReady到底如何使用这个数据?
###onDataFetcherReady中如何去使用输入流?
我们通过上面第34行decodeFromRetrievedData()方法可以看到真正加载的地方:
private void decodeFromRetrievedData() {
    if (Log.isLoggable(TAG, Log.VERBOSE)) {
      logWithTimeAndKey("Retrieved data", startFetchTime,
          "data: " + currentData
          + ", cache key: " + currentSourceKey
          + ", fetcher: " + currentFetcher);
    }
    Resource<R> resource = null;
    try {

		//通过decodeFromData方法把输入流解码并返回给resource
      resource = decodeFromData(currentFetcher, currentData, currentDataSource);
    } catch (GlideException e) {
      e.setLoggingDetails(currentAttemptingKey, currentDataSource);
      exceptions.add(e);
    }
    if (resource != null) {
      notifyEncodeAndRelease(resource, currentDataSource);
    } else {
      runGenerators();
    }
  }
上面代码,首先创建一个Resource类型的变量,通过decodeFromData方法把输入流解码并返回给resource,我们去看下decodeFromData方法:
  private <Data> Resource<R> decodeFromData(DataFetcher<?> fetcher, Data data,
      DataSource dataSource) throws GlideException {
    try {
      if (data == null) {
        return null;
      }
      long startTime = LogTime.getLogTime();
      Resource<R> result = decodeFromFetcher(data, dataSource);
      if (Log.isLoggable(TAG, Log.VERBOSE)) {
        logWithTimeAndKey("Decoded result " + result, startTime);
      }
      return result;
    } finally {
      fetcher.cleanup();
    }
  }
会去调用decodeFromFetcher解码返回一个Resource::
  private <Data> Resource<R> decodeFromFetcher(Data data, DataSource dataSource)
      throws GlideException {
    LoadPath<Data, ?, R> path = decodeHelper.getLoadPath((Class<Data>) data.getClass());
    return runLoadPath(data, dataSource, path);
  }
在这里获取到data.getClass,这个Class就是InputStrem.class,那么在调用decodeHelper.getLoadPath方法后,我们来看看做了哪些操作:
  <Data> LoadPath<Data, ?, Transcode> getLoadPath(Class<Data> dataClass) {
    return glideContext.getRegistry().getLoadPath(dataClass, resourceClass, transcodeClass);
  }
getLoadPath方法啥也没做,直接调用Registry中的getLoadPath,我们进去看一下:
  public <Data, TResource, Transcode> LoadPath<Data, TResource, Transcode> getLoadPath(
      Class<Data> dataClass, Class<TResource> resourceClass, Class<Transcode> transcodeClass) {
    LoadPath<Data, TResource, Transcode> result =
        loadPathCache.get(dataClass, resourceClass, transcodeClass);
    if (result == null && !loadPathCache.contains(dataClass, resourceClass, transcodeClass)) {
      List<DecodePath<Data, TResource, Transcode>> decodePaths =
          getDecodePaths(dataClass, resourceClass, transcodeClass);
      // It's possible there is no way to decode or transcode to the desired types from a given
      // data class.
      if (decodePaths.isEmpty()) {
        result = null;
      } else {
        result = new LoadPath<>(dataClass, resourceClass, transcodeClass, decodePaths,
            exceptionListPool);
      }
      loadPathCache.put(dataClass, resourceClass, transcodeClass, result);
    }
    return result;
  }
先从loadPathCache缓存中获取LoadPath对象,如果没有则调用getDecodePaths方法进行获取:
  private <Data, TResource, Transcode> List<DecodePath<Data, TResource, Transcode>> getDecodePaths(
      Class<Data> dataClass, Class<TResource> resourceClass, Class<Transcode> transcodeClass) {

    List<DecodePath<Data, TResource, Transcode>> decodePaths = new ArrayList<>();
    List<Class<TResource>> registeredResourceClasses =
        decoderRegistry.getResourceClasses(dataClass, resourceClass);

    for (Class<TResource> registeredResourceClass : registeredResourceClasses) {
      List<Class<Transcode>> registeredTranscodeClasses =
          transcoderRegistry.getTranscodeClasses(registeredResourceClass, transcodeClass);

      for (Class<Transcode> registeredTranscodeClass : registeredTranscodeClasses) {

        List<ResourceDecoder<Data, TResource>> decoders =
            decoderRegistry.getDecoders(dataClass, registeredResourceClass);
        ResourceTranscoder<TResource, Transcode> transcoder =
            transcoderRegistry.get(registeredResourceClass, registeredTranscodeClass);
        decodePaths.add(new DecodePath<>(dataClass, registeredResourceClass,
            registeredTranscodeClass, decoders, transcoder, exceptionListPool));
      }
    }
    return decodePaths;
  }
这里我们获得了DecodePath,退到上一步:Registry类中,我们继续看:
  public <Data, TResource, Transcode> LoadPath<Data, TResource, Transcode> getLoadPath(
      Class<Data> dataClass, Class<TResource> resourceClass, Class<Transcode> transcodeClass) {
    LoadPath<Data, TResource, Transcode> result =
        loadPathCache.get(dataClass, resourceClass, transcodeClass);
    if (result == null && !loadPathCache.contains(dataClass, resourceClass, transcodeClass)) {
      List<DecodePath<Data, TResource, Transcode>> decodePaths =
          getDecodePaths(dataClass, resourceClass, transcodeClass);
      // It's possible there is no way to decode or transcode to the desired types from a given
      // data class.
      if (decodePaths.isEmpty()) {
        result = null;
      } else {
        result = new LoadPath<>(dataClass, resourceClass, transcodeClass, decodePaths,
            exceptionListPool);
      }
      loadPathCache.put(dataClass, resourceClass, transcodeClass, result);
    }
    return result;
  }
第13行: 为我们创建了一个LoadPath 包括我们之前传入的三个参数dataClass, resourceClass, transcodeClass,以及刚才生成的decodePaths。
我们去看一下LoadPath是什么东西?
###LoadPath是什么东西?
Class LoadPath<Data,ResourceType,Transcode> API
官方说明:
For a given DataFetcher for a given data class, attempts to fetch the data and then run it through one or more DecodePaths.
其实就是为了让DataFetcher能够去加载给定的数据。
既然知道了LoadPath的用途了。那么该去了解一下如何用LoadPath。
###如何用LoadPath?
那么我们再退回到DecodeJob类的decodeFromFetcher方法,看一下runLoadPath:
  private <Data> Resource<R> decodeFromFetcher(Data data, DataSource dataSource)
      throws GlideException {
    LoadPath<Data, ?, R> path = decodeHelper.getLoadPath((Class<Data>) data.getClass());
    return runLoadPath(data, dataSource, path);
  }
看下runLoadPath方法:
  private <Data, ResourceType> Resource<R> runLoadPath(Data data, DataSource dataSource,
      LoadPath<Data, ResourceType, R> path) throws GlideException {
    Options options = getOptionsWithHardwareConfig(dataSource);
    DataRewinder<Data> rewinder = glideContext.getRegistry().getRewinder(data);
    try {
      // ResourceType in DecodeCallback below is required for compilation to work with gradle.
      return path.load(
          rewinder, options, width, height, new DecodeCallback<ResourceType>(dataSource));
    } finally {
      rewinder.cleanup();
    }
  }
可以看到在第7行:path.load()方法中最终得到了我们想要的资源Resource。
原来真正的使者是LoadPath,那么来看一下最后一步path.load()到底是如何生成资源的。
###path.load()到底是如何生成资源?
path.load()主要调用loadWithExceptionList()方法:
  private Resource<Transcode> loadWithExceptionList(DataRewinder<Data> rewinder, Options options,
      int width, int height, DecodePath.DecodeCallback<ResourceType> decodeCallback,
      List<Exception> exceptions) throws GlideException {
    int size = decodePaths.size();
    Resource<Transcode> result = null;
    for (int i = 0; i < size; i++) {
      DecodePath<Data, ResourceType, Transcode> path = decodePaths.get(i);
      try {
        result = path.decode(rewinder, width, height, options, decodeCallback);
      } catch (GlideException e) {
        exceptions.add(e);
      }
      if (result != null) {
        break;
      }
    }

    if (result == null) {
      throw new GlideException(failureMessage, new ArrayList<>(exceptions));
    }

    return result;
  }
我们看一下第九行的path.decode(rewinder, width, height, options, decodeCallback);
  public Resource<Transcode> decode(DataRewinder<DataType> rewinder, int width, int height,
      Options options, DecodeCallback<ResourceType> callback) throws GlideException {
    Resource<ResourceType> decoded = decodeResource(rewinder, width, height, options);
    Resource<ResourceType> transformed = callback.onResourceDecoded(decoded);
    return transcoder.transcode(transformed);
  }

  private Resource<ResourceType> decodeResource(DataRewinder<DataType> rewinder, int width,
      int height, Options options) throws GlideException {
    List<Exception> exceptions = listPool.acquire();
    try {
      return decodeResourceWithList(rewinder, width, height, options, exceptions);
    } finally {
      listPool.release(exceptions);
    }
  }
decode调用decodeResource,decodeResource调用decodeResourceWithList。
来看下decodeResourceWithList:
下面代码注释里,我已经把重点部分注释出来了。
  private Resource<ResourceType> decodeResourceWithList(DataRewinder<DataType> rewinder, int width,
      int height, Options options, List<Exception> exceptions) throws GlideException {
    Resource<ResourceType> result = null;
    /**
     * 遍历decoders集合,分别的获取到ResourceDecoder解码器
     * 主要包含两种:BitmapDrawable.class和GifDrawable.class。
     * 之前的文章讲过,可以自行查阅前两篇文章
     */
    for (int i = 0, size = decoders.size(); i < size; i++) {
      ResourceDecoder<DataType, ResourceType> decoder = decoders.get(i);
      try {
        DataType data = rewinder.rewindAndGet();
        /**
         * 方法来过滤掉不相匹配的解码器
         * 会给我们配对对应的解码器
         * 这就是为什么Gif图,我们不用设置asGif也可以加载的原因。
         */
        if (decoder.handles(data, options)) {
          /**
           * 获取我们的InputStream数据流
           */
          data = rewinder.rewindAndGet();
          /**
           * 得到真正的Resource
           */
          result = decoder.decode(data, width, height, options);
        }
      } catch (IOException e) {
        if (Log.isLoggable(TAG, Log.VERBOSE)) {
          Log.v(TAG, "Failed to decode data for " + decoder, e);
        }
        exceptions.add(e);
      }

      if (result != null) {
        break;
      }
    }

    if (result == null) {
      throw new GlideException(failureMessage, new ArrayList<>(exceptions));
    }
    return result;
  }
此时我们获得了Resource,不过最后又调用了onResourceDecoded做了一些缓存和磁盘存储之间的转换,然后通过将transcoder.transcode(transformed)将给定的资源代码转换为新的资源类型并返回新资源。
那么看一下transcoder.transcode(transformed):
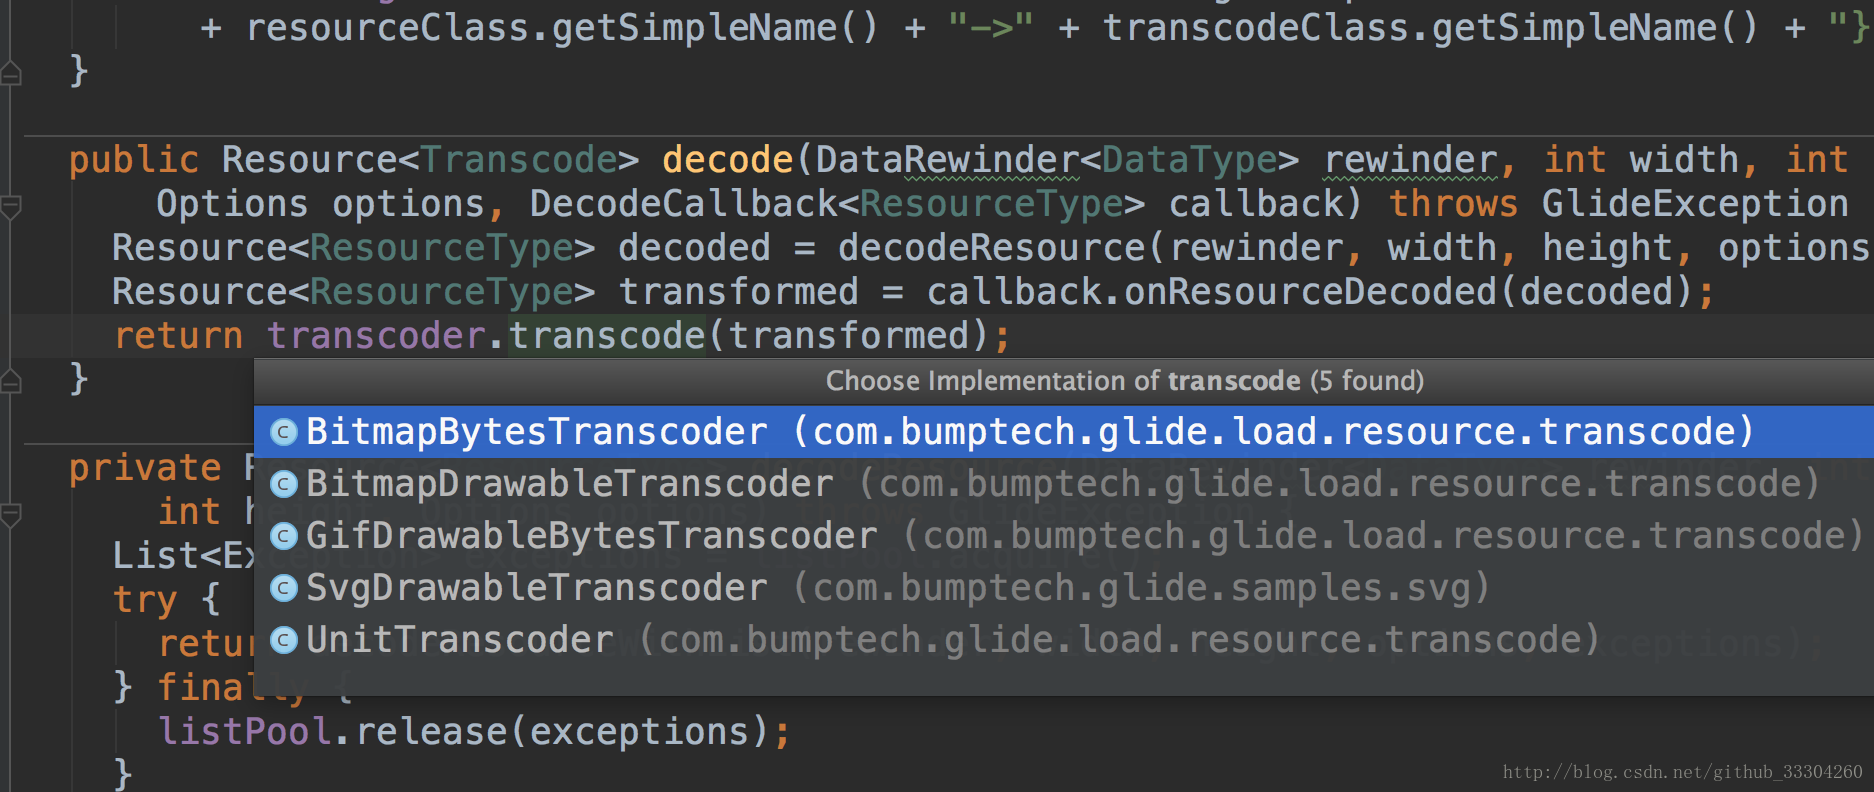
从上面分析我们知道,我们解析的是普通的图片,所以这个transcoder就是BitmapDrawableTranscoder转换器类。
接着我们去BitmapDrawableTranscoder中的transcode方法看看:
public class BitmapDrawableTranscoder{
	...
	...
  @Override
  public Resource<BitmapDrawable> transcode(Resource<Bitmap> toTranscode) {
    return LazyBitmapDrawableResource.obtain(resources, bitmapPool, toTranscode.get());
  }
  	...
	...
}
这里返回了一个LazyBitmapDrawableResource⚠️:这里记住,后面会用到。
到这里我们拿到了想要的资源喽。
###获得资源后我们做什么事?
我们知道如何获得Resource之后,再回到DecodeJob类的decodeFromRetrievedData()方法:
  private void decodeFromRetrievedData() {
    if (Log.isLoggable(TAG, Log.VERBOSE)) {
      logWithTimeAndKey("Retrieved data", startFetchTime,
          "data: " + currentData
          + ", cache key: " + currentSourceKey
          + ", fetcher: " + currentFetcher);
    }
    Resource<R> resource = null;
    try {
      /**
       * 通过decodeFromData方法把输入流解码并返回给resource
       */
      resource = decodeFromData(currentFetcher, currentData, currentDataSource);
    } catch (GlideException e) {
      e.setLoggingDetails(currentAttemptingKey, currentDataSource);
      exceptions.add(e);
    }
    if (resource != null) {
      notifyEncodeAndRelease(resource, currentDataSource);
    } else {
      runGenerators();
    }
  }
第19行:当resource不为空时notifyEncodeAndRelease(resource, currentDataSource);
进去看一下:
  private void notifyEncodeAndRelease(Resource<R> resource, DataSource dataSource) {
    if (resource instanceof Initializable) {
      ((Initializable) resource).initialize();
    }

    Resource<R> result = resource;
    LockedResource<R> lockedResource = null;
    if (deferredEncodeManager.hasResourceToEncode()) {
      lockedResource = LockedResource.obtain(resource);
      result = lockedResource;
    }

    notifyComplete(result, dataSource);

    stage = Stage.ENCODE;
    try {
      if (deferredEncodeManager.hasResourceToEncode()) {
        deferredEncodeManager.encode(diskCacheProvider, options);
      }
    } finally {
      if (lockedResource != null) {
        lockedResource.unlock();
      }
      onEncodeComplete();
    }
  }
重点在13行:notifyComplete(result, dataSource);
看一下里面:
  private void notifyComplete(Resource<R> resource, DataSource dataSource) {
    setNotifiedOrThrow();
    callback.onResourceReady(resource, dataSource);
  }
具体看看callback.onResourceReady(resource, dataSource);方法:
class EngineJob{
   ...
  @Override
  public void onResourceReady(Resource<R> resource, DataSource dataSource) {
    this.resource = resource;
    this.dataSource = dataSource;
    MAIN_THREAD_HANDLER.obtainMessage(MSG_COMPLETE, this).sendToTarget();
  }
  ...
}
MAIN_THREAD_HANDLER是什么? 我们去看一下:
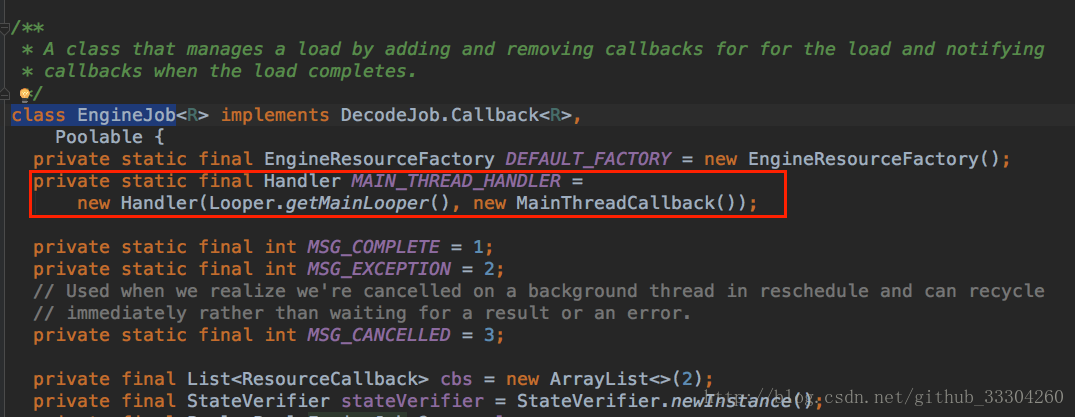
其实是个handler,那么这里发了一个MSG_COMPLETE消息,我们去看下接收的地方:
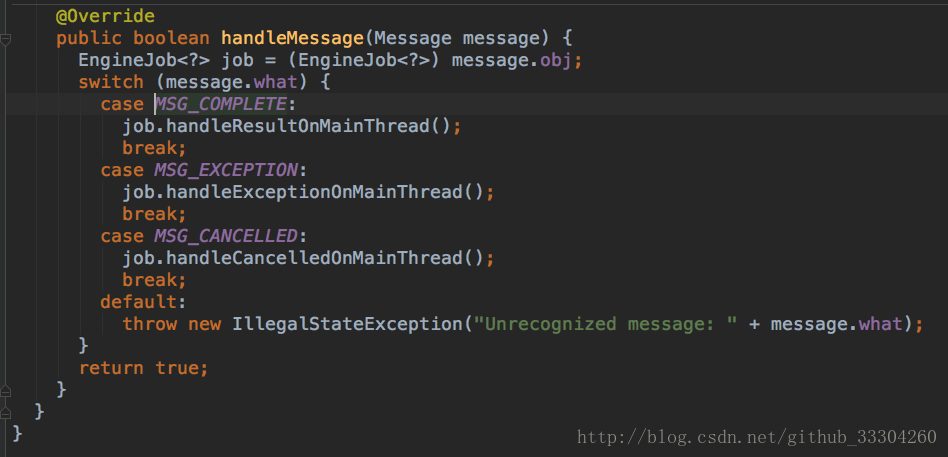
看下handleResultOnMainThread:
@Synthetic
  void handleResultOnMainThread() {
    stateVerifier.throwIfRecycled();
    if (isCancelled) {
      resource.recycle();
      release(false /*isRemovedFromQueue*/);
      return;
    } else if (cbs.isEmpty()) {
      throw new IllegalStateException("Received a resource without any callbacks to notify");
    } else if (hasResource) {
      throw new IllegalStateException("Already have resource");
    }
    engineResource = engineResourceFactory.build(resource, isCacheable);
    hasResource = true;

    // Hold on to resource for duration of request so we don't recycle it in the middle of
    // notifying if it synchronously released by one of the callbacks.
    engineResource.acquire();
    listener.onEngineJobComplete(key, engineResource);

    for (ResourceCallback cb : cbs) {
      if (!isInIgnoredCallbacks(cb)) {
        engineResource.acquire();
        cb.onResourceReady(engineResource, dataSource);
      }
    }
    // Our request is complete, so we can release the resource.
    engineResource.release();

    release(false /*isRemovedFromQueue*/);
  }
该方法主要是在做对资源的加载与释放。
我们重点来看一下24行,cb.onResourceReady(engineResource, dataSource);
这里调用了cb.onResourceReady(resource, dataSource);方法,那这个cb是什么呢?它其实是一个ResourceCallback,在SingleRequest中发起的,并且SingleRequest还实现了ResourceCallback接口内的方法:
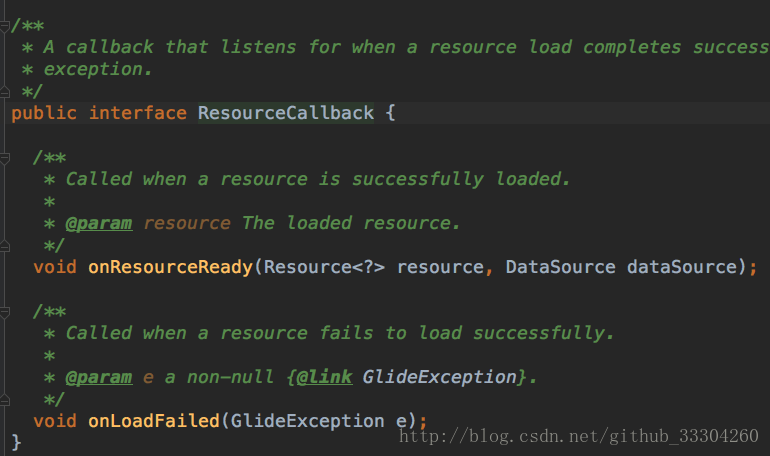
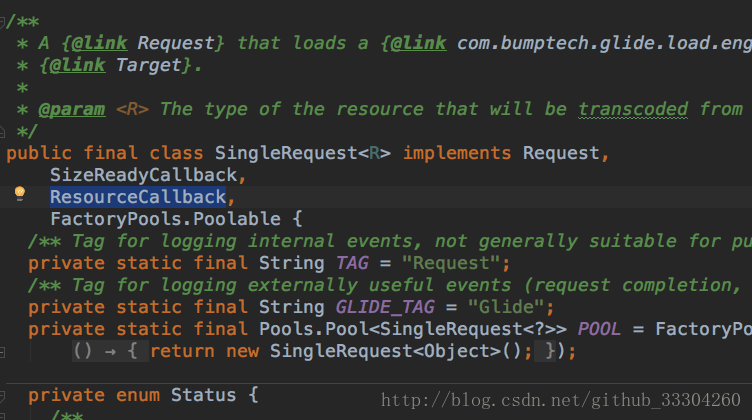
上图注释写明:Called when a resource is successfully loaded.
也就时成功加载资源后会回调该方法。
⚠️⚠️⚠️⚠️⚠️⚠️⚠️⚠️⚠️⚠️⚠️⚠️
不过这里需要注意一下:文章上面也有个类似的代码
private void notifyComplete(Resource<R> resource, DataSource dataSource) {
    setNotifiedOrThrow();
    callback.onResourceReady(resource, dataSource);
  }
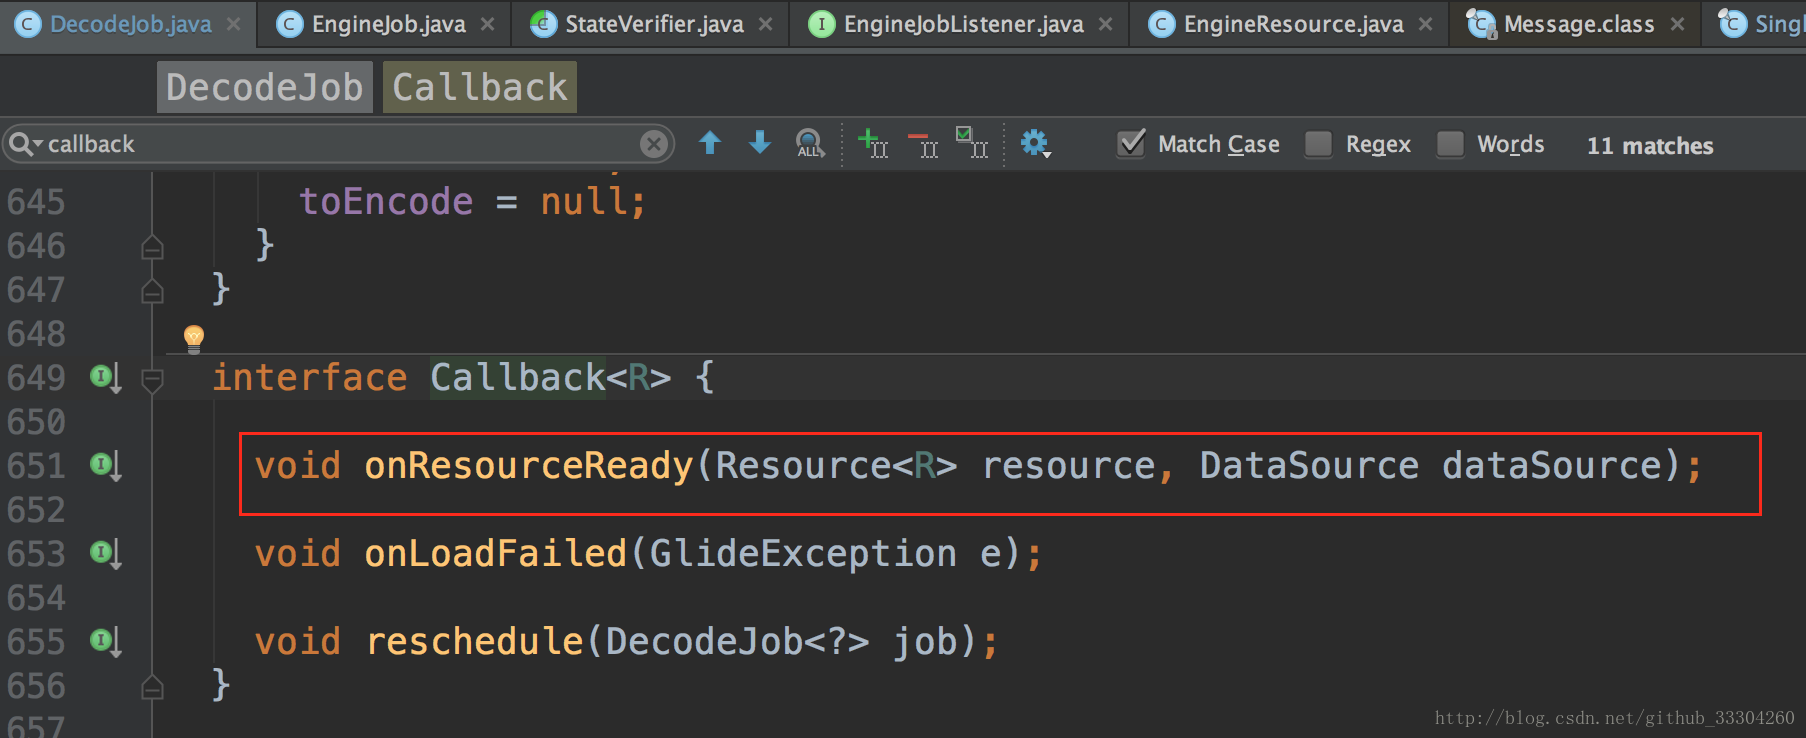
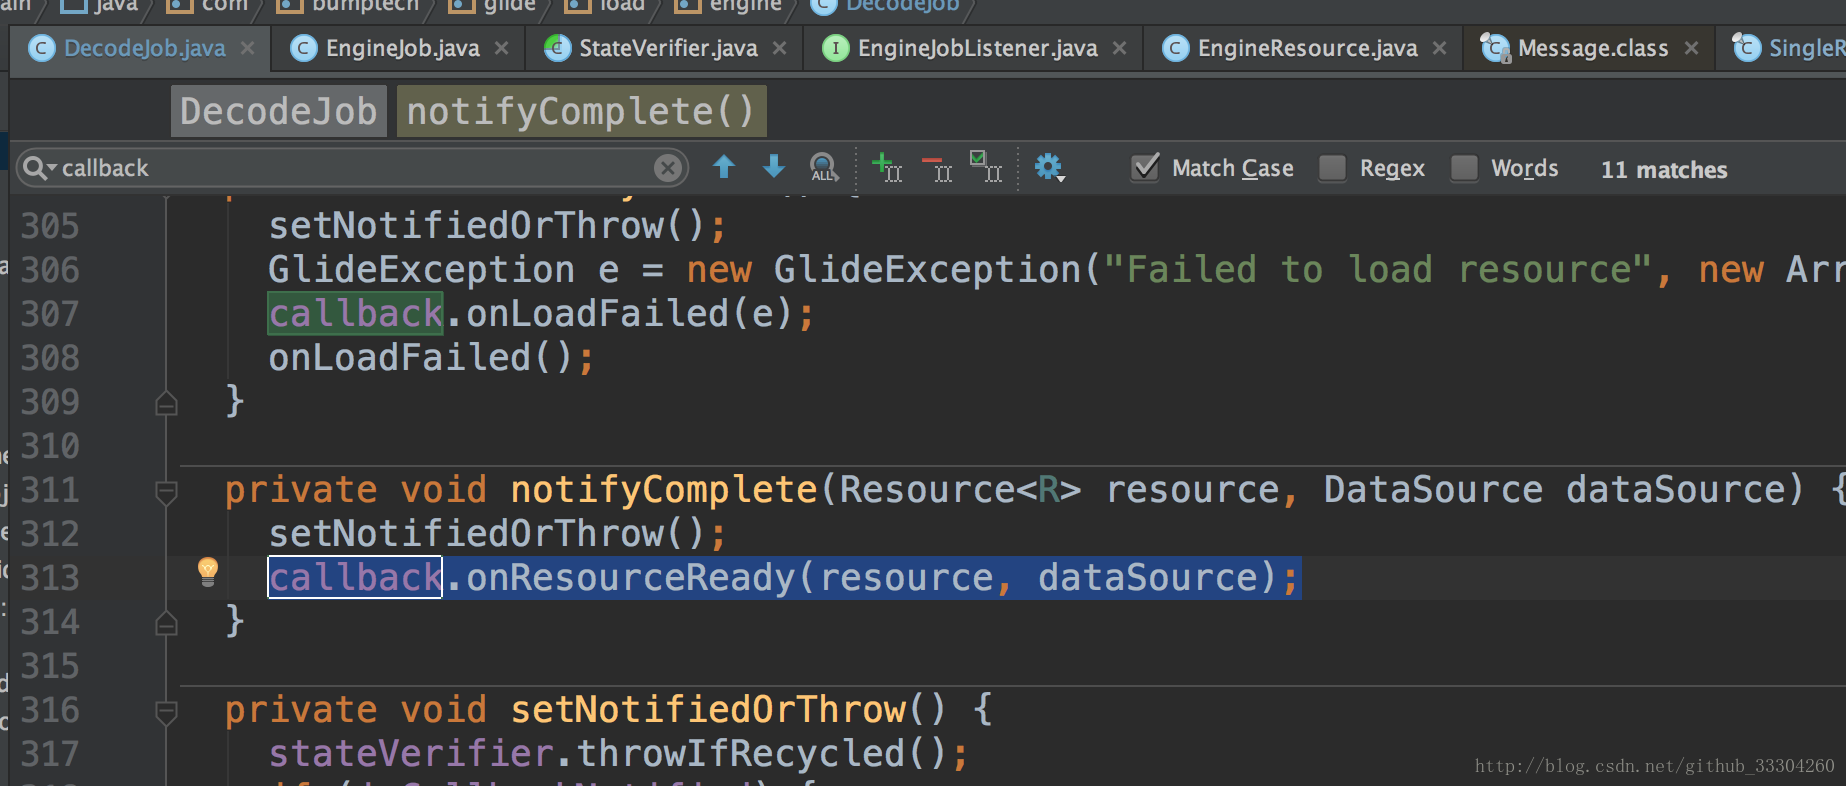
这个callback是DecodeJob.java的内部接口。和我们SingleRequest里的cb.onResourceReady不一样。
⚠️⚠️⚠️⚠️⚠️⚠️⚠️⚠️⚠️⚠️⚠️⚠️
那这里一定是去加载了资源,我们进去看一下
cb.onResourceReady(engineResource, dataSource);:方法
  /**
   * A callback method that should never be invoked directly.
   */
  @SuppressWarnings("unchecked")
  @Override
  public void onResourceReady(Resource<?> resource, DataSource dataSource) {
    stateVerifier.throwIfRecycled();
    loadStatus = null;
    if (resource == null) {
      GlideException exception = new GlideException("Expected to receive a Resource<R> with an "
          + "object of " + transcodeClass + " inside, but instead got null.");
      onLoadFailed(exception);
      return;
    }

    Object received = resource.get();
    if (received == null || !transcodeClass.isAssignableFrom(received.getClass())) {
      releaseResource(resource);
      GlideException exception = new GlideException("Expected to receive an object of "
          + transcodeClass + " but instead" + " got "
          + (received != null ? received.getClass() : "") + "{" + received + "} inside" + " "
          + "Resource{" + resource + "}."
          + (received != null ? "" : " " + "To indicate failure return a null Resource "
          + "object, rather than a Resource object containing null data."));
      onLoadFailed(exception);
      return;
    }

    if (!canSetResource()) {
      releaseResource(resource);
      // We can't put the status to complete before asking canSetResource().
      status = Status.COMPLETE;
      return;
    }

    onResourceReady((Resource<R>) resource, (R) received, dataSource);
  }
重点看一下16行:Object received = resource.get();,
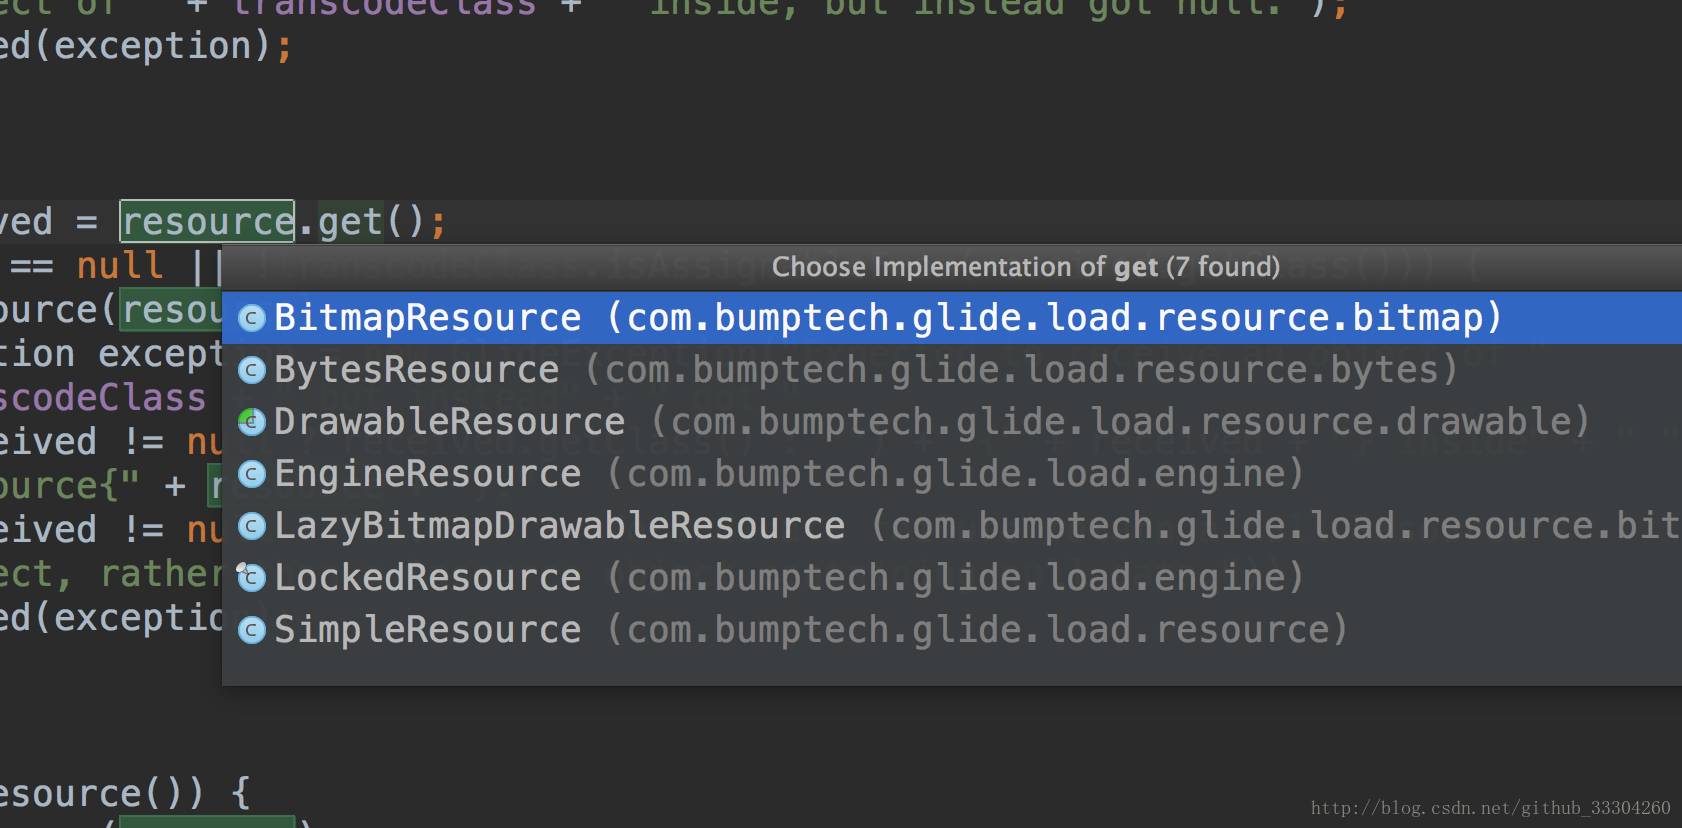
我们上面分析过,这里的resource就是LazyBitmapDrawableResource。
那么我们进去看一下:
public class LazyBitmapDrawableResource{
  ...
  @Override
  public BitmapDrawable get() {
    return new BitmapDrawable(resources, bitmap);
  }
  ...
}
在resource.get();中获取到了BitmapDrawable对象直接赋值给了received变量,然后调用重载方法onResourceReady方法
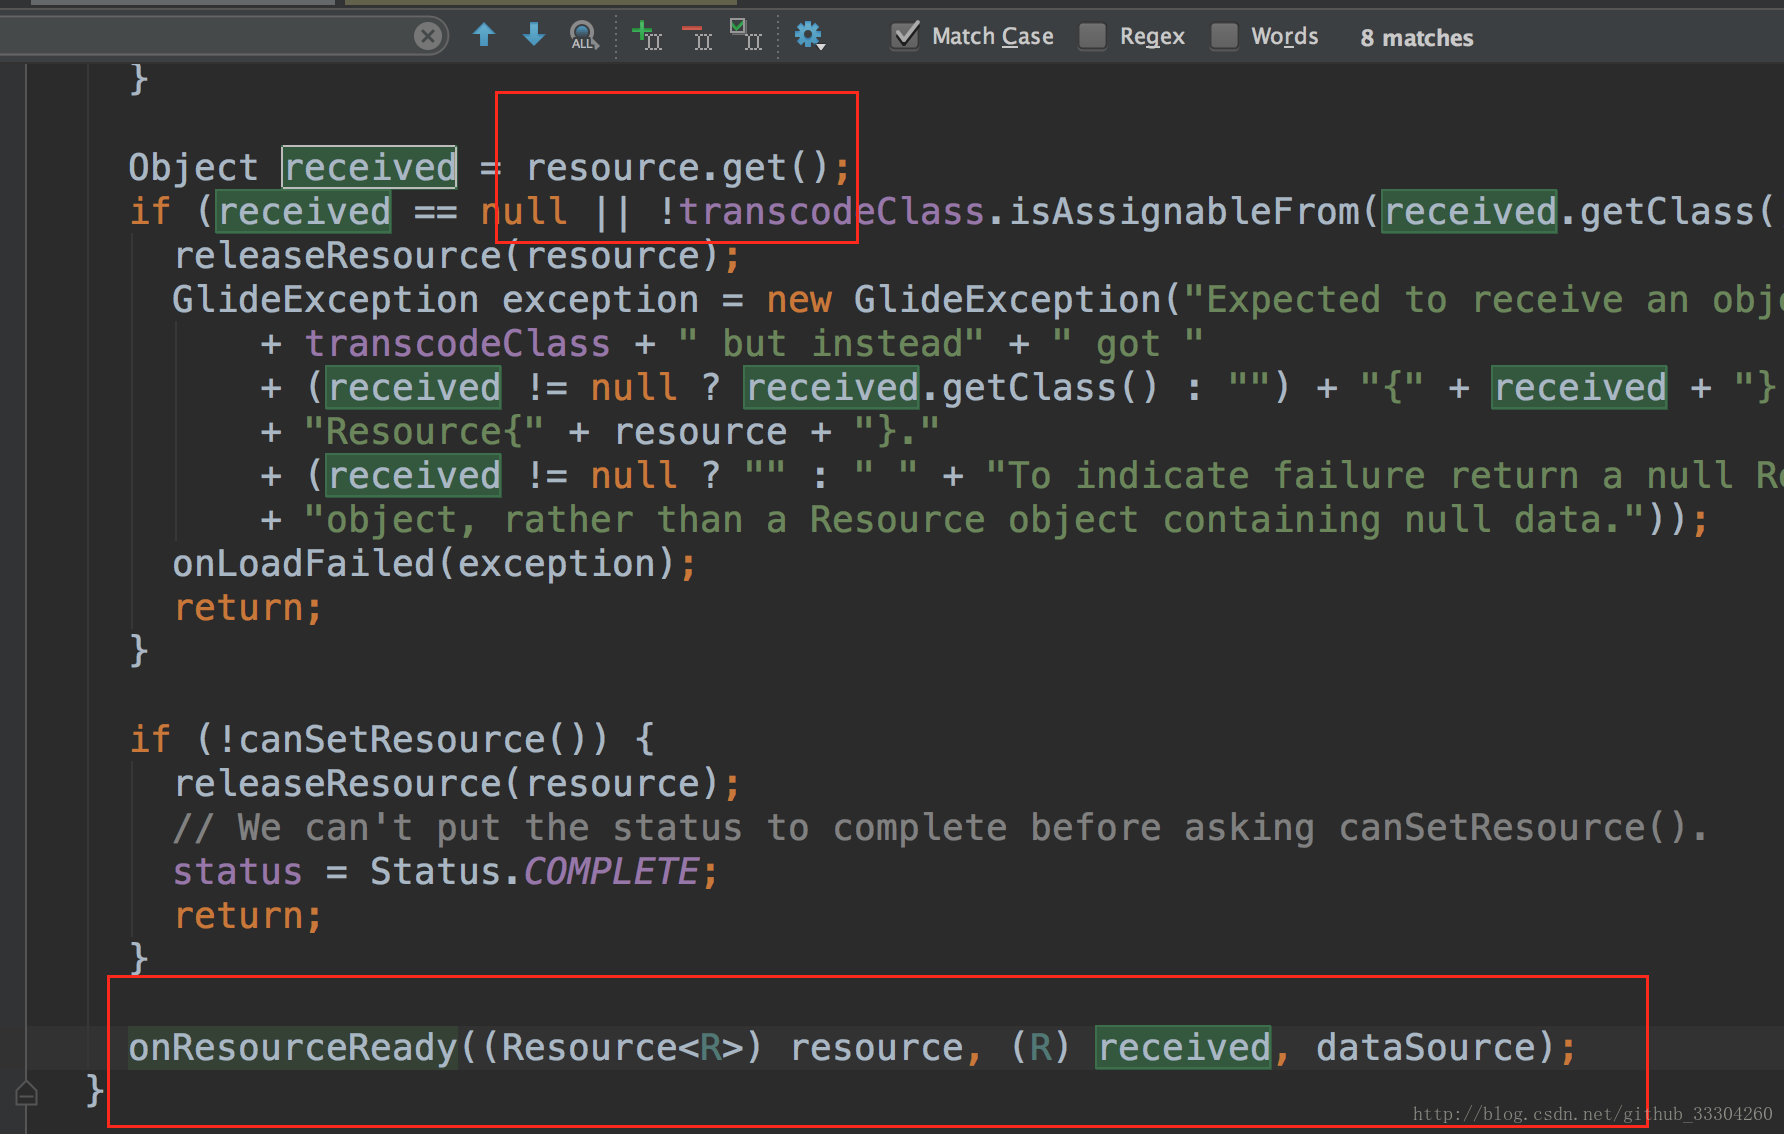
  /**
   * Internal {@link #onResourceReady(Resource, DataSource)} where arguments are known to be safe.
   *
   * @param resource original {@link Resource}, never <code>null</code>
   * @param result   object returned by {@link Resource#get()}, checked for type and never
   *                 <code>null</code>
   */
  private void onResourceReady(Resource<R> resource, R result, DataSource dataSource) {
    // We must call isFirstReadyResource before setting status.
    boolean isFirstResource = isFirstReadyResource();
    status = Status.COMPLETE;
    this.resource = resource;

    if (glideContext.getLogLevel() <= Log.DEBUG) {
      Log.d(GLIDE_TAG, "Finished loading " + result.getClass().getSimpleName() + " from "
          + dataSource + " for " + model + " with size [" + width + "x" + height + "] in "
          + LogTime.getElapsedMillis(startTime) + " ms");
    }

    if (requestListener == null
        || !requestListener.onResourceReady(result, model, target, dataSource, isFirstResource)) {
      Transition<? super R> animation =
          animationFactory.build(dataSource, isFirstResource);
      target.onResourceReady(result, animation);
    }

    notifyLoadSuccess();
  }
在onResourceReady第24行方法中调用了target.onResourceReady(result, animation);
之前我们可是花了好多时间讲述了Target,这里终于又遇到了,知道了用处了吧!哈哈。
它在load方法中已讲解过,就是DrawableImageViewTarget对象,调用它的onResourceReady会转移到父类ImageViewTarget中:
public abstract class ImageViewTarget<Z> extends ViewTarget<ImageView, Z>implements Transition.ViewAdapter {
	...
	...
	  @Override
  public void onResourceReady(Z resource, @Nullable Transition<? super Z> transition) {
    if (transition == null || !transition.transition(resource, this)) {
      setResourceInternal(resource);
    } else {
      maybeUpdateAnimatable(resource);
    }
  }
	...
	...
	  private void setResourceInternal(@Nullable Z resource) {
    maybeUpdateAnimatable(resource);
    setResource(resource);
  }
	...
	...
	protected abstract void setResource(@Nullable Z resource);
	...
	...
}
然后调用setResourceInternal方法,接着是setResource(resource);方法,都是ImageViewTarget类的方法 ,所以抽取出来,都放在上面了。
我们看到最后的setResource(resource);是抽象方法,所以去到实现的地方DrawableImageViewTarget中:
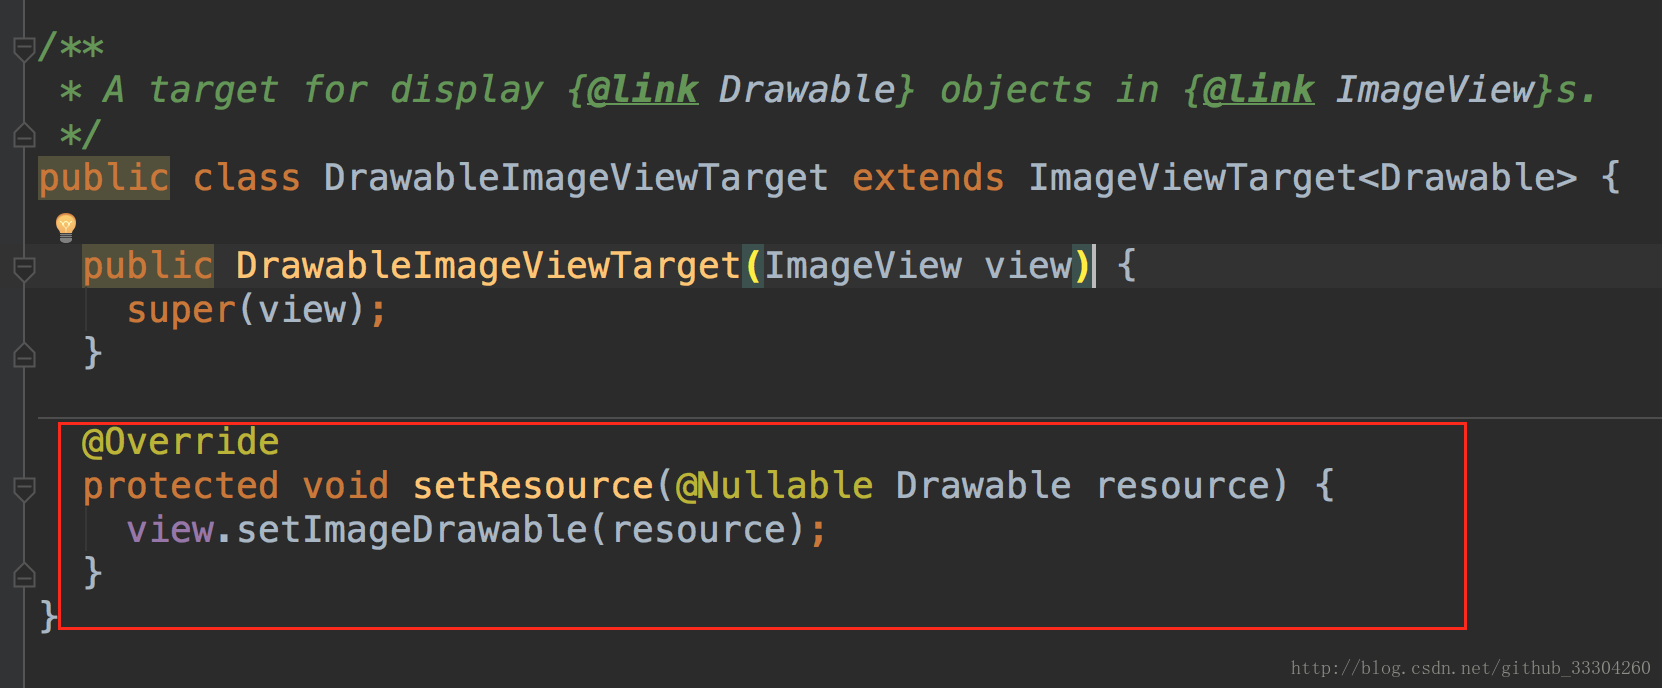
哈哈是不很开心,看到了足后一步view.setImageDrawable(resource);历经千辛万苦,终于加载上了图片。
别看Glide只有三步,这代码里帮我们做了好多事情,不看不知道一看吓一跳。
喜欢的小伙伴可以扫码左侧二维码,加入微信群讨论交流技术。
对于本文如果有错误的地方请小伙伴能多多指点。
扫码关注公众号“伟大程序猿的诞生“,更多干货新鲜文章等着你~

公众号回复“资料获取”,获取更多干货哦~
有问题添加本人微信号“fenghuokeji996” 或扫描博客导航栏本人二维码
最后
以上就是含蓄流沙最近收集整理的关于Glide4.0源码全解析(三),into()方法背后的故事的全部内容,更多相关Glide4.0源码全解析(三),into()方法背后内容请搜索靠谱客的其他文章。


发表评论 取消回复