文章目录
- 文章目录
- 依赖注入
文章目录
依赖注入
根据官网介绍,依赖注入主要分两种方式
1、构造函数注入
2、Setter方法注入

我们分别对这两种方法进行测试,官网上用的是XML,我这里采用注解方式。
测试代码如下,我们通过再PhrService中注入TestService这个过程来分析:
public class Main01 {
	public static void main(String[] args) {
		AnnotationConfigApplicationContext ac = new AnnotationConfigApplicationContext(AppConfig.class);
		ac.getBean(PhrService.class).test();
	}
}
@Component
public class TestService {
	TestService(){
		System.out.println("test create ");
	}
}
测试Setter方法注入:
@Component
public class PhrService {
	private TestService testService;

	public PhrService(){
		System.out.println("phrService create ");
	}
	public void test(){
		System.out.println(testService);
	}
	@Autowired
	public void setTestService(TestService testService){
		System.out.println("注入testService by setter");
		this.testService = testService;
	}
}
控制台输出如下:
phrService create
test create
注入testService by setter //验证了确实是通过setter注入的
com.phr.service.TestService@65ae6ba4
测试构造函数注入:
@Component
public class PhrService {
	private TestService testService;
	public PhrService(){
		System.out.println("phrService create by no args constructor");
	}
	public void test(){
		System.out.println(testService);
	}
	public PhrService(TestService testService){
		System.out.println("注入testService create by constructor with arg");
		this.testService = testService;
		System.out.println("phrService create by no args constructor");
	}
}
输出结果:
phrService create by no args constructor
test create
null
默认是使用无参构造函数,如果想要指定使用某个构造函数,可以使用@Autowired加在该构造方法上,例如
@Component
public class PhrService {
	private TestService testService;
	public PhrService(){
		System.out.println("phrService create by no args constructor");
	}
	public void test(){
		System.out.println(testService);
	}
	@Autowired
	public PhrService(TestService testService){
		System.out.println("注入testService create by constructor with arg");
		this.testService = testService;
		System.out.println("phrService create by no args constructor");
	}
}
输出结果为:
test create
注入testService create by constructor with arg //说明使用了特定的构造方法
phrService create by no args constructor
com.phr.service.TestService@1e81f4dc
疑问:
在上面的验证中,大家可能会有些疑问:
1、@Autowired直接加到字段上和加到方法上到底有什么区别?为什么我们验证的时候需要加在方法上?
1.1、首先我们需要明确一点的是,平时我们写代码时直接将@Autowired加在属性上不需要提供setter方法也能完成注入。以上面的例子来说,Spring会通过反射获取到PhrService中的TestService,然后通过反射包的方法,Field.set(phrService,testService)这种方式完成注入。
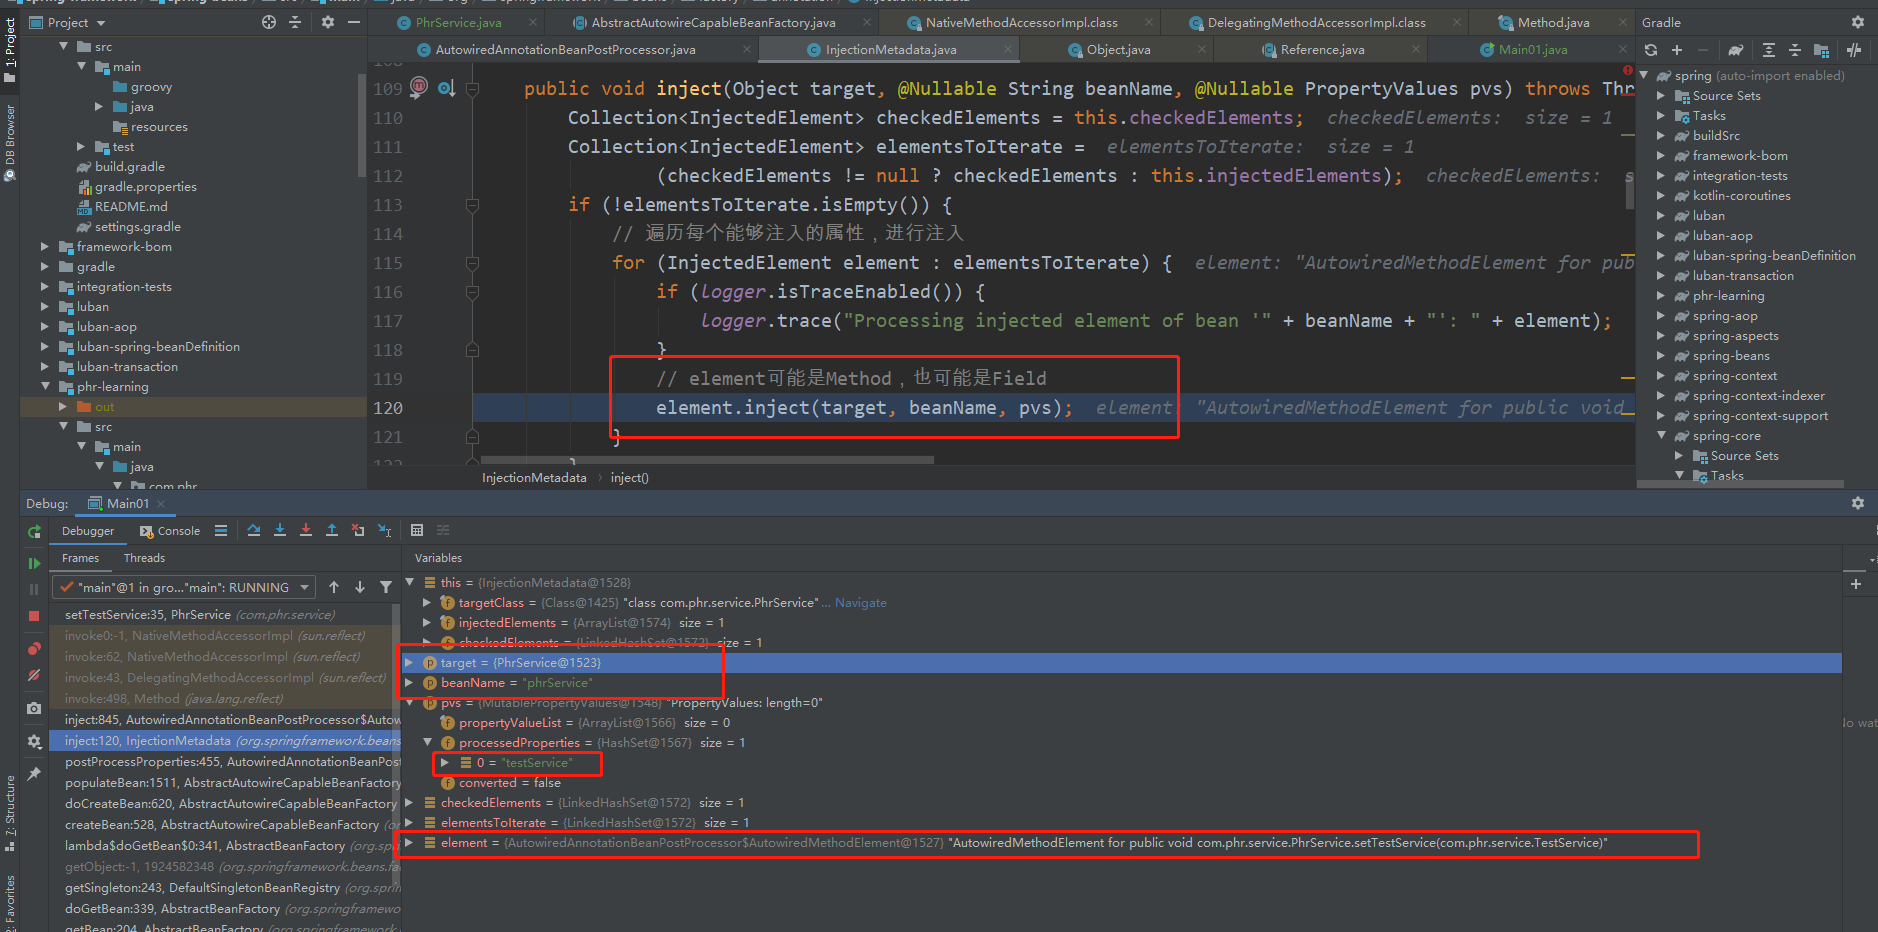
1.2、我们将@Autowired放在setter方法上,debug一下调用栈,如下

对于这种方式,最终是通过Method.invoke(object,args)的方式来完成注入的,这里的Method就是set方法。
2、为什么@Autowired加在构造方法上就能使用该构造函数
上面已经显示了我们不加@Autowired在构造函数上采用的是无参构造
@Component
public class PhrService {
	private TestService testService;
	@Autowired
	public PhrService(){
		System.out.println("phrService create by no args constructor");
	}
	public void test(){
		System.out.println(testService);
	}
	@Autowired
	public PhrService(TestService testService){
		System.out.println("注入testService create by constructor with arg");
		this.testService = testService;
		System.out.println("phrService create by no args constructor");
	}
}
发现直接报错了,看报错信息
三月 11, 2021 8:11:49 下午 org.springframework.context.support.AbstractApplicationContext refresh
警告: Exception encountered during context initialization - cancelling refresh attempt: org.springframework.beans.factory.BeanCreationException: Error creating bean with name 'phrService': Invalid autowire-marked constructor: public com.phr.service.PhrService(com.phr.service.TestService). Found constructor with 'required' Autowired annotation already: public com.phr.service.PhrService()
Exception in thread "main" org.springframework.beans.factory.BeanCreationException: Error creating bean with name 'phrService': Invalid autowire-marked constructor: public com.phr.service.PhrService(com.phr.service.TestService). Found constructor with 'required' Autowired annotation already: public com.phr.service.PhrService()
	at org.springframework.beans.factory.annotation.AutowiredAnnotationBeanPostProcessor.determineCandidateConstructors(AutowiredAnnotationBeanPostProcessor.java:367)
	at org.springframework.beans.factory.support.AbstractAutowireCapableBeanFactory.determineConstructorsFromBeanPostProcessors(AbstractAutowireCapableBeanFactory.java:1356)
	at org.springframework.beans.factory.support.AbstractAutowireCapableBeanFactory.createBeanInstance(AbstractAutowireCapableBeanFactory.java:1263)
	at org.springframework.beans.factory.support.AbstractAutowireCapableBeanFactory.doCreateBean(AbstractAutowireCapableBeanFactory.java:573)
	at org.springframework.beans.factory.support.AbstractAutowireCapableBeanFactory.createBean(AbstractAutowireCapableBeanFactory.java:528)
	at org.springframework.beans.factory.support.AbstractBeanFactory.lambda$doGetBean$0(AbstractBeanFactory.java:341)
	at org.springframework.beans.factory.support.DefaultSingletonBeanRegistry.getSingleton(DefaultSingletonBeanRegistry.java:243)
	at org.springframework.beans.factory.support.AbstractBeanFactory.doGetBean(AbstractBeanFactory.java:339)
	at org.springframework.beans.factory.support.AbstractBeanFactory.getBean(AbstractBeanFactory.java:204)
	at org.springframework.beans.factory.support.DefaultListableBeanFactory.preInstantiateSingletons(DefaultListableBeanFactory.java:917)
	at org.springframework.context.support.AbstractApplicationContext.finishBeanFactoryInitialization(AbstractApplicationContext.java:918)
	at org.springframework.context.support.AbstractApplicationContext.refresh(AbstractApplicationContext.java:574)
	at org.springframework.context.annotation.AnnotationConfigApplicationContext.<init>(AnnotationConfigApplicationContext.java:107)
	at com.phr.Main01.main(Main01.java:16)
翻译一下大概是
线程“主”中的异常org.springframework.beans.factory.BeanCreationException:创建名称为“ phrService”的bean时出错:自动标记的构造函数无效:public com.phr.service.PhrService(com.phr.service.TestService)。 已找到具有“必需”自动装配注释的构造函数:public com.phr.service.PhrService()
@Component
public class PhrService {
	private TestService testService;
	@Autowired
	public PhrService(){
		System.out.println("phrService create by no args constructor");
	}
	public void test(){
		System.out.println(testService);
	}
	@Autowired(required = false)
	public PhrService(TestService testService){
		System.out.println("注入testService create by constructor with arg");
		this.testService = testService;
		System.out.println("phrService create by no args constructor");
	}
}
我把其中一个改为required = false发现还是报错,我把两个都改了request=false,这回不报错了,采用的是无参构造函数。
要说清楚这一点,涉及到两个知识点
2.1、spring的注入模型。
2. 2、spring对构造函数的推断。这个源码后面单独讲解,现在我们只要记住
在默认的注入模型下,spring如果同时找到两个符合要求的构造函数,那么spring会采用无参构造函数进行实例化,如果这个时候没有无参构造,那么此时会报java.lang.NoSuchMethodException。什么叫符合要求的构造函数呢? 就是构造函数中参数要在spring中能找到,说白了参数要被spring所管理的。
这里着重要记得两个要点。1、注入模型 2、符合要求的构造函数
3、那我们同时采用构造注入加属性注入会是怎样呢?
在进行测试前,我们应该能想到,构造函数注入,这个是属于实例化的过程,属性注入属于初始化过程,肯定会将其覆盖掉。这个只是猜测,现在我们来验证我们的猜测是否正确。
@Component
public class PhrService {
	private TestService testService;
	public void test(){
		System.out.println(testService);
	}
	public PhrService(TestService testService){
		System.out.println("注入testService create by constructor with arg");
		this.testService = testService;
		System.out.println("testService create by constructor with arg");
	}
	@Autowired
	public void setTestService(TestService testService){
		System.out.println("注入testService create by setter");
		this.testService = null;
	}
}
输出结果为:
test create
注入testService create by constructor with arg
testService create by constructor with arg
注入testService create by setter
null
通过结果分析不难发现确实进行了覆盖
区别:

来自spring官网的描述翻译大概是
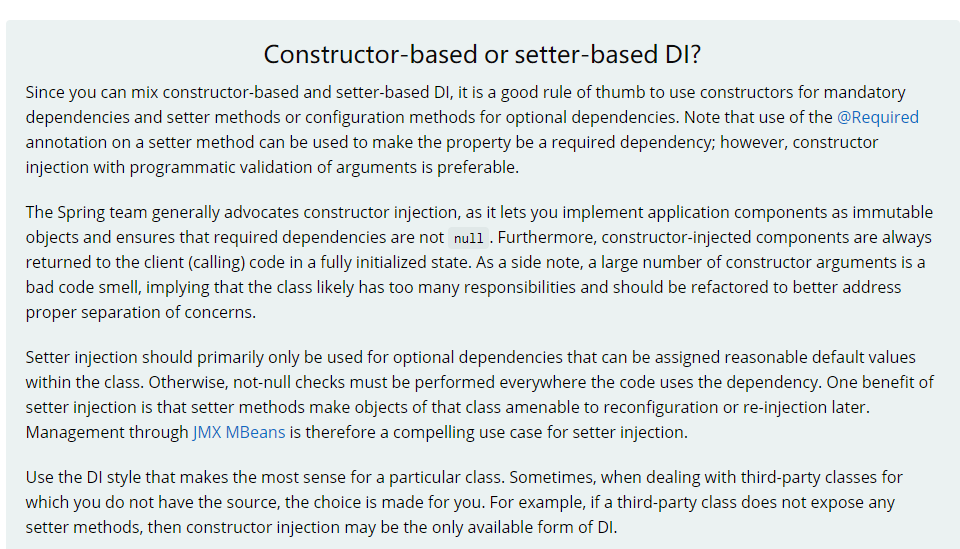
因为你可以混合使用基于构造函数和基于setter的DI,对于强制依赖使用构造函数,对于可选依赖使用setter方法或配置方法是一个很好的经验法则。注意,在setter方法上使用@Required注释可以使属性成为必需的依赖项;但是,使用编程验证参数的构造函数注入更可取。Spring团队通常提倡构造函数注入,因为它允许您将应用程序组件实现为不可变对象,并确保所需的依赖项不为空。而且,构造函数注入的组件总是以完全初始化的状态返回给客户端(调用)代码。附带说明一下,大量的构造函数参数是一种糟糕的代码味道,这意味着类可能有太多的责任,应该进行重构,以更好地处理关注点的适当分离。Setter注入应该主要只用于可选的依赖项,这些依赖项可以在类中分配合理的默认值。否则,必须在代码使用依赖项的任何地方执行非空检查。setter注入的一个好处是,setter方法使该类的对象易于重新配置或稍后重新注入。因此,通过JMX mbean进行管理是setter注入的一个引人注目的用例。使用对特定类最有意义的DI样式。有时,当处理您没有源代码的第三方类时,选择是为您做出的。例如,如果第三方类没有公开任何setter方法,那么构造函数注入可能是DI唯一可用的形式。
当然我们也不一定非得循规蹈矩,这一篇主要讲注入,我们先看一下这一节

我将基于我项目中遇到的一个问题来讲解一下我对这个的一个看法以及一点思考,虽然最终我的解决方案不是以方法注入的而是每次从容器里面取一个出来。
首先我们先思考一下,为什么需要方法注入?在有了依赖注入的情况下,为什么还需要方法注入这种方式呢?换而言知,方法注入解决了什么问题?
我这里先说一下我们项目的一个业务场景:我们有任务需要从外部导入数据到系统,这是一个比较长的流程,根据不同的任务,步数是不一样的。上一步操作成功了才能往下一步走。然后每步也支持单步执行。
我这里当时设计的时候用的是责任链模式加策略模式;大概模拟一下当时的代码
public class A {
	/**
	 * 进度节点
	 */
	private Integer progressNode;
	private String ruleType;
	public Integer getProgressNode() {
		return progressNode;
	}
	public void setProgressNode(Integer progressNode) {
		this.progressNode = progressNode;
	}
	public String getRuleType() {
		return ruleType;
	}
	public void setRuleType(String ruleType) {
		this.ruleType = ruleType;
	}
}
public abstract class AbstractHandler {
	protected AbstractHandler nextHandler;
	public void setNextHandler(AbstractHandler nextHandler) {
		this.nextHandler = nextHandler;
	}
	public abstract boolean action(A a);
	public abstract Integer getProgressNode();
	public void handler( A a){
		boolean result = Boolean.TRUE;
		//当前节点和任务匹配直接执行
		if (Objects.equals(this.getProgressNode(), a.getProgressNode())) {
			result = action(a);
		}
		if (result && Objects.nonNull(nextHandler)) {
			//控制只有上个节点执行完了才处理下个节点
			if (nextHandler.getProgressNode() > a.getProgressNode()) {
				a.setProgressNode(nextHandler.getProgressNode());
			}
			//执行下一步的处理
			nextHandler.handler(a);
		}
	}
}
@Component
public class StepOneHandler extends AbstractHandler {
	@Override
	public boolean action(A a) {
		return false;
	}
	@Override
	public Integer getProgressNode() {
		return 1;
	}
}
@Component
public class StepTwoHandler extends AbstractHandler {
	@Override
	public boolean action(A a) {
		return false;
	}
	@Override
	public Integer getProgressNode() {
		return 2;
	}
}
@Component
public class StepThreeHandler extends AbstractHandler {
	@Override
	public boolean action(A a) {
		return false;
	}
	@Override
	public Integer getProgressNode() {
		return 3;
	}
}
@Component
public class StepFourHandler extends AbstractHandler {
	@Override
	public boolean action(A a) {
		return false;
	}
	@Override
	public Integer getProgressNode() {
		return 4;
	}
}
当时大概是这样写的代码,存在一个问题就是当有一个任务有四步,另外一个任务只有三步会出现这个只有三步的任务也会执行四步任务。可以想想问题出在哪?
有什么好的解决办法呢?
spring容器中的bean默认是单例的,上面代码如果有一个任务是有四步的,后面有一个三步的就会执行四步操作。因为每次使用的都是都一个对象。在每一步的处理器上都加上@Scope(“prototype”)这个注解。解决方法有两种。这里我是采用的每次从容器中取。
@Component
public class Client {
	@Autowired
	private ApplicationContext applicationContext;
	public void executeTask(A a){
		StepOneHandler stepOneHandler = applicationContext.getBean(StepOneHandler.class);
		StepTwoHandler stepTwoHandler = applicationContext.getBean(StepTwoHandler.class);
		StepThreeHandler stepThreeHandler = applicationContext.getBean(StepThreeHandler.class);
		StepFourHandler stepFourHandler = applicationContext.getBean(StepFourHandler.class);
		stepOneHandler.setNextHandler(stepTwoHandler);
		if (Objects.equals(a.getRuleType(),2)) {
			stepThreeHandler.setNextHandler(stepFourHandler);
		} else {
			stepTwoHandler.setNextHandler(stepThreeHandler);
			stepThreeHandler.setNextHandler(stepFourHandler);
		}
	}
}
这样就把上面的存在的问题给解决了。当然可以使用另外一种方式@Lookup注解的方式去解决这个问题。基于@Lookup解决方式我们也来写个例子。
@Component
public class MyService {
	@Autowired
	private TestService testService;
	public void test(int a){
		testService.addAndPrint(a);
	}
}
@Component
@Scope("prototype")
public class TestService {
	int count;
	TestService(){
		System.out.println("test create ");
	}
	public void addAndPrint(int a){
		count += a;
		System.out.println(count);
	}
}
public class Main02 {
	public static void main(String[] args) {
		AnnotationConfigApplicationContext ac = new AnnotationConfigApplicationContext(AppConfig.class);
		MyService myService = ac.getBean(MyService.class);
		myService.test(1);
		myService.test(2);
		myService.test(3);
	}
}
我们期望的结果是 1 、2、3,我们运行一下这个测试方法:
1
3
6
这个结果说明我们调用testService是同一个对象,当然这很好理解,因为在依赖注入阶段我们就完成了对testService的注入。之后我们在调用测试方法时不会再进行注入。所以我们用的都是同一个对象。也就是说原型对象在这里失去了意义。这里解决方法也可以和我上面的一个,每次需要的时候重新从容器里面获取一个bean这里就不多加描述了。主要说说@Lookup的用法。把MyService改造一下
@Component
public class MyService {
	public void test(int a){
		TestService testService = lookup();
		testService.addAndPrint(a);
	}
	@Lookup
	public TestService lookup(){
		return null;
	}
}
运行一下main02函数,结果和我们预期一样。
test create
1
test create
2
test create
3
对testService的注入。之后我们在调用测试方法时不会再进行注入。所以我们用的都是同一个对象。也就是说原型对象在这里失去了意义。这里解决方法也可以和我上面的一个,每次需要的时候重新从容器里面获取一个bean这里就不多加描述了。主要说说@Lookup的用法。把MyService改造一下
@Component
public class MyService {
	public void test(int a){
		TestService testService = lookup();
		testService.addAndPrint(a);
	}
	@Lookup
	public TestService lookup(){
		return null;
	}
}
运行一下main02函数,结果和我们预期一样。
test create
1
test create
2
test create
3
这个@lookup注解在spring里面的源码体现后面再来分析。
最后
以上就是发嗲火车最近收集整理的关于spring官网笔记2的全部内容,更多相关spring官网笔记2内容请搜索靠谱客的其他文章。


发表评论 取消回复