参考链接:https://7byte.github.io/2016/10/02/trytouse-FlameGraph/
火焰图就像是给一个软件系统拍的 X 光照片,可以很自然地把时间和空间两个维度上的信息融合在一张图上,以非常直观的形式展现出来,从而反映系统在性能方面的很多定量的统计规律。 ——动态追踪技术漫谈
下面介绍下火焰图相关工具的安装和使用。
-
首先需要安装内核开发包和调试包。查看当前系统的内核版本:
1
2
$ uname -r
3.10.0-327.28.2.el7.x86_64
-
然后进入 http://debuginfo.centos.org/ ,可以看到有 4/ 5/ 6/ 7/ 这样的目录,这些目录分别对应了centos系统的大版本。找到并下载自己的系统内核版本对应的包:
1
2
$ wget "http://debuginfo.centos.org/7/x86_64/kernel-debuginfo-($version).rpm"
$ wget "http://debuginfo.centos.org/7/x86_64/kernel-debuginfo-common-($version).rpm"
-
安装上面的开发包和调试包,并安装内核探测工具 systemtap
1
2
3
4
$ sudo rpm -ivh kernel-debuginfo-common-($version).rpm
$ sudo rpm -ivh kernel-debuginfo-($version).rpm
$ sudo yum install kernel-devel-($version)
$ sudo yum install systemtap
-
下载火焰图绘制相关工具
1
2
$ git clone https://github.com/openresty/nginx-systemtap-toolkit.git
$ git clone https://github.com/brendangregg/FlameGraph.git
-
然后测试下有没有安装成功
通过ps命令查看当前 nginx worker 进程的PID,如果有多个worker选择其中一个即可,下面是我测试时查询到的结果 PID=144891
2
3
$ ps -ef | grep nginx
root 1580 1 0 11:36 ? 00:00:00 nginx: master process /usr/local/openresty/nginx/sbin/nginx -c /home/7byte/openresty-test/conf/nginx.conf
nobody 14489 1580 0 13:46 ? 00:00:00 nginx: worker process
这里我选用了工具包里的 sample-bt 来验证,它抓取的是C级别的运行状态,参数 -p 表示要抓取的进程id,-t是探测的时间,单位是秒,-u表示抓取用户空间,对应的-k表示内核空间,探测结果输出到 a.bt
1
2
3
4
$ mkdir svg
$ sudo nginx-systemtap-toolkit/./sample-bt -p 14489 -t 20 -u > svg/a.bt
WARNING: Tracing 14489 (/usr/local/openresty/nginx/sbin/nginx) in user-space only...
WARNING: Time's up. Quitting now...(it may take a while)
得到 a.bt 后再用 FlameGraph 提供的两个脚本处理输出结果
1
2
$ FlameGraph/stackcollapse-stap.pl svg/a.bt > svg/a.cbt
$ FlameGraph/flamegraph.pl svg/a.cbt > svg/a.svg
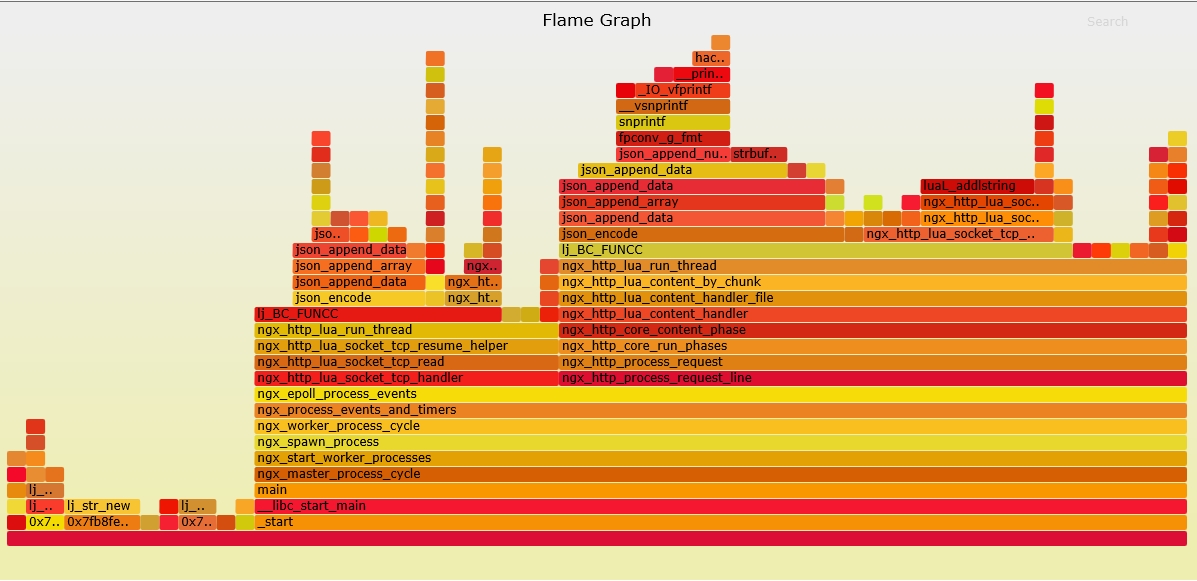
最后生成的 a.svg 就是火焰图,用浏览器打开即可,效果如下图:

每个框代表一个栈里的一个函数;
Y轴代表栈深度(栈桢数)。最顶端的框显示正在运行的函数,这之下的框都是调用者。在下面的函数是上面函数的父函数;
X轴代表采样总量。从左到右并不代表时间变化,从左到右也不具备顺序性;
框的宽度代表占用CPU总时间。宽的框代表的函数可能比窄的运行慢,或者被调用了更多次数。框的颜色深浅也没有任何意义;
如果是多线程同时采样,采样总数会超过总时间。 -
然后再测试下抓取lua级别的火焰图,这里需要使用另外一个工具 ngx-sample-lua-bt , –luajit20 表示nginx使用luajit2.0,如果使用的是标准lua则使用 –lua51
1
2
3
4
$ sudo nginx-systemtap-toolkit/./ngx-sample-lua-bt -p 2834 --luajit20 -t 20 > svg/a.bt
WARNING: missing unwind/symbol data for module 'kernel'
WARNING: Tracing 2836 (/usr/local/openresty/nginx/sbin/nginx) for LuaJIT 2.0...
WARNING: Time's up. Quitting now...
对输出文件 a.bt 的后续处理与上文基本相同。另外可以预处理一下输出文件,增强可读性:
1
2
3
$ nginx-systemtap-toolkit/./fix-lua-bt svg/a.bt > svg/tmp.bt
$ FlameGraph/stackcollapse-stap.pl svg/tmp.bt > svg/a.cbt
$ FlameGraph/flamegraph.pl svg/a.cbt > svg/a.svg
输出效果如下图:

遇到的问题:
1
2
3
4
5
6
7
8
9
10
11
12
$ sudo nginx-systemtap-toolkit/./ngx-sample-lua-bt -p 2039 --luajit20 -t 5 > svg/a.bt
WARNING: cannot find module /usr/local/openresty/luajit/lib/libluajit-5.1.so.2.1.0 debuginfo: No DWARF information found [man warning::debuginfo]
WARNING: Bad $context variable being substituted with literal 0: identifier '$L' at <input>:17:30
source: lua_states[my_pid] = $L
^
semantic error: type definition 'TValue' not found in '/usr/local/openresty/luajit/lib/libluajit-5.1.so.2.1.0': operator '@cast' at :62:12
source: return @cast(tvalue, "TValue", "/usr/local/openresty/luajit/lib/libluajit-5.1.so.2.1.0")->fr->tp->ftsz
^
Pass 2: analysis failed. [man error::pass2]
Number of similar warning messages suppressed: 100.
Rerun with -v to see them.
在使用 ngx-sample-lua-bt 探测lua级别的火焰图时遇到了失败的情况,从错误信息来看是找不到 DWARF 调试信息。查找官网资料,貌似在很早以前 openresty 自带的 LuaJIT 2.0 默认就会启用 DWARF 调试信息,那我用的最新版怎么就是没有调试信息呢?折腾了好久,最后我到 luajit 官网下载了当前 openresty 版本对应的 luajit 源码,然后编译
1
$ make CCDEBUG=-g -B -j8
备份然后替换 /usr/local/openresty/luajit 目录下的两个文件,重启 openresty之后问题解决。
1
2
3
4
5
6
7
$ cd /usr/local/openresty/luajit/bin/
$ sudo cp luajit-2.1.0-beta2 luajit-2.1.0-beta2_20160829
$ sudo cp ~/LuaJIT-2.1.0-beta2/src/luajit/luajit luajit-2.1.0-beta2
$ cd /usr/local/openresty/luajit/lib/
$ sudo cp libluajit-5.1.so.2.1.0 libluajit-5.1.so.2.1.0_20160829
$ sudo cp ~/LuaJIT-2.1.0-beta2/src/libluajit.so libluajit-5.1.so.2.1.0
从上面的分析可以看出,使用火焰图可以精确地定位 nginx + lua 潜在的性能问题,对CPU占用率低、吐吞量低的情况也可以使用火焰图的方式排查程序中是否有阻塞调用导致整个架构的吞吐量低下。
根据官网的说明,火焰图本身对系统性能的影响较小,每秒请求数会下降11%:The overhead exposed on the target process is usually small. For example, the throughput (req/sec) limit of an nginx worker process doing simplest “hello world” requests drops by only 11% (only when this tool is running), as measured by ab -k -c2 -n100000 when using Linux kernel 3.6.10 and systemtap 2.5. The impact on full-fledged production processes is usually smaller than even that, for instance, only 6% drop in the throughput limit is observed in a production-level Lua CDN application.
最后
以上就是震动钻石最近收集整理的关于Openresty绘制火焰图的全部内容,更多相关Openresty绘制火焰图内容请搜索靠谱客的其他文章。


发表评论 取消回复