安装
yarn add @wangeditor/editor
# 或者 npm install @wangeditor/editor --save

yarn add @wangeditor/editor-for-vue
# 或者 npm install @wangeditor/editor-for-vue --save
使用
模板
<template>
  <div>
    <div style="border: 1px solid #ccc; margin-top: 10px">
      <!-- 工具栏 -->
      <Toolbar style="border-bottom: 1px solid #ccc" :editor="editor" :defaultConfig="toolbarConfig" :mode="mode" />
      <!-- 编辑器 -->
      <Editor style="height: 400px; overflow-y: hidden" :defaultConfig="editorConfig" v-model="html" @onChange="onChange" @onCreated="onCreated" />
    </div>
  </div>
</template>
script
<script>
import { Editor, Toolbar } from "@wangeditor/editor-for-vue";
import { uploadFile } from "@/api/index";
// 表情包配置 自定义表情可在该js文件中统一修改
// import { sina } from "@/libs/emoji";
export default {
  name: "MyEditor",
  components: { Editor, Toolbar },
  props: {
    id: {
      type: String,
      default: "editor",
    },
    value: String,
  },
  data() {
    return {
      editor: null,
      html: "",
      toolbarConfig: {
        toolbarKeys: [// [ /* 显示哪些菜单,如何排序、分组 */ ]
          "headerSelect",
          "blockquote",
          "header1",
          "header2",
          "header3",
          "|",
          "bold",
          "underline",
          "italic",
          "through",
          "color",
          "bgColor",
          "clearStyle",
          "|",
          "fontSize",
          "fontFamily",
          "lineHeight",
          "|",
          "bulletedList",
          "numberedList",
          // "todo",
          "justifyLeft",
          "justifyRight",
          "justifyCenter",
          "divider",
          {
            iconSvg: "<svg viewBox="0 0 1024 1024"><path d="M0 64h1024v128H0z m384 192h640v128H384z m0 192h640v128H384z m0 192h640v128H384zM0 832h1024v128H0z m0-128V320l256 192z"></path></svg>",
            key: "group-indent",
            menuKeys: ["indent", "delIndent"]
          },
          "|",
          "insertLink",
          "emotion",
          {
            key: 'group-image',
            title: '图片',
            iconSvg: '<svg viewBox="0 0 1024 1024"><path d="M959.877 128l0.123 0.123v767.775l-0.123 0.122H64.102l-0.122-0.122V128.123l0.122-0.123h895.775zM960 64H64C28.795 64 0 92.795 0 128v768c0 35.205 28.795 64 64 64h896c35.205 0 64-28.795 64-64V128c0-35.205-28.795-64-64-64zM832 288.01c0 53.023-42.988 96.01-96.01 96.01s-96.01-42.987-96.01-96.01S682.967 192 735.99 192 832 234.988 832 288.01zM896 832H128V704l224.01-384 256 320h64l224.01-192z"></path></svg>',
            menuKeys: ["insertImage", "uploadImage"]
          },
          "insertVideo",
          "insertTable",
          // "codeBlock",
          "|",
          "undo",
          "redo",
          "|",
          "fullScreen",
        ],
        // excludeKeys: [ /* 隐藏哪些菜单 */ ],
      },
      editorConfig: {
        placeholder: "请输入内容...",
        // autoFocus: false,
        // 所有的菜单配置,都要在 MENU_CONF 属性下
        MENU_CONF: {
          uploadImage: {
            server: uploadFile,
            // form-data fieldName ,默认值 'wangeditor-uploaded-image'
            fieldName: 'file',
            // 单个文件的最大体积限制,默认为 2M
            maxFileSize: 1 * 1024 * 1024, // 1M
            // 最多可上传几个文件,默认为 100
            maxNumberOfFiles: 10,
            // 选择文件时的类型限制,默认为 ['image/*'] 。如不想限制,则设置为 []
            allowedFileTypes: ['image/jpeg', 'image/jpg', 'image/png', 'image/gif'],
            // 自定义上传参数,例如传递验证的 token 等。参数会被添加到 formData 中,一起上传到服务端。
            meta: {
              accessToken: this.getStore("accessToken"),
              // otherKey: 'yyy'
            },
            // 将 meta 拼接到 url 参数中,默认 false
            metaWithUrl: false,
            // 自定义增加 http  header
            headers: {
              // Accept: 'application/json',
              // otherKey: 'xxx'
            },
            // 跨域是否传递 cookie ,默认为 false
            withCredentials: true,
            // 超时时间,默认为 10 秒
            timeout: 5 * 1000, // 5 秒
            base64LimitSize: 5 * 1024,//小于5K的用base64位表示
            customInsert: this.customInsertFn// 如果服务器端返回的不是 {errno:0, data: [...]} 这种格式,可使用该配置
          },
        },
        hoverbarKeys: {//图片和链接hover时的编辑按钮配置
          // 'link': {
          //   menuKeys: ['editLink', 'unLink', 'viewLink']
          // },
          // 'image': {
          //   menuKeys: [

          //   ]
          // }
        }
      },
      mode: 'simple', // default默认显示全部 or 'simple'简单模式 工具栏工具比较少
    };
  },
  methods: {
    onCreated(editor) {
      this.editor = Object.seal(editor); // 【注意】一定要用 Object.seal() 否则会报错

    },
    onChange(editor) {
      let data = editor.getHtml() // onChange 时获取编辑器最新内容
      this.$emit("input", data);
      this.$emit("on-change", data);
      // console.log("onChange",editor.getHtml() ); // onChange 时获取编辑器最新内容
    },
    customInsertFn(res, insertFn) {
      if (res.success == true) {
        let url = res.result;
        insertFn(url);
        this.$Message.success("上传视频成功");
      } else {
        this.$Message.error(res.message);
      }
    }
  },
  mounted() {
    // 模拟 ajax 请求,异步渲染编辑器
    setTimeout(() => {
      this.html = this.value;
    }, 500);
  },
  beforeDestroy() {
    const editor = this.editor;
    if (editor == null) return;
    editor.destroy(); // 组件销毁时,及时销毁 editor ,重要!!!
  },
};
</script>

<style src="@wangeditor/editor/dist/css/style.css"></style>
组件在其他页面的使用
 <editor
                  ref="editor"
                  v-model="form.content"
                  height="200"
                ></editor>
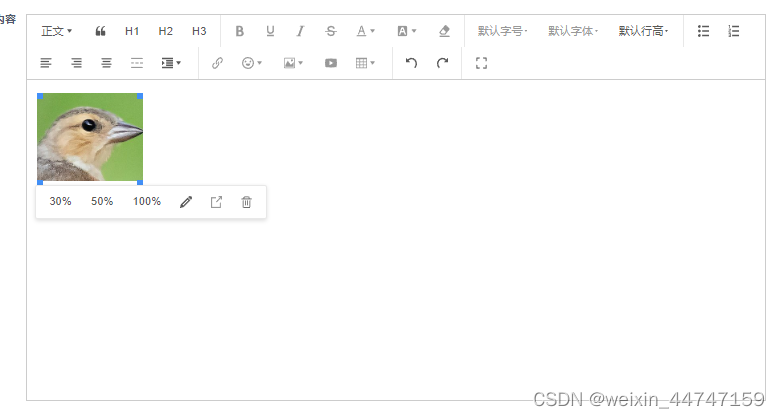
完成后效果

最后
以上就是轻松皮卡丘最近收集整理的关于vue2 + wangeditor5的全部内容,更多相关vue2内容请搜索靠谱客的其他文章。
本图文内容来源于网友提供,作为学习参考使用,或来自网络收集整理,版权属于原作者所有。


发表评论 取消回复